Delinlea - My little fantasy world
  • ♥ Home
  • ♥ About Me
  • ♥ Blogmas 2021
  • ♥ Free Patterns
    • ♥ Amigurumi; Spring/Easter
    • ♥ Amigurumi; Fall/Halloween
    • ♥ Amigurumi; Winter
    • ♥ Amigurumi Tsum Tsum
    • ♥ Amigurumi Ufufy
    • ♥ Amigurumi Others
    • ♥ Christmas Countdown 2017
    • ♥ Blogmas 2018
    • ♥ Blogmas 2020
  • ♥ Tutorials
    • ♥ Easter
    • ♥ Home Deco
    • ♥ Others
  • ♥ Drawing Lessons
  • ♥ FanFic
    • ♥ Chapter 1
    • ♥ Chapter 2
    • ♥ Chapter 3
    • ♥ Chapter 4
    • ♥ Chapter 5
    • ♥ Chapter 6
    • ♥ Chapter 7
  • ♥ Gallery
    • ♥ Crafts
    • ♥ Drawings
    • ♥ Poseable Art Dolls
  • ♥ Links
  • ♥ Contact
    • Privacy Policy

Amigurumi

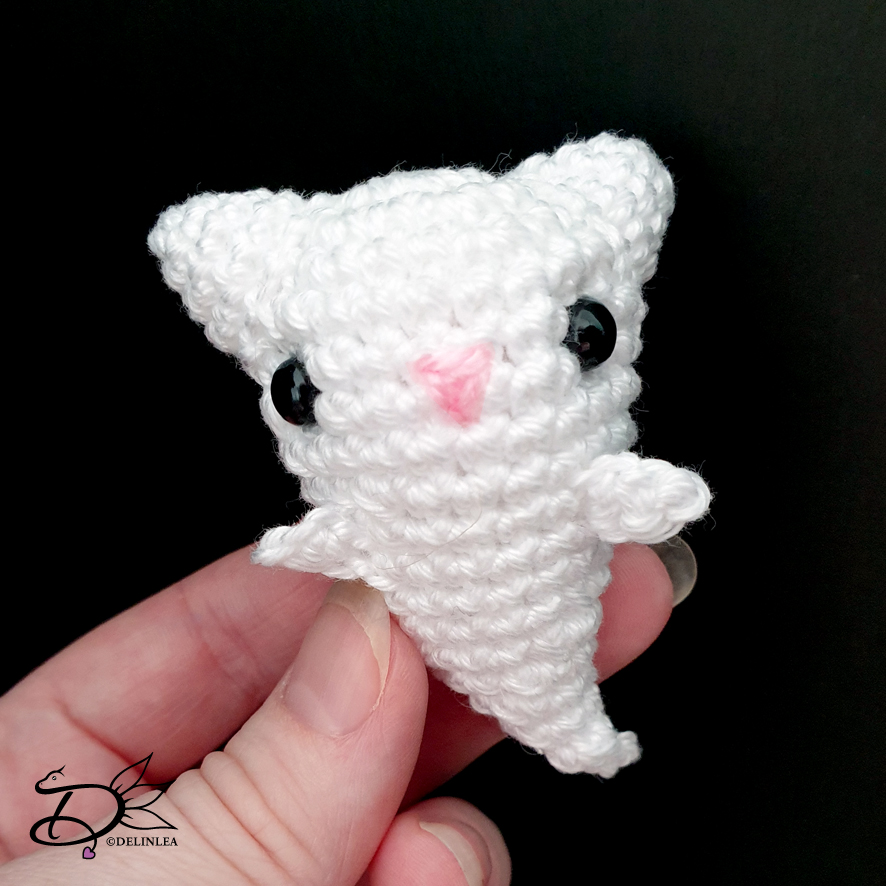
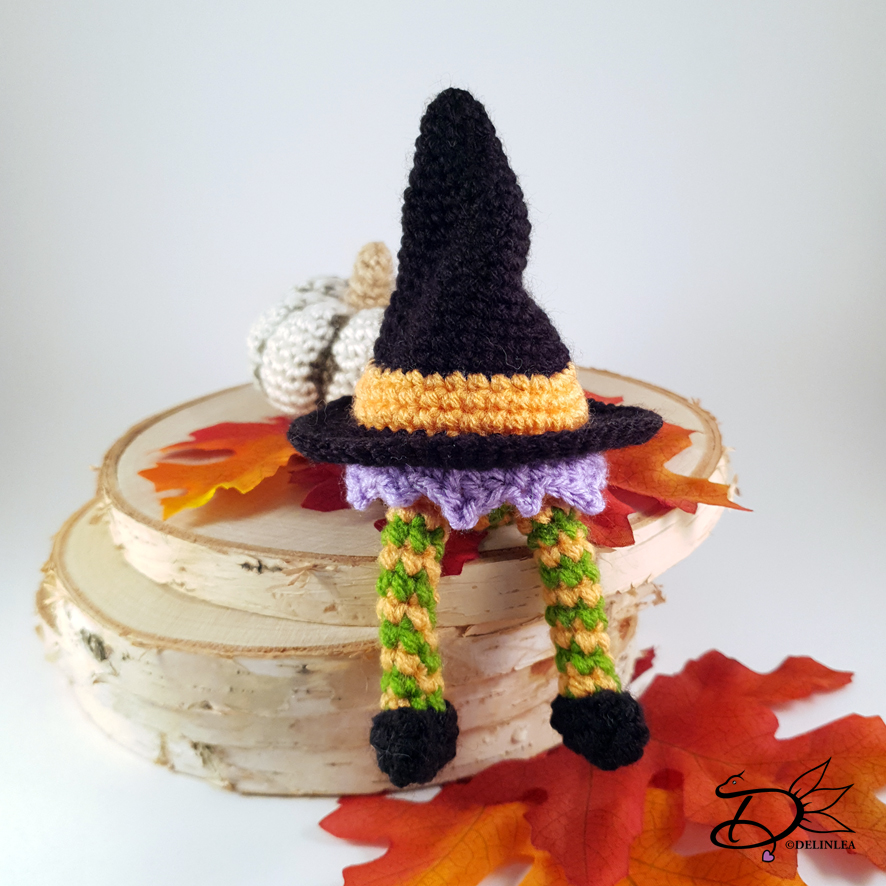
♥ Free Pattern; Hiding Witches Amigurumi

24 oktober 2019 by Delinlea Leave a Comment

Hey Lovelies! I actually, don’t know how I came up with this amigurumi, but I totally love it! And I hope you will as well. I wanted to make so many of those hiding witches! I had to hold myself back and do other stuffs as well, always enough to do, don’t need to add extra things. Are you like that as well? Way to excited to make so many things, while you have no time for it all? Anyway, let’s get into this pattern!

Hiding Witches

For this DIY you’ll need:
♥ Yarn in the colors; Black, Orange, Purple and Green. ( I used Stylecraft and some other yarn I don’t remember it’s name).
♥ Crochet Hook (I used a 2,5mm hook).
♥ Stuffing.
♥ Scissors.
♥ Sewing Pins.
♥ Yarn Needle.

Stitches used (US Terms):
Magic Ring.
CH = Chain.
SLST = Slip Stitch.
SC = Single Crochet.
HDC = Half Double Crochet.
DC = Double Crochet.
ST = Stitch.
Inc = Increase.
Dec = Decrease.
FL = Front Loop.
BL = Back Loop.
(…) = Repeat the space in brackets the given number of times.
[…] = Total number of stitches.

Pattern

Work in continues rounds, use a stitch marker to mark your first stitch of every row. This is for every part, unless stated otherwise.

Witch Hat
Start with the color Black.

1: 6SC in Magic Ring. [6]
2: (2SC, inc) 2 times. [8]
3: (3SC, inc) 2 times. [10]
4: 10SC. [10]
5: (4SC, inc) 2 times. [12]
6: (3SC, inc) 3 times. [15]
7: 15SC. [15]
8: (4SC, inc) 3 times. [18]
9: 18SC. [18]
10: (5SC, inc) 3 times. [21]
11: 21SC. [21]
12: (6SC, inc) 3 times. [24]
13: 24SC. [24]
14: (7SC, inc) 3 times. [27]
15: 27SC. [27]
16: (8SC, inc) 3 times. [30]
17: 30SC. [30]
Change to the color Orange.
18: (9SC, inc) 3 times. [33]
19: 33SC. [33]
20: (10SC, inc) 3 times. [36]
Change back to the color Black.
21: FL, (5SC, inc) 6 times. [42]
22: (6SC, inc) 6 times. [48]
23: 3SC, inc, (7SC, inc) 5 times, 4SC. [54]
24: (8SC, inc) 6 times. [60]
Fasten off and weave in tail. I didn’t stuff the hat at all, so I could get it all creasy.

Body
Start with the color Purple.

1: 6SC in Magic Ring. [6]
2: 2SC in each st around. [12]
3: (1SC, inc) 6 times. [18]
4: (2SC, inc) 6 times. [24]
5: (3SC, inc) 6 times. [30]
6: 30SC. [30]
|
8: 30SC. [30]
Change to the color Orange.
9: BL, 30SC. [30]
10: 30SC. [30]
Change to the color Green
11: (3SC, dec) 6 times. [24]
Change to the color Orange.
12: (2SC, dec) 6 times. [18]
Change to the color Green.
13: (1SC, dec) 6 times. [12] Stuff the body around here.
Change to the color Orange.
14: dec all around. [6]
Fasten off and weave in tail.

Skirt
Use the color Purple.

At row 9 of the body you worked in Back Loops only, now you are gonna rejoin in the Front Loops.

1: 30SC. [30]
2: (1SC, DC + Picot +DC in the next st, 1HDC, 1SC, Picot, 1SC) 6 times. [40]
Fasten off and weave in tail.

Leg (Make 2)
Start with the color Green.

1: 6SC in Magic RIng. [6]
2: 6SC. [6]
Change to the color Orange.
3: 6SC. [6]
Change to the color Green.
4: 6SC. [6]
Repeat row 3 and 4 until you have 11 rows total.
Fasten off and leave a long tail for sewing.

Shoes (Make 2)
Use the color Black.

1: Ch6, insert in the second Ch from hook, 4SC, 3SC in the next st, 3SC, inc. [12]
2: 12SC. [12]
3: 12SC. [12]
Fasten off and sew a small part together, until you are left with a gap for the leg to fit in.

Assembling.

By the use of sewing pins, you can position all of your parts first to see if you like it. When you are happy,  you can sew it on. I recomment you doing so.

Sew the body to the head using a bit a extra thread. Mine is sewn where the dress starts, into the BL of the hat. Then sew the legs to the body and add her shoes as well. And you are already done!

I hope you liked this Hiding Witches pattern as much as I do! I still wanna make more haha, one day, one day!
Have a wonderful day and make sure to show me on social media if you made one.

Love
Danielle

Posted in: Crafting, Crochet Tagged: Amigurumi, Crochet, cute, haken, Halloween, Hiding, kawaii, Witch, Witches

♥ Free Pattern; Bat Amigurumi

10 oktober 2019 by Delinlea Leave a Comment

Hey Lovelies! Do you enjoy fall so far?! Here there is a lot of wind and rain, but I love it, specially cause al lot of fruits and nuts are ready to collect. I love going out in nature and see what foods I can find. It’s a good feeling to work for your food =P. Do you do this as well? Or do you prefer to stay inside with this weather? ^_^
Since it’s getting darker faster now, every evening when I close my curtains, I see a bat flying around, it’s so fun to watch! This made me inspired to make a Bat amigurumi, it’s so cute~. I hope you will love it as well, do you see real bat’s flying sometimes?

For this DIY you’ll need:
♥ Yarn in the colors; Black and Purple (I used Budgetyarn.com).
♥ Crochet Hook (I used a 2,5mm hook).
♥ Stuffing.
♥ Scissors.
♥ Sewing Pins.
♥ Yarn Needle.
♥ Safety Eyes, 9mm.

Stitches used (US Terms):
Magic Ring.
CH = Chain.
SLST = Slip Stitch.
SC = Single Crochet.
HDC = Half Double Crochet.
DC = Double Crochet.
ST = Stitch.
Inc = Increase.
Dec = Decrease.
(…) = Repeat the space in brackets the given number of times.
[…] = Total number of stitches.

Pattern

Work in continues rounds, use a stitch marker to mark your first stitch of every row. This is for every part, unless stated otherwise.

Head + Body
Use the color Black.

1: 6SC in Magic Ring. [6]
2: 2SC in each st around. [12]
3: (1SC, inc) 6 times. [18]
4: (2SC, inc) 6 times. [24]
5: (3SC, inc) 6 times. [30]
6: 30SC. [30]
|
11: 30 SC. [30]
12: (3SC, dec) 6 times. [24]
13: (2SC, dec) 6 times. [18] Insert the eyes between row 8 and 9, about 4 cm apart. Stuff the head here to make it easier for yourself. You can do it last but it’s harder to stuff nicely.
14: (1SC, dec) 6 times. [12]
15: 12SC. [12]
16: (1SC, inc) 6 times. [18]
17: 18SC. [18]
|
20: 18SC. [18]
21: (1SC, dec) 6 times. [12] Stuff the body now as well.
22: Dec all around. [6]
Fasten off and weave in tail.

Ears (Make 2)
Use the color black

1: 6SC in Magic Ring. [6]
2: (1SC, inc) 3 times. [9]
3: (2SC, inc) 3 times. [12]
4: 12SC. [12]
|
8: 12 SC. [12]
Fasten off and leave a long tail for sewing.

Inside of the Ears (Make 2)
Use the color Purple.
You won’t work in continues rounds.

1: Ch5, insert in second Ch from hook, 4SC, turn. [4]
2: 4SC, 3SC in the next st, 4SC. [11]
Fasten off and leave a long tail for sewing, sew this to the outer ear.

Belly
Use the color Purple.

1: 6SC in Magic Ring. [6]
2: 2SC in each st around. [12]
Fasten off and leave a long tail for sewing.

Legs (Make 2)
Use the color Black.

1: 6SC in Magic Ring. [6]
2: (1SC, inc) 3 times. [9]
3: 9SC. [9]
Fasten off and leave a long tail for sewing.

Wings (Make 2)
Start with the color Black.
You won’t work in continues rounds.

1: Ch3, insert in second Ch from hook, 2SC, turn. [2]
2: Inc 2 times, turn. [4]
3: Inc, 2SC, inc, turn. [6]
4: Inc, 4SC, inc, turn. [8]
5: 8SC, turn. [8]
6: Inc, 6SC, inc, turn. [10]
7: 10SC, turn. [10]
8: Ch3, DC + HDC in the next st, 3SC, HDC + DC in the next st, Ch1, DC + HDC in the next st, 4SC.
Change to the color Purple.
Crochet along the edge of the wing now. In the middle of the wing you can either stitch on a line with Purple yarn of use the Surface Crochet Technique.

Assembling

By using sewing pins, you can position all parts before sewing them on. This way you can easily move them around until you are happy with how it looks.

Sew the ears on to of the head of the Bat and his belly to the body. His legs go right beside, slightly lower his belly. On His back you will sew his wings. Position them however you like.

If you want you can sew on a little mouth, I didn’t because I like it this way xD.

I hope you enjoyed this new bat pattern and let me know if you made it! I always love to see works that are made by you, using my patterns, I always feel so loved!

Have a wonderful day!

Love
Danielle

Posted in: Crafting, Crochet Tagged: Amigurumi, Autumn, Bat, Crochet, cute, fall, Free Pattern, haken, Halloween, kawaii, october

♥ Free Pattern; Cat Ghost Amigurumi

3 oktober 2019 by Delinlea Leave a Comment

Hey Lovelies! It’s the first blog of October! Guess what that means, this month I will release only Halloween themed DIY’s or patterns, but they will have something cute over them. I hope you are excited for that! For today I planned this cute Cat Ghost! Very easy to make but so adorable to make a lot of them!

Cat Ghost

For this DIY you’ll need:
♥ Yarn in the color; White (cotton yarn).
♥ Crochet Hook (I used a 2,5mm hook).
♥ Stuffing.
♥ Scissors.
♥ Sewing Pins.
♥ Yarn Needle.
♥ Piece of pink yarn to sew on it’s nose.
♥ Safety Eyes, 5mm.

Stitches used (US Terms):
Magic Ring.
CH = Chain.
SLST = Slip Stitch.
SC = Single Crochet.
ST = Stitch.
Inc = Increase.
Dec = Decrease.
(…) = Repeat the space in brackets the given number of times.
[…] = Total number of stitches.

Pattern

Work in continues rounds, use a stitch marker to mark your first stitch of every row. This is for every part, unless stated otherwise.

Body
Use the color White.

1: 6SC in Magic Ring. [6]
2: 2SC in each st around. [12]
3: (1SC, inc) 6 times. [18]
4: (2SC, inc) 6 times. [24]
5: 24SC. [24]
|
8: 24SC. [24]
9: (6SC, dec) 3 times. [21]
10: 21SC. [21]
11: (5SC, dec) 3 times. [18]
12: 18SC. [18]
13: (4SC, dec) 3 times. [15] Insert the eyes between row 6 and 7, and also stuff the body.
14: (3SC, dec) 3 times. [12]
15: (2SC, dec) 3 times. [9]
16: (1SC, dec) 3 times. [6]
17: 6SC. [6]
18: 4SC, dec. [5]
Fasten off and weave in tail.

Ears (Make 2)
Use the color white.

1: 6SC in Magic Ring. [6]
2: (1SC, inc) 3 times. [9]
3: (2SC, inc) 3 times. [12]
4: 12SC. [12]
Fasten off and leave a long tail for sewing.

Arms (make 2)
Use the color white.

Ch3, insert in second ch from hook, 2SC.
Fasten off and leave a long tail for sewing.

Assembling

By using sewing pins, you can position all parts before sewing them on. This way you can easily move them around until you are happy with how it looks.

Place the ears on top of the body and sew them on. Also position the arms and sew those on as well. With some pink yarn stitch on the nose, or you can use felt to do so.

I hope your Cat Ghost turned out as cute as mine and got you addicted to make a few more as well! BTW I love to see yours if you made it! Please show me on social media or send me an email!

Love
Danielle

Posted in: Crafting, Crochet Tagged: Amigurumi, Cat, Crochet, cute, ghost, haken, kawaii

♥ Free Pattern; Mushroom Buddy Amigurumi

19 september 2019 by Delinlea 2 Comments

Hey Lovelies! Fall is really starting to show it’s face. I am so happy we can leave summer behind, finally! Autumn is my favorite season of the year, but if you know me, when there’s snow in winter, you will hear me say, winter is my favorite season haha.
I have like so many ideas for autumn to make, that I barely know where to start. I’ll probably busy until next year to get everything done. That’s not happening. I have to make decisions! So for today I decided to make this adorable Mushroom buddy! I hope you will love him as much as I do. You can make so many variations with him, I kinda wanted to make a bazillion versions *hides.

Mushroom Buddy

For this DIY you’ll need:
♥ Yarn in the colors; off white and a color of choise. (I used StyleCraft Special DK)
♥ Crochet Hook (I used a 2,5mm hook).
♥ Stuffing.
♥ Scissors.
♥ Sewing Pins.
♥ Yarn Needle.
♥ Piece of black yarn to sew on it’s mouth
♥ Safety Eyes, 6mm.

Stitches used (US Terms):
Magic Ring.
BL = Back Loops.
CH = Chain.
SLST = Slip Stitch.
SC = Single Crochet.
ST = Stitch.
Inc = Increase.
Dec = Decrease.
(…) = Repeat the space in brackets the given number of times.
[…] = Total number of stitches.

Pattern

Work in continues rounds, use a stitch marker to mark your first stitch of every row. This is for every part, unless stated otherwise.

Body
Use the color Off-White.

1: 6SC in Magic Ring. [6]
2: 2SC in each st around. [12]
3: (1SC, inc) 6 times. [18]
4: (2SC, inc) 6 times. [24]
5: 24SC. [24]
|
9: 24SC. [24]
10: (2SC, dec) 6 times. [18]
11: 18SC. [18]
12: (1SC, dec) 6 times. [12]
13: 12SC. [12]
14: 12SC. [12]
15: BL, (1SC, inc) 6 times. [18]
16: (2SC, inc) 6 times. [24]
17: (3SC, inc) 6 times. [30]
Fasten of and weave in tail. Insert the eyes between row 9 and 10, and stuff the body firmly.

Hood
Use any color of choise.

1: 6SC in Magic Ring. [6]
2: 2SC in each st around. [12]
3: 12SC. [12]
4: 12SC. [12]
5: (3SC, inc) 3 times. [15]
6: 15SC. [15]
7: (4SC, inc) 3 times. [18]
8: 18SC. [18]
9: (2SC, inc) 6 times. [24]
10: 24SC. [24]
11: (3SC, inc) 6 times. [30]
12: (4SC, inc) 6 times. [36]
13: (5SC, inc) 6 times. [42]
14: 42SC. [42]
15: 42SC. [42]
16: (5SC, dec) 6 times. [30]
17: (4SC, dec) 6 times. [24]
Fasten off and leave a long tail for sewing. Stuff the hood, make sure around the opening, not to much stuffing.

Legs (make 2)
Use the color Off-White.

1: 6SC in Magic Ring. [6]
2: 2SC in each st aorund. [12]
3: 12SC. [12]
Fasten off and leave a long tail for sewing. Stuff both legs.

Arms (make 2)
Use the color Off-White.

1: 6SC in Magic Ring. [6]
2: 6SC.[6]
Fasten off and leave a long tail for sewing.

A look under the Hood.

Assembling

By using sewing pins, you can position all parts before sewing them on. This way you can easily move them around until you are happy with how it looks.

Sew the hood to the body, if you indeed kept a bit of space by the stuff part, you are able to push the body a bit inward for a more natural look.
Position his arms and legs and sew those on.
Stitch on a little mouth in case you like. You can also add dots to it’s hood as a variation on this one. just go wild with this pattern! Have fun!

I hope you enjoyed this pattern, and if you made one, show me! I would love to see!

Love
Danielle

Posted in: Crafting, Crochet Tagged: Amigurumi, Autumn, buddy, Crochet, cute, fall, haken, kawaii, mushroom

♥ Free Pattern; 7 Dwarfs Ufufy

5 september 2019 by Delinlea 1 Comment

Hey Lovelies! Remember I made Dopey of the 7 Dwarfs of Snow White earlier this year?! Well I made his friends finally, couldn’t leave him alone! And it feels also perfect with fall kicking in. I don’t know I always think of dwarfs/gnome with fall xD. So, here’s today’s pattern. The remaining 6 dwarfs, Grumpy, Sneezy, Bashful, Sleepy, Doc and Happy.

For this DIY you’ll need:
♥ Yarn in the colors;  Beige, Brown, Yellow, Dark Pink, Light Orange, Light Yellow, Light Green, Blue, Light Blue, Light Brown. (I used Budgetyarn.com and Stylecraft Special DK)
♥ Fluffy Yarn in White.
♥ Crochet Hook (I used a 2,5mm hook for the ‘normal’yarn and a 3mm hook for the fluffy yarn).
♥ Stuffing.
♥ Scissors.
♥ Sewing Pins.
♥ Yarn Needle.
♥ Felt in Black.
♥ (Fabric) Glue.

Stitches used (US Terms):
Magic Ring.
BL = Back Loops.
FL = Front Loops.
CH = Chain.
SLST = Slip Stitch.
SC = Single Crochet.
ST = Stitch.
Inc = Increase.
Dec = Decrease.
(…) = Repeat the space in brackets the given number of times.
[…] = Total number of stitches.

Color Scheme for each Dwarf

  • Name                   Shirt                      Pants                    Hat
  • Grumpy               Dark Pink            Light Brown       Light Brown
  • Bashful                Light Brown       Light Brown       Light Blue
  • Doc                      Light Orange      Light Brown       Light Green
  • Happy                 Light Brown       Blue                      Light Yellow
  • Sleepy                  Light Green        Light Green        Light Blue           
  • Sneezy                 Light Brown       Light Brown       Light Yellow

For all dwarfs you alse use the colors Beige, Brown and Yellow.

Pattern

The pattern will be the same as Dopey, which you can find here. With some alternations. Look carefully which color you need for which dwarf. The faces will give each dwarf the personality, so look carefully at that.

Body

If you have a different color for the pants make sure to change color at row 16!

At the body, row 12, you worked in BL make sure to keep the first stitch marked. When you finished the body, work in the front loops of row 12, to make a part of the rim of the shirt but also his beard.

Beard, work with your fulffy yarn:
Skip 5 st, 7SC, 2HDC, 2DC, 2HDC, 7SC and leave the remaining 5st as they are. Fasten off and weave in tail.
The stitches you skipped you will SlSt with the matching color of the shirt. Fasten off and weave in tail.

Arms/Feet/Belt/Hat

These are all the same as Dopey, no alternations, just check you are using the right color for the right dwarf.

For those dwarfs, you don’t have to make the ears, they will dissapear under the hat anyway. You can tho, if you still want xD.

  • Sneezy
  • Sleepy
  • Happy
  • Doc
  • Basful

Assemble your dwarfs as described on Dopey’s Pattern. And once again, make sure to check what each face looks like, this will give the difference for each.  For Doc I made him some little glasses out of wire, so adorable!

I hope you enjoyed those instuctions. The 7 dwarfs are finally complete! Now I miss Snow White, I’ll make her one day!

Love
Danielle

Posted in: Crafting, Crochet, plush, Ufufy Tagged: 7 dwarfs, Amigurumi, Crochet, Disney, haken, snow white, Ufufy
« Vorige 1 2 3 4 5 … 14 15 16 17 18 19 20 21 22 … 25 26 27 28 29 Volgende »

What are you looking for?!

My Socials

Ko-Fi

I love making all these free things for you, tho it would be very helpfull if you can support me on Ko-Fi! (You don’t have to tho, totally up to you!)

Ko-Fi Shop!!

In my Ko-Fi shop you can find PDF Amigurumi Patterns!! You can pay easily with PayPal.
Go to the shop here!!

Recent Blog Posts

  • ♥ Happy 2022!
  • ♥ Day 12; Lights
  • ♥ Day 11; Flower Deco
  • ♥ Day 10; Snowman
  • ♥ Day 9; Gingerbread Houses

Recent Comments

  • Delinlea op ♥ Pietje Gnome Amigurumi
  • Delinlea op ♥ Toy Story Alien TsumTsum Amigurumi
  • Delinlea op ♥ Pua Tsum Tsum Amigurumi
  • Charli op ♥ Free Pattern; CNY Mouse Amigurumi
  • Peter Pesch op ♥ Pietje Gnome Amigurumi

Categories

  • animation
  • Beadwork
  • Blogmas 2018
  • Blogmas 2020
  • Blogmas 2021
  • Books
  • Bujo
  • Christmas
  • Christmas CAL 2019
  • Christmas Countdown 2017
  • Contest
  • Crafting
  • Crochet
  • Drawing
  • Drawing Lesson
  • Easter
  • Geen categorie
  • Life
  • Miniature
  • Nail Art
  • New Year
  • Paper
  • plush
  • Pokemon
  • Poseable Art Doll
  • Recipe
  • Sewing
  • Shop Pattern
  • Sinterklaas
  • Social Media
  • Tsum Tsum
  • Ufufy

Copyright © 2025 Delinlea - My little fantasy world.

Family WordPress Theme by themehall.com