Delinlea - My little fantasy world
  • ♥ Home
  • ♥ About Me
  • ♥ Blogmas 2021
  • ♥ Free Patterns
    • ♥ Amigurumi; Spring/Easter
    • ♥ Amigurumi; Fall/Halloween
    • ♥ Amigurumi; Winter
    • ♥ Amigurumi Tsum Tsum
    • ♥ Amigurumi Ufufy
    • ♥ Amigurumi Others
    • ♥ Christmas Countdown 2017
    • ♥ Blogmas 2018
    • ♥ Blogmas 2020
  • ♥ Tutorials
    • ♥ Easter
    • ♥ Home Deco
    • ♥ Others
  • ♥ Drawing Lessons
  • ♥ FanFic
    • ♥ Chapter 1
    • ♥ Chapter 2
    • ♥ Chapter 3
    • ♥ Chapter 4
    • ♥ Chapter 5
    • ♥ Chapter 6
    • ♥ Chapter 7
  • ♥ Gallery
    • ♥ Crafts
    • ♥ Drawings
    • ♥ Poseable Art Dolls
  • ♥ Links
  • ♥ Contact
    • Privacy Policy

kawaii

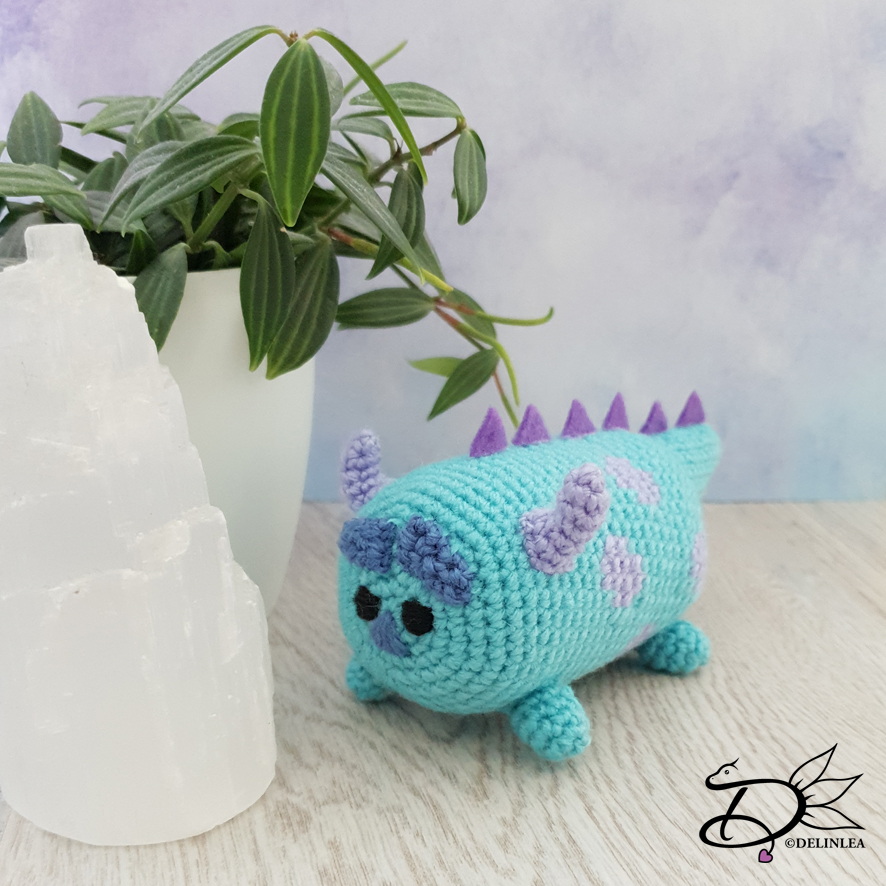
♥ Free Pattern; Sulley Tsum Tsum Amigurumi

23 mei 2019 by Delinlea Leave a Comment

Hey Lovelies! How are you doing? I’m doing okay, I made a to do list till the end of June, and it’s quite a bit XD. Also because I wanna join 2 contests, 1 by Hahnemuhle for their 2020 calendar and 1 by WayV. They both include a lot of drawing, so I really I hope I can get that done on time besides all the other stuff. Do you like to join contests?!
Anyway on to today’s post, it’s time for a new Tsum Tsum pattern! I was so excited to make a Tsum again, so expect a few more these weeks haha. It’s Monsters Inc. Sulley’s turn today. This one was requested by someone a while ago, but I can’t remember who. *hides. But here it is, have fun.

Sulley Tsum Tsum

For this DIY you’ll need:
♥ Yarn in the colors;  Turquoise, Purple and Dark Blue. (I used Zeeman Supersoft)
♥ Crochet Hook (I used a 2mm hook).
♥ Stuffing.
♥ Scissors.
♥ Sewing Pins.
♥ Yarn Needle.
♥ Embroidery Needle with black floss.
♥ Felt in Purple.
♥ (Fabric) Glue. (Optional)

Stitches used (US Terms):
Magic Ring.
Color Changing.
Ch = Chain.
SC = Single Crochet.
ST = Stitch.
FSC = Foundation Single Crochet
FHDC = Foundation Half Double Crochet
FDC = Foundation Double Crochet
Inc = Increase.
Dec = Decrease.
(…) = Repeat the space in brackets the given number of times.
[…] = Total number of stitches.

Sulley Tsum Tsum

Pattern

This pattern will be worked in continues round, unless stated otherwise.

Body
Start with the color Turquoise.

1: 6SC in Magic Ring. [6]
2: 2SC in each st around. [12]
3: (1SC, inc) 6 times. [18]
4: (2SC, inc) 6 times. [24]
5: (3SC, inc) 6 times. [30]
6: (4SC, inc) 6 times. [36]
7: (5SC, inc) 6 times. [42]
8: 42SC. [42]
|
16: 10SC, Change to Purple, 2SC, Change to Turquoise, 19SC, Change to Purple, 2SC, Change to Turquoise, 9SC. [42]
17: 9SC, Change to Purple, 4SC, Change to Turquoise, 17SC, Change to Purple, 4SC, Change to Turquoise, 8SC. [42]
18: Repeat row 17.
19: Repeat row 16.
20: 42SC. [24]
21: 5SC, Change to Purple, 2SC, Change to Turquoise, 9SC, Change to Purple, 2SC, Change to Turquoise, 6SC, Change to Purple, 2SC, Change to Turquoise, 9SC, Change to Purple, 2SC, Change to Turquoise, 5SC  [42]
22: 4SC, Change to Purple, 4SC, Change to Turquoise, 7SC, Change to Purple, 4SC, Change to Turquoise, 4SC, Change to Purple, 4SC, Change to Turquoise, 7SC, Change to Purple, 4SC, Change to Turquoise, 4SC  [42]
23: Repeat row 22.
24: Repeat row 21.
25: 42SC. [42]
26: 11SC, Change to Purple, 2SC, Change to Turquoise, 19SC, Change to Purple, 2SC, Change to Turquoise, 8SC. [42]
27: 10SC, Change to Purple, 4SC, Change to Turquoise, 17SC, Change to Purple, 4SC, Change to Turquoise, 7SC. [42]
28: Repeat row 27.
29: Repeat row 26.
30: (5SC, dec) 6 times. [36]
31: (4SC, dec) 6 times. [30]
32: (3SC, dec) 6 times. [24]
33: (2SC, dec) 6 times. [18] Make sure to stuff the body around here.
34: (1SC, dec) 6 times. [12]
35: dec all around. [6]
Fasten off and weave in the tail.

Sulley Tsum Tsum

Legs (Make 4)
Use the color Turquoise.

1: 4SC in magic ring. [4]
2: Inc in each st around. [8]
3: SC in each st around. [8]
|
5: SC in each st around. [8]
Fasten off and leave a long tail for sewing.

Sulley Tsum Tsum

Tail
Use the color Turquoise.

1: 6SC in Magic Ring. [6]
2: (1SC, inc) 3 times. [9]
3: 9SC. [9]
4: (2SC, inc) 3 times. [12]
5: 12SC. [12]
6: (3SC, inc) 3 times. [15]
7: 15SC. [15]
8: 15SC. [15]
9: (4SC, inc) 3 times. [18]
10: 18SC. [18]
11: 18SC. [18]
Fasten off and leave a long tail for sewing. Stuff the tail lightly.

Horns (make 2)
Use the color Purple.

1: 4SC in Magic Ring. [4]
2: (1SC, inc) 2 times. [6]
3: 6SC. [6]
4: 6SC. [6]
5: (2SC, inc) 2 times. [8]
6: (3SC, inc) 2 times. [10]
Fasten off and leave a long tail for sewing. You don’t stuff the horns, you will bend them later and if you stuff them they won’t hold shape.

Eyebrows
Use the color Dark Blue.

Make 2 FSC, for 1 eyebrow you finish with a FHDC and for the other with a FDC.
Fasten off and leave a long tail for sewing.

Sulley Tsum Tsum

Assembling

For assembling I always use pins first to place all the parts, this way I can easily move them around until I am happy with how it looks!
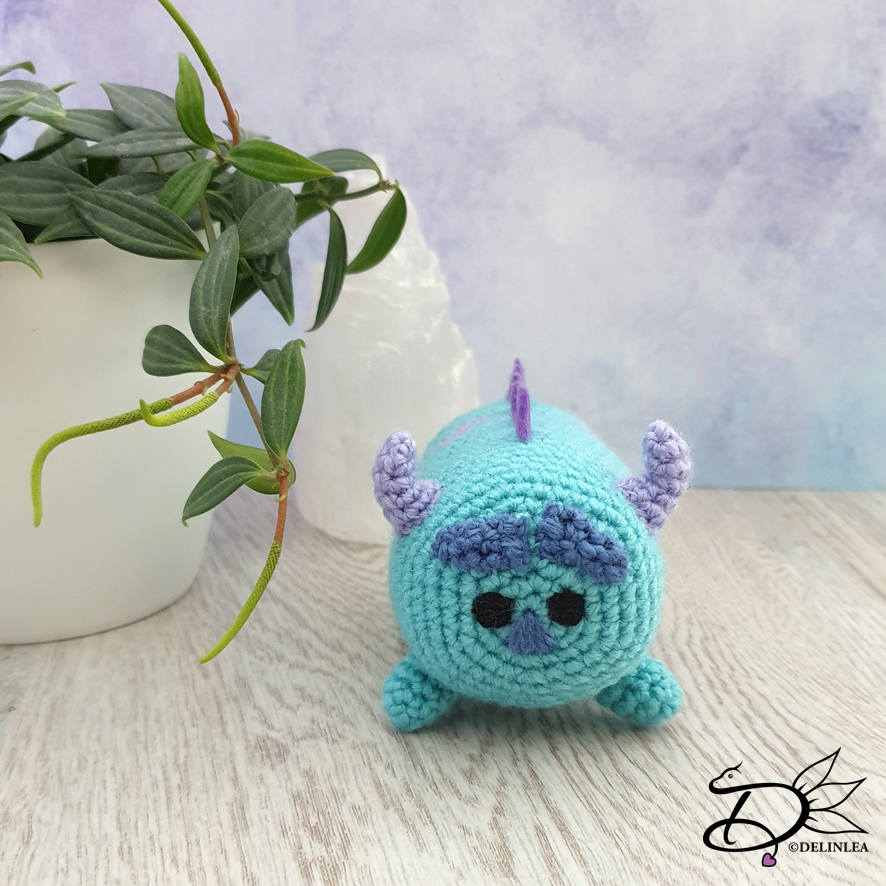
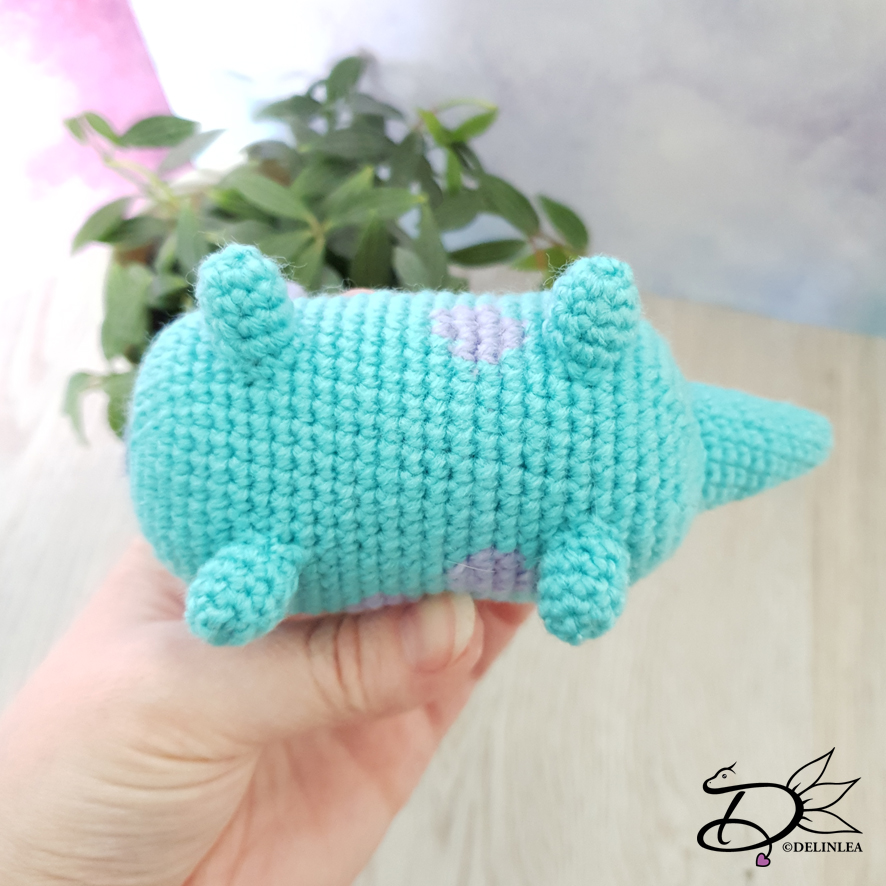
First place the legs, the 2 in front, slightly forward. two at the back, facing outward, sew them on. Make sure that both sides of the body have about 4 purple dots.
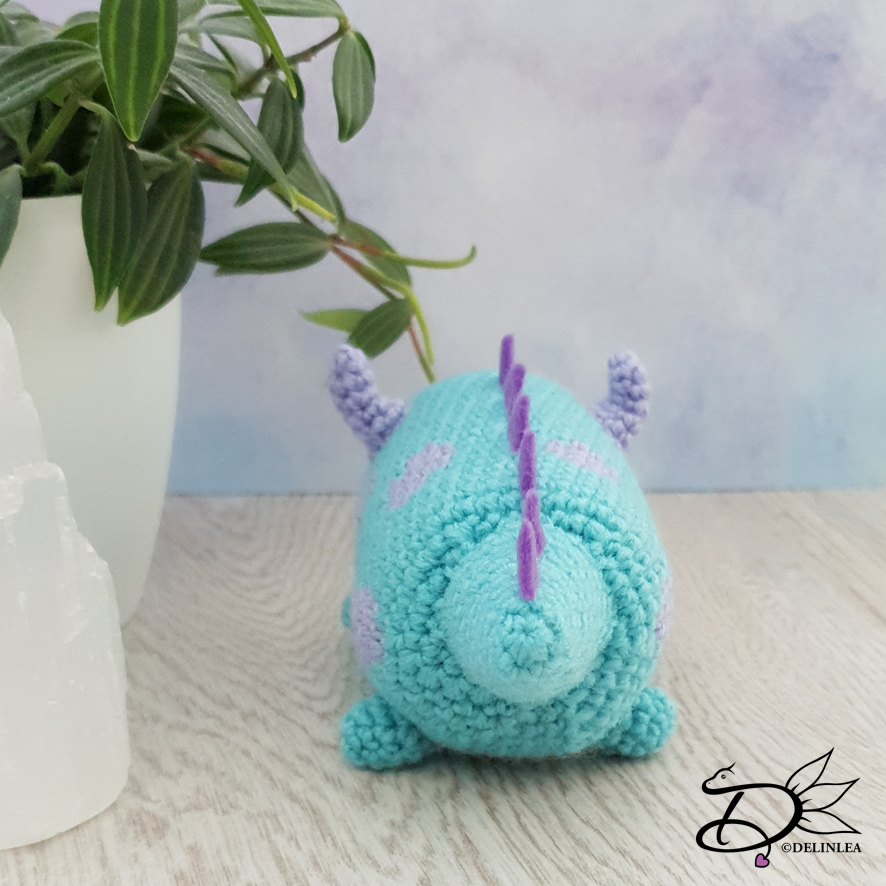
Sew on his tail, it’s not centered, slightly more up. Sew on his horns as well.
For his face, you can embroider it on like I did, or use felt, just what you prefer. For his nose I used the same yarn to embroider on as the eyebrows. Last you sew on the Eyebrows, since you know now where they need to go!
Cut out of Purple felt 6 or 7 small triangle to go on his back and tail. Glue those on.

Sulley and Mike Tsum Tsum

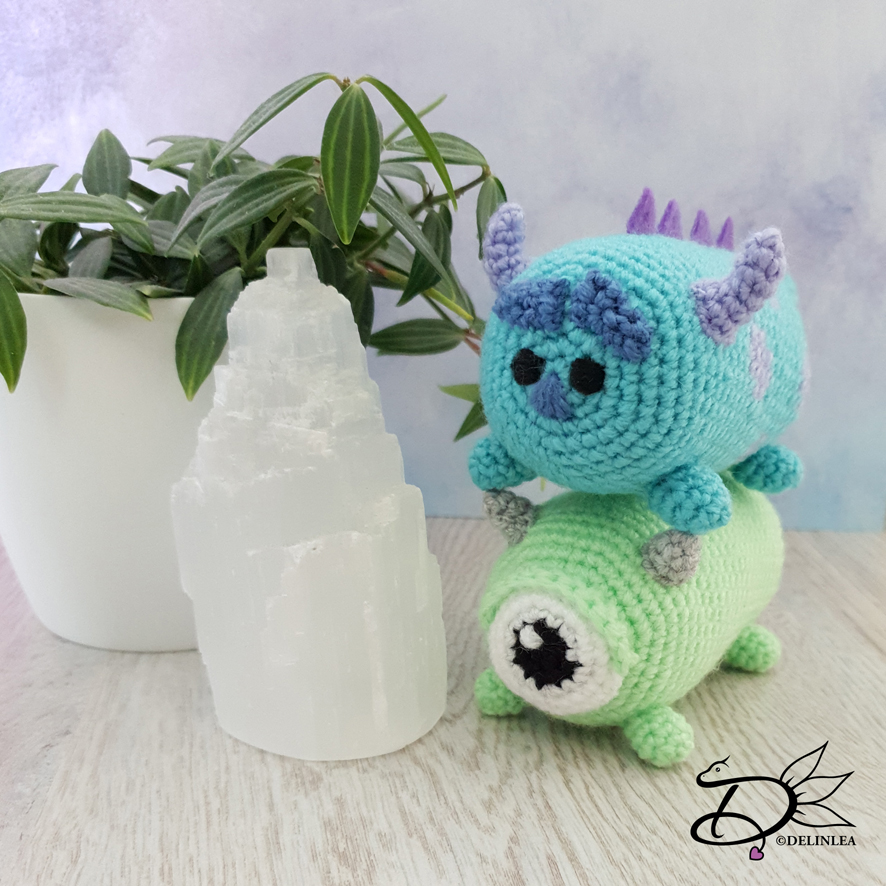
And you have finished Sulley! I hope you  like how he turned out and make our collection of Tsum Tsum’s a bit bigger! If you wanna make Mike as well, here can you find the pattern! Show me yours when you made it, on twitter or instagram with the #DelinleaDIY.

Love
Danielle

Posted in: Crafting, Crochet, Tsum Tsum Tagged: Amigurumi, Crochet, cute, Disney, haken, kawaii, Monsters Inc., pixar, Sulley

♥ Free Pattern; Baby Chicken

18 april 2019 by Delinlea Leave a Comment

Hey Lovelies! How are you doing these days?! I hope you are doing fine and having fun. As I said in last weeks blog, I was working on a baby chicken as well. And I finished that one up for today’s blog post. I hope you will enjoy this pattern as well. It’s based ones again on my Boho Duckling! Enjoy!

For this DIY you’ll need:
♥ Yarn in the colors;  Yellow, Orange and White. (I used Budgetyarn)
♥ Crochet Hook (I used a 2,5mm hook).
♥ Stuffing.
♥ Scissors.
♥ Sewing Pins.
♥ Yarn Needle.
♥ Safety eyes, 6mm.

Stitches used (US Terms):
Magic Ring.
Ch = Chain.
SC = Single Crochet.
HDC = Half Double Crochet.
DC = Double Crochet.
Picot = made of 3 Chains.
ST = Stitch.
Inc = Increase.
Dec = Decrease.
(…) = Repeat the space in brackets the given number of times.
[…] = Total number of stitches.

Pattern

The Body, Head and Wings will be the same as the Boho Duckling. Use Yellow for these parts.

Beak
In the color Orange.

1: 4SC in Magic Ring. [4]
2: (inc, 1SC) 2 times. [6]
Fasten off and leave a long tail for sewing.

Feet
In the color Orange.

1: 6SC in Magic Ring. [6]
2: (1SC, inc) 3 times. [9]
The next part will be a bit tricky. If you can’t do it you can always make the feet from boho Duckling. You’ll devide your workin 3 parts. So the row you work on, make flat, side by side. Follow row 3/4 as written and repeat 3 times (2 times you need to re-attach your yarn).
3/4: 1SC, go to the other side of your work/row (that’s  why you had to flatten). Count 3 stitches back (so the 1 you just made and 2 from the last row). Insert your hook in that stitch. Make 2SC. You will work in a tiny circle. make 3 more SC on top of the 3 st you just made.
Fasten off and weave in all tails.

Egg Shell
In the color White.

1: 6SC in Magic Ring. [6]
2: 2SC in each st around. [12]
3: (1SC, inc) 6 times. [18]
4: (2SC, inc) 6 times. [24]
5: (3SC, inc) 6 times. [30]
6: 30SC. [30]
7: 30SC. [30]
8: (4SC, inc) 6 times. [36]
9: 36SC. [36]
|
11: 36SC. [36]
12: (HDC, DC, Picot, HDC, Picot, 3SC, HDC, DC, Picot, HDC, 2SC, Picot, 1SC) 3 times.
Fasten off and weave in tail.

Assembling

I always use sewing pins to place all parts first, before sewing. This way you can easily move all parts around until you are happy with the outcome.

Sew on the body to his head and place the wings at both sides of the body, sew on. His beak will go in between his eyes, but slighly lower. You don’t have to stuff the beak, but you can do if you want, do that when you are almost done sewing it on. Last sew on his feet.

Tip, add some pink pastel dust on his cheeks, for an extra cute look.

I hope you liked this pattern, and show me if you made it! Have a lovely day

Love
Danielle

Posted in: Crafting, Crochet, Easter Tagged: Amigurumi, animal, baby, chicken, Crochet, cute, haken, kawaii

♥ Free Pattern; Easter Bunny

11 april 2019 by Delinlea 1 Comment

Hey Lovelies! Are you ready for easter yet?! Well, I think I am, but at the same time I am not, I have so many ideas I wanna make and create, but there is not enough time haha. I think I can make easter stuff all year round. Better not do that xD. I’ll just gonna write them down, and if I have time I’ll make them for next year. For today I planned a easter variation on my Boho Duckling. A Easter Bunny! I also wanted to do a little chick, but I couldn’t figure out on time how I wanted the feet to look like, and since my arm hurts a lot, I thought it was better to only upload the easter bunny for you. And hopefully next week upload the little chick.

For this DIY you’ll need:
♥ Yarn in the colors;  Light Brown and Cream. (I used Stylecraft Special DK)
♥ Crochet Hook (I used a 2,5mm hook).
♥ Stuffing.
♥ Scissors.
♥ Sewing Pins.
♥ Yarn Needle.
♥ Safety eyes, 6mm.
♥ Pink Felt.
♥ Fabric Glue.

Stitches used (US Terms):
Magic Ring.
Ch = Chain.
SC = Single Crochet.
ST = Stitch.
Inc = Increase.
Dec = Decrease.
(…) = Repeat the space in brackets the given number of times.
[…] = Total number of stitches.

Pattern

The Body and Head will be the same as the Boho Duckling. Use the Light Brown color for this.
For the nose you can use either pink felt or embroider it on. Just what you think is best.

Ears (Make 2)
Use the color Light brown.

1: 6SC in Magic Ring. [6]
2: 2SC in each st around. [12]
3: (1SC, inc) 6 times. [18]
4: (2SC, inc) 6 times. [24]
5: 24SC. [24]
6: 24SC. [24]
7: 24SC. [24]
8: (6SC, dec) 3 times. [21]
9: 21SC. [21]
10: (5SC, dec) 3 times. [18]
11: 18SC. [18]
12: (4SC, dec) 3 times. [15]
13: 15SC. [15]
14: 15SC. [15]
15: 15SC. [15]
16: (3SC, dec) 3 times. [12]
17: 12SC. [12]
18: 12SC. [12]
19: 12SC. [12]
Fasten off and leave a long tail for sewing. Out of Pink felt, cut the inner ear. This you will glue on with fabric glue.

Feet (make 2)
Use the color Light Brown.

1: 6SC in Magic Ring. [6]
2: (1SC, inc) 3 times. [9]
3: 9SC. [9]
4: 9SC. [9]
5: 9SC. [9]
6: (2SC, inc) 3 times. [12]
7: 12SC. [12]
8: 12SC. [12]
9: (3SC, inc) 3 times. [15]
10: 15SC. [15]
11: (4SC, inc) 3 times. [18]
12: 18SC. [18]
13: 3SC, dec, 7SC, dec, 4SC. [16]
14: 3SC, dec, 6SC, dec, 3SC. [14]
15: 2SC, dec, 5SC, dec, 3SC. [12]
Fasten off and leave a long tail for sewing.
Sew the top part, the opening, close.
Cut a heart out pink felt and glue this to the feet.

Arms and Tail (Make 3)
Use the color Light Brown for the arms (2). Use the color Cream for the tail.

1: 6SC in Magic Ring. [6]
2: (1SC, inc) 3 times. [9]
Fasten off and leave a long tail for sewing.

Assembling.

I always use sewing pins to place all parts first, before sewing. This way you can easily move all parts around until you are happy with the outcome.

Sew the body to the head. After that sew on the arms. Now you can reach them well.
The order doesn’t really matter, but sew on the ears, feet and tail on as well. And you are already done!

I hope you will love this cute little easter bunny! I definitely love him! Will you show me yours when you made him too? I’d love to see!

Have a wonderful day!

Love
Danielle

Posted in: Crafting, Crochet, Easter Tagged: Amigurumi, Bunny, Crochet, cute, Easter, Free Pattern, haken, kawaii

♥ Free Pattern; Boho Duckling

28 maart 2019 by Delinlea Leave a Comment

Hey Lovelies! It’s a new week, and Spring has begon! Are you enjoying to see nature slowly come alive again? I love to see plants waking up from their sleep, and see all the fresh leaves and flowers, so, so pretty! Though on the other hand, the waether isn’t sure how to act right now, one moment it storms badly with rain, and the next second it’s sunny. How is it in your country?! Kinda the same as here? Anyway, since it’s spring now, that also means the time of baby animals, yay~~. I thought I would make a cute Duckling pattern, with boho touch, for you to make. I hope you will enjoy it!

For this DIY you’ll need:
♥ Yarn in the colors;  Yellow and orange (I used Stylecraft Special DK and Budgetyarn)
♥ Crochet Hook (I used a 2,5mm hook).
♥ Stuffing.
♥ Scissors.
♥ Sewing Pins.
♥ Yarn Needle.
♥ Safety eyes, 6mm.
♥ 3 scrap pieces of yarn in colors of choise. (optional)
♥ Little Feather. (optional)

Stitches used (US Terms):
Magic Ring.
Ch = Chain.
SC = Single Crochet.
ST = Stitch.
Inc = Increase.
Dec = Decrease.
(…) = Repeat the space in brackets the given number of times.
[…] = Total number of stitches.

Pattern

Body
Use the color yellow.

1: 6SC in Magic Ring. [6]
2: 2SC in each st around. [12]
3: (1SC, inc) 6 times. [18]
4: (2SC, inc) 6 times. [24]
5: 24SC. [24]
|
7: 24SC. [24]
8: (2SC, dec) 6 times. [18]
9: 18SC. [18]
10: 18SC. [18]
11: (1SC, dec) 6 times. [12]
Fasten off and leave a long tail for sewing. Don’t forget to stuff the body.

Head
Use the color yellow.

1: 6SC in Magic Ring. [6]
2: 2SC in each st around. [12]
3: (1SC, inc) 6 times. [18]
4: 18SC. [18]
5: (2SC, inc) 6 times. [24]
6: 24SC. [24]
7: 24SC. [24]
8: (3SC, inc) 6 times. [30]
9: 30SC. [30]
10: 30SC. [30]
11: (4SC, inc) 6 times. [36]
Between row 10 and 11 you will place the eyes, about 3 cm apart.
12: 36SC. [36]
13: 36SC. [36]
14: (4SC, dec) 6 times. [30]
15: (3SC, dec) 6 times. [24]
16: (2SC, dec) 6 times. [18]
17: (1SC, dec) 6 times. [12] Stuff the body here.
18: Dec all around. [6]
fasten off and weave in tail. With some 10cm piece of the same yarn you can create some fluff on top of his head. I use 3 strings. and pulled those through the bottom to the top of his head. Make sure you have aknot in the end so they stay in place. Fluff the top parts of the yarn a bit up.

Wings
Use the color yellow.

1: 6SC in Magic Ring. [6]
2: 2SC in each st around. [12]
3: 12SC. [12]
4: 12SC. [12]
5: (2SC, dec) 3 times. [9]
6: 9SC. [9]
7: 9SC. [9]
Fasten off and leave a long tail for sewing. You don’t have to stuff the wings, just flatten them.

Beak
Use the color orange.

1: Ch7, insert in second chain from hook, 5SC, 3SC in the next st, 4SC, inc. [14]
2: 14SC. [14]
Fasten off and leave a long tail for sewing.

Foot
Use the color orange.

1: 6SC in Magic Ring. [6]
2: 6SC. [6]
3: (1SC, inc) 3 times. [9]
4: 9SC. [9]
5: (2SC, inc) 3 times. [12]
6: 12SC. [12]
Fasten off and leave a long tail for sewing. The gap you are left with at the end of row 6 you sew close with some stitches, make sure to flatten it first.

Assembling

I always use sewing pins to place all parts first, before sewing. This way you can easily move all parts around until you are happy with the outcome.

Sew on the body to his head and place the wings at both sides of the body, sew on. His beak will go in between his eyes, but slighly lower. You don’t have to stuff the beak, but you can do if you want, do that when you are almost done sewing it on. Last sew on his feet.
This part is optional, but you can give him a little headband. Braid 3 scrap pieces in a color of choise together until it’s long enough to tie around his head. Add a little feather, and you are done!

Tip, add some pink pastel dust on his cheeks, for an extra cute look.

I hope you liked this pattern, and show me if you made it! Have a lovely day

Love
Danielle

Posted in: Crafting, Crochet, Easter Tagged: Amigurumi, boho, Crochet, cute, duckling, Free Pattern, haken, kawaii

♥ Free Pattern; Tulpje

28 februari 2019 by Delinlea 5 Comments

Hey Lovelies! How are you doing?! I’m pretty good because I am going to see ATEEZ in Amsterdam! YAY! I’m so glad I managed to get a VIP ticket, april 12 it’s going to happen! Woop Woop. I’m gonna do a project, hopefully, but I’ll gonna tell you more about that later on. Now back to today’s post! I was clueless what to make for today, so I asked my friend if she had an idea and she instantly replied Tulips! I obvisously, don’t like the make just the thing so my brain made something up with that. Meet Tulpje! Isn’t she adorable?!

For this DIY you’ll need:
♥ Yarn in the colors;  Pink and Green. (I used Zeeman Supersoft)
♥ Crochet Hook (I used a 2mm hook).
♥ Stuffing.
♥ Scissors.
♥ Sewing Pins.
♥ Yarn Needle.
♥ Safety eyes, 6mm.
♥ Tiny piece of black yarn for the mouth.

Stitches used (US Terms):
Magic Ring.
Ch = Chain.
SC = Single Crochet.
HDC = Half Double Crochet.
DC = Double Crochet.
TR = Treble Crochet.
ST = Stitch.
Inc = Increase.
Dec = Decrease.
(…) = Repeat the space in brackets the given number of times.
[…] = Total number of stitches.

Pattern

Base of the Flower.
Use the color Pink.

1: 6SC in Magic Ring. [6]
2: Inc in each st around. [12]
3: 12SC. [12]
4: (1SC, inc) 6 times. [18]
5: 18SC. [18]
6: 18SC. [18]
7: (2SC, inc) 6 times. [24]
8: 24SC. [24]
|
13: 24SC. [24]
14: (2SC, dec) 6 times. [18] Make sure to stuff here.
15: (1SC, dec) 6 times. [12]
16: Dec all around. [6]
Fasten off and weave in tail.

Petals  (make 3)
Use the color Pink.

1: 6SC in Magic Ring. [6]
2: (1SC, inc) 3 times. [9]
3: (2SC, inc) 3 times. [12]
4: 12SC. [12]
5: (3SC, inc) 3 times. [15]
6: (4SC, inc) 3 times. [18]
7: (2SC, inc) 6 times. [24]
8: 24SC. [24]
|
14: 24SC. [24]
15: (2SC, dec) 6 times. [18]
16: (1SC, dec) 6 times. [12]
Fasten off and leave a long tail for sewing. You don’t stuff these, just make them flat.
At 2 petals you have to place a safety eye, between row 11 and 12.

Body
Use the color green.

1: 6SC in Magic Ring. [6]
2: Inc in each st around. [12]
3: (1SC, inc) 6 times. [18]
4: (2SC, inc) 6 times. [24]
5: (3SC, inc) 6 times. [30]
6: 30SC. [30]
|
11: 30SC. [30]
12: (3SC, dec) 6 times. [24]
13: 24SC. [24]
14: 24SC. [24]
15: (2SC, dec) 6 times. [18]
16: 18SC. [18]
Fasten off and leave a long tail for sewing. Stuff the body as well.

Legs (Make 2)
Use the color green.

1: 6SC in Magic Ring. [6]
2: Inc in each st around. [12]
3: 12SC. [12]
Fasten off and leave a long tail for sewing.

Arms (Make 2)
Use the color Green.

Ch10, insert in second ch from hook, 1SC, 1HDC, 3DC, 4TR.
Fasten off and leave a long tail for sewing.

Assembling

To assemble anything in crochet I always use sewing pins to position all parts first, this way you can easily move things around until you are happy. The you can sew it on.
Start with the base part of the flower, around it you will put the petals. Sew them tot he base at the bottom, and along the sides where the petals meet each other.
Then sew the body to the flower. And add his legs and arms.
Last, sew on a mouth and you are done!

I hope you enjoyed this pattern! I can imagine a whole bunch together, how cute would that be in all different colors and such, aww *_*. I deffinitely wanna make some more when I have time! I would love to see yours when you made one or a few!

Have a wonderful day!

Love
Danielle

Posted in: Crafting, Crochet Tagged: Amigurumi, Crochet, cute, Free Pattern, kawaii, tulips, Tulpje
« Vorige 1 2 3 4 5 … 16 17 18 19 20 21 22 23 Volgende »

What are you looking for?!

My Socials

Ko-Fi

I love making all these free things for you, tho it would be very helpfull if you can support me on Ko-Fi! (You don’t have to tho, totally up to you!)

Ko-Fi Shop!!

In my Ko-Fi shop you can find PDF Amigurumi Patterns!! You can pay easily with PayPal.
Go to the shop here!!

Recent Blog Posts

  • ♥ Happy 2022!
  • ♥ Day 12; Lights
  • ♥ Day 11; Flower Deco
  • ♥ Day 10; Snowman
  • ♥ Day 9; Gingerbread Houses

Recent Comments

  • Delinlea op ♥ Pietje Gnome Amigurumi
  • Delinlea op ♥ Toy Story Alien TsumTsum Amigurumi
  • Delinlea op ♥ Pua Tsum Tsum Amigurumi
  • Charli op ♥ Free Pattern; CNY Mouse Amigurumi
  • Peter Pesch op ♥ Pietje Gnome Amigurumi

Categories

  • animation
  • Beadwork
  • Blogmas 2018
  • Blogmas 2020
  • Blogmas 2021
  • Books
  • Bujo
  • Christmas
  • Christmas CAL 2019
  • Christmas Countdown 2017
  • Contest
  • Crafting
  • Crochet
  • Drawing
  • Drawing Lesson
  • Easter
  • Geen categorie
  • Life
  • Miniature
  • Nail Art
  • New Year
  • Paper
  • plush
  • Pokemon
  • Poseable Art Doll
  • Recipe
  • Sewing
  • Shop Pattern
  • Sinterklaas
  • Social Media
  • Tsum Tsum
  • Ufufy

Copyright © 2025 Delinlea - My little fantasy world.

Family WordPress Theme by themehall.com