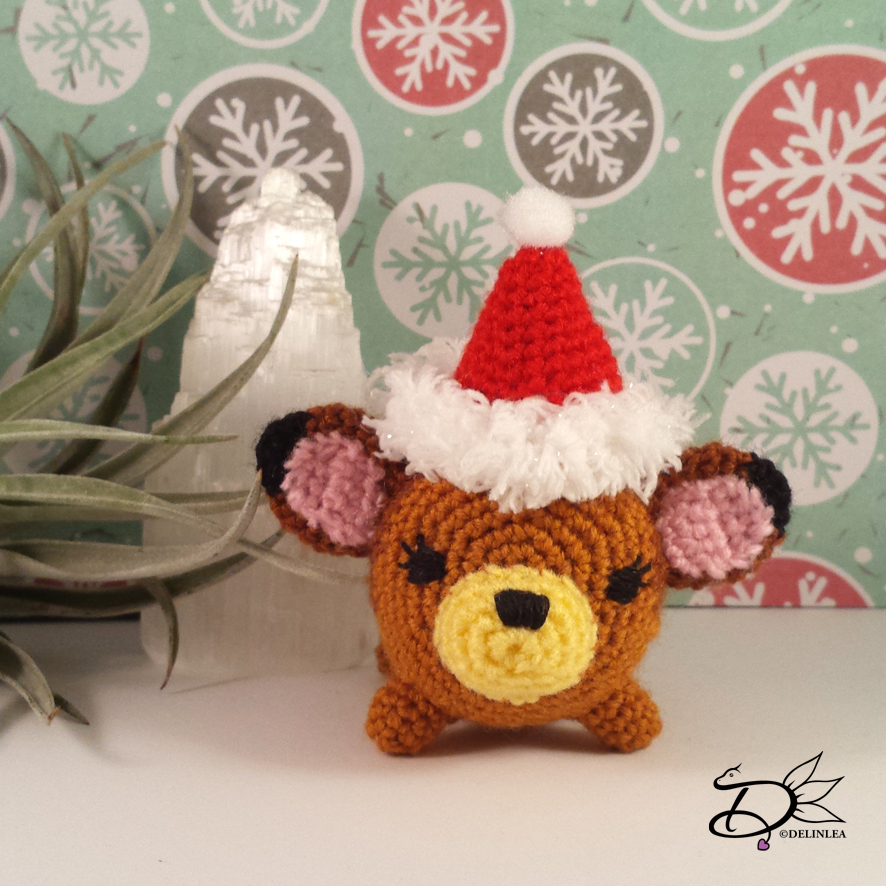
♥ Day 25: Bambi Tsum Tsum Amigurumi
Hey Lovelies!
It’s Christmas!! Merry Christmas to you all!! And that also means this is the last day of the Disney Christmas Countdown! And right now I have used the word Christmas too much haha. For the last one for this years countdown we are gonna make a Bambi Tsum Tsum. I have to admit, he stole Piglet’s hat xD Okay, maybe I was lazy… xD
I hope you have a wonderful Christmas! Let’s go to the pattern now ^-^.

For this DIY you will need:
♥ Yarn: in the colors Light Brown, Dark Brown, Light Yellow, Black, Pink and Red.
♥ Cloud yarn in White (optional)
♥ Small Pompom.
♥ Crochet hook.
♥ Stitch marker.
♥ Fiber fill.
♥ Yarn needle.
♥ Embroidery needle with black thread or black felt.
♥ Scissors.
♥ Glue.
Stitches used:
SC = Single Crochet.
TR = Triple Crochet
ST = Stitch.
Inc = Increase.
Dec = Decrease.
Slst = Slip Stitch.
(…) = Repeat the space in brackets the given number of times.
[…] = Total number of stitches.
♥ Pattern:
Body:
Start with Light Brown
1: 6SC in magic ring. [6]
2: Inc in each st around. [12]
3: (1SC, inc), 6 times. [18]
4: (2SC, inc), 6 times. [24]
5: (3SC, inc), 6 times. [30]
6: (4SC, inc), 6 times. [36]
7: (5SC, inc), 2 times, 4SC, Change to Dark Brown, 1SC, inc, 1SC, Change to Light Brown, 4SC, inc, (5SC, inc), 2 times. [42]
8: 17SC, Change to Dark Brown, 6SC, Change to Light Brown, 19SC. [42]
9: 9SC, Change to Dark Brown, 23SC, Change to Light Brown, 10SC. [42]
10: 8SC, Change to Dark Brown, 25SC, Change to Light Brown, 9SC. [42]
|
13: 8SC, Change to Dark Brown, 25SC, Change to Light Brown, 9SC. [42]
14: 10SC, Change to Dark Brown, 21SC, Change to Light Brown, 11SC. [42]
15: SC in each st around. [42]
|
29: SC in each st around. [42]
30: (5SC, dec), 6 times. [36]
31: (4SC, dec), 6 times. [30]
32: (3SC, dec), 6 times. [24]
33: (2SC, dec), 6 times. [18] Stuff the body here.
34: (1SC, dec), 6 times. [12]
35: Dec around. [6]
Fasten off and weave in tail.
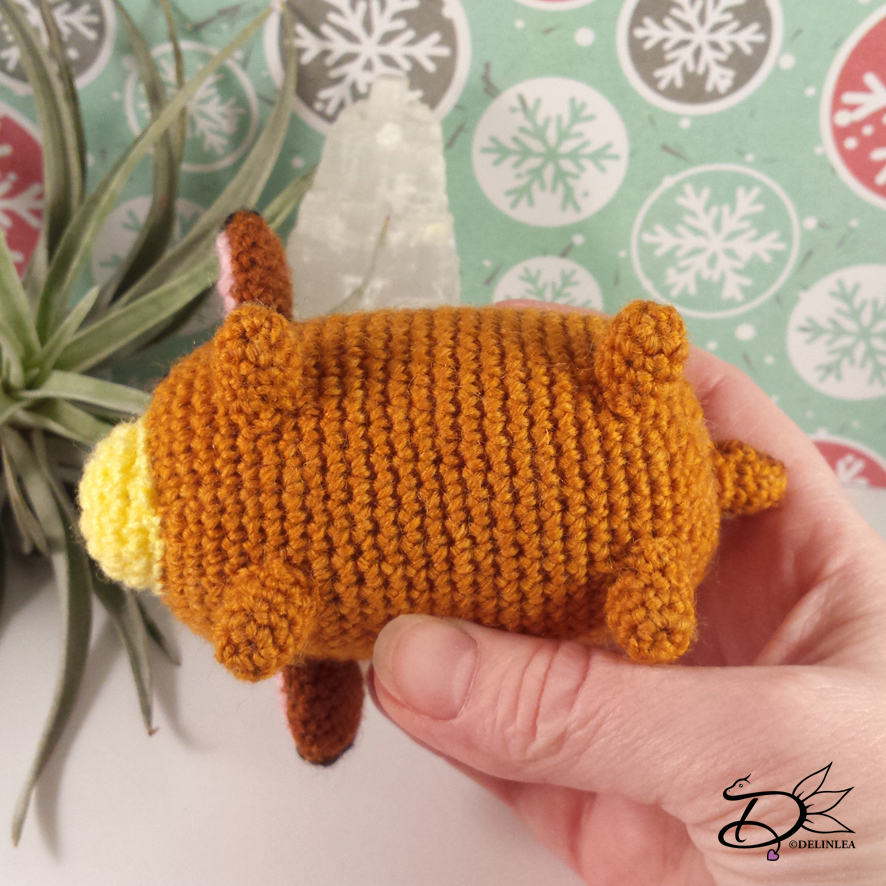
Legs: (4)
In Light Brown
1: 4SC in magic ring. [4]
2: Inc in each st around. [8]
3: SC in each st around. [8]
|
5: SC in each st around. [8]
Fasten off and leave a long tail for sewing. You don’t have to stuff them.
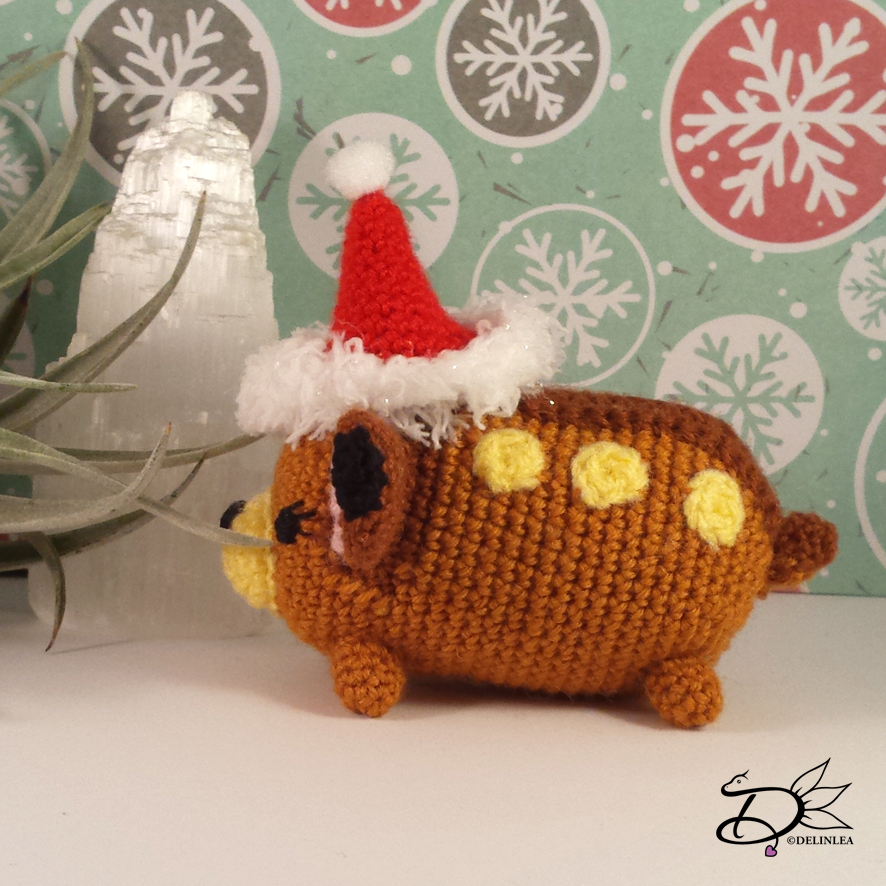
Stripe on his back:
In Dark Brown.
1: Chain 20, insert in 4th chain from hook, 17TR, turn. [17]
2: SC in each st around. (First in 17DC st and then in 20 Chain st). [37]
Fasten off and leave long tail for sewing.
Dots on his back: (6)
Make 6SC in magic ring, with Light Yellow. Fasten off and leave long tail for sewing.
Nose:
In Light Yellow.
1: 6SC in magic ring. [6]
2: Inc in each st around. [12]
3: (1SC, inc), 6 times. [18]
4: SC in each st around. [18]
Fasten off and leave long tail for sewing. Stuff the nose lightly.
Ears: (2)
Start with Black.
1: 6SC in magic ring. [6]
2: (1SC, inc), 3 times. [9]
Change to Dark Brown.
3: (2SC, inc), 3 times. [12]
4: (1SC, inc), 6 times. [18]
5: SC in each st around. [18]
|
8: SC in each st around. [18]
9: (1SC, dec), 6 times. [12]
Fasten off and leave long tail for sewing. Don’t stuff the ears, just flatten them.
Inside Ears: (2)
In Pink.
1: Chain 4, insert in 2nd chain from hook, 3SC, turn. [3]
2: Chain 1, 1SC, inc, 1SC, turn. [4]
3: Chain 1, 4SC. [4]
Fasten off and sew to the ear.
Tail:
Start with Dark Brown
1: 2SC, Change to Light Brown, 2SC in magic ring. [4]
2: Change to Dark Brown, 1SC, inc, Change to light Brown, 1SC, inc. [6]
3: Change to Dark Brown, 1SC, inc, 2SC, Change to Light Brown, 1SC in the same st as the last SC, 1SC, inc. [9]
4: Change to Dark Brown, 5SC, Change to Light Brown, 4SC. [9] Stuff lightly.
5: Change to Dark Brown, (1SC, dec) 2 times, Change to Light Brown, 1SC, dec. [6]
Fasten off and leave long tail for sewing.
Santa Hat:
Start with red.
1: 6SC in magic ring. [6]
2: (2SC, inc), 2 times. [8]
3: (3SC, inc), 2 times. [10]
4: (4SC, inc), 2 times. [12]
5: (5SC, inc), 2 times. [14]
6: (6SC, inc), 2 times. [16]
7: (7SC, inc), 2 times. [18]
8: (8SC, inc), 2 times. [20]
9: (9SC, inc), 2 times. [22]
10: (10SC, inc), 2 times. [24]
11: (11SC, inc), 2 times. [26]
Change to white cloud yarn.
12: SC in each st around. [26]
Fasten off and weave in tail. Glue the pompom on the tip of the hat.
♥ Assembling:
To make sure you sew all parts in the right place, you can use some sewing pins to position them. When you are happy with the position, you can sew them on.
Sew the legs on to the bottom of the body, the front legs are pointing to the front. The back legs are pointing to the side.
From the Dark Brown part of his head, add the stripe over his back up till his but. Sew it on, when done, sew the tail to the end of the stripe.
Along the stripe place 3 dots on each side and sew them on.
For his nose, place it just under the middle of the face. and sew it on.
Position the ears on both sides of the ears, keep the in the Dark Brown part of his head and sew them on.
Put his Santa hat on.
For the eyes you can either choose to use felt or you can embroider them on. I chose to embroider them on, cause yeah why choose the easy way haha. But which way you choose, Bambi will look cute.
And that’s a wrap! ^-^ I love how Bambi turned out, and now I wanna watch the movies haha, let’s relax a bit with Christmas ^^ Have a wonderful day everyone! And if you have the time to make one of my DIYs, share them with #DelinleaDIY on Twitter or Instagram!
Love
Danielle