Delinlea - My little fantasy world
  • ♥ Home
  • ♥ About Me
  • ♥ Blogmas 2021
  • ♥ Free Patterns
    • ♥ Amigurumi; Spring/Easter
    • ♥ Amigurumi; Fall/Halloween
    • ♥ Amigurumi; Winter
    • ♥ Amigurumi Tsum Tsum
    • ♥ Amigurumi Ufufy
    • ♥ Amigurumi Others
    • ♥ Christmas Countdown 2017
    • ♥ Blogmas 2018
    • ♥ Blogmas 2020
  • ♥ Tutorials
    • ♥ Easter
    • ♥ Home Deco
    • ♥ Others
  • ♥ Drawing Lessons
  • ♥ FanFic
    • ♥ Chapter 1
    • ♥ Chapter 2
    • ♥ Chapter 3
    • ♥ Chapter 4
    • ♥ Chapter 5
    • ♥ Chapter 6
    • ♥ Chapter 7
  • ♥ Gallery
    • ♥ Crafts
    • ♥ Drawings
    • ♥ Poseable Art Dolls
  • ♥ Links
  • ♥ Contact
    • Privacy Policy

Disney

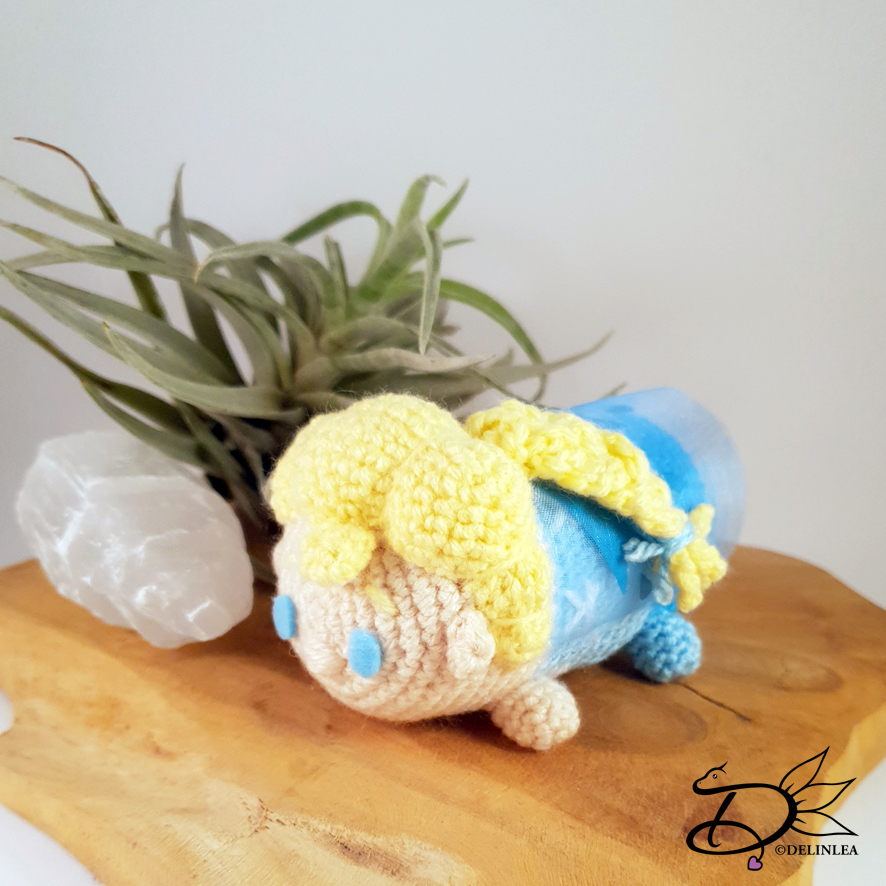
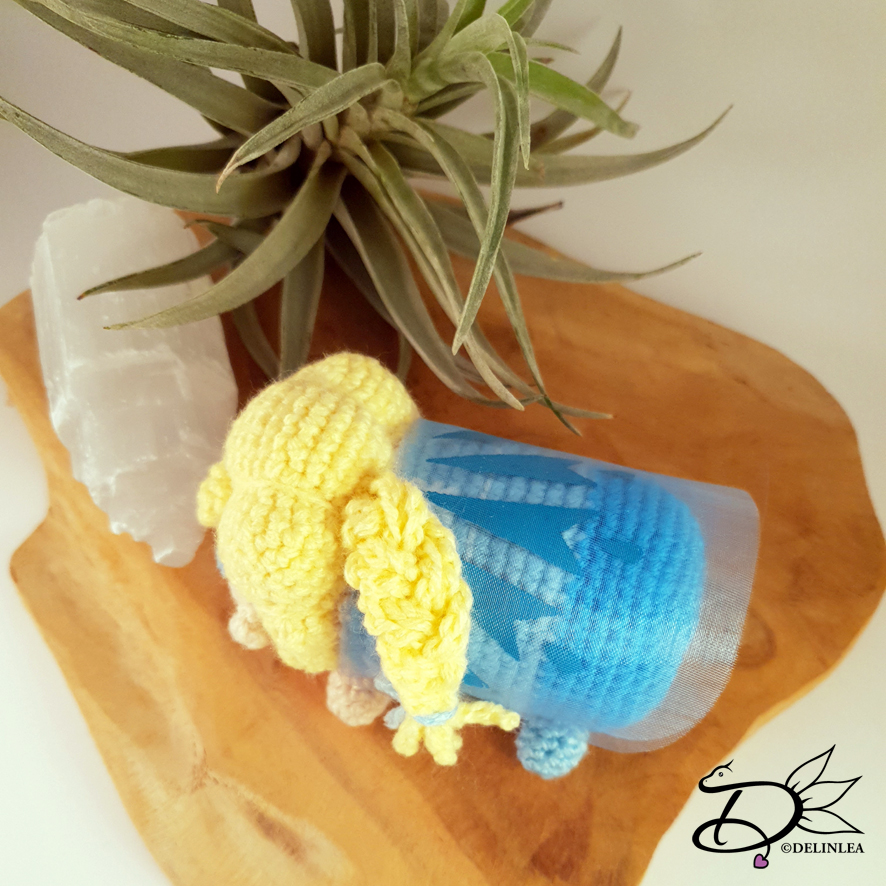
♥ Free Pattern; Elsa TsumTsum Amigurumi

31 januari 2020 by Delinlea Leave a Comment

Hey Lovelies! I am so sorry I am posting this blog late this week! Some personal things were going on and I still haven’t managed to work ahead this year! I will try to do so, from now on, so I don’t stress myself out too much. Anyway, I am planning to make at least one Tsum a month. I’m quite excited about that, I hope you are too! For this week I planned to make a Elsa, from Frozen, as a TsumTsum! I had to figure out how to make her hair, but I guess I figured it out, I hope you will like her!? Let’s dive into this week’s pattern.

For this Pattern you’ll need:
♥ DK Yarn in the colors; Beige, Light Blue, Darker Blue, Light Yellow. (I used BudgetYarn.com and Stylecraft Special)
♥ Some extra White yarn for the details on her body.
♥ Crochet Hook (I used a 2,5mm hook).
♥ Stuffing.
♥ Scissors.
♥ Sewing Pins.
♥ Yarn Needle.
♥ Light blue felt.
♥ Glue.
For the Cape:
♥ White or Light Blue Mesh, 10 by 7cm.
♥ Dark Blue Acrylic Paint. (Optional)
♥ Brush. (Optional)
♥ Tape. (Optional)
♥ Piece of Glass. (Optional)

Stitches used (US Terms):
Magic Ring.
CH = Chain.
SLST = Slip Stitch.
SC = Single Crochet.
ST = Stitch.
Inc = Increase.
Dec = Decrease.
(…) = Repeat the space in brackets the given number of times.
[…] = Total number of stitches.

Pattern

For this pattern you will work in continues rounds, unless stated otherwise.

Body
Start with the Beige color.

1: 6SC in Magic Ring. [6]
2: 2SC in each st around. [12]
3: (1SC, inc) 6 times. [18]
4: (2SC, inc) 6 times. [24]
5: (3SC, inc) 6 times. [30]
6: (4SC, inc) 6 times. [36]
7: (5SC, inc) 6 times. [42]
8: 42SC. [42]
|
14: 42SC. [42]
Change to the Light Blue color.
15: 42SC. [42]
|
24: 42SC. [42]
Change to the Dark Blue color.
25: 42SC. [42]
|
29: 42SC. [42]
30: (5SC, dec) 6 times. [36]
31: (4SC, dec) 6 times. [30]
32: (3SC, dec) 6 times. [24]
33: (2SC, dec) 6 times. [18] Stuff.
34: (1SC, dec) 6 times. [12]
35: dec all around. [6]
Fasten off and weave in tail.
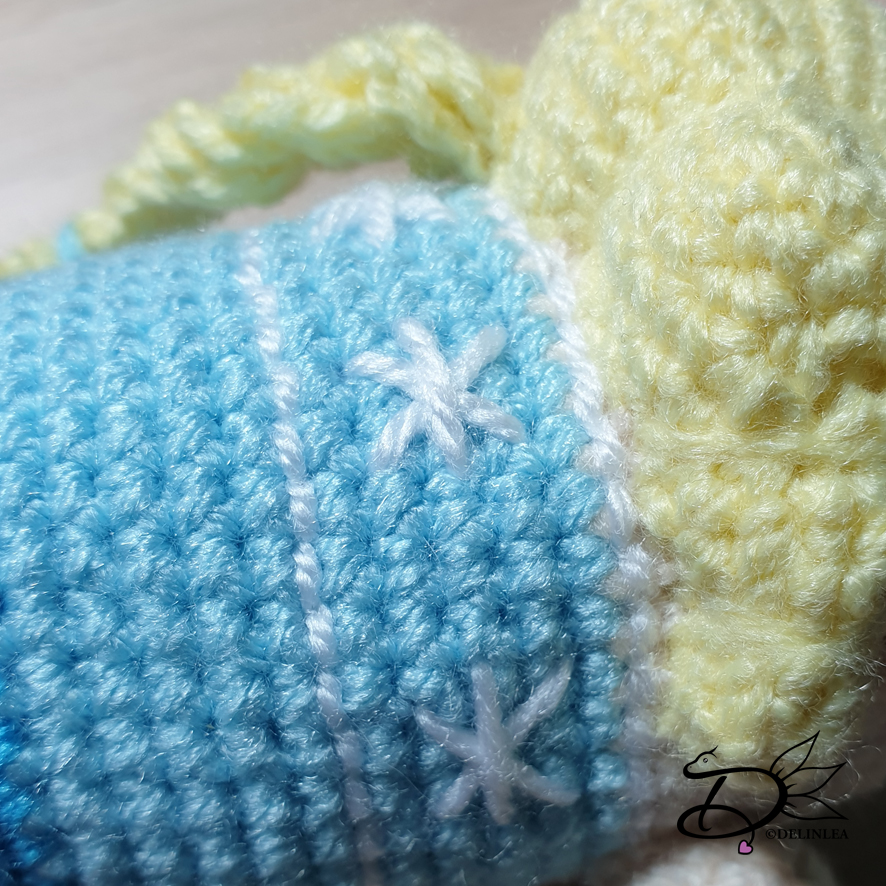
With white yarn, stitch on a stripe between row 14-15 and between row 19-20. In between those two stripes, make a snowflake pattern.

Legs (Make 4)
2 in Beige Yarn and 2 in Light Blue yarn.

1: 4SC in Magic Ring. [4]
2: 2SC in each st around. [8]
3: 8SC. [8]
|
5: 8SC. [8]
Fasten off and leave a long tail for sewing.

Ears (Make2)
Use the Beige color.

6SC in Magic Ring.
Fasten off and leave a long tail for sewing.

Hair
Use the Light Yellow color.

1: Ch11, insert in second Ch from hook, 9SC, 3SC in the next st, work along the other side of the Chain, 8SC, inc. [22]
2: Inc, 8SC, (inc) 3 times, 8SC, (inc) 2 times. [28]
3: 2SC, inc, (6SC, inc) 3 times, 4SC. [32]
4: (16SC, Ch5, insert in second Ch from hook, 4SC, continue working on the base shape) 2 times. [50]
5: 20SC, inc, 24SC, inc, 4SC. [52]
6: 52SC. [52]
Fasten off and leave a long tail for sewing.

Lock of hair
Use the Light Yellow color.

1: 4SC in Magic Ring. [4]
2: (1SC, inc) 2 times. [6]
3: 6SC. [6]
Fasten off and leave a long tail for sewing.

Strands of hair for the braid. (Make 6)
Use the Light Yellow color.

Chain 20.
Fasten off and leave along tail for sewing.
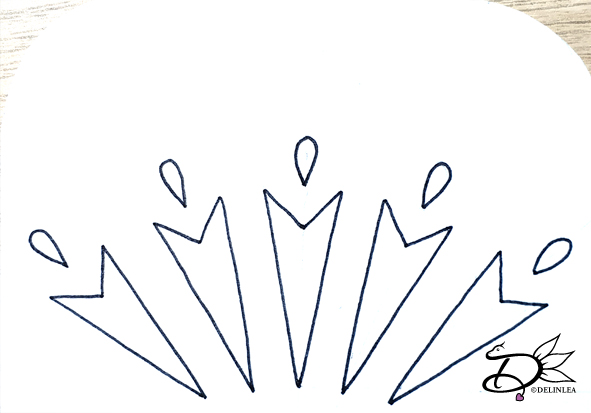
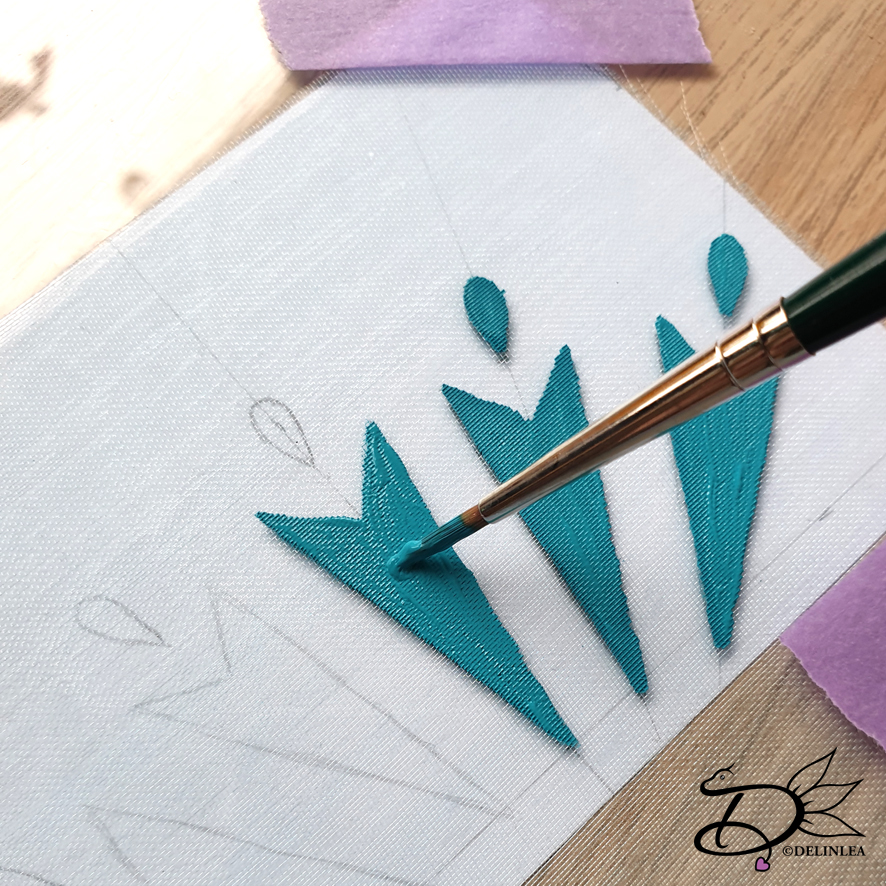
Cape from Elsa

The cape will be made from the mesh, you can leave it as it is of paint on detail with some acrylic paint. Tape the mesh to a very smooth surface, like glass (from a frame for example). Put the pattern I drew under the glass and trace this with the acrylic paint on the mesh. do about 2 layers of paint and let is dry very well. The you will carefully take it off the glass.

Assembling

I always use sewing pins to position all the parts, this way I can still move all the parts around until I am happy. Then I will sew it on.

First sew on the legs, the beige ones go on the beige part of the body, the light blue ones go on the dark blue part of the body.
Then sew on the hair. Start on the back side, so you can sew this along the edge of the light blue part of the body, this way you know where the front part of the hair goes. Stuff the hair while you sew along.  You will make sections of the hair. You do this with a long piece of matching yarn and go around the part you want the notch, pull tight until you are happy with the look. Make about 7 sections.
Now sew on the lock of hair in front and on the back sew on the strands of hair for the braid, about 3 side by side and the other 3 on top of those. Braid those together and tie them with a piece of light blue yarn.
Last make eyes out of felt and glue those on. Also attach the cape on her back, you can use glue of stitch it on. Finalize some details on her face.

And you are done! Isn’t Elsa adorable?! The only thing I would change are the eyes, I really wanna embroider them on. But that’s for later! I hope you enjoyed this pattern.

Have a wonderful day!

Love
Danielle

Posted in: Crafting, Crochet, Tsum Tsum Tagged: Amigurumi, Crochet, cute, Disney, Elsa, Free Pattern, haken, kawaii, Tsum Tsum

♥ Clay Chip and Dale Pumpkin TsumTsum

17 oktober 2019 by Delinlea Leave a Comment

Hey Lovelies! A friend brought those adorable Halloween Tsum Tsum of 2019 to my attention. And I immediately thought I have to make those somehow, but I already knew then, I can’t make them all. *sadly enough*. Chip and Dale got my attention mainly, where they are little pumpkins, so cute! I was dubbing if I would make Amigurumi’s or make them another way. Then I saw the Air Dry Clay I recently bought, and thought, that’s it, I’ll be making them out of clay! I struggled to get nice pictures tho, *sigh, how to you photograph this?! Oh well, I hope you will get what I mean. Let’s do this~.

Chip And Dale Pumpkin Tsum Tsum halloween 2019

For this DIY you’ll need;
♥ Air Dry Clay or Polymer Clay. (It’s up to you for what you prefer).
♥ X-acto Knive.
♥ Clay Tools. (If you prefer).
♥ Water. (In case you use Air Dry Clay like me).
♥ Acrylic Paint. (To either paint the whole thing, if you don’t use colored clay or to paint details).
♥ Brush.

For this tutorial you can choose to use colored clay or just one base color like white. I used a combination of colored clay and painting on details. But you can also paint the whole thing at the end.

Tutorial

Take a bit of (Orange) clay for the body, make a ball and roll this out until you get a ‘pill’ shape. Flatten it a bit, so it doesn’t roll around all the time, and to create the belly.

At about 1/3 of the pill, make an indence, this is where the head seperates from the body. You won’t cut it of tho, just to define it.

On top of the body you will create a line as well, all the way to it’s butt. You will create two more lines on each half, nicely seperated. See the pictures to let this make more sense xD.

Now make 4 small, even, tiny balls for the feet. Place these around his belly (the flattened part) and place it back on a flat surface so the feet get a bit squized.

Take a tiny bit of (Yellow) clay for his snout.  Roll it in to a ball, and push it a bit flat on whatever surface you are working on, while doing so, also make it a bit more oval.

Place this on his face with some water and if you want you can smooth out the edges nicely.

Take another bit of (Green) clay and make it flat. With an X-acto knive, cute out a tiny leave for the tail. You can smooth out the edges a bit after you cutted it. When you are happy, place it where the tail should be.

Create a little pumpkin stem now, I used a bit darker green for this, this goes on top of his head.

For the ears, create a tiny snake out of green clay, flatten it so you have a long oval. Cut this in half, you have 2 ears now. Place these besides the stem.

Painting

To finish of Chip and Dale, paint on the details, the little veins on the tail and ears, and ofcourse his face. The difference between Chip and Dale are the eyes, and the nose, Dale’s nose is red.

To finish it of completely you can choose to varnish it, to seal in the paint and protect it from future damage.

I hope you liked this tutorial, I hope I did well. It’s always much more complicated to explane clay tutorials. I tried my hardest.

Have a wonderful day~

Love
Danielle

Posted in: Crafting, Tsum Tsum Tagged: 2019, chip, cute, dale, Disney, Halloween, kawaii, pumpkin, Tsum Tsum

♥ Free Pattern; 7 Dwarfs Ufufy

5 september 2019 by Delinlea 1 Comment

Hey Lovelies! Remember I made Dopey of the 7 Dwarfs of Snow White earlier this year?! Well I made his friends finally, couldn’t leave him alone! And it feels also perfect with fall kicking in. I don’t know I always think of dwarfs/gnome with fall xD. So, here’s today’s pattern. The remaining 6 dwarfs, Grumpy, Sneezy, Bashful, Sleepy, Doc and Happy.

For this DIY you’ll need:
♥ Yarn in the colors;  Beige, Brown, Yellow, Dark Pink, Light Orange, Light Yellow, Light Green, Blue, Light Blue, Light Brown. (I used Budgetyarn.com and Stylecraft Special DK)
♥ Fluffy Yarn in White.
♥ Crochet Hook (I used a 2,5mm hook for the ‘normal’yarn and a 3mm hook for the fluffy yarn).
♥ Stuffing.
♥ Scissors.
♥ Sewing Pins.
♥ Yarn Needle.
♥ Felt in Black.
♥ (Fabric) Glue.

Stitches used (US Terms):
Magic Ring.
BL = Back Loops.
FL = Front Loops.
CH = Chain.
SLST = Slip Stitch.
SC = Single Crochet.
ST = Stitch.
Inc = Increase.
Dec = Decrease.
(…) = Repeat the space in brackets the given number of times.
[…] = Total number of stitches.

Color Scheme for each Dwarf

  • Name                   Shirt                      Pants                    Hat
  • Grumpy               Dark Pink            Light Brown       Light Brown
  • Bashful                Light Brown       Light Brown       Light Blue
  • Doc                      Light Orange      Light Brown       Light Green
  • Happy                 Light Brown       Blue                      Light Yellow
  • Sleepy                  Light Green        Light Green        Light Blue           
  • Sneezy                 Light Brown       Light Brown       Light Yellow

For all dwarfs you alse use the colors Beige, Brown and Yellow.

Pattern

The pattern will be the same as Dopey, which you can find here. With some alternations. Look carefully which color you need for which dwarf. The faces will give each dwarf the personality, so look carefully at that.

Body

If you have a different color for the pants make sure to change color at row 16!

At the body, row 12, you worked in BL make sure to keep the first stitch marked. When you finished the body, work in the front loops of row 12, to make a part of the rim of the shirt but also his beard.

Beard, work with your fulffy yarn:
Skip 5 st, 7SC, 2HDC, 2DC, 2HDC, 7SC and leave the remaining 5st as they are. Fasten off and weave in tail.
The stitches you skipped you will SlSt with the matching color of the shirt. Fasten off and weave in tail.

Arms/Feet/Belt/Hat

These are all the same as Dopey, no alternations, just check you are using the right color for the right dwarf.

For those dwarfs, you don’t have to make the ears, they will dissapear under the hat anyway. You can tho, if you still want xD.

  • Sneezy
  • Sleepy
  • Happy
  • Doc
  • Basful

Assemble your dwarfs as described on Dopey’s Pattern. And once again, make sure to check what each face looks like, this will give the difference for each.  For Doc I made him some little glasses out of wire, so adorable!

I hope you enjoyed those instuctions. The 7 dwarfs are finally complete! Now I miss Snow White, I’ll make her one day!

Love
Danielle

Posted in: Crafting, Crochet, plush, Ufufy Tagged: 7 dwarfs, Amigurumi, Crochet, Disney, haken, snow white, Ufufy

♥ Free Pattern; Maleficent Tsum Tsum Amigurumi

8 augustus 2019 by Delinlea Leave a Comment

Hey Lovelies! How are you all doing?! I hope better as that I am. As you might have noticed, I haven’t uploaded a blog post for the last  two weeks. I wanna apologize for that. Due to some health problems it’s hard for me to create things. I hope those problems will be solved very soon and can go back to my regular uploading schedule. I’ll try to start with next weeks entry right away after posting this one.
Enough babbling, today it’s time for a new free Tsum Tsum Pattern. I wanted to make Maleficent for quit some time now, and I finally did! It was quit challenging tho. I had to redo some parts regularly, which is not usual for me. Hopefully you’ll like the pattern, let’s get to it.

Maleficent Tsum Tsum

For this DIY you will need:
♥  Yarn: in the colors Black, Mint Green and Purple. (I used budgetyarn.com)
♥  Crochet hook. (I used a 2,5mm hook)
♥  Stitch marker.
♥  Stuffing
♥  Yarn needle.
♥  Sewing Pins.
♥  Felt in Black and Purple.
♥  Scissors.
♥  (Fabric) Glue.

Stitches used (US Terms):
Magic Ring.
CH = Chain.
SC = Single Crochet.
ST = Stitch.
FSC = Foundation Single Crochet. (Optional)
BL = Back Loops.
FL = Front Loops.
Picot = Chain 3, and SlSt in the 3rd loop of the first CH.
Inc = Increase.
Dec = Decrease.
Slst = Slip Stitch.
(…) = Repeat the space in brackets the given number of times.
[…] = Total number of stitches.

Maleficent Tsum Tsum

Pattern

This pattern will be worked in continues rounds, unless stated otherwise.

Body
start with the color Mint Green.
Before you start, keep about 1meter of black yarn apart.

1: 6SC in Magic Ring. [6]
2: : 2SC in each st around. [12]
3: (1SC, inc) 6 times. [18]
4: (2SC, inc) 6 times. [24]
5: (3SC, inc) 2 times, 3SC, (1SC Mint Green and 1SC Black in the same st) Change to Mint Green, (3SC, inc)3 times. [30]
6: (4SC, inc) 2 times, 3SC, change to Black, 1SC, inc, 1SC, Change to Mint Green, 3SC, inc, (4SC, inc) 2 times. [36]
7: (5SC, inc) 2times, 3SC, Change to Black, 2SC, inc, 1SC, Change to Mint Green, 4SC, Inc, (5SC, inc) 2 times. [42]
8: 13SC, Change to Black, 13SC, Change to Mint Green, 16SC. [42]
9: 10SC, Change to Black, 19SC, Change to Mint Green, 13SC. [42]
10: 8SC, Change to Black, 23SC, Change to Mint Green, 11SC. [42]
11: Change to Black, 42SC. [42]
|
14: 42SC.
The edge of the face looks a bit rough this way, you can neaten it up by using Surface Crochet. This means, SlSt around the edge of the face with the meter of black yarn you kept apart.
15: 42SC. [42]
|
26: 42SC. [42]
Change to Purple
27: Work in back loops only, 42SC. [42]
28: 42SC. [42]
29: 42SC. [42]
30: (5SC, dec), 6 times. [36]
31: (4SC, dec), 6 times. [30]
32: (3SC, dec), 6 times. [24]
33: (2SC, dec), 6 times. [18] Stuff the body here.
34: (1SC, dec), 6 times. [12]
35: Dec around. [6]
Fasten off and weave in tail.

Skirt
Use the color Black.

At row 27 of the body you worked in the back loops only. Rejoin your yarn now in the front loops.
1: 42SC. [42]
2: 42SC. [42]
3: (1SC, 1HDC, 1DC + Picot + 1DC in the next st, 1HDC) 10 times, 1SC, SLST. [62]
Fasten off and weave in tail.

Maleficent Tsum Tsum

Ears (Make 2)
Use the color Mint Green.

Crochet 6SC in a Magic Ring, fasten off and leave a long tail for sewing.

Legs (Make 4)
Make 2 in the color Mint Green and 2 in the color Black.

1: 4SC in Magic Ring. [4]
2: 2SC in each st around. [8]
3: 8SC. [8]
|
4: 8SC. [8]
Fasten off and leave a long tail for sewing. 
You don’t have to stuff the legs, but you can if you want.

Horns (Make 2)
Use the color Black.

1: 4SC in Magic Ring. [4]
2: 4SC. [4]
3: (1SC, inc) 2 times. [6]
4: 6SC. [6]
5: (2SC, inc) 2 times. [8]
6: 8SC. [8]
7: 3SC, (inc) 2 times, 3SC. [10]
8: 4SC, (inc) 2 times, 4SC. [12]
9: 12SC. [12]
10: 12SC. [12]
Fasten off and leave a long tail for sewing.
Stuff the horns nicely.

Maleficent Tsum Tsum

Spikes (Make 4)
Use the color Black.

1: 4SC in Magic Ring. [4]
2: 4SC. [4]
3: (1SC, inc) 2 times. [6]
4: 6SC. [6]
Fasten off and leave a long tail for sewing.

Collar (Make 2)
Make 1 in Black and 1 in Purple.
You won’t work this one in continues rounds but turn your work after every row.

1: 27FSC, turn. [27] (Or chain 28, insert in the second ch from hook and make 27SC.)
2: Inc, 25SC, inc, turn. [29]
3: Inc, 27SC, inc. [31]
Fasten off and leave a long tail for sewing.
Sew Both parts together so you have 1 colar in the end.

Maleficent Tsum Tsum

Assembling

By using sewing pins to position all of the parts, before sewing on, you can move around all parts until you are happy with the result. I recomment you doing that as well.

Start with sewing on the legs/arms first. The Black ones are the legs, those go on the purple part of the body, behind the skirt. The Mint Green ones are the arms and face slightly forward.
Sew the ears to both sides of the face.
The horns go on next, if you have sewn those on, atach some purple yarn to the tip and swirl it down and fasten off. Now you can slightly shape them as well, by folding a bit (I hope you get what I mean).
Now the horns are in place, you sew on the spikes, 2 under each horn.
Last you sew on the collar. Mine is placed around the 16th row of the body.
With some left over Mint Green yarn, I made her nose, slightly lower as the start of the body. From felt, cut our the eyes and eyebrows, and glue those on!

Tip; if you still have some mint green parts showing in the black part around the face, use a waterproof black marker and simply color them. If you are planning to give this to a kid who possibly sticks it in the mouth, you might not wanna do this.

Maleficent is done! She has a lot of individual parts, but we made it to the end! I hope you like how she turned out, will you show me if you made her? I would love to see what you made with my pattern!

Love
Danielle

Posted in: Crafting, Crochet, Tsum Tsum Tagged: Amigurumi, Crochet, cute, Disney, haken, kawaii, maleficent, Tsum Tsum

♥ Free Pattern; Dopey Ufufy Amigurumi

4 juli 2019 by Delinlea Leave a Comment

Hey Lovelies! I first wanna apologize that I didn’t upload a blog last week. Personal things, it just all got to much for me and with the heat kicking in…Yeah. I hate hot weather, I’ll be waiting for winter already haha. What is your favorite season?
Anyway, I hope you are doing fine!? Are you ready for a new Amigurumi pattern?! Do you have your hook and yarn ready?! Because today we are gonna make a Dopey Ufufy! Who doesn’t love the 7 dwarfs of Snow White. Let’s do this.

Dopey Ufufy

For this DIY you’ll need:
♥ Yarn in the colors;  Beige, Light Green, Brown, Light Purple and a tiny bit of Yellow. (I used Budgetyarn.com)
♥ Crochet Hook (I used a 2,5mm hook).
♥ Stuffing.
♥ Scissors.
♥ Sewing Pins.
♥ Yarn Needle.
♥ Felt in Black.
♥ (Fabric) Glue.

Stitches used (US Terms):
Magic Ring.
BL = Back Loops.
FL = Front Loops.
CH = Chain.
SLST = Slip Stitch.
SC = Single Crochet.
ST = Stitch.
Inc = Increase.
Dec = Decrease.
(…) = Repeat the space in brackets the given number of times.
[…] = Total number of stitches.

Pattern

Work in continues rounds, use a stitch marker to mark your first stitch of every row. This is for every part, unless stated otherwise.

Body
Start with the color Beige.

1: 6SC in magic ring. [6]
2: 2SC in each ST around. [12]
3: (1SC, inc) 6 times. [18]
4: (2SC, inc) 6 times. [24]
5: 24SC. [24]
6: 24SC. [24]
7: (3SC, inc) 6 times. [30]
8: 30SC. [30]
|
10: 30SC. [30]
Change to the color Light Green.
11: 30SC. [30]
12: Work in BL, 30SC. [30]
13: 30SC. [30]
|
17: 30SC. [30]
18: (3SC, dec) 6 times. [24]
19: (2SC, dec) 6 times. [18] Stuff the body here.
20: (1SC, dec) 6 times. [12]
21: Dec all around. [6]
Fasten off and  weave in tail.

Arms/Legs and Ears (Make 6)
Use the color Beige for 2 Arms & 2 Ears. Use the color Brown for the Legs.

1: 4SC in Magic Ring.
2: (1SC, inc) 2 times. [6]
Fasten off and leave a long tail for sewing.
At row 12 you worked in back loops, work now in the front loops, SLST around the body to make an extra dimension in his clothes. This is optional.

Belt
Use the color Brown.

Make a chain of 32CH. You can adjust the size by crocheting more or less CH. Make round and sew together.

Hat
Use the color Light Purple. (I used a darker shade of this color as should been, since I didn’t had a lighter version. It still does look cute I guess, maybe I’ll change it in the future.

1: 6SC in Magic Ring. [6]
2: 2SC in each St around. [12]
3: 12SC. [12]
|
5: 12SC. [12]
6: (1SC, inc) 6 times. [18]
7: 18SC. [18]
|
9: 18SC. [18]
10: (2SC, inc) 6 times. [24]
11: 24SC. [24]
12: (3SC, inc) 6 times. [30]
13: 30SC. [30]
14: (4SC, inc) 6 times. [36]
15: 36SC. [36]
|
17: 36SC. [36]
Fasten off and leave a long tail for sewing. You can stuff the hat lightly to hold shape a bit. To keep the tip of the hat folded over, I have sewn it to the base of the hat. Just with one stitch to hold it in place.

Dopey Ufufy

Assembling

For amigurumi, I always use sewing pins to position all of my parts. This way you can easily move everything around until you are happy with the result. I recommend you do so as well.

Start with sewing on his legs, this way you know where the arms have to be placed, just under the rim of his green clothes. Above the green rim, you will position his ears, on both sides of his head.
Put on his belt, I recommend to secure it with a few stitches in the back so it won’t slide down. And in front, you will secure the piece of yellow yarn, make a small rectangle with the yarn so it looks like a belt.
Make a nose with some beige yarn, going back and forth on the same spot. And put his hat on, you can sew this on, it really depends on how it sit on itself.
From some black felt, cut out eyes and eyebrows, and glue those on.

I hope you love this new addition to our Ufufy family! It’s getting bigger and bigger. Which ones have you made so far?! So me on twitter or instagram!

Love
Danielle

Posted in: Crafting, Crochet, Ufufy Tagged: 7 dwarfs, Amigurumi, Crochet, cute, Disney, dopey, haken, kawaii, snow white, Ufufy
« Vorige 1 2 3 4 5 6 7 8 9 10 11 12 13 14 15 Volgende »

What are you looking for?!

My Socials

Ko-Fi

I love making all these free things for you, tho it would be very helpfull if you can support me on Ko-Fi! (You don’t have to tho, totally up to you!)

Ko-Fi Shop!!

In my Ko-Fi shop you can find PDF Amigurumi Patterns!! You can pay easily with PayPal.
Go to the shop here!!

Recent Blog Posts

  • ♥ Happy 2022!
  • ♥ Day 12; Lights
  • ♥ Day 11; Flower Deco
  • ♥ Day 10; Snowman
  • ♥ Day 9; Gingerbread Houses

Recent Comments

  • Erzsebet M. Marosvari op ♥ My Entry For a Faber Castell Contest
  • Delinlea op ♥ Pietje Gnome Amigurumi
  • Delinlea op ♥ Toy Story Alien TsumTsum Amigurumi
  • Delinlea op ♥ Pua Tsum Tsum Amigurumi
  • Charli op ♥ Free Pattern; CNY Mouse Amigurumi

Categories

  • animation
  • Beadwork
  • Blogmas 2018
  • Blogmas 2020
  • Blogmas 2021
  • Books
  • Bujo
  • Christmas
  • Christmas CAL 2019
  • Christmas Countdown 2017
  • Contest
  • Crafting
  • Crochet
  • Drawing
  • Drawing Lesson
  • Easter
  • Geen categorie
  • Life
  • Miniature
  • Nail Art
  • New Year
  • Paper
  • plush
  • Pokemon
  • Poseable Art Doll
  • Recipe
  • Sewing
  • Shop Pattern
  • Sinterklaas
  • Social Media
  • Tsum Tsum
  • Ufufy

Copyright © 2025 Delinlea - My little fantasy world.

Family WordPress Theme by themehall.com