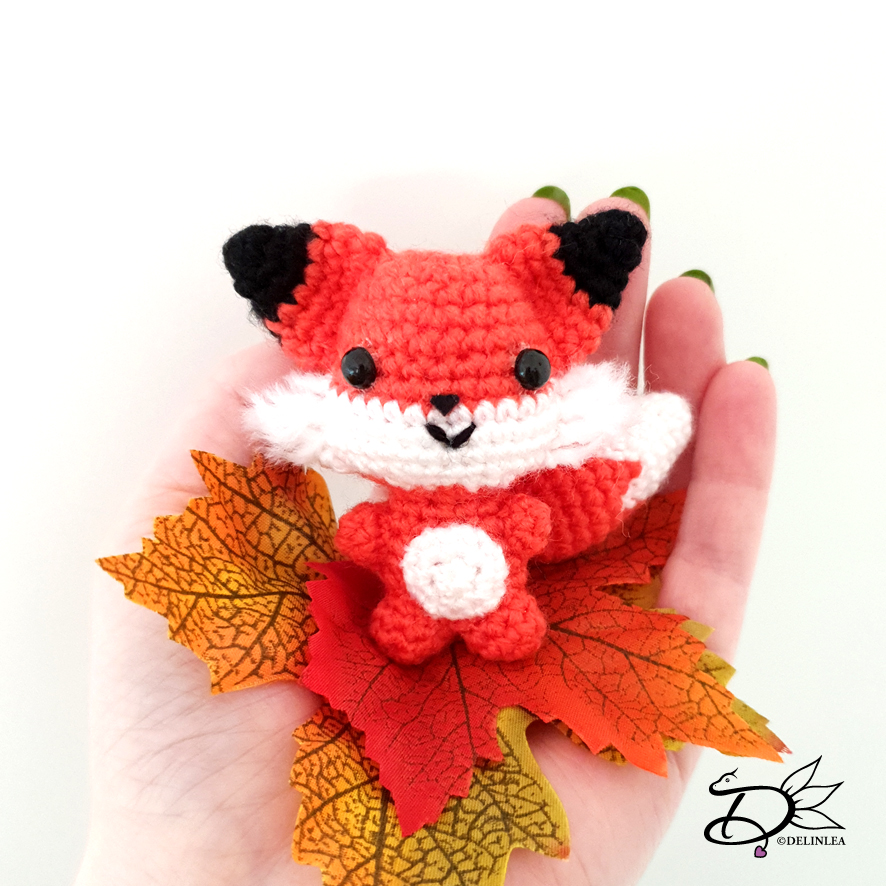
Hey Lovelies! It’s getting cold outside now, I love when it
starts to get freezy. Such healthy weather, you just have to put on enough
clothes when going out. What about you, do you like cold weather? For today I
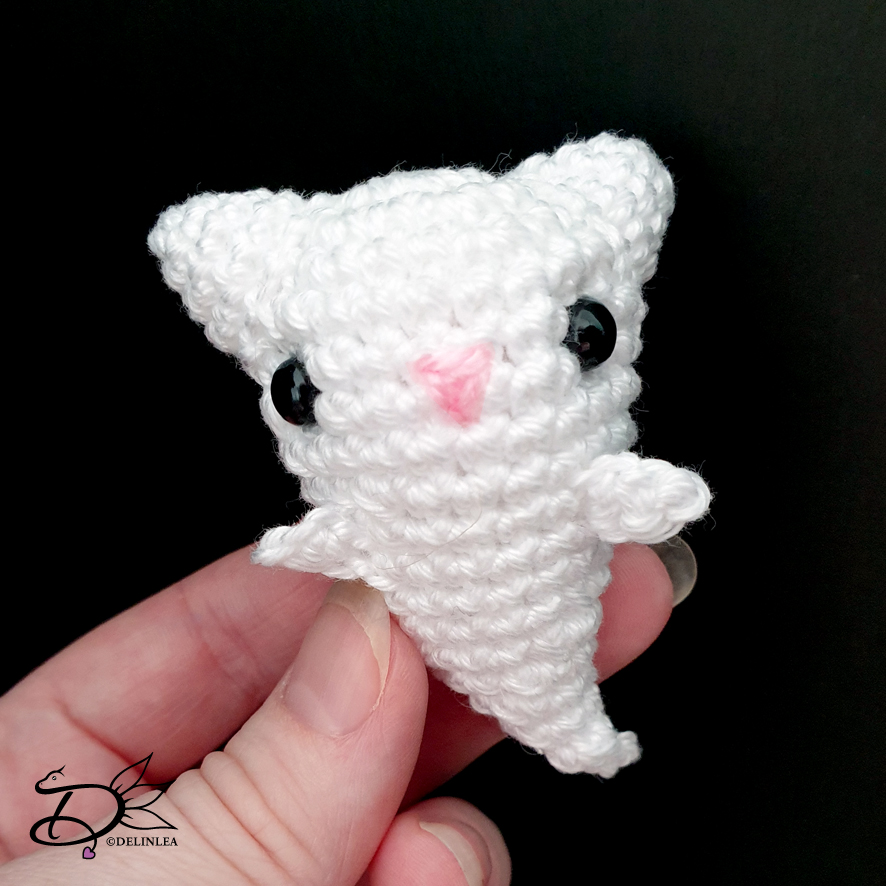
wanted to make a cute Little Foxy with you. I realized you can make those in so
many ways. But I made him this way and I hope you will enjoy!
For this DIY you’ll need:
♥ Yarn in the colors; Orange, White and Black. (I used Zeeman Supersoft)
♥ Crochet Hook (I used a 2mm hook).
♥ Stuffing.
♥ Scissors.
♥ Sewing Pins.
♥ Yarn Needle.
♥ Safety Eyes, 4mm.
♥ Tiny bit of black felt for his nose/mouth.
♥ (Fabric)Glue.
Stitches used (US Terms):
Magic Ring.
CH = Chain.
SLST = Slip Stitch.
SC = Single Crochet.
ST = Stitch.
Inc = Increase.
Dec = Decrease.
(…) = Repeat the space in brackets the given number of times.
[…] = Total number of stitches.
Pattern
Work in continues rounds, use a stitch marker to mark your
first stitch of every row. This is for every part, unless stated otherwise.
Head and Body
Start with the color Orange.
1: 6SC in Magic Ring. [6]
2: 2SC in each st around. [12]
3: (1SC, inc) 6 times. [18]
4: 18SC. [18]
5: (2SC, inc) 6 times. [24]
6: 24SC. [24]
7: 24SC. [24]
8: (3SC, inc) 6 times. [30]
9: 8SC, change to white, 15SC, change to orange, 7SC. [30]
|
11: 8SC, change to white, 15SC, change to orange, 7SC. [30]
Place the eyes between row 7 and 8, about 6/7 stitches apart.
12: (3SC, dec) 2 times, change to white, (3SC, dec) 2 times, 2SC, change to
orange, 1SC, dec, 3SC, dec. [24]
13: (2SC, dec) 2 times, 2SC, change to white, dec, 2SC, dec, 1SC, change to
orange, 1SC, dec, 2SC, dec. [24]
14: (1SC, dec) 6 times. [12] Stuff.
15: 12SC. [12]
16: (1SC, inc) 6 times. [18]
17: 18SC. [18]
|
21: 18SC. [18]
22: (1SC, dec) 6 times. [12] Stuff
23: dec all around. [6]
Fasten off and weave in tail.
Arms (Make 2)
Use the color orange.
1: 6SC in Magic Ring.
2: 6SC. [6]
Fasten off and leave a long tail for sewing.
Legs (Make 2)
Use the color orange.
1: 6SC in Magic Ring. [6]
2: (1SC, inc) 3 times. [9]
3: 9SC. [9]
Fasten off and leave a long tail for sewing.
Belly
Use the color white.
1: 6SC in Magic Ring. [6]
2: 2SC in each st around. [12]
Fasten off and leave a long tail for sewing.
Tail
Start with the color white.
1: 6SC in Magic Ring. [6]
2: (1SC, inc) 3 times. [9]
3: 9SC. [9]
4: (2SC, inc) 3 times. [12]
5: (3SC, inc) 3 times. [15]
6: (4SC, inc) 3 times. [18]
7: (change to orange, 1SC, change to white, 2SC) 6 times. [18]
8: (change to orange, 2SC, change to white, 1SC) 6 times. [18]
Change to orange.
9: 18SC. [18]
|
12: 18SC. [18]
13: (1SC, dec) 6 times. [12]
14: 12SC. [12] Stuff.
15: (2SC, dec) 3 times. [9]
16: (1SC, dec) 3 times. [6]
Fasten off and leave a long tail for sewing.
Ears (Make 2)
Start with the color Black.
1: 6SC in Magic Ring. [6]
2: 6SC. [6]
3: (1SC, inc) 3 times. [9]
4: (2SC, inc) 3 times. [12]
Change to orange.
5: (3SC, inc) 3 times. [15]
6: 15SC. [15]
7: 15SC. [15]
Fasten off and leave a long tail for sewing.
Assembling
By the use of sewing pins, you can position all of your
parts first to see if you like it. When you are happy, you can sew it on. I recomment you doing so.
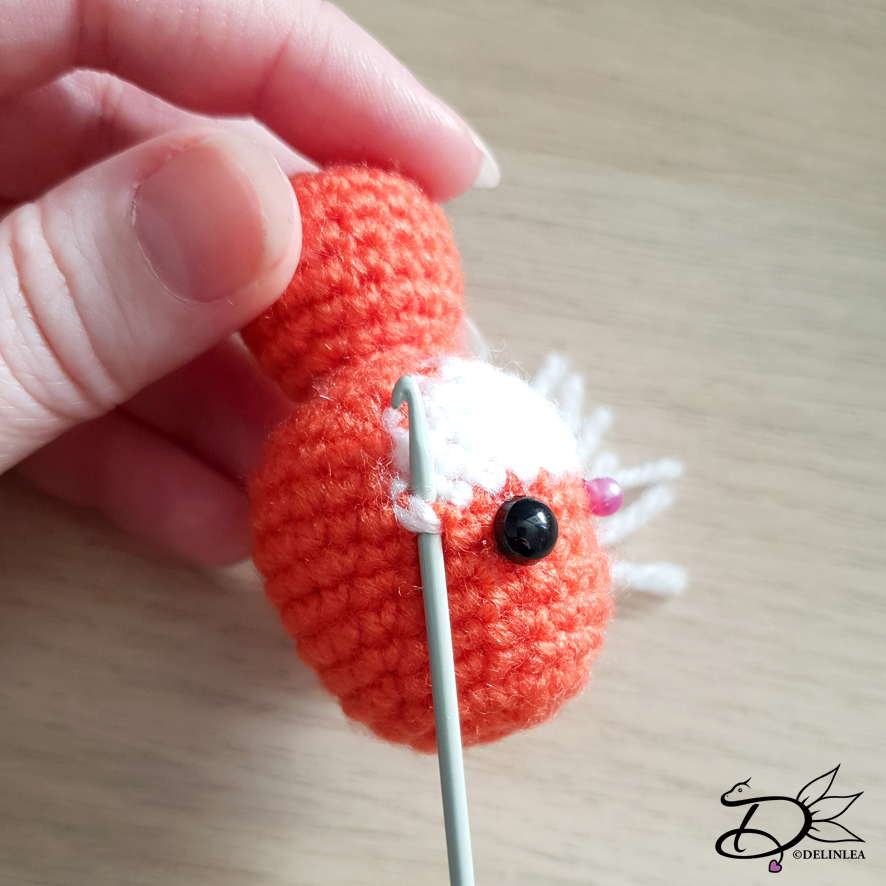
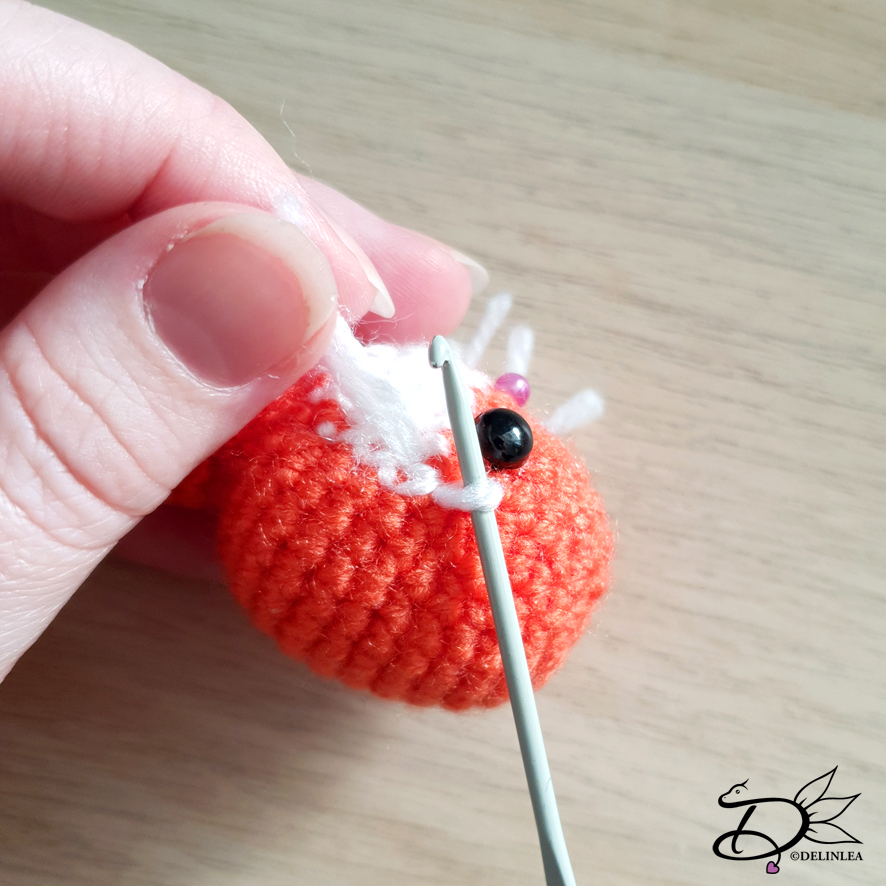
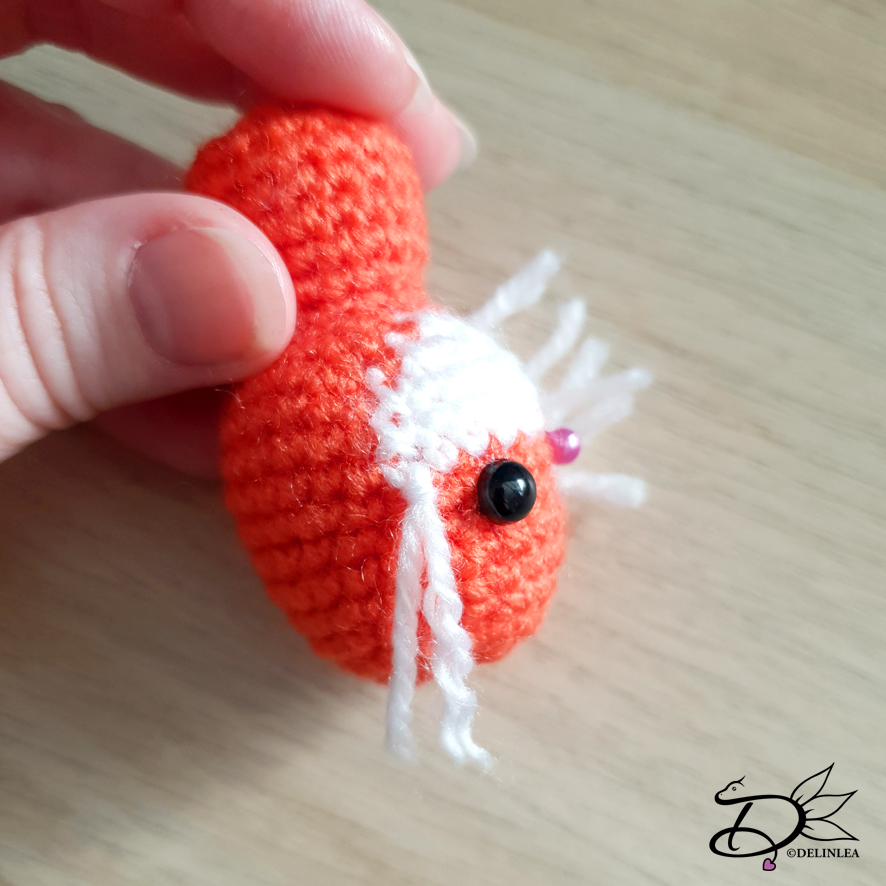
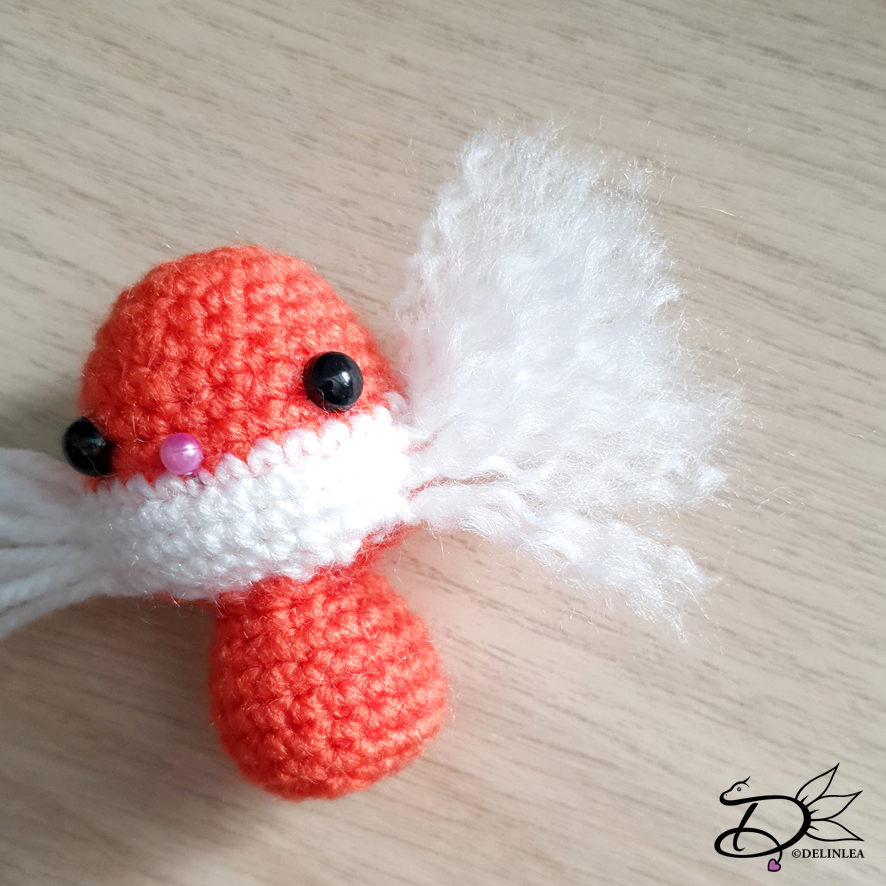
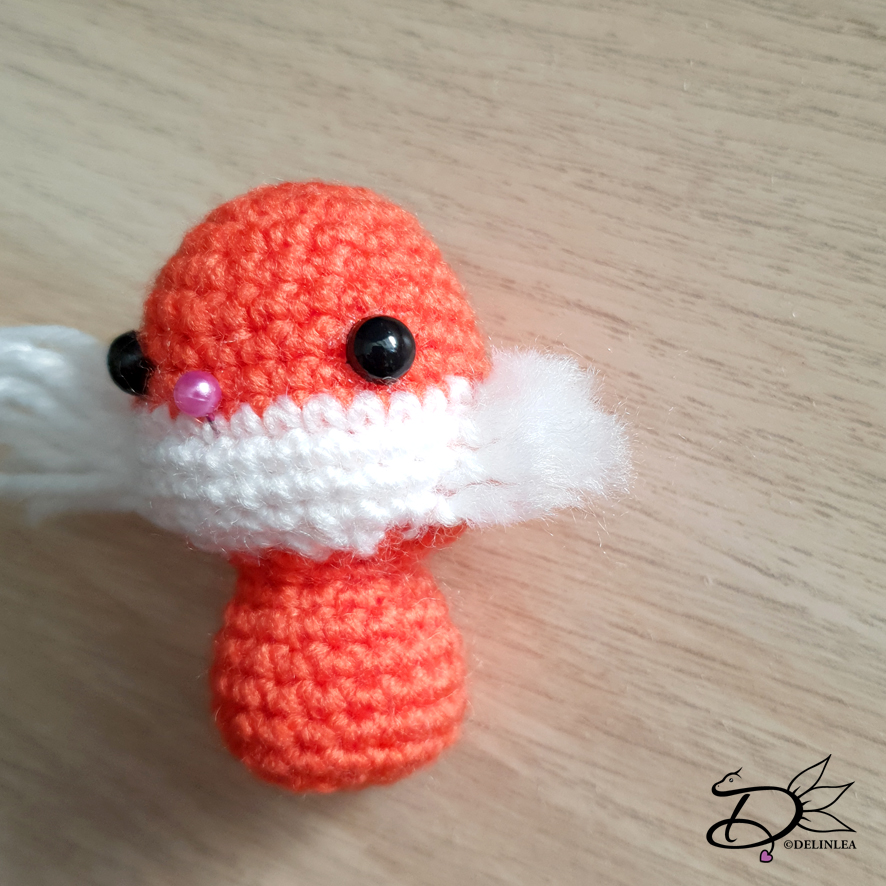
First, cut of 14 pieces of white yarn, about 7 cm. (You’ll gonna cut them shorter later, so it doesn’t come very close). Those pieces of yarn we are gonna add to the sides of little foxy’s face, around the edge of the white. This with be fluffy. Add 7 on each side, 3 front, 4 behind those, if you don’t know how to do this, look at the pictures, you basicly tie a knot.
unraffle the pieces of yarn with a needle, and if you want you can brush it a little more to get even more fluff.
Now it needs to be trimmed, cut it a little longer as you want them, you’ll probably loose lengthe if you shape them. And cut those in the shape you like.
Time to add his arms and legs, sew those on, but make sure
there’s enough space to sew his belly on as well.
On his backside, his tail will be added. Just play around until you like how he
looks.
Last add his ears, slightly curved, just above his fluffy white cheeks.
From the black felt, cut his little nose and mouth, and glue those on.
And he is already finished! What do you think?! Liked this cute little foxy pattern? I just love designing small things, I’d probably can go smaller, hmm, but that’s for another time!
Have a wonderful day!
Love
Danielle