Delinlea - My little fantasy world
  • ♥ Home
  • ♥ About Me
  • ♥ Blogmas 2021
  • ♥ Free Patterns
    • ♥ Amigurumi; Spring/Easter
    • ♥ Amigurumi; Fall/Halloween
    • ♥ Amigurumi; Winter
    • ♥ Amigurumi Tsum Tsum
    • ♥ Amigurumi Ufufy
    • ♥ Amigurumi Others
    • ♥ Christmas Countdown 2017
    • ♥ Blogmas 2018
    • ♥ Blogmas 2020
  • ♥ Tutorials
    • ♥ Easter
    • ♥ Home Deco
    • ♥ Others
  • ♥ Drawing Lessons
  • ♥ FanFic
    • ♥ Chapter 1
    • ♥ Chapter 2
    • ♥ Chapter 3
    • ♥ Chapter 4
    • ♥ Chapter 5
    • ♥ Chapter 6
    • ♥ Chapter 7
  • ♥ Gallery
    • ♥ Crafts
    • ♥ Drawings
    • ♥ Poseable Art Dolls
  • ♥ Links
  • ♥ Contact

summer

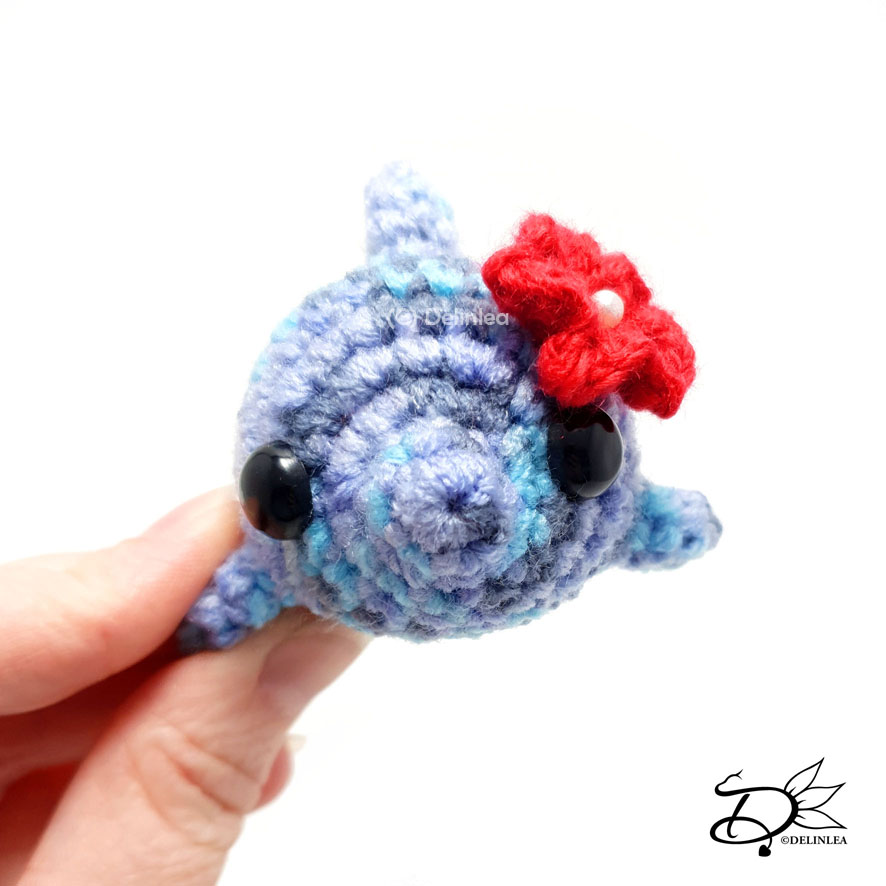
♥ Floral Dolphin Amigurumi

16 juli 2020 by Delinlea Leave a Comment

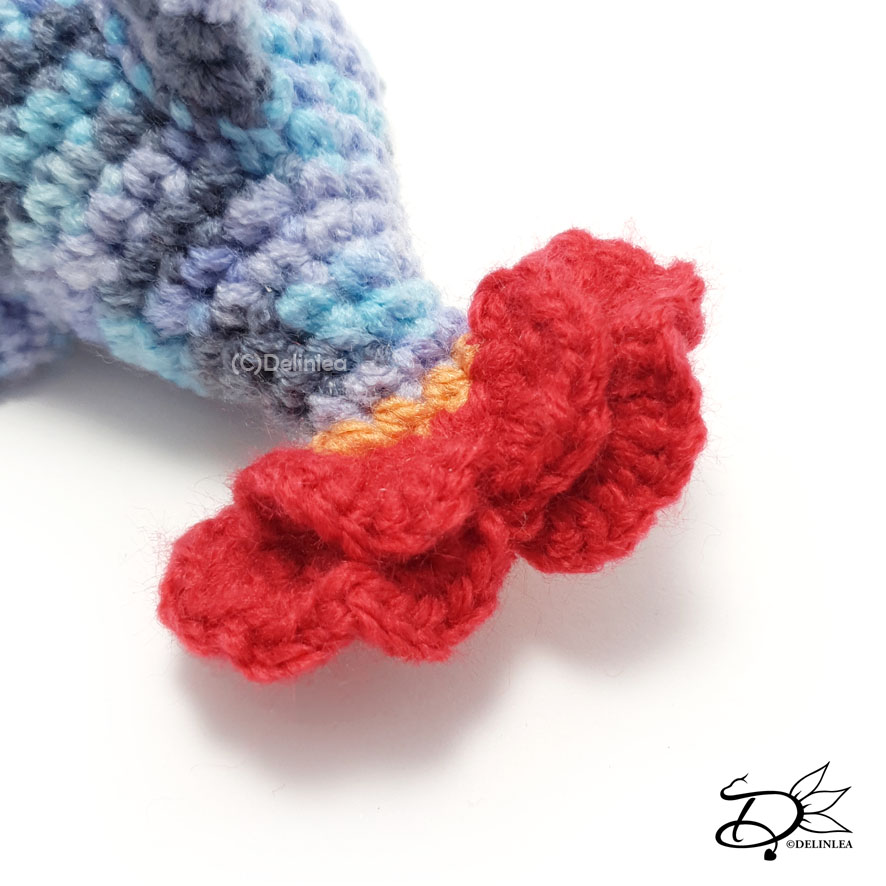
Hey Lovelies! I always struggle making things with a Summer theme. Maybe because I dislike Summer, but when I started to write down things that are Summery, there are quite some things I love. Like, all those beautiful flowers and plants, Dolphins, etc. So, I tried to combine flowers with a dolphin, a Floral Dolphin. Well, I sorta like how it turned out, but the tail without the bright, flowery, colors I probably like better. But you can be the judge and make your own version with your lovely color choices. Let’s go to the pattern, shall we?

For this Pattern you’ll need:
♥ Yarn in the colors; Blue and Red (I used a mix of DK yarns)
♥ Crochet Hook. (I used a 2,5mm)
♥ Safety Eyes, 9mm.
♥ Stuffing.
♥ Yarn Needle.
♥ Sewing Pins.
♥ Stitch Marker.

Stitches used (US Terms):
Magic Ring.
CH = Chain.
SLST = Slip Stitch.
SC = Single Crochet.
ST = Stitch.
Inc = Increase.
Dec = Decrease.
(…) = Repeat the space in brackets the given number of times.
[…] = Total number of stitches.

♥ Pattern Floral Dolphin

This pattern is made with continues rounds, unless stated otherwise. Use a stitch marker to mark your first/last stitch of your row.

Body
Start with the color Blue.

1: 6SC in a Magic Ring. [6]
2: 6SC. [6]
3: (1SC, inc) 3 times. [9]
4: (inc) 5 times, 4SC. [14]
5: (1SC, inc) 4 times, 6SC. [18]
6: (1SC, inc) 6 times, 6SC. [24]
7: 24SC. [24]
|
11: 24SC. [24]
Add the eyes between row 5-6.
12: (4SC, dec) 3 times, 6SC. [21]
13: (4SC, dec) 3 times, 3SC. [18]
14: 18SC. [18]
15: (1SC, dec) 6 times. [12]
16: 12SC. [12] Stuff the body
17: (2SC, dec) 3 times. [9]
18: 9SC. [9]
19: 9SC. [9]
Now make the end of the tail flat, horizontal, to see if your stitches line up the way the tail should line up with the body. You need to have 5 stitches on the bottom and 4 on top.

Tail Part1
Use the same color as the body or use some colorful, flowery colors.
This with be the bottom part of the tail, made on the 5 stitches, I talked about earlier.
This part won’t be made in continues rounds.

1: 5SC, turn. [5]
2: Inc, 3SC, inc, turn. [7]
3: Inc, 3SC, turn. [5]
4: 4SC, inc, turn. [6]
5: (4SC in the next st) 5 times, SlSt. [21]
As you noticed from row 3 on you don’t use all the stitches on the tail. That’s because the tail is split up in the middle. Repeat row 3 to 5 again from the outer stitch of the tail. (Just like the part you made already, just opposite). The middle stitch of row 2 is used for both sides of the tail, be aware of that.
Fasten off and weave in all the tails that might be there.

Tail Part2
Use the same color as the body or use some colorful, flowery colors.
This with be the upper part of the tail, made on the 4 stitches, I talked about earlier.
This part won’t be made in continues rounds.

1: 4SC, turn. [4]
2: 3SC in the next st, 1SC, turn.
3: 1SC, (4SC in the next st) 3 times. [13]
Same as with part1 of the tail, you need to repeat row 2 and 3 to complete the tail.
Fasten off and weave in any tails.

Fins (Make 3)
Use the color Blue,

1: 4SC in a Magic Ring. [4]
2: (1SC, inc) 2 times. [6]
3: (inc) 2 times, 2SC, (inc) 2 times. [10]
Fasten off and leave a long tail for sewing.

Flower
Use the color Red.

In a Magic Ring, crochet; (Ch2, 2DC, Ch2, 1SC) 5 times.
Pull tight and leave a long tail for sewing. Add a pearl or anything you would like in the middle of the flower.

Floral Dolphin

♥ Assembling

For any amigurumi I’m gonna assemble, I use sewing pins first, This way I can move parts around until I am happy with the outcome, and then sew it on. I would recommend you do so as well!

For this amigurumi there is not much to assemble, just the back and side fins and the flower if you chose to make it. Add all these on where you think it’s cute.

And that was it for this floral dolphin! Obviously I chose this name because of the tail. I hope you enjoyed this cutie! If you decided to make this pattern, I would love to see it, so show me on Twitter or Instagram with #DelinleaDIY.

Have a wonderful day and I’ll see you next week!

Love
Danielle

Posted in: Crafting, Crochet Tagged: Amigurumi, Crochet, cute, Dolphin, Free Pattern, haken, kawaii, summer, Virka

♥ Ice Cream Cactus Amigurumi

4 juni 2020 by Delinlea Leave a Comment

Hey Lovelies! I can feel summer is coming this month, it starts to heat up and May was a really dry month, we need rain badly. I always struggle with coming up with DIY for summer, maybe because it’s my least favorite season of the year, more like I hate it unless it rains xD. So I decided to write down things that remind me of summer, and I had both ice cream and a cactus written down. So put those together and make ice cream cactus. I hope you will love them!

Ice Cream Cactus

For this pattern you’ll need:
♥ Yarn in Light Green and White (I used Budgetyarn.com)
Additional colors for the sprinkles on top, I used Pink, Blue and Purple.
♥ Safety Eyes, 7mm.
♥ Crochet Hook, 2,5mm.
♥ Stuffing.
♥ Stitch Markers.
♥ Yarn Needle.
♥ Sewing Pins.
♥ Soft Pastel or anything else you can create stripes on the amigurumi later.
♥ Terracotta pot, 4,5cm.

Stitches used (US Terms):
Magic Ring.
CH = Chain.
SLST = Slip Stitch.
SC = Single Crochet.
HDC = Half Double Crochet.
DC = Double Crochet.
ST = Stitch.
Inc = Increase.
Dec = Decrease.
(…) = Repeat the space in brackets the given number of times.
[…] = Total number of stitches.

Pattern Ice Cream Cactus

This pattern is made using continuous rounds, unless stated otherwise.

Body
Use the color Light Green

1: 6SC in a Magic Ring. [6]
2: 2SC in each st around. [12]
3: (1SC, inc) 6 times. [18]
4: (2SC, inc) 6 times. [24]
5: (3SC, inc) 6 times. [30]
6: 30SC. [30]
|
10: 30SC. [30]
11: (3SC, dec) 6 times. [24]
12: 24SC. [24]
|
15: 24SC. [24]
16: (2SC, dec) 6 times. [18]
17: 18SC. [18] Place the eyes between row 9 and 10, and stuff the body.
18: (1SC, dec) 6 times. [12]
19 (dec) 6 times. [6]
Fasten off and weave in tail.

Side Arm
Use the color Light Green.

1: 6SC in a Magic Ring. [6]
2: 2SC in each st around. [12]
3: 12SC. [12]
4: 12SC. [12]
5: (2SC, dec) 3 times. [9] Stuff the arm.
6: 9SC. [9]
7: (1SC, dec) 3 times. [6]
Fasten off and leave a long tail for sewing.

Cream for Body
Use the color White.

1: 6SC in a Magic Ring. [6]
2: 2SC in each st around. [12]
3: (1SC, inc) 6 times. [18]
4: (2SC, inc) 6 times. [24]
5: (3SC, inc) 6 times. [30]
6: 30SC. [30]
7: (1SC + 1HDC in the next st, 2DC in the next st, 1HDC + 1SlSt in the next st, 1SC + 1HDC in the next st, 1SlSt) 6 times. [54]
Fasten off and leave a long tail for sewing.

Cream for the Side Arm
Use the color White.

1: 6SC in a Magic Ring. [6]
2: (1SC+HDC in the next st, 1SlSt) 3 times. [9]
Fasten off and leave a long tail for sewing.

Assembling.

I always use sewing pins to place all parts first. This way you can easily move all parts around until you are happy with the outcome.

Sew the side arm to the body, place it where you like it. With the extra pieces of colored yarn create the sprinkles on both cream parts. I found it easier to it now, before sewing it to the body. After you have created the sprinkles, sew the cream parts to the body and the side arm.

With some soft pastel pencils I created some strokes on the body of the cactus to make it more cactus like. You could also leave this out or use things like watercolor or make-up.

And the Ice Cream Cactus is already done! Isn’t it perfect for summer? I love it at least and I hope you will too. If you made him, please show me on Instagram of Twitter with the #DelinleaDIY

Have a wonderful day and I’ll see you next week!

Love
Danielle

Posted in: Crafting, Crochet Tagged: Amigurumi, Crochet, cute, Free Pattern, haken, Ice Cream, kawaii, summer

♥ BerryCat Amigurumi

7 mei 2020 by Delinlea Leave a Comment

Hey Lovelies! I saw strawberries around in the stores already, and that always gives me the feeling of Summer is near. I love strawberries and cats so I combined them xD.  Here are some adorable BerryCat! Ready to jump into the pattern?!

BerryCat

For this Pattern you’ll need:
♥ Yarn in Pink and Light Green (Or Red and Green). (I used Budgetyarn.com)
♥ Extra White or Light Yellow yarn, around 30-40cm, for the ‘seeds’.
♥ Black Felt or Yarn for the nose.
♥ Crochet Hook, 2,5mm.
♥ Stuffing.
♥ Stitch Markers.
♥ Yarn Needle.
♥ Sewing Pins.

Stitches used (US Terms):
Magic Ring.
CH = Chain.
SLST = Slip Stitch.
SC = Single Crochet.
HDC = Half Double Crochet.
DC = Double Crochet.
Bobble = For 1 Bobble Stitch you work 5 DC in one stitch, but without finishing the last loop of each DC, after you have 6 loops on your hook, yarn over and pull through all 6 loops.
ST = Stitch.
Inc = Increase.
Dec = Decrease.
(…) = Repeat the space in brackets the given number of times.
[…] = Total number of stitches.

Pattern BerryCat

Work in continues rounds, use a stitch marker to mark your first stitch of every row. This is for every part, unless stated otherwise.

Body
Use Pink colored yarn.

1: 6SC in Magic Ring. [6]
2: 2SC in each st around. [12]
3: 12SC. [12]
4: 1SC, Ch8, insert in second ch from hook, 7SlSt, continue working on the ‘base’, 2SC, inc, (Bobble, 2SC, inc) 2 times. [15]
5: 15SC. (You skip working in the ’tail’) [15]
6: (4SC, inc) 3 times. [18]
7: (5SC, inc) 3 times. [21]
8: 6SC, inc, (Bobble, 5SC, inc) 2 times. [24]
9: (7SC, inc) 3 times. [27]
10: (8SC, inc) 3 times. [30]
11: 30SC. [30]
12: 30SC. [30]
13: (3SC, dec) 6 times. [24]
14: (4SC, dec) 6 times. [18] stuff here and place the eyes between row 10 and 11, about 2cm apart.
15: (1SC, dec) 6 times. [12]
16: (dec) 6 times. [6]
Fasten off and weave in tail.

Ears (Make 2)
Use Pink colored yarn.

Ch4, insert in second Ch from hook, 1SC, 1HDC, 1DC.
Fasten off and leave a long tail for sewing.

Stem
Use the light Green colored yarn.

Ch7, insert in second Ch from hook, 6SlSt.
Fasten off and leave along tail for sewing.

Crown
Use the light Green colored yarn.

1: 6SC in Magic Ring. [6]
2: (Ch4, insert in second Ch from hook, 1SlSt, 2SC, 1SlSt in Base) 6 times.
Fasten off and leave a long tail for sewing.

Assembling

Whenever I start assembling amigurumi’s, I prefer to use sewing pins first. This way I can position and reposition all parts until I am happy with how it looks. I recommend you do so as well.

Start sewing the stem to the crown, and then the crown to the top of the strawberry.
Then position the ears and sew them on.
Last with the extra white yarn you can stitch on the ‘seeds’.  With black felt or yarn create a small nose.

That was it already for today’s pattern! I hope you liked this BerryCat! I can imagine them hanging around everywhere!

Have a wonderful day!

Love
Danielle

Posted in: Crafting, Crochet Tagged: Amigurumi, berrycat, Cat, Crochet, cute, haken, kawaii, Strawberry, summer, Virka

What are you looking for?!

My Socials

Ko-Fi

I love making all these free things for you, tho it would be very helpfull if you can support me on Ko-Fi! (You don’t have to tho, totally up to you!)

Ko-Fi Shop!!

In my Ko-Fi shop you can find PDF Amigurumi Patterns!! You can pay easily with PayPal.
Go to the shop here!!

Recent Blog Posts

  • ♥ Happy 2022!
  • ♥ Day 12; Lights
  • ♥ Day 11; Flower Deco
  • ♥ Day 10; Snowman
  • ♥ Day 9; Gingerbread Houses

Recent Comments

  • Delinlea op ♥ Pua Tsum Tsum Amigurumi
  • Marfermar op ♥ Free Pattern; Easter Bunny
  • mary op ♥ Pua Tsum Tsum Amigurumi
  • Delinlea op ♥ Life Update + Kittens
  • Delinlea op ♥ Amigurumi Ghost

Categories

  • animation
  • Beadwork
  • Blogmas 2018
  • Blogmas 2020
  • Blogmas 2021
  • Books
  • Bujo
  • Christmas
  • Christmas CAL 2019
  • Christmas Countdown 2017
  • Contest
  • Crafting
  • Crochet
  • Drawing
  • Drawing Lesson
  • Easter
  • Geen categorie
  • Life
  • Miniature
  • Nail Art
  • New Year
  • Paper
  • plush
  • Pokemon
  • Poseable Art Doll
  • Recipe
  • Sewing
  • Shop Pattern
  • Sinterklaas
  • Social Media
  • Tsum Tsum
  • Ufufy

Copyright © 2023 Delinlea - My little fantasy world.

Family WordPress Theme by themehall.com