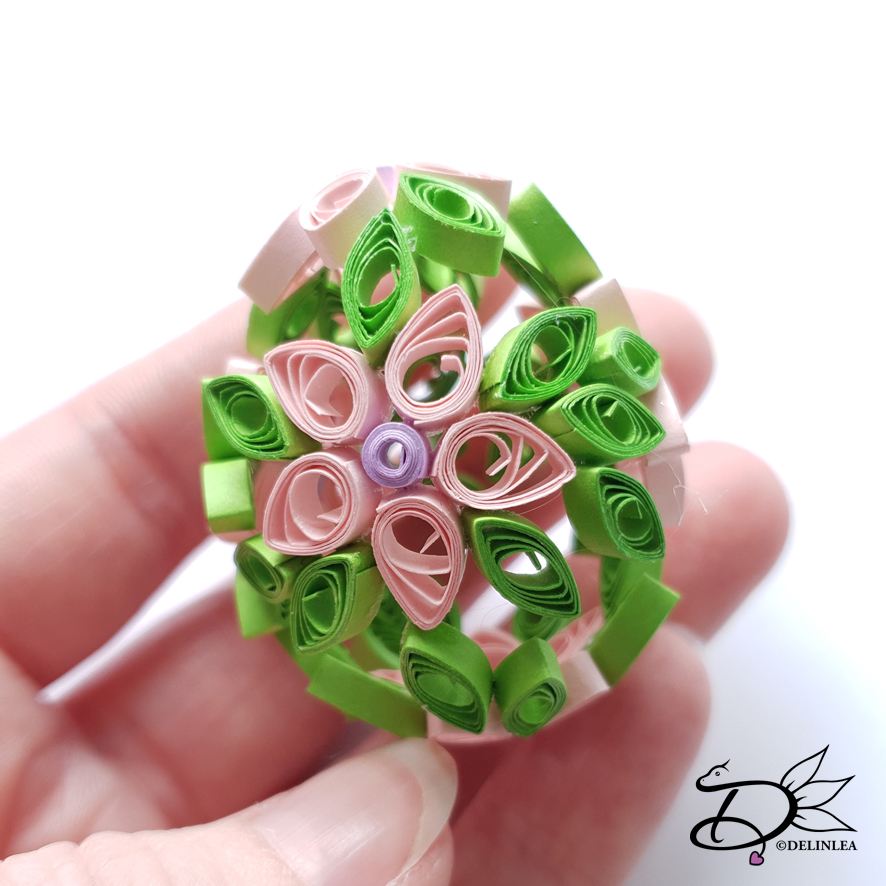
Delinlea - My little fantasy world
  • ♥ Home
  • ♥ About Me
  • ♥ Blogmas 2021
  • ♥ Free Patterns
    • ♥ Amigurumi; Spring/Easter
    • ♥ Amigurumi; Fall/Halloween
    • ♥ Amigurumi; Winter
    • ♥ Amigurumi Tsum Tsum
    • ♥ Amigurumi Ufufy
    • ♥ Amigurumi Others
    • ♥ Christmas Countdown 2017
    • ♥ Blogmas 2018
    • ♥ Blogmas 2020
  • ♥ Tutorials
    • ♥ Easter
    • ♥ Home Deco
    • ♥ Others
  • ♥ Drawing Lessons
  • ♥ FanFic
    • ♥ Chapter 1
    • ♥ Chapter 2
    • ♥ Chapter 3
    • ♥ Chapter 4
    • ♥ Chapter 5
    • ♥ Chapter 6
    • ♥ Chapter 7
  • ♥ Gallery
    • ♥ Crafts
    • ♥ Drawings
    • ♥ Poseable Art Dolls
  • ♥ Links
  • ♥ Contact
    • Privacy Policy

Tutorial

♥ Paper Quilled Egg

12 maart 2020 by Delinlea Leave a Comment

Hey Lovelies! I hope you are doing well with all the virus stuff going on! It’s getting pretty critical here in the Netherlands, but it doesn’t bother me much. Since I can craft all day, every day, I have no time to be bored! xD. For today’s blog I found my quilling stuff back, it’s been ages since I used it, but it’s paper, and anything paper, I love. Not sure why xD just a little obsession I guess. I will explain to you how to make a 3D quilled egg, which works awesome for easter! I hope you will enjoy this tutorial!

Paper Quilled Egg

For this DIY you’ll need:
♥ 5 Purple Strokes of 3mm by 7cm.
♥ 25 Pink Strokes of 3mm by 10,5cm.
♥ Green Strokes of 3mm by 10,5cm, as many as you want.
♥ Quilling Tools, but you can use alternatives, in the past I never used quilling tools.
♥ Glue.
♥ Styrofoam Egg, about 4cm in height. (You can use larger, but then you’ll need more of the other supplies as well).
♥ Tweezers. (optional)
♥  (Sewing) Pins.

Tutorial Paper Quilled Egg

If you don’t know what Quilling or paper Quilled things are, I suggest you to look some up! It’s really fun!

Rolling the Papers

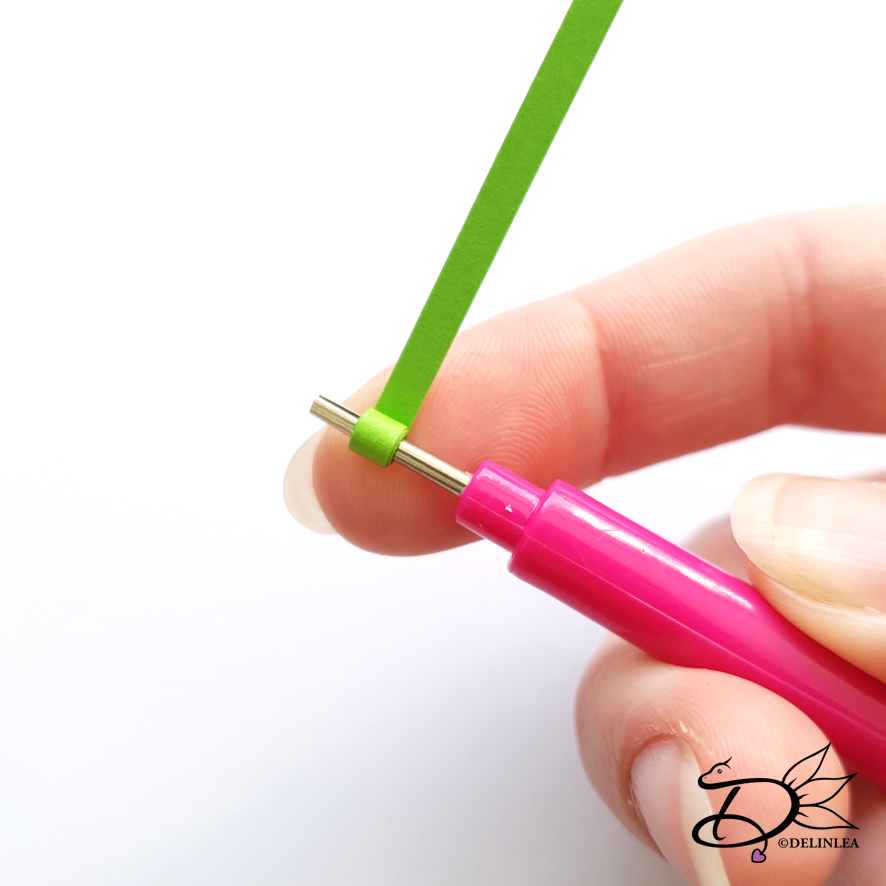
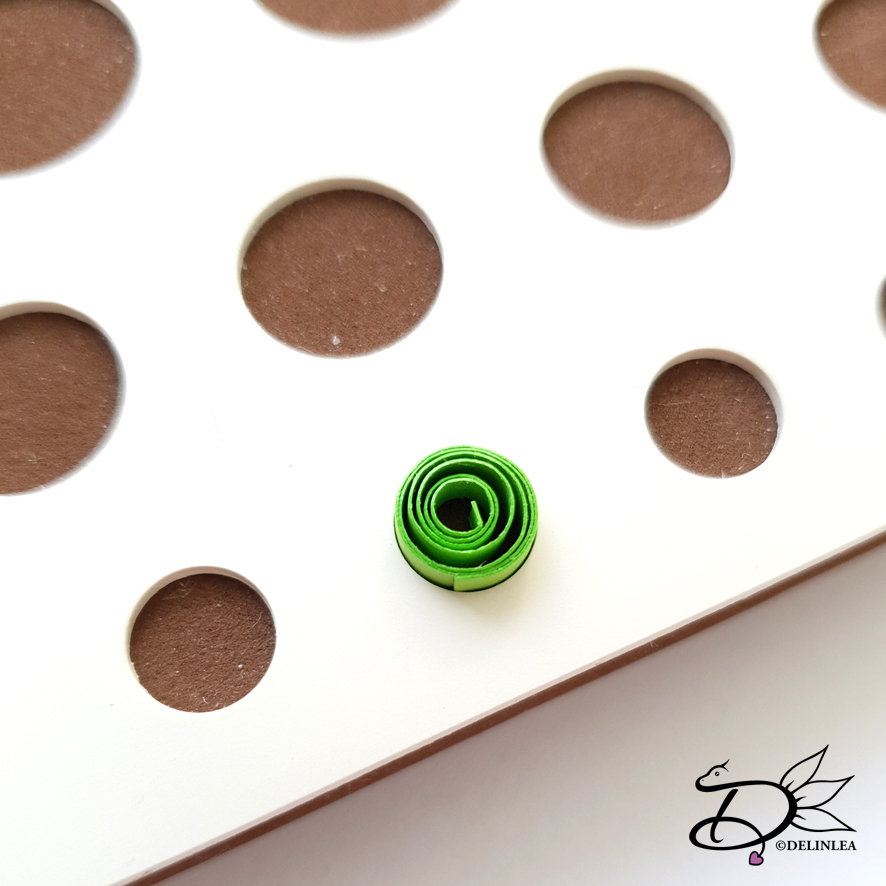
Start with rolling up all the paper strokes. The Purple ones you just keep them as is and use some glue at the end of the stroke to keep it from unwinding.

The Greens and Pinks you’ll let them expand to a width of 8mm. I had a quilling board with different size circles, which made it really easy to get the right size every time. As for those as well, glue the end of the stroke so it won’t unwind any further.

Shaping

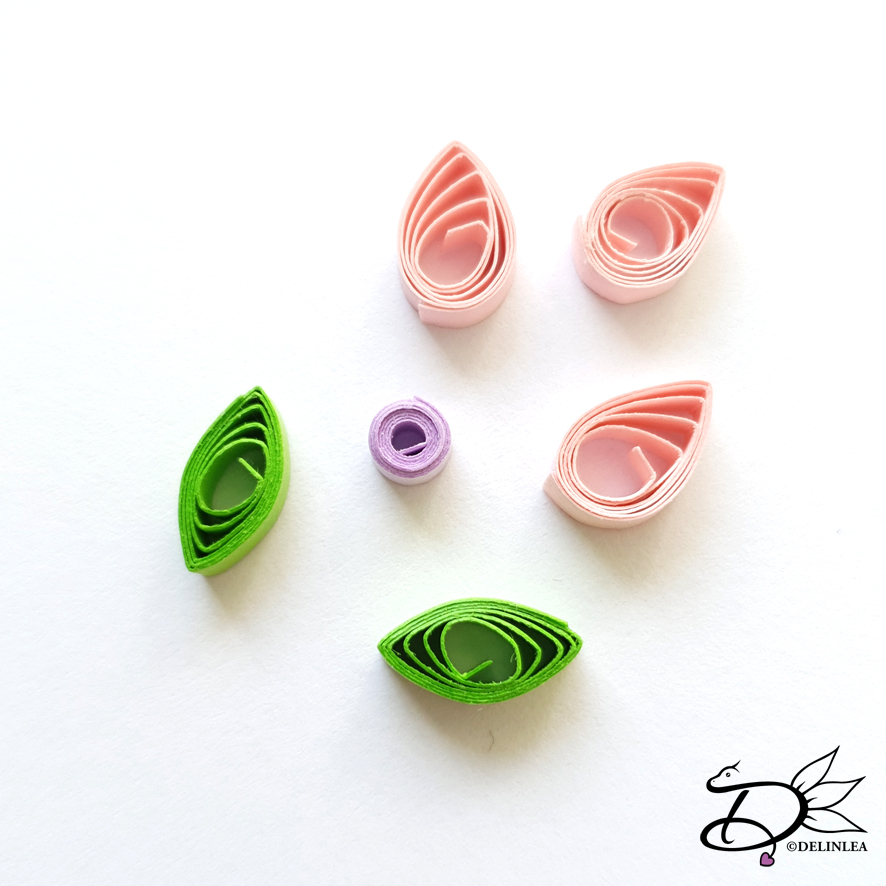
The pink ones you pinch at one side. The Green at two sides.  See the image below to see the shapes they need to have. Continue this for all the pinks and greens.

Making the Egg

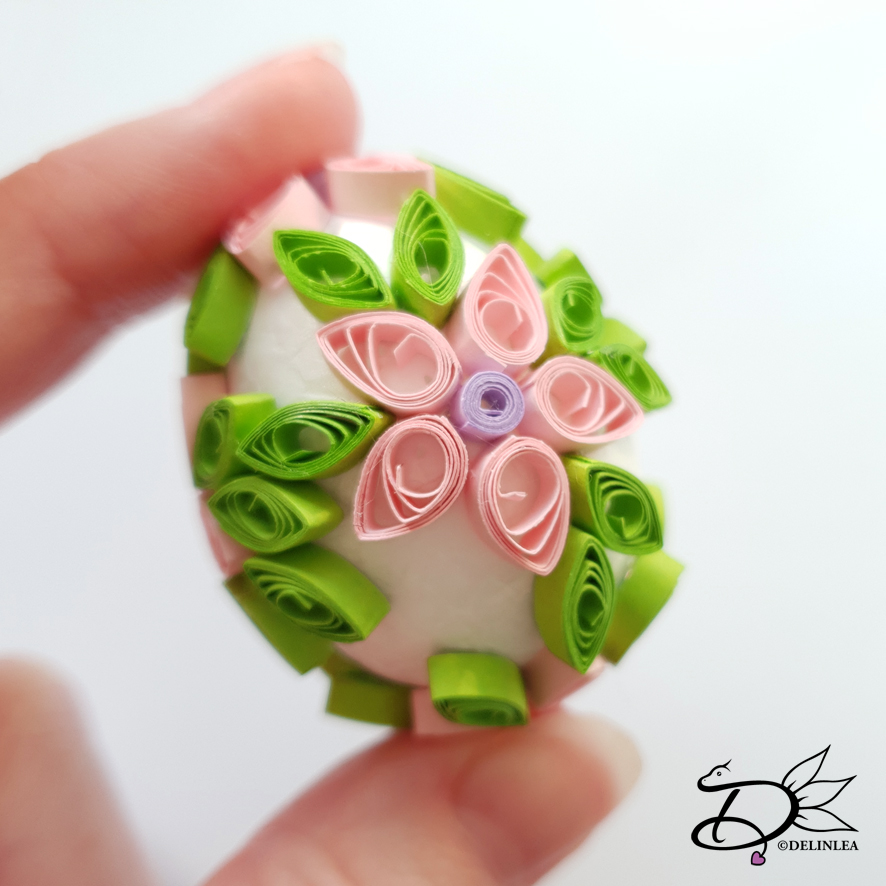
Now you need the Styrofoam egg, you need to decide now if you wanna leave the egg in or that you wanna be able to remove it. If you wanna remove it, like I did, make sure you won’t glue the pieces to the egg.

Start off with drawing a line on the egg, as you can see in the picture, my egg already had a line from the making process. Divide this line in 3 even parts. Take the 5 purple parts and add those with a pin. so 3 on the line, 1 on top and 1 on the bottom.

Around the Purple parts, glue 5 Pink parts, so you will create some kind of flowers. Use pins to keep all parts in place until it’s dry.

Lastly, in between the flowers you just made, add the green parts. They will be the leaves. Those you can glue however you want, but you want to connect all flowers together. If you won’t connect everthing, it will fall apart, and that’s not what you want. (If you decided to keep the egg in the inside, it doesn’t matter if it’s connected or not).
However, in order to be able to remove the egg, don’t use glue around the line from earlier. This way you’ll have a upper and lower half which you will glue together after removing the egg. Make sure to make some marks to which part goes where, or the shape will be lost.

Before you remove the egg though, make sure everything has dried well and is hard enough to hold its shape. So glue’s take 24hours to be completely hardened.

You could add a piece of thread to the top of the egg to be able to hang it as decoration!

I hope you liked this Quilled Paper Egg tutorial! It’s fun to do something else a crocheting all the time xD. It’s funny, that before I figured out how to crochet, I only used paper to create things. Now I barely use paper, while I have a huge stack  *Hides

Have a wonderful day everyone!

Love
Danielle

Posted in: Crafting, Easter, Paper Tagged: Easter, egg, flowers, paper, papierfilligraan, quilled, Quilling, Tutorial

♥ DIY Envelope Booklet

13 februari 2020 by Delinlea Leave a Comment

Hey Lovelies! Did you also survive the storm Ciara, if you lived in Europe? It really went nuts here, but nothing got damaged and I could walk most of the days without been blown away haha. I kinda like to walk outside when it storms, not completely sure why, just love it. For today I wanted to make a small booklet that looks like an envelope. I first wanted to create something else, but what I imaged, didn’t worked out in reality. So sad, but sometimes it’s like that. I hope you’ll like this tutorial. The booklet would also be very cute to use as a valentines gift with little notes or drawings, how cute would that be?!

Envelope Booklet

For this DIY you’ll need:
♥ 1mm Board.
♥ Pretty Cardstock or Paper.
♥ Paper for the sheets inside, I used dark and light pink.
♥ Scissors.
♥ Ruler.
♥ X-acto Knive.
♥ Glue.
♥ Needle that’s strong enough to poke through board.
♥ Piece of Yarn, about 30cm.
♥ Beads. (optional)

DIY

Cut the board to size, according to the picture below. All heights are the same, 4,5cm.

Then also cut the cardstock that you wanna use for the cover. The best way to do this is to start measuring out 0,75cm, then line up all the pieces including the space in between the spine pieces of the book, and add another 0,75cm. Add 0,75 on the top and bottom as well. Try to make it look like the picture below. (The good side of the paper is facing down).

Glue all pieces of board to the cardstock.

Now cut all the corners of the cardstock, like I did in the picture. Make sure to leave a little space close to the board (about 1mm) so the corners will get covered nicely.

Now glue all edges around the board.

For the inside of the cover, choose some paper/cardstock you like and cut it to size. It’s the same size but 1,5mm less from all edges.
Glue this to the inside.

Pages for the Booklet

Cut 7 sheets of paper for the pages of the booklet, 6 by 4cm. Fold them in half on the short side, so you get folded sheets of 3 by 4cm.

Stack all sheets together. As you will notice, when you stack them together, you can an outward facing V-shape on the side where you would open the book. You can leave them as it is. Or trim it down smooth. Just what you prefer.

It’s time to make the binding holes. Measure 1,25cm inwards on the spine at the left side. Both from top and bottom so you’ll end up with 2 holes. Poke those through with a needle, make sure to be careful. Copy those holes to the pages and poke those through as well.

Using the yarn, put it on your needle and go from the outside of the book to the inside, through the stack of pages. Then go through the other hole to the outside again. Tie a knot on the outside, on the spine. Try to have even ends of the yarn.

The ends of the yarn you can decorate if you prefer, for example with beads and use those ends to be able to close the book. You can also use a sticker for example to close it or anything else you can think of.

Envelope Booklet

And you just reached the end of the DIY. I hope you enjoyed making this little booklet! It would be a fun gift for your valentine with a cute little message or drawings.

I hope you had fun, and I’ll see you next week!

Love
Danielle

Posted in: Crafting, Paper Tagged: Bookbinding, booklet, cute, DIY, envelope, kawaii, mini, tiny, Tutorial, Valentine

♥ Sinterklaas Lucky Charms

21 november 2019 by Delinlea Leave a Comment

Hey Lovelies! Sinterklaas is back in town xD! You excited?! Haha me not so much, but I like to get crafty around this time of year. *Sigh I wish my family would do something called ‘surprises’, but we don’t. Oh well, I’ll buy something nice for myself then! If you do live in a country where they have Sinterklaas, how do you celebrate it?
Okay, back to the crafty part of this blog. Last year I made those Pietjes lucky charms! Do you remember? This year I had to add Sinterklaas lucky charms, as promised. I just like making those charms I believe~ hehe.

Sinterklaas Luck Charms

For this DIY you’ll need:
♥ Wooden beads in 2 sizes. (you can make them as big as you want)
♥ Air Dry Clay.
♥ PVA Glue.
♥ Skewer or Toothpick.
♥ Acrylic paints in colors of choice.
♥ Paintbrush.
♥ Matching pieces of thread, to the paint.
♥ Varnish (optional).
♥ Scissors.

Tutorial

Glue the 2 wooden beads together, make sure to line up the holes. Let those dry before you continue.

From a bit of clay, make a triangle for his ‘mijter’ and place this, with some glue, on top of the small bead.

Make another triangle of clay, a bit smaller for his beard. Place those, with some glue as well, on his head/body, were the beard is suppose to be xD. With the skewer of toothpick, make a few indences to give it a bit more shape.

With the skewer or toothpick, poke a hole though the ‘mijter’. This is so you can add the threads through later.

Make a moustache out of clay, it’s a bit fiddly, but I am sure you can do it! Glue it on and shape it until you like it. Make sure to let everything dry first.

Painting

Now for the fun part, painting!! Let’s give those buddies some color! You can paint them however you want, of course. But I kept them sorta traditional. It is possible that you need several layers of paint for good coverage. When you are finished, you can varnish it, if you want.

Lastly, add 2 pieces of thread (about 30cm) through the body. Make sure to have a loop at the top and tie a knot at the bottom.

And it’s completely done! I hope you enjoyed this little tutorial for Sinterklaas Lucky Charms!
Have a wonderful day, stay warm, stay healthy!

Love
Danielle

Posted in: Crafting, Sinterklaas Tagged: clay, cute, DIY, gelukspoppetjes, Lucky Charm, sinterklaas, Tutorial

♥ Memoboard DIY

28 juni 2018 by Delinlea Leave a Comment

Hey Lovelies!

I’ve been drawing polaroids weekly, well I try to. And I’m putting them like everywhere in my room and quit a few are put away already. Now I’m kinda afraid some get damaged so I though of having a place where I could put them. That’s why I’m making a memoboard today, where I can collect them without having to worry!

I know this tutorial isn’t gonna be very original, but I still wanna share with you all, how I made mine!

For this DIY you’ll need:
♥  Cardboard (25 by 45cm).
♥  Sheet stuffing (not sure how it’s called, I used a snow blanket xD)
♥  Fabric (55 by 45cm) make sure it’s not a stretchy fabric but choose something like cotton.
♥  Fabric (30 by 30cm) Same for this one, don’t pick a stretchy fabric but choose something like cotton.
♥  Yarn or Ribbon.
♥  Glue Gun.
♥  (Fabric) Scissors.
♥  Sewing Pins.

Let’s start

Plug your glue gun in first so it has time to warm up.
Make sure your cardboard has the right size. Now take the sheet stuffing and cut that down to the same size of the cardboard, and glue these two together.


Take your main fabric of 55 by 45cm and place this on a flat surface with the good side facing down. Place the cardboard with the stuffing on top, with the stuffing facing down as well. Now take your glue gun and glue all the corners of the fabric to the cardboard, just as shown in the pictures.


When that’s done, it’s time to glue all sides to the cardboard as well. I started in the middle of each side and working my way down to the corners. While glueing down the sides make sure to stretch the fabric so any oneven things in the fabric will be gone. I learned in school to start in the middle by making things like these with fabric, so the surface will be nice and sturdy. If you start at a corner and work to the other corner there’s a higher chance that there will form any wrinkles, and that’s not what you want.

Decorating

This step you can skip if you want, but we are gonna work with the second fabric (30 by 30cm). Cut this diagonal, so, from one corner to the other. Fold about 1cm over of the longest side of both triangles. You can choose to sew this down but I chose to glue it down with my glue gun, quick and easy. Just don’t burn yourself like I did xD.

Take one triangle and place it of the right side of your memoboard, with the good side of the fabric facing up. Position it the way you like, but make sure you have enough fabric going over the cardboard to glue down. When you are happy with the way it looks, use a sewing pin to keep it in place. And flip the whole thing over.

Do the same for glueing down as the main fabric, start with the corner. And glue down the side.


Repeat for the other triangle.

Get out your yarn or ribbon that you chose. and start wrapping it around the memoboard. I used Pins to hold the place I wanted them to stay in. I loved wrapping it criss cross around the board but you can do it however you want, like straight lines. When you are happy with how it looks, glue everything down on the sides of the cardboard, make sure you glue them on tight, so it stays in place forever xD. To secure it more, I glued the yarn/ribbon once more on the back as well.


Finished!

And you are done! Yay! ^-^ Now you can stick all those memories on there, or like I did, my drawings. You can use pins on there, or use those tiny clothespins on the threads.

I hope you enjoyed this tutorial and if you made it, show it to me on instagram or twitter with the hastag #DelinleaDIY. Have a lovely day everyone!

Love
Danielle

Posted in: Crafting Tagged: DIY, Memoboard, Tutorial
« Vorige 1 2 3

What are you looking for?!

My Socials

Ko-Fi

I love making all these free things for you, tho it would be very helpfull if you can support me on Ko-Fi! (You don’t have to tho, totally up to you!)

Ko-Fi Shop!!

In my Ko-Fi shop you can find PDF Amigurumi Patterns!! You can pay easily with PayPal.
Go to the shop here!!

Recent Blog Posts

  • ♥ Happy 2022!
  • ♥ Day 12; Lights
  • ♥ Day 11; Flower Deco
  • ♥ Day 10; Snowman
  • ♥ Day 9; Gingerbread Houses

Recent Comments

  • Erzsebet M. Marosvari op ♥ My Entry For a Faber Castell Contest
  • Delinlea op ♥ Pietje Gnome Amigurumi
  • Delinlea op ♥ Toy Story Alien TsumTsum Amigurumi
  • Delinlea op ♥ Pua Tsum Tsum Amigurumi
  • Charli op ♥ Free Pattern; CNY Mouse Amigurumi

Categories

  • animation
  • Beadwork
  • Blogmas 2018
  • Blogmas 2020
  • Blogmas 2021
  • Books
  • Bujo
  • Christmas
  • Christmas CAL 2019
  • Christmas Countdown 2017
  • Contest
  • Crafting
  • Crochet
  • Drawing
  • Drawing Lesson
  • Easter
  • Geen categorie
  • Life
  • Miniature
  • Nail Art
  • New Year
  • Paper
  • plush
  • Pokemon
  • Poseable Art Doll
  • Recipe
  • Sewing
  • Shop Pattern
  • Sinterklaas
  • Social Media
  • Tsum Tsum
  • Ufufy

Copyright © 2025 Delinlea - My little fantasy world.

Family WordPress Theme by themehall.com