Delinlea - My little fantasy world
  • ♥ Home
  • ♥ About Me
  • ♥ Blogmas 2021
  • ♥ Free Patterns
    • ♥ Amigurumi; Spring/Easter
    • ♥ Amigurumi; Fall/Halloween
    • ♥ Amigurumi; Winter
    • ♥ Amigurumi Tsum Tsum
    • ♥ Amigurumi Ufufy
    • ♥ Amigurumi Others
    • ♥ Christmas Countdown 2017
    • ♥ Blogmas 2018
    • ♥ Blogmas 2020
  • ♥ Tutorials
    • ♥ Easter
    • ♥ Home Deco
    • ♥ Others
  • ♥ Drawing Lessons
  • ♥ FanFic
    • ♥ Chapter 1
    • ♥ Chapter 2
    • ♥ Chapter 3
    • ♥ Chapter 4
    • ♥ Chapter 5
    • ♥ Chapter 6
    • ♥ Chapter 7
  • ♥ Gallery
    • ♥ Crafts
    • ♥ Drawings
    • ♥ Poseable Art Dolls
  • ♥ Links
  • ♥ Contact

Christmas

♥ Winter Wonderland BLOGMAS 2021

27 november 2021 by Delinlea Leave a Comment

Hey Lovelies! This year we will do another Christmas Craft Along, or Blogmas, or however you wanna call it! I’m excited to do this this year again! I somehow always look forward to making those blogs every year. They make me happy, even though it is a lot of work as well and coming up with something new each year isn’t easy either. But I managed.

This year will be a tiny bit different, I will make a blog post every other day, not each day like I usually do. I will post every uneven day, so dec 1st, dec 3rd etc. I hope that’s fine by you!

Last year I did all crochet items, check them here if you missed them!

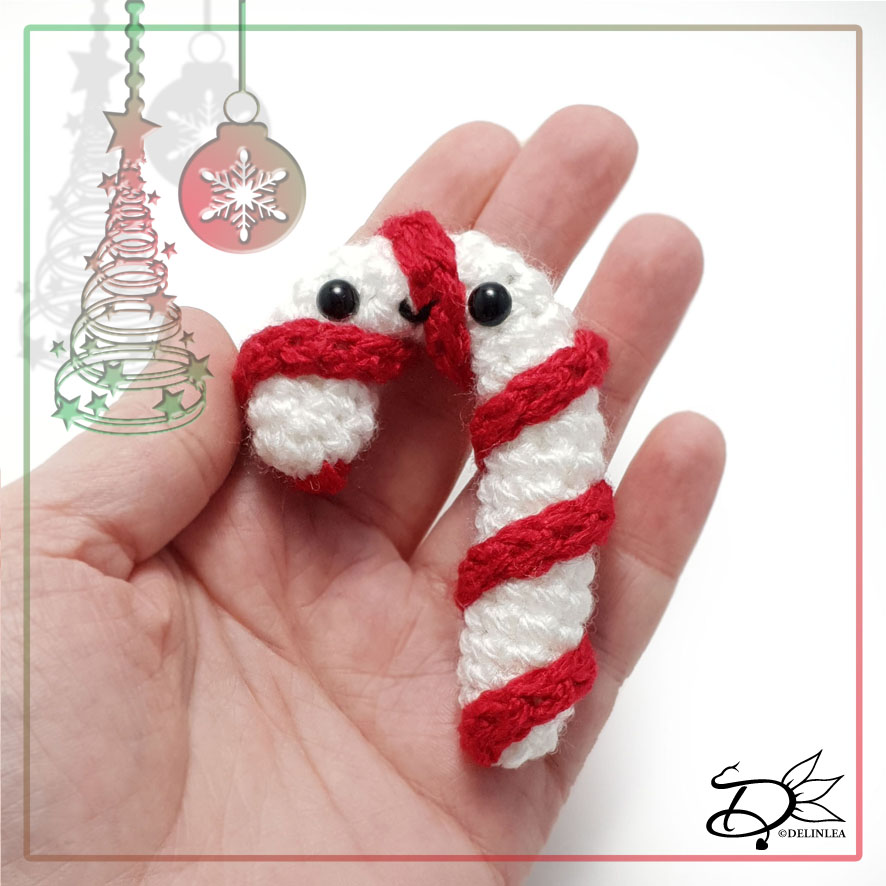
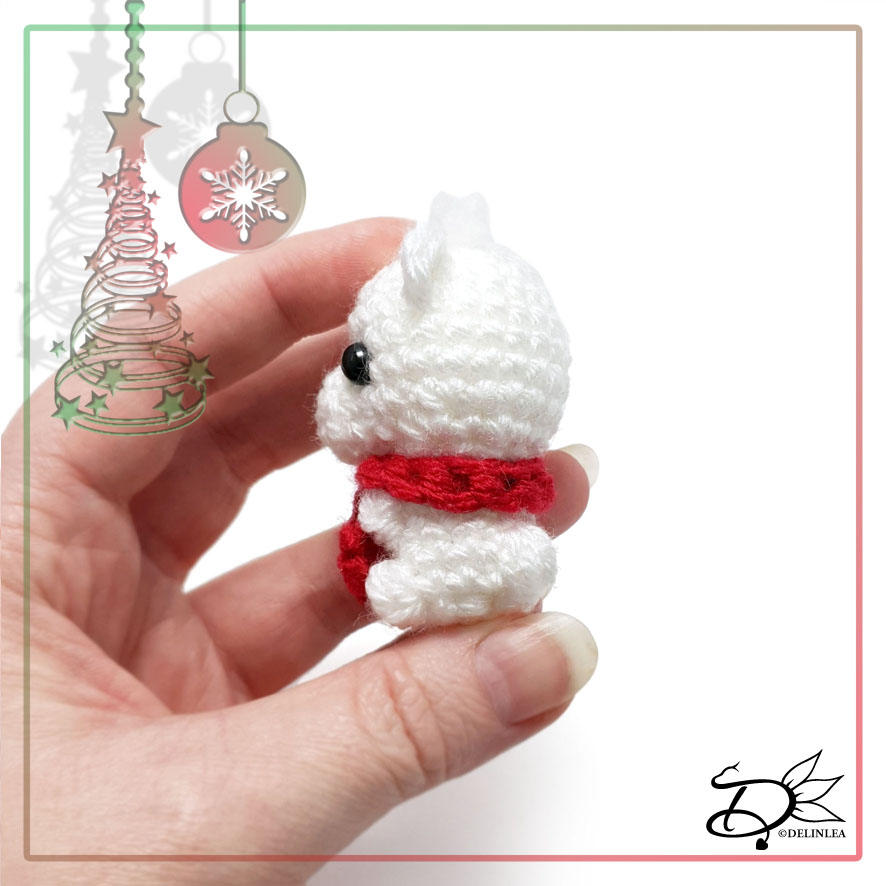
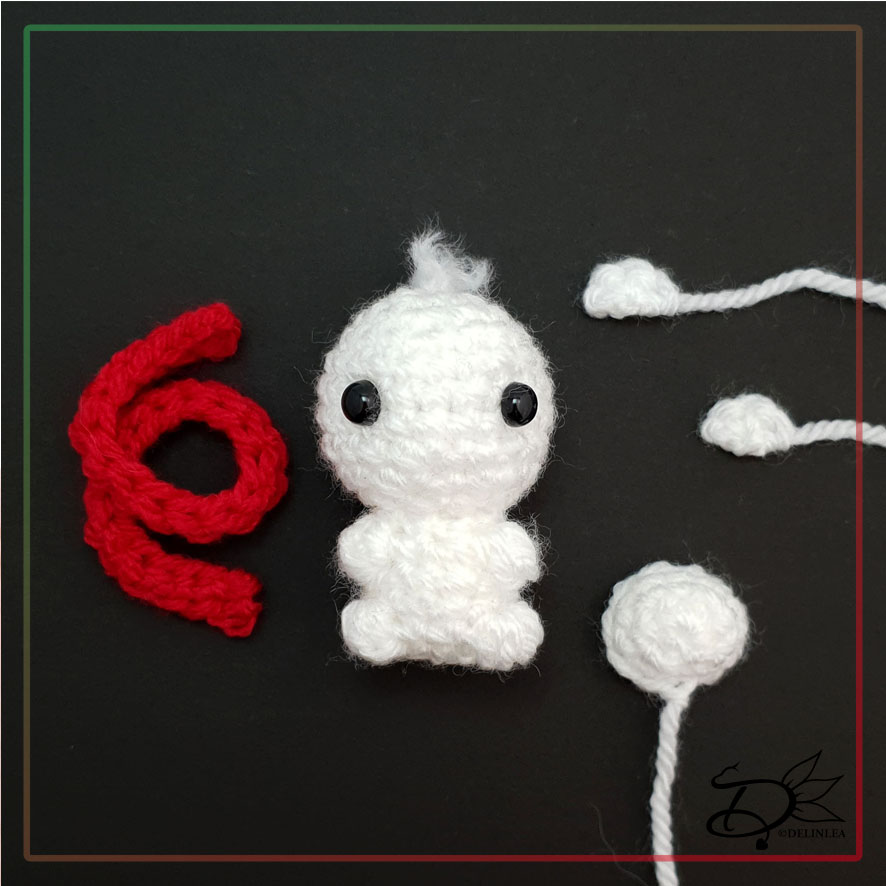
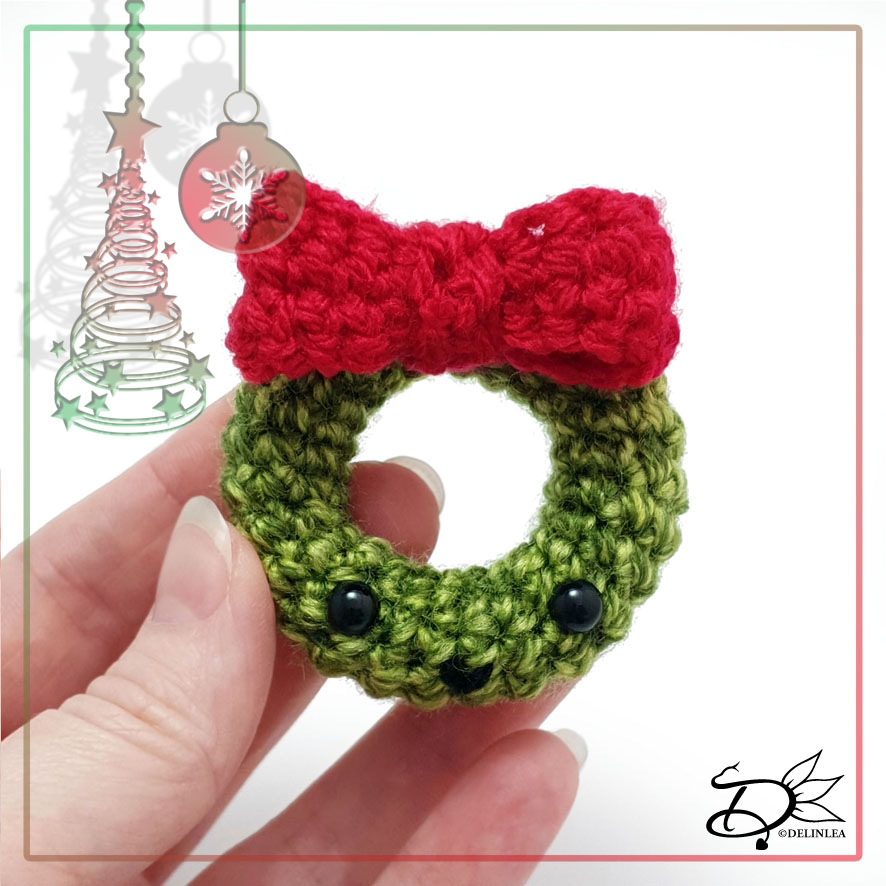
This time we will do all kinds of crafts, like paper art, crochet, clay, etc. All kinds of things, but I am sure you will manage to make all, even if you are not familiar with the medium we’re working with!

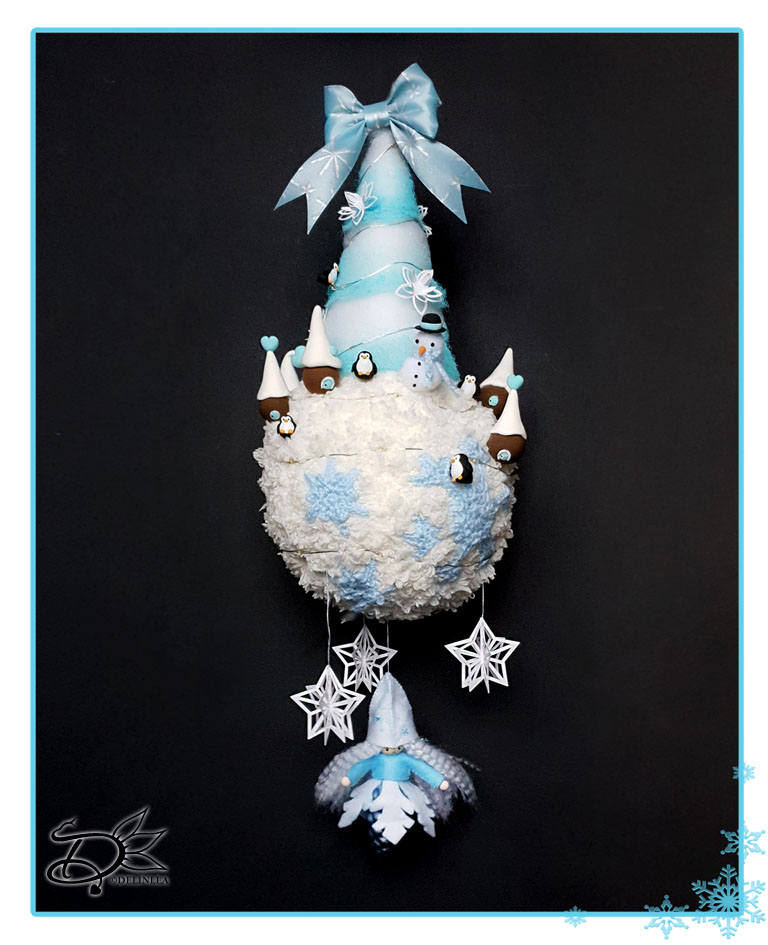
It has a Winter Wonderland theme!
We will basically make one thing in the end, but all the items we will make it separate and assemble it together along the way. Of course you don’t have to make everything, for example if you only like the tree or the fairies, just make those and decorate your house with it.

This is what we will make in the end:

The whole DIY/pattern is already available as PDF on my Ko-Fi, in case you wanna start early or don’t want any advertisement in the blogs. A little extra in the PDF is a story line. You won’t get that in the blogs! Go to my Ko-Fi shop now and buy it!

I hope you are just as excited as I am, I had a lot of fun making this and coming up with all those Winter Wonderland parts.

Stay Creative!

Love
Danielle

PS. Don’t forget to mark dec 1st on your calendar! I’ll see you then!
PS2. if you love those patterns, maybe you’d like to support me on Ko-Fi?! So I can keep making content like this!

// ©2021 Delinlea / Danielle Kaal // Items made with this pattern/DIY may be sold in a limited number. Credit to ‘Delinlea’ is appreciated. Not allowed for mass production or commercial purposes. You may not reproduce, translate, share, freely distribute or sell this pattern/DIY as your own in digital or printed from.

Posted in: Blogmas 2021, Christmas, Crafting, Crochet, Paper, Shop Pattern Tagged: Blogmas 2021, Christmas, crafting, DIY, intro, Ko-Fi, Pattern

♥ Day24; Candy Cane Amigurumi

24 december 2020 by Delinlea Leave a Comment

Hey Lovelies! I can’t believe it’s the last day of Blogmas 2020! Did you enjoy it this year?! I hope you did. I loved designing all the items. We are not there yet, today we still have to make this cute candy cane! Although he doesn’t taste so sweet, he does look sweet, like you wanna put it in your pocket. Have fun today!

Candy Cane made with Amigurumi

For this pattern you’ll need:
♥ Yarn in the color White and Red. (I used Stylecraft Special DK)
♥ A bit of extra Black yarn to create it’s mouth.
♥ Crochet hook. (I used 3mm)
♥ Stuffing.
♥ Yarn Needle.
♥ Sewing Pins.
♥ Stitch Marker.
♥ Safety Eyes, 6mm.
♥ Wire.

Stitches used (US Terms):
Magic Ring.
CH = Chain.
SLST = Slip Stitch.
FSC = Foundation Single Crochet.
SC = Single Crochet.
ST = Stitch.
Inc = Increase.
Dec = Decrease.
(…) = Repeat the space in brackets the given number of times.
[…] = Total number of stitches.

This pattern is made with continues rounds, unless stated otherwise. Use a stitch marker to mark your first/last stitch of your row.

♥ Pattern Candy Cane

Cane
Use the color White.
While making the cane, stuff along the way. Place the eyes along the way as well, 1 between row 7&8 and the other between row 12&13.

1: 4SC in a Magic Ring. [4]
2: 2SC in each st around. [8]
3: 8SC. [8]
|
26: 8SC. [8]
Try to slide in the wire here, it probably won’t go in easily but just try to wiggle it through.
27: Dec around. [4]
Fasten off and weave in tail.

Red Stripe
Use the color Red.

Make an x amount of FSC. The reason I don’t give and amount is that you sew the first part to the cane right after you start making the stripe, along you go wrap the stripe around the cane, it can differ how many FSC you need. When you have enough to reach the other end of the cane fasten off and sew it tight. Weave in tail.

♥ Assembling

Whenever I start assembling Amigurumi, I’d like to use sewing pins to position all parts first until I’m happy. Then I will sew them on. I recommend you do so as well.

There isn’t any to assemble here. Just bent the cane in the right shape and then with the piece of black yarn, create his mouth.
If you want to hang it, don’t forget to add a loop to the top.

I hope you enjoyed today’s pattern! I think it’s adorable. If you decided to make any of the blogmas amigurumi, please show me on Twitter or Instagram  with #DelinleaDIY. I’d love to see what you make using my patterns.

And don’t forget that you can get all Blogmas patterns ad free in a PDF bundle in my Ko-Fi shop (English US terms and Dutch). The link you can find on the Blogmas Page here! (Etsy might follow later).

Have a wonderful day and Merry Christmas!

Love
Danielle

PS. if you love those Blogmas patterns, maybe you’d like to support me on Ko-Fi?! So I can keep making content like this!

// ©2020 Delinlea / Danielle Kaal // Items made with this pattern may be sold in a limited number. Credit to ‘Delinlea’ is appreciated. Not allowed for mass production or commercial purposes. You may not reproduce, translate, share, freely distribute or sell this pattern as your own in digital or printed from.

Posted in: Blogmas 2020, Christmas, Crafting, Crochet Tagged: Amigurumi, Blogmas 2020, candy cane, Christmas, Crochet, cute, Free Pattern, haken, kawaii

♥ Day23; Polar Bear Amigurumi

23 december 2020 by Delinlea Leave a Comment

Hey Lovelies! Whenever I think of a polar bear I often have to think of the movie the golden compass! I should re-watch is again, it’s so good! Do you like to watch movies multiple times, or do you just watch them once?! I can watch good movies often, or I ‘watch’ them while making stuff. But for today we aren’t gonna watch a movie but make this adorable polar bear amigurumi! Let’s have fun!

Polar Bear made with Amigurumi

For this pattern you’ll need:
♥ Yarn in the colors White and Red. (I used Stylecraft Special DK)
♥ Bit of Black felt and (Fabric)Glue for the Nose.
♥ Crochet hook. ( I used 3mm)
♥ Stuffing.
♥ Yarn Needle.
♥ Sewing Pins.
♥ Stitch Marker.
♥ Safety Eyes, 6mm.

Stitches used (US Terms):
Magic Ring.
CH = Chain.
SLST = Slip Stitch.
FSC = Foundation Single Crochet.
SC = Single Crochet.
BB = Bobble Stitch.
ST = Stitch.
FL = Front Loops.
Inc = Increase.
Dec = Decrease.
(…) = Repeat the space in brackets the given number of times.
[…] = Total number of stitches.

This pattern is made with continues rounds, unless stated otherwise. Use a stitch marker to mark your first/last stitch of your row.

♥ Pattern Christmas Polar Bear

Body
Use the color White.
Prepare 3 strings of White yarn of about 8cm, tie these together.

1: 6SC in a Magic Ring. [6]
Add the 3 strings of White yarn to the magic ring, the close it up.
2: 2SC in each st around. [12]
3: (1SC, inc) 6 times. [18]
4: (5SC, inc) 3 times. [21]
5: 21SC. [21]
6: 21SC. [21]
7: 21SC. [21]
8: (5SC, dec) 3 times. [18]
9: (1SC, dec) 6 times. [12]
10: (2SC, dec) 3 times. [9]
11: FL, 9SC. [9]
12: (1SC, inc, BB) 2 times, 2SC, inc. [12]
Place the eyes now between row 6&7, about 5st apart. It will be a bit fiddly but this way you know where the legs will be, so you know where the eyes go. Also Stuff the head.
13: 12SC. [12]
14: 12SC. [12]
15: BB, 3SC, (BB, 3SC) 2 times. [12]
Stuff the body.
16: Dec around. [6]
Fasten off and weave in tail.

Snout
Use the color White.

1: 6SC in a Magic Ring. [6]
2: (inc) 2 times, 1SC, (inc) 2 times, 1SC. [10]
3: 10SC. [10]
Fasten off and leave a long tail for sewing.

Ears (Make 2)
Use the color White.

Make 4SC in a Magic Ring. [4]
Fasten off and leave a long tail for sewing.

Scarf
Use the color Red.

Make 26FSC, Fasten off and weave in tail.

♥ Assembling

Whenever I start assembling Amigurumi, I’d like to use sewing pins to position all parts first until I’m happy. Then I will sew them on. I recommend you do so as well.

Sew first his snout slightly in between his eyes, you might wanna stuff it a bit while sewing it on. Then find the position of his ears and sew those on. Cut his hair to the length you want and unraffle the strings with a needle or brush. Tie his scarf around his neck. From black felt, cut a small nose and glue this on.
If you wanna be able to hang it, make sure you add a little loop to the top.

I hope you enjoyed today’s pattern! I think it’s adorable. If you decided to make any of the blogmas amigurumi, please show me on Twitter or Instagram  with #DelinleaDIY. I’d love to see what you make using my patterns.

And don’t forget that you can get all Blogmas patterns ad free in a PDF bundle in my Ko-Fi shop (English US terms and Dutch). The link you can find on the Blogmas Page here! (Etsy might follow later).

Have a wonderful day and I’ll see you tomorrow!

Love
Danielle

PS. if you love those Blogmas patterns, maybe you’d like to support me on Ko-Fi?! So I can keep making content like this!

// ©2020 Delinlea / Danielle Kaal // Items made with this pattern may be sold in a limited number. Credit to ‘Delinlea’ is appreciated. Not allowed for mass production or commercial purposes. You may not reproduce, translate, share, freely distribute or sell this pattern as your own in digital or printed from.

Posted in: Blogmas 2020, Christmas, Crafting, Crochet Tagged: Amigurumi, Blogmas 2020, Christmas, Crochet, cute, Free Pattern, haken, kawaii, Polar bear

♥ Day22; Christmas Wreath Amigurumi

22 december 2020 by Delinlea Leave a Comment

Hey Lovelies! It’s already day 21, this went by really fast! For today we will make a Christmas wreath. I’ve made plenty over the years, but this is definitely the smallest so far. I usually use all kinds of greens and wire to put it together. The florist in me show then haha. There are so many possibilities to make them tho. This amigurumi is one of them, and would love to be part of your life.

Christmas Wreath made with Amigurumi

For this pattern you’ll need:
♥ Yarn in the colors Red and Green. (I used Stylecraft Special DK)
♥ Bit of Black yarn to make his mouth.
♥ Crochet hook. ( I used 3mm)
♥ Stuffing.
♥ Yarn Needle.
♥ Sewing Pins.
♥ Stitch Marker.
♥ Safety Eyes, 6mm.

Stitches used (US Terms):
Magic Ring.
CH = Chain.
SLST = Slip Stitch.
FSC = Foundation Single Crochet.
SC = Single Crochet.
ST = Stitch.
Inc = Increase.
Dec = Decrease.
(…) = Repeat the space in brackets the given number of times.
[…] = Total number of stitches.

This pattern is made with continues rounds, unless stated otherwise. Use a stitch marker to mark your first/last stitch of your row.

♥ Pattern Christmas Wreath

Wreath
Use the color Green.

1: 8SC in a Magic Ring. [8]
2: 8SC. [8]
Repeat row 2 until you have 27rows total.
Stuff along the way and also place the eyes along the way, 1 eye between row 11&12 and 1 between row 17&18.
Fasten off and sew the last and the first row together to make a circle.

Bow
Use the color Red.
This part isn’t made with continues rounds.

1: 20FSC, turn. [20]
2: 20SC, turn. [20]
3: 20SC. [20]
Fasten off and leave a long tail for sewing.

Middle of the Bow
Use the color Red.
This part isn’t made with continues rounds.

1: 6FSC, turn. [6]
2: 6SC. [6]
Fasten off and leave a long tail for sewing.

♥ Assembling

Whenever I start assembling Amigurumi, I’d like to use sewing pins to position all parts first until I’m happy. Then I will sew them on. I recommend you do so as well.

Make a circle of the ‘bow’ part, and sew this. Do the same with the middle part of the bow, but sew it around the ‘bow’. Then sew the bow completed to the top of the wreath. With a bit of Black yarn, create his Mouth
If you want to hang it, don’t forget to add a loop to the top.

I hope you enjoyed today’s pattern! I think it’s adorable. If you decided to make any of the blogmas amigurumi, please show me on Twitter or Instagram  with #DelinleaDIY. I’d love to see what you make using my patterns.

And don’t forget that you can get all Blogmas patterns ad free in a PDF bundle in my Ko-Fi shop (English US terms and Dutch). The link you can find on the Blogmas Page here! (Etsy might follow later).

Have a wonderful day and I’ll see you tomorrow!

Love
Danielle

PS. if you love those Blogmas patterns, maybe you’d like to support me on Ko-Fi?! So I can keep making content like this!

// ©2020 Delinlea / Danielle Kaal // Items made with this pattern may be sold in a limited number. Credit to ‘Delinlea’ is appreciated. Not allowed for mass production or commercial purposes. You may not reproduce, translate, share, freely distribute or sell this pattern as your own in digital or printed from.

Posted in: Blogmas 2020, Christmas, Crafting, Crochet Tagged: Amigurumi, Blogmas 2020, Christmas, Crochet, cute, Free Pattern, haken, kawaii, Wreath

♥ Day 21; Holly Amigurumi

21 december 2020 by Delinlea Leave a Comment

Hey Lovelies! I feel like this blogmas went really fast! I hope you enjoyed it so far, just a few more days to go! One of the things that always make me think of Christmas is Holly, specially with those red berries and snow! I hope you will enjoy todays pattern as well!

Holly made with amigurumi

For this pattern you’ll need:
♥ Yarn in the colors Red and Green. (I used Stylecraft Special DK)
♥ Bit of Black yarn to make his mouth.
♥ Crochet hook. ( I used 3mm)
♥ Stuffing.
♥ Yarn Needle.
♥ Sewing Pins.
♥ Stitch Marker.
♥ Safety Eyes, 6mm.

Stitches used (US Terms):
Magic Ring.
CH = Chain.
SLST = Slip Stitch.
SC = Single Crochet.
HDC = Half Double Crochet.
DC = Double Crochet.
Picot = Picot of 3SlSt.
ST = Stitch.
Inc = Increase.
Dec = Decrease.
(…) = Repeat the space in brackets the given number of times.
[…] = Total number of stitches.

This pattern is made with continues rounds, unless stated otherwise. Use a stitch marker to mark your first/last stitch of your row.

♥ Pattern Holly

Berry
Use the color Red.

1: 6SC in a Magic Ring. [6]
2: 2SC in each st around. [12]
3: (1SC, inc) 6 times. [18]
4: 18SC. [18]
5: 18SC. [18]
6: 18SC. [18]
7: 18SC. [18]
8: (1SC, dec) 6 times. [12]
Place the eyes between row 5&6, about 3st apart.
Stuff the Berry.
9: Dec around. [6]
Fasten off and weave in tail.

Leaf (Make 2)
Use the color Green.

Ch12, insert in second ch from hook, 1SC, 1HDC, 1DC, Picot, 1DC, 2HDC, 1DC, Picot, 1DC, 2HDC, 1DC+Picot+1DC in the last st, continue to work along the other side of the chain, 2HDC, 1DC, Picot 1DC, 2HDC, 1DC, Picot, 1DC, 1HDC, 1SC.
Fasten off and leave a long tail for sewing.

♥ Assembling

Whenever I start assembling Amigurumi, I’d like to use sewing pins to position all parts first until I’m happy. Then I will sew them on. I recommend you do so as well.

This one is pretty easy to assemble, just sew the leave to the top of the berry. With a bit of Black yarn, create his Mouth
If you want to hang it, don’t forget to add a loop to the top.

I hope you enjoyed today’s pattern! I think it’s adorable. If you decided to make any of the blogmas amigurumi, please show me on Twitter or Instagram  with #DelinleaDIY. I’d love to see what you make using my patterns.

And don’t forget that you can get all Blogmas patterns ad free in a PDF bundle in my Ko-Fi shop (English US terms and Dutch). The link you can find on the Blogmas Page here! (Etsy might follow later).

Have a wonderful day and I’ll see you tomorrow!

Love
Danielle

PS. if you love those Blogmas patterns, maybe you’d like to support me on Ko-Fi?! So I can keep making content like this!

// ©2020 Delinlea / Danielle Kaal // Items made with this pattern may be sold in a limited number. Credit to ‘Delinlea’ is appreciated. Not allowed for mass production or commercial purposes. You may not reproduce, translate, share, freely distribute or sell this pattern as your own in digital or printed from.

Posted in: Blogmas 2020, Christmas, Crafting, Crochet Tagged: Amigurumi, Blogmas 2020, Christmas, Crochet, cute, Free Pattern, haken, Holly, kawaii
« Vorige 1 2 3 4 5 6 7 … 12 13 14 15 16 Volgende »

What are you looking for?!

My Socials

Ko-Fi

I love making all these free things for you, tho it would be very helpfull if you can support me on Ko-Fi! (You don’t have to tho, totally up to you!)

Ko-Fi Shop!!

In my Ko-Fi shop you can find PDF Amigurumi Patterns!! You can pay easily with PayPal.
Go to the shop here!!

Recent Blog Posts

  • ♥ Happy 2022!
  • ♥ Day 12; Lights
  • ♥ Day 11; Flower Deco
  • ♥ Day 10; Snowman
  • ♥ Day 9; Gingerbread Houses

Recent Comments

  • Liane Van der Donck op ♥ Amigurumi Ghost
  • Kimberly Spear op ♥ Free Pattern; Amigurumi Shiber
  • Delinlea op ♥ Pua Tsum Tsum Amigurumi
  • Marfermar op ♥ Free Pattern; Easter Bunny
  • mary op ♥ Pua Tsum Tsum Amigurumi

Categories

  • animation
  • Beadwork
  • Blogmas 2018
  • Blogmas 2020
  • Blogmas 2021
  • Books
  • Bujo
  • Christmas
  • Christmas CAL 2019
  • Christmas Countdown 2017
  • Contest
  • Crafting
  • Crochet
  • Drawing
  • Drawing Lesson
  • Easter
  • Geen categorie
  • Life
  • Miniature
  • Nail Art
  • New Year
  • Paper
  • plush
  • Pokemon
  • Poseable Art Doll
  • Recipe
  • Sewing
  • Shop Pattern
  • Sinterklaas
  • Social Media
  • Tsum Tsum
  • Ufufy

Copyright © 2023 Delinlea - My little fantasy world.

Family WordPress Theme by themehall.com