Delinlea - My little fantasy world
  • ♥ Home
  • ♥ About Me
  • ♥ Blogmas 2021
  • ♥ Free Patterns
    • ♥ Amigurumi; Spring/Easter
    • ♥ Amigurumi; Fall/Halloween
    • ♥ Amigurumi; Winter
    • ♥ Amigurumi Tsum Tsum
    • ♥ Amigurumi Ufufy
    • ♥ Amigurumi Others
    • ♥ Christmas Countdown 2017
    • ♥ Blogmas 2018
    • ♥ Blogmas 2020
  • ♥ Tutorials
    • ♥ Easter
    • ♥ Home Deco
    • ♥ Others
  • ♥ Drawing Lessons
  • ♥ FanFic
    • ♥ Chapter 1
    • ♥ Chapter 2
    • ♥ Chapter 3
    • ♥ Chapter 4
    • ♥ Chapter 5
    • ♥ Chapter 6
    • ♥ Chapter 7
  • ♥ Gallery
    • ♥ Crafts
    • ♥ Drawings
    • ♥ Poseable Art Dolls
  • ♥ Links
  • ♥ Contact

Christmas

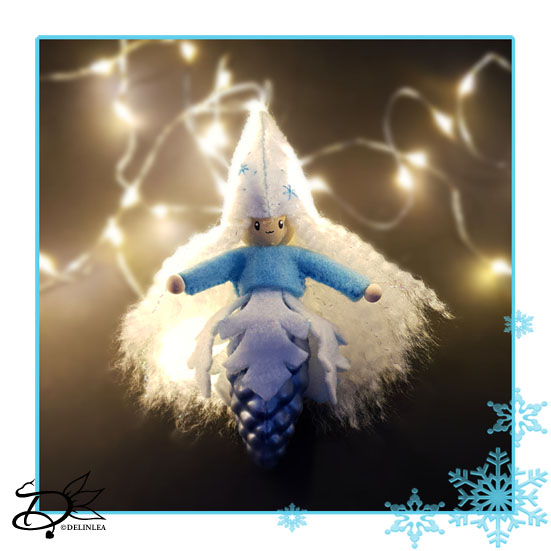
♥ Day 6; Paper Stars

11 december 2021 by Delinlea Leave a Comment

Hey Lovelies! I hope you like paper craft or cutting or how you wanna call it. Because today we are making some paper stars in 3d! I love how they turned out, not too complicated but still very pretty. Let’s see how to make those!

I hope you are having fun so far making all or some of the crafts for this year’s blogmas?! We are at the sixths day, so half way through.

Paper Stars

For this DIY you’ll need:
♥ This Template. (This download gives you all templates for blogmas 2021)
♥ White Paper, preferably about 200gr/m2.
♥ X-acto Knife.
♥ Cutting Mat.
♥ Ruler.
♥ Needle and Thread.

DIY Paper Stars

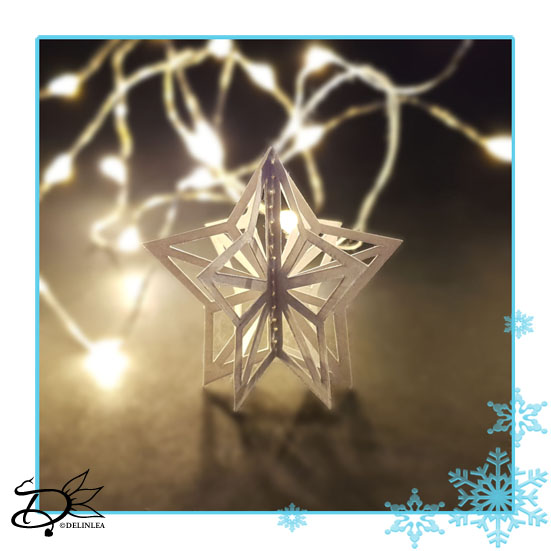
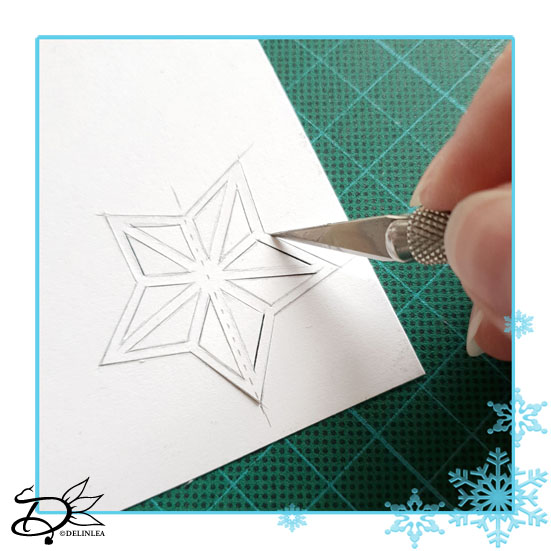
First print out this template. This will be enough for 5 stars.

For one complete star, you need to have 3 stars cut out. Cut along all the solid lined using an x-acto knife and a ruler, the dotted line you’ll leave alone. Make sure to put a cutting mat underneath your work, so you won’t damage your surface.

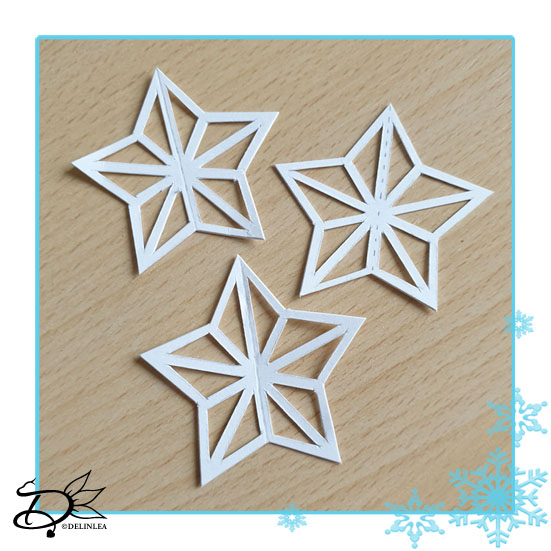
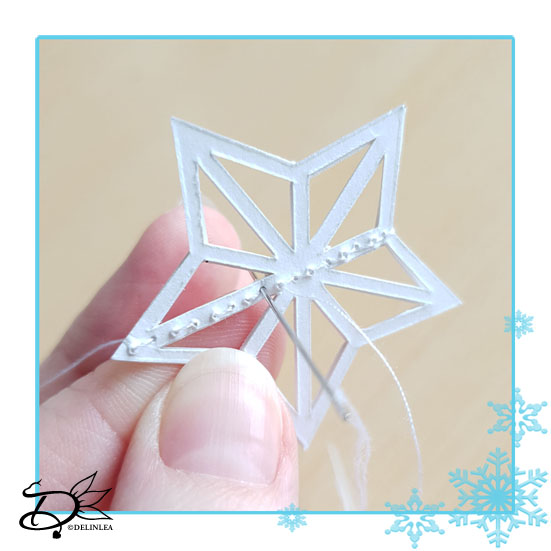
When you’ve cut them out, score two of them along the dotted line. Put one in front of the non scored star and one behind it. Now sew along the dotted line using a needle and thread, make holes before you start sewing to make it easier. Make sure to start from the point and leave a long thread before you start. Then sew down and up again using a running stitch. So, both ends of the thread will be at the top and this will make the loop to hang it from.

That’s all there is to do! Make several stars if you like and hang them underneath the snowball.

If you decided to join this lovely project, or just some parts of it, show me on Twitter or Instagram what you are working on! I’d love to see!

If you like to buy the PDF pattern for this whole project, go to my ko-fi shop. This will have an extra story attached and no ads.

Have a wonderful day!

Love
Danielle

PS. if you love those patterns, maybe you’d like to support me on Ko-Fi?! So I can keep making content like this!

// ©2021 Delinlea / Danielle Kaal // Items made with this pattern/DIY may be sold in a limited number. Credit to ‘Delinlea’ is appreciated. Not allowed for mass production or commercial purposes. You may not reproduce, translate, share, freely distribute or sell this pattern/DIY as your own in digital or printed from.

Posted in: Blogmas 2021, Christmas, Crafting, Paper Tagged: Blogmas 2021, Christmas, paper, star, stars, Winter Wonderland

♥ Day 5; Winter Fairy from Felt

9 december 2021 by Delinlea Leave a Comment

Hey Lovelies! I love fairies, what you do you think of fairies?! I hope you like them, because today I’ll gonna show you how to make this Winter Fairy from felt and a Bauble. I hope it’s not too fiddly, but I think it’s a good size this way. I hope you’ll have fun making this one.

Note; This tutorial, for this fairy, will only be available during December 2021, after that I will make a separate PDF file in my ko-fi shop.

Winter Fairies from Felt

For this DIY you’ll need:
♥ This Template. (This download gives you all templates for blogmas 2021)
♥ Oval Bauble, about 5,5-6cm in height.
♥ White and Light Blue Felt.
♥ White (Sparkly) Yarn.
♥ Needle and thread.
♥ 18cm of thin wire.
♥ Wooden Bead, 15mm.
♥ 2 Small Wooden Beads, 5mm.
♥ Acrylic Paint and Brush to make a face.
♥ (Hot) Glue.
♥ Pen.
♥ Scissors.

Winter Fairy DIY

Start with printing out this template and cut out all parts for the Winter Fairy.

Snowflake Skirt

Start with part A, trace this on white felt, about 5 times (If your bauble is bigger, maybe you need more pieces). Cut those pieces out neatly. Glue all those pieces around the top of the bauble (Where the hook was).
With a needle and thread, sew the points together that are next to each other, where the cross is in the template.

Body

Use part B of the template now and trace this on Light Blue felt. Cut out neatly.

Take the 18cm of wire, fold it in half and twist it together. Glue this to the top of the bauble, this will be the structure for the arms.

Sew part b around the arms/body with the blanket stitch, so it’s gonna be a shirt. Bend the arms down a bit, carefully.

Head

Take the 15mm bead and glue this on top of the body. You could draw/paint a face on it now, but I prefer to do that last.
Inside the bead, glue a loop from 20cm thread (You can make it longer, depends on how you wanna hang them).

  • Winter Fairies from Felt DIY

Hands

For the hands you use the 2 small beads. Trim the wire for the arms a bit if it’s still too long, it needs to stick out about 3mm from the sleeve. Then glue the beads on. (Since I didn’t had small beads, I used a bit of clay).

Hair

Get out the white yarn and cut 35 strands (or more) of about 8cm in length. Tie these tightly together, at the top, with a bit of white thread. Don’t worry about how neat it looks for now, you’ll trim that later on.
Unravel the strands of yarn with a big needle, so it’s looks a bit more like hair. This can be quite a progress, but if you lay it down on your desk and do it bit by bit, you’ll be fine.
When that’s done, take the loop of thread and get that through the top of the hair with a needle. Glue the hair to the top of the bead. Keep in mind where you want to face to be, keep the hair to the sides of the face.

If you want you can trim the hair a bit now.

Hat

Trace part C three times on to white felt and cut those out.

On at least one part, embroider some ‘snowflakes’ and dots with light blue thread. When you’ve done that, sew it together using the long sides.

Now that the hat is created, carefully put it on its hat. Don’t forget to take the loop of thread through first! You can use a bit of glue if it won’t stay in place.

Finishing off

Last is to paint a face one with some acrylic, you can make it as fancy as you want. I kept it quite simple this time.

Now you can hang the Winter Fairy on to the Snowball. You can hang as many as you want.

If you decided to join this lovely project, or just some parts of it, show me on Twitter or Instagram what you are working on! I’d love to see!

If you like to buy the PDF pattern for this whole project, go to my ko-fi shop. This will have an extra story attached and no ads.

Have a wonderful day!

Love
Danielle

PS. if you love those patterns, maybe you’d like to support me on Ko-Fi?! So I can keep making content like this!

// ©2021 Delinlea / Danielle Kaal // Items made with this pattern/DIY may be sold in a limited number. Credit to ‘Delinlea’ is appreciated. Not allowed for mass production or commercial purposes. You may not reproduce, translate, share, freely distribute or sell this pattern/DIY as your own in digital or printed from.

Posted in: Blogmas 2021, Christmas, Crafting Tagged: Blogmas 2021, Christmas, Fairy, felt, vilt, winter, Winter Wonderland

♥ Day 3; Bow

5 december 2021 by Delinlea Leave a Comment

Hey Lovelies! A lovely bow on top of our tree is a must, right?! Well it doesn’t have to be a bow on top, but something on top. And this time I just went for a pretty bow. It’s not that hard to make, although a bow can look pretty complicate to make. I’ll help you step by step in this blog to make your own.

Bow

For this DIY you’ll need:
♥ Light Blue Ribbon, 2,5cm wide.
♥  (Hot) Glue.
♥ Scissors.
♥ Ruler.
♥ Pencil.

DIY Bow

Cut 3 pieces of ribbon of 15cm and 1 piece of 5cm.

Make a circle of 2 of the 15cm lengths and clue the ends together. The 3rd 15cm length you fold in half and cut a triangle out of both ends. Where the fold is you make a small zigzag down, to make it easier to insert later. You can use a bit of glue to keep the zigzag together.

The 5cm length you fold ¼ in from both sides, so you make the width of the ribbon smaller.

Now put both rings slightly inside each other and push it flat in the middle, make sure the glued ends are in the back. And glue this down as well, so they stay like that. (See picture).
Where you put the glue in the middle, grab from both the top and bottom, so it ruffles up there. You can see the bow shape now.

Add the piece with the triangle cut out on the bottom on the bow. And wrap the 5cm length, that’s folded smaller to the middle of the bow. It might be slightly too long, just cut a bit off and glue it neatly.

Last you can shape the bow a bit, carefully pull the 2 circles a bit out of each other. And maybe adjust here and there.

Your bow is ready and you can add it to the top of your tree now! Look how beautiful!

If you decided to join this lovely project, or just some parts of it, show me on Twitter or Instagram what you are working on! I’d love to see!

If you like to buy the PDF pattern for this whole project, go to my ko-fi shop. This will have an extra story attached and no ads.

Have a wonderful day!

Love
Danielle

PS. if you love those patterns, maybe you’d like to support me on Ko-Fi?! So I can keep making content like this!

// ©2021 Delinlea / Danielle Kaal // Items made with this pattern/DIY may be sold in a limited number. Credit to ‘Delinlea’ is appreciated. Not allowed for mass production or commercial purposes. You may not reproduce, translate, share, freely distribute or sell this pattern/DIY as your own in digital or printed from.

Posted in: Blogmas 2021, Christmas, Crafting Tagged: Blogmas 2021, bow, Christmas, ribbon, Winter Wonderland

♥ Day 2; Christmas Tree

3 december 2021 by Delinlea Leave a Comment

Hey Lovelies! The next day of Christmas. And what is Christmas without a tree, well we really need to make one. Even though this one is not typical, I hope you’ll still like it! It’s a snowy one, almost looking like a cotton candy tree, don’t eat it though! I love how it turned out and I hope yours will turn out amazing as well.

Christmas Tree

For this DIY you’ll need:
♥ This Template. (This download gives you all templates for blogmas 2021)
♥ Paper, about 200gr/m2.
♥ Snow Blanket or Sheet Stuffing.
♥ Light Blue Acrylic Paint.
♥ Sponge.
♥ Scissors.
♥ Pencil/Marker.
♥ (Hot) Glue.

DIY Christmas Tree

Print out this template and cut all parts out of the Christmas Tree.

Base

Trace part A on some thicker paper, like 200gr/m2 and make a cone of it, glue neatly together.

Snow

Trace the other parts, B, C and D on to the snow blanket and cut all those parts out. Round of the edge with the waves, with a pair of scissors, to make it look prettier. Try all parts on the cone, matching the lines and see if they fit. If they do, go to the next step.

Painting

With a sponge I made the edge with the waves, light blue. Just dab it on carefully, leave a part white with a gradient to a light blue edge. You could skip this step as well if you think a white tree is better.

Finishing off

Now it’s time to glue parts B, C and D to the cone (part A). I used hot glue for this to make this go faster. Start with gluing on the bottom layer, Part B use the lines drawn on the cone as guide. Do the same for part C. For Part D, you kinda do the same, but since there is no line to guide you, place the top part about 1cm past the top of the cone and continue to glue it on.

That’s it! The Christmas tree is done. Glue it on top of the snowball, but before you do so, attach a long piece of thread to the snowball and pull it through the tree as well.

If you decided to join this lovely project, or just some parts of it, show me on Twitter or Instagram what you are working on! I’d love to see!

If you like to buy the PDF pattern for this whole project, go to my ko-fi shop. This will have an extra story attached and no ads.

Have a wonderful day!

Love
Danielle

PS. if you love those patterns, maybe you’d like to support me on Ko-Fi?! So I can keep making content like this!

// ©2021 Delinlea / Danielle Kaal // Items made with this pattern/DIY may be sold in a limited number. Credit to ‘Delinlea’ is appreciated. Not allowed for mass production or commercial purposes. You may not reproduce, translate, share, freely distribute or sell this pattern/DIY as your own in digital or printed from.

Posted in: Blogmas 2021, Christmas, Crafting Tagged: Blogmas 2021, Christmas, snow, tree

♥ Day 1; Snowball

1 december 2021 by Delinlea Leave a Comment

Hey Lovelies! We are kicking of blogmas 2021 with a pretty easy one! Just a big amigurumi ball made with fluffy yarn. Now I think about it, if you make several you can use it to a “Snowball” fight, how much fun would that be?! Obviously. this ball will be the base for our whole project, if you’ve see the blogmas intro blog. I hope you will have fun with our Winter Wonderland project, as I said before, I’ll post every other day this year. Not each day till Christmas. This will also give you more time to make all the things.

Snowball Amigurumi

For this Pattern you’ll need:
♥ Fluffy Yarn in the color White.
♥ Crochet Hook, 6,5MM*.
♥ Stuffing.
♥ Scissors.
♥ Stitch Markers.
♥ Yarn Needle.

*Check your yarn that you wanna use, to which hook size you need. For amigurumi it isn’t necessary to use the exact same yarn, they will only turn out bigger or smaller.

This is the yarn I used.

Stitches used (US Terms):
Magic Ring.
CH = Chain.
SC = Single Crochet.
ST = Stitch.
Inc = Increase.
Dec = Decrease.
(…) = Repeat the space in brackets the given number of times.
[…] = Total number of stitches.

This pattern is made using continuous rounds, unless stated otherwise. Use a stitch marker to mark the first stitch.

Pattern Snowball

1: 6SC in a Magic Ring. [6]
2: 2SC in each st around. [12]
3: (1SC, inc) 6 times. [18]
4: (2SC, inc) 6 times. [24]
5: (3SC, inc) 6 times. [30]
6: (4SC, inc) 6 times. [36]
7: (5SC, inc) 6 times. [42]
8-12: 42SC. [42]
13: (5SC, dec) 6 times. [36]
14: (4SC, dec) 6 times. [30]
15: (3SC, dec) 6 times. [24]
16: (2SC, dec) 6 times. [18]
Start with stuffing already.
17: (1SC, dec) 6 times. [12]
Continue stuffing.
18: Dec around. [6]
Stuff a bit more if needed.
Fasten off and weave in tail.

For this one there is no assembling needed as well, good thing right. I am sometimes annoyed when I have to assemble amigurumi’s, anyone with me?

If you decided to join this lovely project, or just some parts of it, show me on Twitter or Instagram what you are working on! I’d love to see!

If you like to buy the PDF pattern for this whole project, go to my ko-fi shop. This will have an extra story attached and no ads.

Have a wonderful day!

Love
Danielle

PS. if you love those patterns, maybe you’d like to support me on Ko-Fi?! So I can keep making content like this!

// ©2021 Delinlea / Danielle Kaal // Items made with this pattern/DIY may be sold in a limited number. Credit to ‘Delinlea’ is appreciated. Not allowed for mass production or commercial purposes. You may not reproduce, translate, share, freely distribute or sell this pattern/DIY as your own in digital or printed from.

Posted in: Blogmas 2021, Christmas, Crafting, Crochet, Shop Pattern Tagged: Amigurumi, Blogmas 2021, Christmas, Crochet, haken, snowball, Winter Wonderland
« Vorige 1 2 3 4 5 6 … 12 13 14 15 16 Volgende »

What are you looking for?!

My Socials

Ko-Fi

I love making all these free things for you, tho it would be very helpfull if you can support me on Ko-Fi! (You don’t have to tho, totally up to you!)

Ko-Fi Shop!!

In my Ko-Fi shop you can find PDF Amigurumi Patterns!! You can pay easily with PayPal.
Go to the shop here!!

Recent Blog Posts

  • ♥ Happy 2022!
  • ♥ Day 12; Lights
  • ♥ Day 11; Flower Deco
  • ♥ Day 10; Snowman
  • ♥ Day 9; Gingerbread Houses

Recent Comments

  • Liane Van der Donck op ♥ Amigurumi Ghost
  • Kimberly Spear op ♥ Free Pattern; Amigurumi Shiber
  • Delinlea op ♥ Pua Tsum Tsum Amigurumi
  • Marfermar op ♥ Free Pattern; Easter Bunny
  • mary op ♥ Pua Tsum Tsum Amigurumi

Categories

  • animation
  • Beadwork
  • Blogmas 2018
  • Blogmas 2020
  • Blogmas 2021
  • Books
  • Bujo
  • Christmas
  • Christmas CAL 2019
  • Christmas Countdown 2017
  • Contest
  • Crafting
  • Crochet
  • Drawing
  • Drawing Lesson
  • Easter
  • Geen categorie
  • Life
  • Miniature
  • Nail Art
  • New Year
  • Paper
  • plush
  • Pokemon
  • Poseable Art Doll
  • Recipe
  • Sewing
  • Shop Pattern
  • Sinterklaas
  • Social Media
  • Tsum Tsum
  • Ufufy

Copyright © 2023 Delinlea - My little fantasy world.

Family WordPress Theme by themehall.com