Delinlea - My little fantasy world
  • ♥ Home
  • ♥ About Me
  • ♥ Blogmas 2021
  • ♥ Free Patterns
    • ♥ Amigurumi; Spring/Easter
    • ♥ Amigurumi; Fall/Halloween
    • ♥ Amigurumi; Winter
    • ♥ Amigurumi Tsum Tsum
    • ♥ Amigurumi Ufufy
    • ♥ Amigurumi Others
    • ♥ Christmas Countdown 2017
    • ♥ Blogmas 2018
    • ♥ Blogmas 2020
  • ♥ Tutorials
    • ♥ Easter
    • ♥ Home Deco
    • ♥ Others
  • ♥ Drawing Lessons
  • ♥ FanFic
    • ♥ Chapter 1
    • ♥ Chapter 2
    • ♥ Chapter 3
    • ♥ Chapter 4
    • ♥ Chapter 5
    • ♥ Chapter 6
    • ♥ Chapter 7
  • ♥ Gallery
    • ♥ Crafts
    • ♥ Drawings
    • ♥ Poseable Art Dolls
  • ♥ Links
  • ♥ Contact

Miniature

♥ Paper Plant in Shell DIY

10 juni 2021 by Delinlea Leave a Comment

Hey Lovelies! I was thinking hard what to make for this week’s blog. I had a bunch of ideas, but those were more like long term projects. That wouldn’t happen in just a week. You will find out what it will be in the future. For today I kept it a bit more simplistic, but still fun. A little Paper Plant in a Shell! Look how cute that is. I’m absolutely obsessed with this, perfect to decorate with. And the best thing is, you can make it as big as you want.

Paper Plant in a Shell

For this DIY you’ll need:
♥ Shells of choice.
♥ Green paper. (Make sure it’s not too thin so it can hold its shape).
♥ Air Dry Clay.
♥ Acrylic Paint.
♥ (Nylon) Thread.
♥ Glue.
♥ Scissors.
♥ X-Acto Knife.
♥ Tiny Rocks. (Optional)
♥ (Fake) Moss. (Optional)

Tutorial Paper Plant in Shell

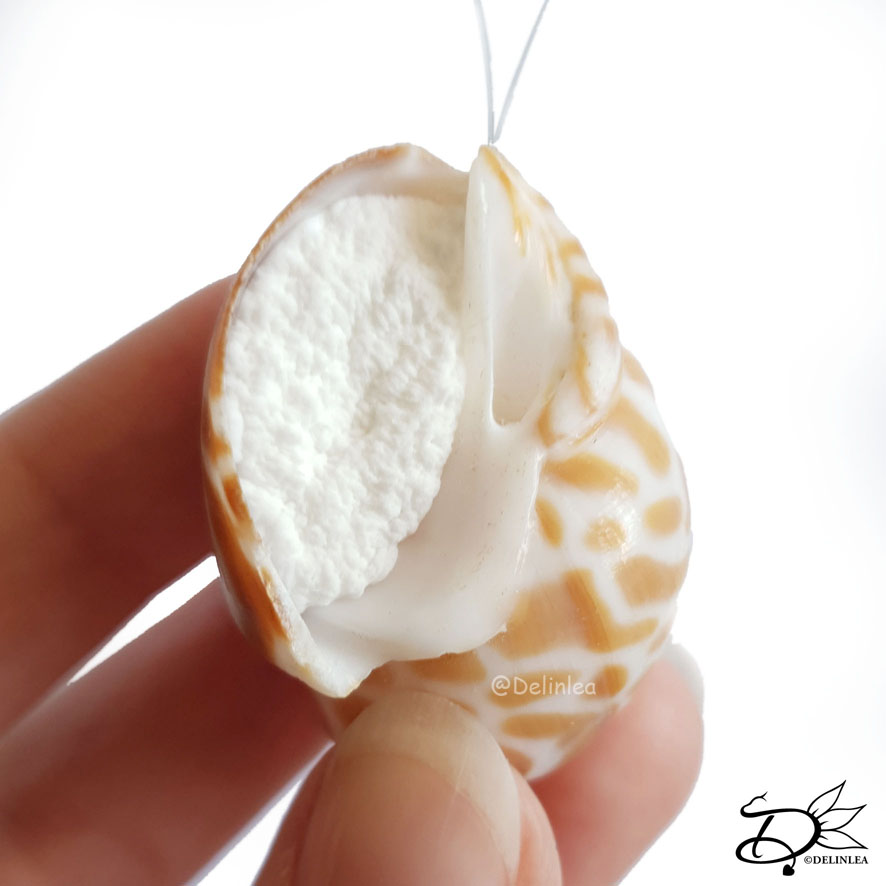
First prep your shell if you wanna be able to hang. Cut about 15cm of the nylon thread, make a loop and make a knot. Glue the knot inside the shell, it’s up to you where, just how you wanna hang it. Let the glue dry well.
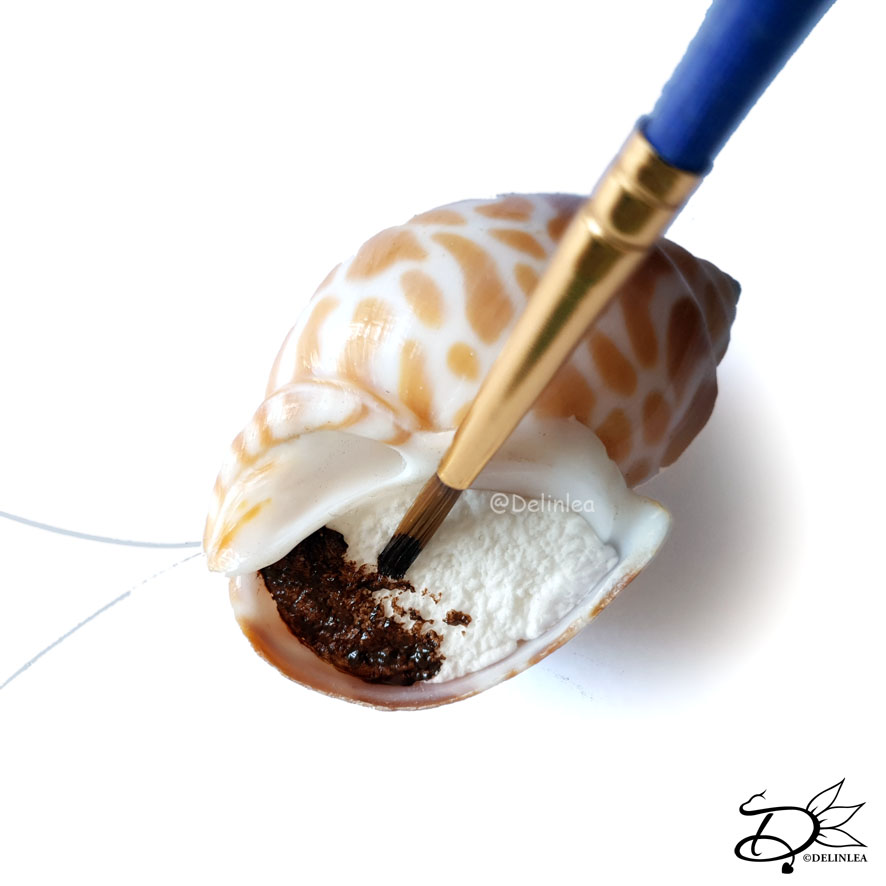
Clay

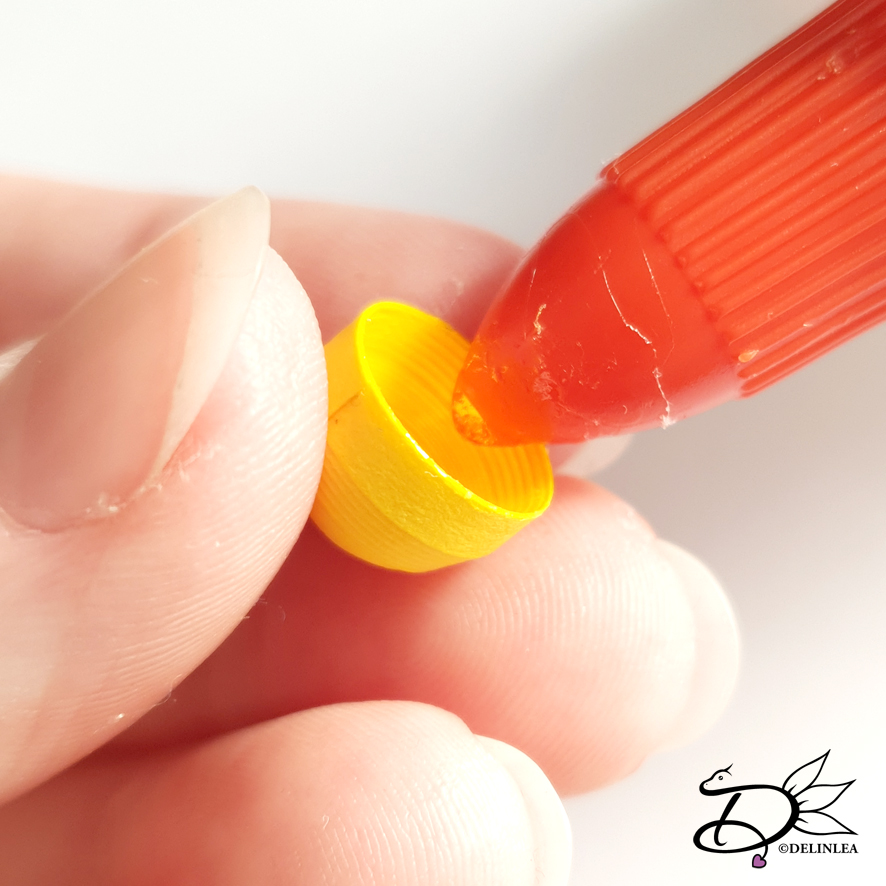
The clay will function as the soil in the shell. Push a bit of clay inside the hole and give it a bit of a rough texture, sand like. And let this dry.
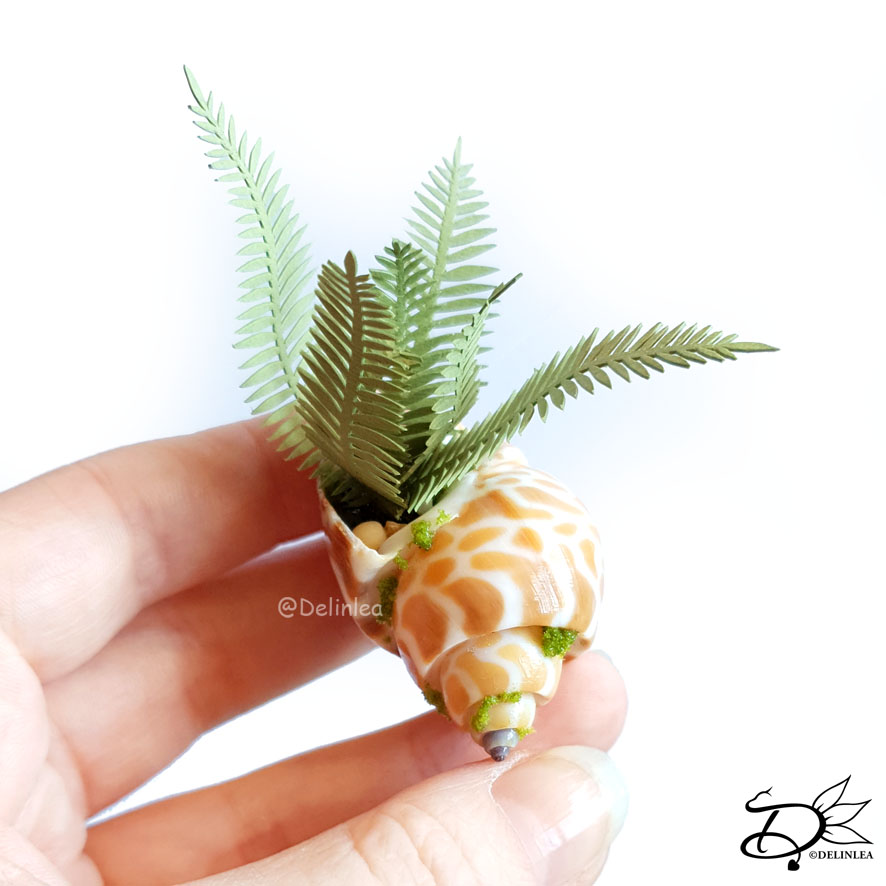
Creating the Plant

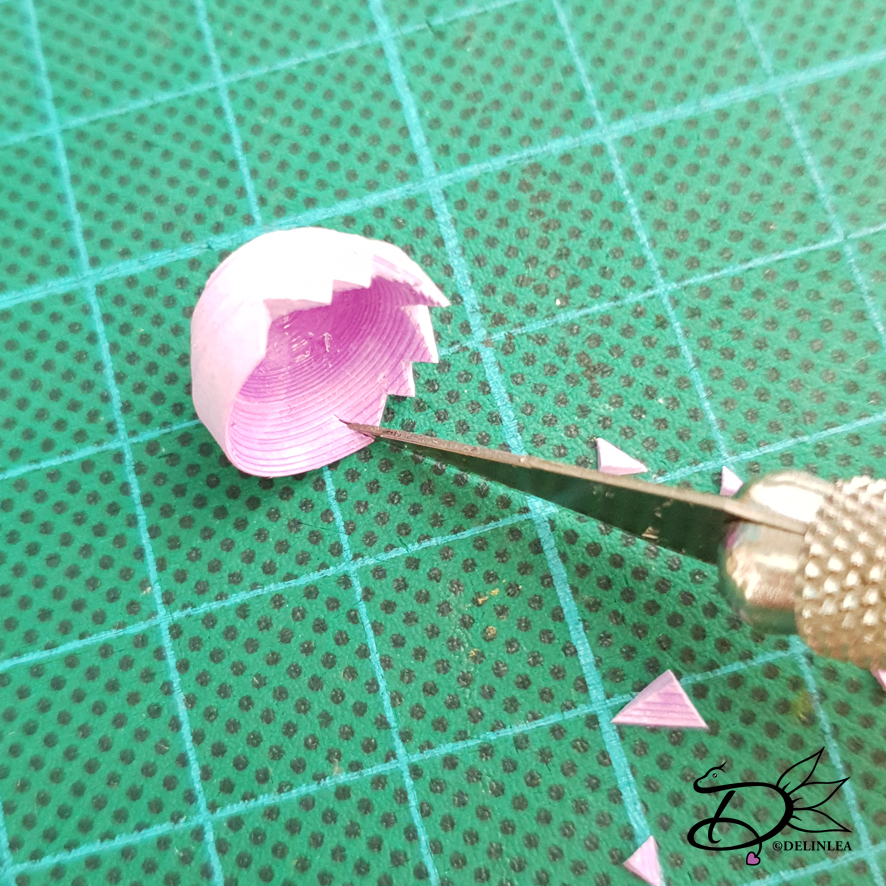
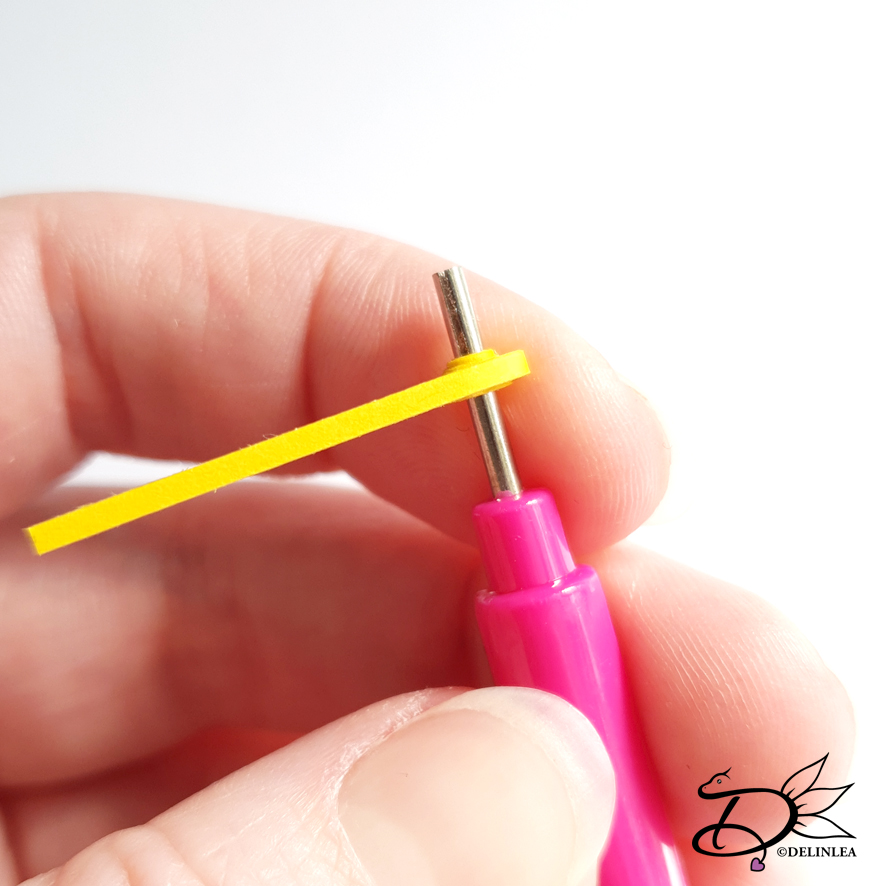
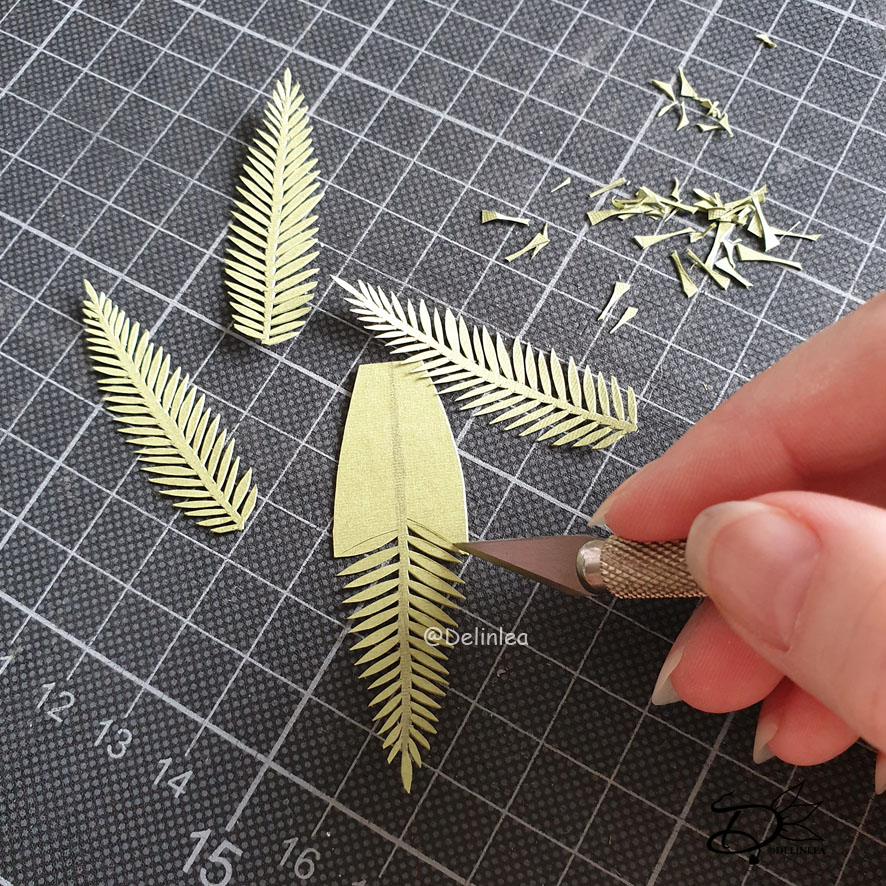
You can make any plant you want. I chose to do a fern, so cute! It’s only a bit fiddly to cut out. So, I can imagine if you chose something else. Look at how to plant is formed and go from there. Copy the leaf shape to the paper with a pencil. Cut those out with an x-acto knife or use scissors if the shape is easy to cut. Maybe add a bit of paint/pastel if you feel like it need more depth or when there are patterns on the leaf, like with a Calathea for example.

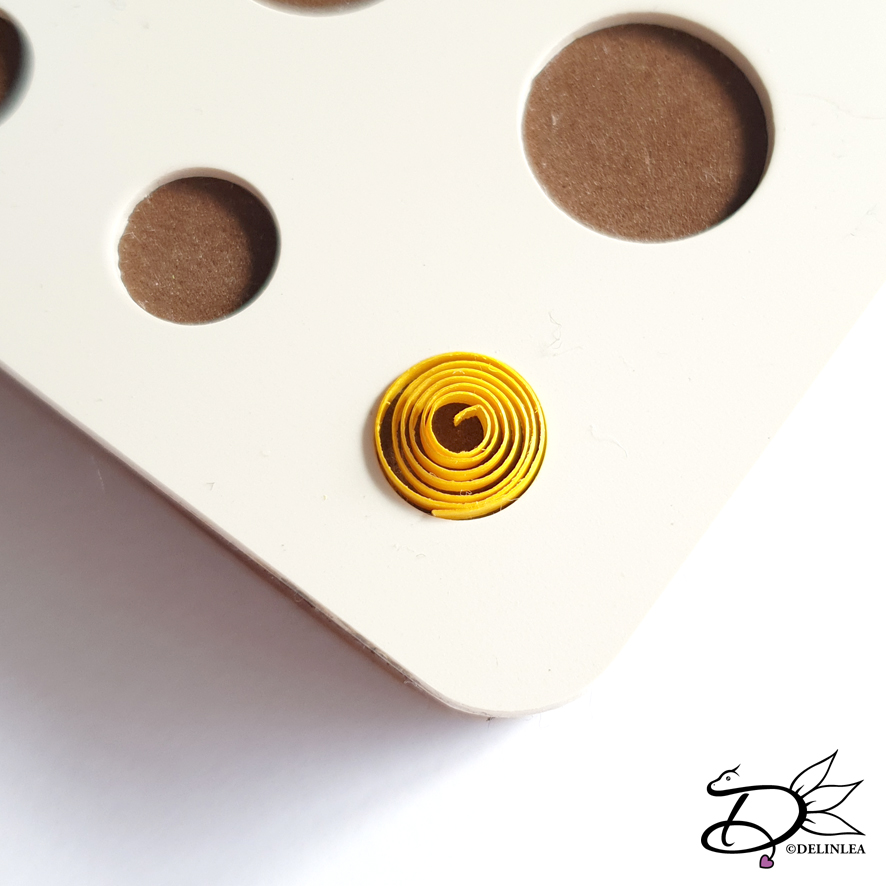
Next, it’s time to glue the leaves together. Since I chose a fern, those all come together at the bottom. So, that’s where I used glue to connect all the leave. But again, use reference pictures if you chose another plant. It could be that you need some kind of stem. Maybe you need some wire to make it a bit more sturdy. Shape the plant a bit if needed.

Finishing off

Paint the soil in a brown color or another color of choise if you prefer. Glue tiny rock here and there as well if you want. I found that the rocks will give it more of a realistic look. Also you could add some (fake) moss if you like, also glue this on the shell, be a bit messy. Nature doesn’t colors inside the lines perfectly either. When all those little bits are added to the shell and the glue is dry. Then it’s time to glue the plant to the soil.

Done!

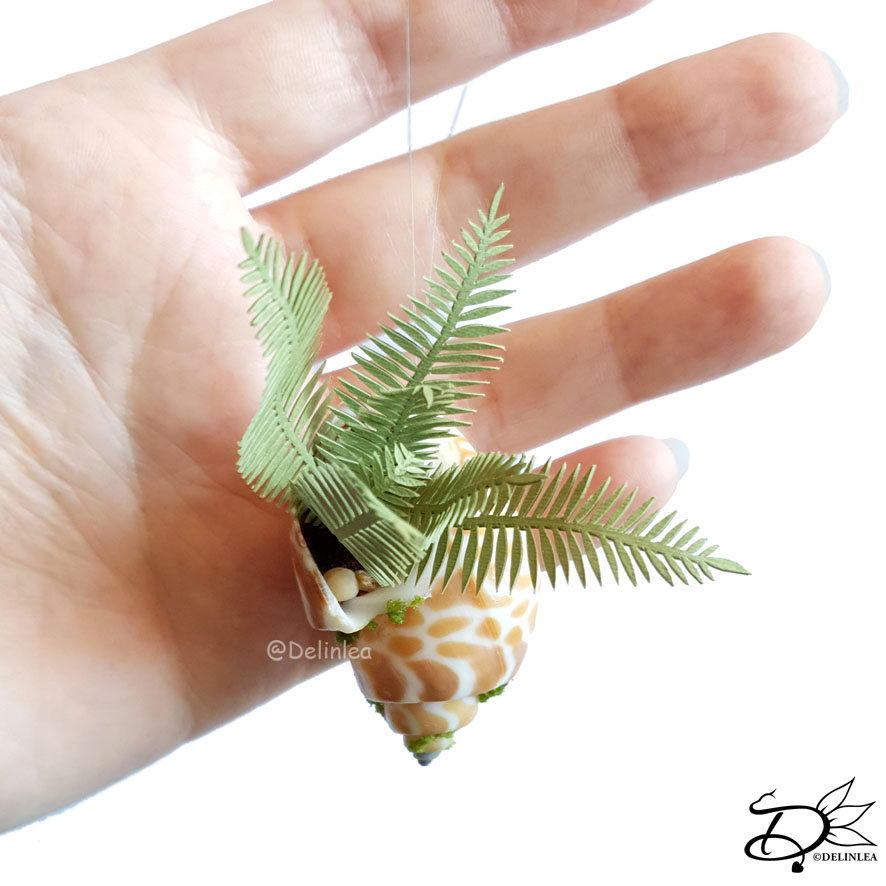
And your paper plant is all done, look how adorable this shell turned out! I love it. When this blog is done, I will make a few more, I might try to attempt to make a Monstera one. Let’s see if that will work out. When it does, I’ll update this blog with some pictures. And of course on social media. If you made one or more as well, don’t forget to show me on Twitter or Instagram! I’d love to see what you create!

Paper Plant in a Shell

Happy crafting and I’ll see you next week!

Love
Danielle

PS. if you love those kinds of blogs, maybe you’d like to support me on Ko-Fi?! So I can keep making content like this!

// ©2021 Delinlea / Danielle Kaal // You may not reproduce, translate, share, freely distribute or sell this blog/craft as your own.

Posted in: Crafting, Miniature, Paper Tagged: craft, crafting, cute, DIY tutorial, kawaii, Miniature, paper, plant, Shell

♥ Fairy House 2

11 juni 2020 by Delinlea Leave a Comment

Hey Lovelies! I didn’t expect to make another Fairy House for you. But I did! I thought of a round house and I kinda wanted to share with you how to make this one. The technique is quite the similar to this one I made before, so you might wanna check that post as well. I will refer to it a few times in this blog. I hope you will enjoy this one too.

Fairy House 2

For this DIY you’ll need:
♥ Popsicle sticks.
♥ Matchsticks.
♥ Glue.
♥ Empty Toilet Paper Roll.
♥ Paint.
♥ Brushes.
♥ Scissors where you’ll be able to cute the popsicle and matchsticks with.
♥ (Masking) Tape. (Optional)
♥ Cutting Mat. (Optional)
♥ Cling Film. (Optional)
♥ Fake Moss. (Optional)
♥ Anything else you wanna decorate with. (Optional)

Tutorial Fairy House

First draw a design and height (Mine is 5cm) you like for the base of the fairy house on to your Toilet Paper Roll. When you are happy, cover the roll with cling film, this is to be able to remove the house from the roll later. If you don’t you most likely will glue the house to the Toilet Paper Roll, and that’s not what you want.

Make the base

Place the sticks one by one on the design you drew on the Toilet Paper Roll. Draw a line on your stick  if it’s too long and trim it down with sharp scissors. Glue them on, one by one, side by side, following the design.

When you went all around let it dry completely. When it did remove it carefully from the Toilet Paper Roll.

Roof

For this house I made a roof structure. I used about 5 matchsticks for this and made them 4cm long. I glued them, spread evenly, on top of the base of the house and let them all meet at the top. This can be a bit tricky to do, so maybe use some tape to keep them in place while the glue dries.

While this dries, make the roof tiles. I’ve explained how to make those in the previous post under the subtitle “roof”. The only difference might be that I made them pointier for this house, so I could create the round roof better.

When the structure for the roof is dry and you made all the tiles, it’s time to make the roof! Glue the pieces on one by one and let it dry first when you think it’s gonna collapse. And like I said in the previous post, don’t try to make it perfect, it’s more fun when it looks a bit messy and aged.

When you are done, let it all dry completely before you continue.

Painting and decorating

Now it’s time for the fun stuff to make it look really cute, it makes such a difference when you paint and decorate the house. I’ve explained how to do this in the other post under “Painting” and “Decorating”.
The only thing I added with this one is paper leaves that I made. And glued them on the way I thought it would look good. They are not too hard to make, just cut out the shape you like, draw on the veins and curl up the ends so they are not so flat.

  • Fairy House 2
Here you can see the difference between before painting and after painting/decorating!

That was it already, you created a Fairy House! It’s such a fun project and I love to put them with my plants! Fairies are allowed to live with my plants haha xD. I wanted to make pics outside, but it was raining, sadly.
UPDATE; I finally could make some pics outside! <3

  • Fairy House 2
  • Fairy House 2

I hope you enjoyed today’s Fairy House craft and I’ll see you next week! Don’t forget to share your creations with me, since I love to see, on Twitter or Instagram.

Have a wonderful day!

Love
Danielle

Posted in: Crafting, Miniature Tagged: craft, crafting, cute, DIY, Fairy House, kawaii, Miniature, Tutorial

♥ Fairy House

14 mei 2020 by Delinlea Leave a Comment

Hey Lovelies! I always love those fairy house, you can place with you plants or in your garden. And since I am a plant lover, I needed those in my life. When I was cleaning my room I found a bunch of those popsicle sticks and matchsticks. I thought these were the perfect materials to make a fairy house with. And, sure, while writing this, I could also have used fake leaves for the roof or so. Okay, I guess I will make more in the future haha. Those are much fun to make. I hope you will have fun as well!

For this DIY you’ll need:
♥ Popsicle sticks.
♥ Matchsticks.
 ♥ Glue.
♥ This Template. (Or draw something yourself)
♥  (Masking) Tape.
♥ Paint.
♥ Brushes.
♥ Scissors where you’ll be able to cute the popsicle and matchsticks with.
♥ Cutting Mat. (Optional)
♥ Cling Film. (Optional)
♥ Fake Moss. (Optional)
♥ Anything else you wanna decorate with. (Optional)

Tutorial Fairy House

Start with cutting out this template or your self-drawn template. (Yes, there is no template for the roof, I’ll explain that later). Tape this to a flat surface you don’t mind to get glue on. I used my cutting mat. Over the template I used some cling film to make sure to wooden sticks won’t get glued to the template. (Cling film I could easily remove even it was glued together).

Make all parts of the house

Place the sticks one by one on the template, draw a line if your stick is too long and trim it down with sharp scissors. Glue them one by one each time on top of the other, following the template.

When you have one side done, leave it to dry and continue to make all the other side’s as well. If you made all sides, before moving on, make sure they dry properly, preferably over night.

Build the house

All parts are dry, now it’s time to build the house! I placed the floor on a flat surface, and start to glue the front and the back of the house first. Put some glue on the place that touch each other and use tape, that you can remove later, to hold the piece together until it dried. Then place the sides of the house, with glue, between the front and back. Use more tape to hold those pieces together as well. it can be a bit of a stuggle, sometimes you need to let a piece dry before you continue. Just try what works for you.

I decided to add window seals and a door as well. the windows the same technique as the walls and the door from a popsicle stick.

Roof

Now it’s time to make the roof tiles! I used 2 sizes of popsicle sticks for those. Cut them to about 1,5cm in length. It doesn’t really need to be exact that size. It gives the house more of an aged look when they are all different. Like those you will find in a story where the with lives or something xD.

It’s totally fine when the tiles break in half, you can still use those, and the roof will look more fun. Distress all of the pieces with something sharp like a big needle or a knife. But be careful to not hurt yourself! Check the picture if you’re not sure what I mean.

Make enough to cover the roof, and that’s probably more than you would think xD.

Glue the roof tiles on the house one by one, this process can take a while, especially in the beginning you have to wait to let the pieces dry before being able to continue. Don’t try to make it perfect, just make sure that you will be able to meet both sides of the roof on top.

When you are done, let it dry completely.

Painting

To paint the house, I used watered down acrylics. I started with a base color, Brown for the walls and Turquoise for the roof. I made sure to be able to see the wood through the paint. I let the first layer dry completely first. Then I moved on to a second later, watered down Black acrylics this time, for both the roof and walls. Let dry completely.

For the roof I also dry brushed some White acrylic to bring out the texture a bit more. If  you don’t know how to dry brush, try to find a tutorial first.

Decorating

I have used fake moss and dried plants. You can basically anything you like. But I would recommend the fake moss, that really makes the house look likes it’s been there for a while. It’s all in the details! xD

  • Fairy House

I hope you enjoyed today’s tutorial. I sure had fun making this fairy house and wanna make more so badly. I’ll gonna have a problem I guess xD, maybe I can sell them if I make too many! Don’t forget to show me yours if you followed along, on my Instagram or Twitter and use the #DelinleaDIY.

Love
Danielle

Posted in: Crafting, Miniature Tagged: DIY, Fairy House, Matchsticks, Miniature, Popsicle sticks, Tutorial, Wood

♥ Quilled Easter Baby Chick

2 april 2020 by Delinlea Leave a Comment

Hey Lovelies! Are you ready for Easter? I know these are weird times, but if you don’t make it fun for yourself, no one else would do it for you. And a way to make you feel better if to decorate your place with fun stuff and lovely (homemade) food! So I have a fun project for you to do! Most of us have paper around, just find the right colors and cut it to size. Then you are ready to make those adorable Easter baby chick!

Easter Baby Chicks

For this DIY you’ll need:
♥ 3 Strokes of Yellow, 3mm by 21cm each.
♥ 4 Strokes of Purple, 3mm by 21cm each. (Of course you can use another color!)
♥ 2 Strokes of Yellow, 1,5mm by 10,5cm each.
♥ Bit of extra Orange and Yellow Paper.
♥ X-Acto Knife.
♥ Glue.
♥ Acrylic Paint, Black and White.
♥ Brush.

Tutorial

Roll up the 3 yellow strokes (3mm by 21cm), use glue if you need to add a new stroke to make it easier (you don’t have to). Glue the end of the last stroke so it keeps the tight, round shape.

Making shapes

If you have this quilling board to make 3d shapes, please us it, it makes life a lot easier. If you don’t try to shape it without or try to find similar shapes to what I show in the pictures.
The board is easy to use, just push the circle, with your fingers, over the shape, carefully. Do it for both colors, for yellow I used a slightly cone shape one, for purple a half ball shape.

When you have your shapes ready, make sure to put a layer of glue on the inside. This will prevent it to lose its shape. Let this dry before you continue.

Egg Shell

The purple one, on the edge, you wanna cut out little triangles. You don’t want them to exactly the same, if you break an egg, they aren’t either. Be careful that you don’t cut them to deep. This will be the egg shell.

Now, glue the yellow part inside the purple part. So the little chick inside the egg shell.

Wings

Roll up the other yellow strokes, those will be for the wings. Let them expand to around 8mm and secure with a bit of glue. Pinch one side so you will get the shape as shown in the picture.
Glue the wings to body sides of the body of the baby chick.

Finishing Off

Last but not least, create a beak, hairs and eyes. I used paper for the beak and hairs and paint for the eyes. Since it’s so tiny, it’s hard to make everything from paper. Just do what works for you!

Easter Baby Chicks

You could also decorate the eggs if you like to! And maybe add some thread to be able to hang them up. ^-^

I hope you had fun with this tutorial. I love exploring things with paper, you can do so much with it. I did quilling in the past, but never anything 3D. Although I obviously know how to make it. It was fun!

Have a wonderful day!

Love
Danielle

Posted in: Crafting, Easter, Paper Tagged: baby, chick, Easter, kawaii, Miniature, paper, quilled, Quilling, tiny

♥ Theatre Boxes

21 juni 2018 by Delinlea Leave a Comment

Hey Lovelies!

Today I just need to share these DIY kits with you. I’m addicted to them and definitely gonna get some more. I’m talking about Theatre boxes! I found out about these on this Chinese website called aliexpress.com (<< That’s actually a dangerous place for me as a crafter xD). I can spend hours on that site, so I often find cute things that I can use for crafting or, like these, craft kits!

At first I wasn’t sure if I should get them. The instructions seemed to be in Chinese. Usually that doesn’t bother me much, I just follow the pics xD (or if it are videos, just copy what they do xD). After a while of searching and over thinking if I should get them, I found out that there are kits with English instructions, well that makes it a lot easier! Specially if it comes to connecting the lights. Yes! There are lights in there as well! It makes it so much more magical!

Okay, so, if you get a kit like I bought, ‘Forest Rhapsody’ or ‘Snow Dream’, everything is included that you will need, except for the glue (But I saw some ppl online that had glue as well, it depends on the seller I guess). And in one of the packs were batteries and in the other there were not. Even backgrounds are included (those are in the last 2 pages of the instructions that are meant for cutting out). Sadly enough, I don’t have pictures of when the box has just been opened and not used.

With these kits you almost make everthing yourself. In the instructions they tell you exactly what you need for a particulair item and you glue that togehter. Sometimes you need to cut some pieces to the right lenght but that’s always stated. The instructions are very clear, just follow what they show.


I had a lot of fun making these, and definitely gonna get some more! They take some time to make tho. AND you totally should get some tweezers with a bent tip, it can be very fiddly! Most item are tiny, like really tiny to fit in the box. (the boxes are about 8 by 14 cm).

Here you can find the ones I got:
Forest Rhapsody
Snow Dream

I hope I got you a new addiction as well *evil laugh*.

Love
Danielle

Note: this is not sponsored, just someting I love!

Posted in: Crafting, Miniature Tagged: Cute Room, Miniature, Theatre Boxes
1 2 Volgende »

What are you looking for?!

My Socials

Ko-Fi

I love making all these free things for you, tho it would be very helpfull if you can support me on Ko-Fi! (You don’t have to tho, totally up to you!)

Ko-Fi Shop!!

In my Ko-Fi shop you can find PDF Amigurumi Patterns!! You can pay easily with PayPal.
Go to the shop here!!

Recent Blog Posts

  • ♥ Happy 2022!
  • ♥ Day 12; Lights
  • ♥ Day 11; Flower Deco
  • ♥ Day 10; Snowman
  • ♥ Day 9; Gingerbread Houses

Recent Comments

  • Liane Van der Donck op ♥ Amigurumi Ghost
  • Kimberly Spear op ♥ Free Pattern; Amigurumi Shiber
  • Delinlea op ♥ Pua Tsum Tsum Amigurumi
  • Marfermar op ♥ Free Pattern; Easter Bunny
  • mary op ♥ Pua Tsum Tsum Amigurumi

Categories

  • animation
  • Beadwork
  • Blogmas 2018
  • Blogmas 2020
  • Blogmas 2021
  • Books
  • Bujo
  • Christmas
  • Christmas CAL 2019
  • Christmas Countdown 2017
  • Contest
  • Crafting
  • Crochet
  • Drawing
  • Drawing Lesson
  • Easter
  • Geen categorie
  • Life
  • Miniature
  • Nail Art
  • New Year
  • Paper
  • plush
  • Pokemon
  • Poseable Art Doll
  • Recipe
  • Sewing
  • Shop Pattern
  • Sinterklaas
  • Social Media
  • Tsum Tsum
  • Ufufy

Copyright © 2023 Delinlea - My little fantasy world.

Family WordPress Theme by themehall.com