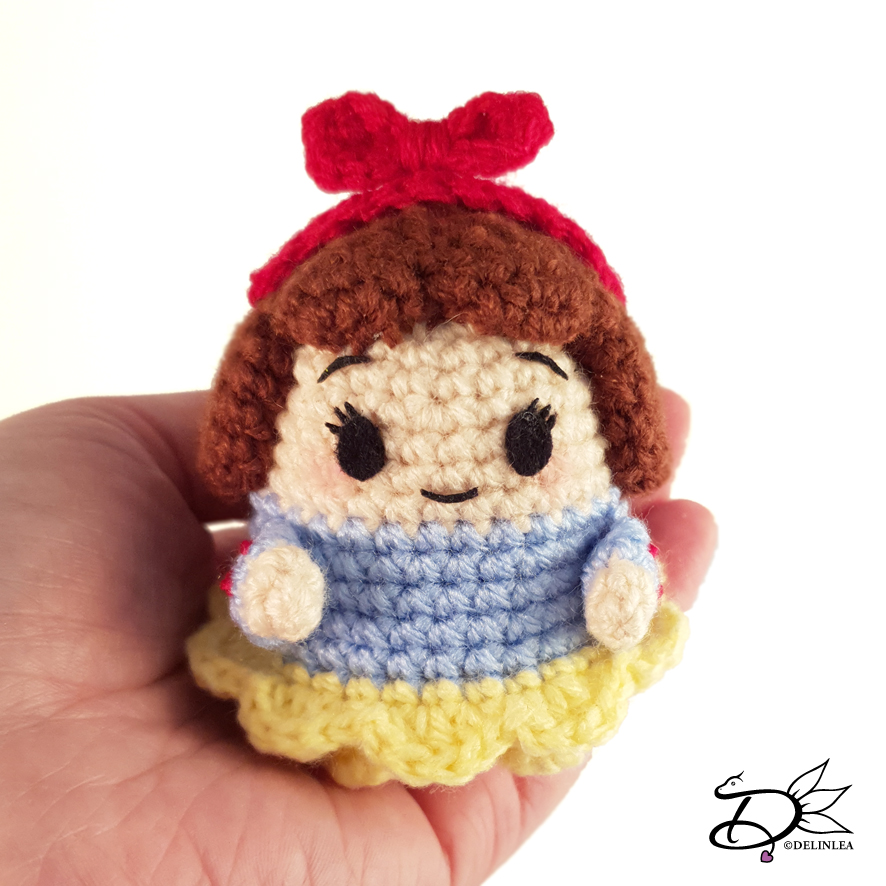
Hey Lovelies! Are you ready for a new Ufufy Amigurumi Pattern?! I hope you are cause today I have a Snow White pattern for you. I thought the 7 dwarfs I made before should be joined by her finally.
For this Pattern you’ll need:
♥ Yarn in the colors; Brown, Red, Light Blue, Beige, White and Light Yellow. (I used Budgetyarn.com and Stylecraft Special)
♥ Crochet Hook (I used a 2,5mm hook).
♥ Stuffing.
♥ Scissors.
♥ Sewing Pins.
♥ Yarn Needle.
♥ Felt in Black.
♥ (Fabric) Glue.
Stitches used (US Terms):
Magic Ring.
BL = Back Loops.
FL = Front Loops.
CH = Chain.
SLST = Slip Stitch.
SC = Single Crochet.
FSC = Foundation Single Crochet.
ST = Stitch.
Inc = Increase.
Dec = Decrease.
(…) = Repeat the space in brackets the given number of times.
[…] = Total number of stitches.
Pattern Snow White
Work in continues rounds, use a stitch marker to mark your first stitch of every row. This is for every part, unless stated otherwise.
Body
Start with the color Beige.
1: 6SC in magic ring. [6]
2: 2SC in each ST around. [12]
3: (1SC, inc) 6 times. [18]
4: (2SC, inc) 6 times. [24]
5: 24SC. [24]
6: 24SC. [24]
7: (3SC, inc) 6 times. [30]
8: 30SC. [30]
|
10: 30SC. [30]
Change to the color Light Blue.
11: 30SC. [30]
|
15: 30SC. [30]
Change to the color white
16: Work in Back Loops only, 30SC. [30]
|
17: 30SC. [30]
18: (3SC, dec) 6 times. [24]
19: (2SC, dec) 6 times. [18] Stuff the body here.
20: (1SC, dec) 6 times. [12]
21: Dec all around. [6]
Fasten off and weave in tail.
Skirt
Use the color Yellow.
You will work this directly on the body, find row 15, you only used the back loops of this row, now we are gonna use the front loops.
1: 30SC. [30]
2: (SLST & HDC in the next st, 2DC in the next st, HDC & SC in the next st) 10 times.
Fasten off and weave in tail.
Legs/Hands (make 4)
Make 2 using the color Yellow and 2 using the color Beige.
1: 4SC in Magic Ring. [4]
2: (1SC, inc) 2 times. [6]
Fasten off and leave long tail for sewing. You don’t have to stuff them, just flatten.
Sleeves (Make 2)
Use the color Light Blue.
Crochet 6FSC (Or Ch7, insert in 2nd Ch from hook, 6SC). Fasten off and leave a long tail for sewing. Make round but keep the tail.
Hair
Use the Brown color yarn.
For the hair you will need several parts, so read well where you need to add what and how many.
Part 1. (Make 5)
1: 6SC in Magic Ring. [6]
2: 2SC in each st around. [12]
Fasten off.
Part 2.
3: Work on 1 “Part 1” 6SC, Ch5, connect another “part1”, 6SC, Ch5, connect another “part1”, 12SC, continue to work in the other side of the chains and remaining st of the “parts” 22SC. [56]
4: 56SC. [56]
5: (Dec, 26SC) 2 times. [54]
6: (25SC, dec) 2 times [52]
7: dec, (2SC, dec) 6 times, connect another “part1”, 6sc, connect another “part1”, 6SC. [31]
The stitches you didn’t use in the previous row, you won’t use anymore either.
8: (3SC, dec) 6 times, 1SC. [25]
9: (2SC, dec) 6 times, 1SC. [19]
10: (1SC, dec) 6 times, 1SC. [13]
11: Dec until you have 6st remaining. [6]
Fasten off and weave in tail.
Ribbon
Use the Red colored yarn.
Ch13,
insert in the 2nd ch from hook, 2SlSt, 7SC, 3SlSt.
Fasten off and leave a long tail for sewing.
Bow
Use the Red colored yarn.
1: Chain 7,
insert in 2nd chain from hook, 6SC, turn. [6]
2: 6SC. [6]
3: SLST around the bow for a nice edge.
Fasten off and leave a long tail. Use a Yarn Needle to go to the middle of the
bow with the yarn and wrap the tail tightly around several times and fasten off
but don’t cut the yarn.
Assembling
For all of my amigurumi’s I use sewing pins to place all of the parts, so I can easily move them around until I am happy with how it looks. Then I will sew it on.
Sew the hands to the sleeves first, and the sew them to the body. Sew the legs to the body as well.
Postition the hair and sew it on the way you like it. I have stuffed the hair a tiny bit cause you could see where the unfinished inside ended. So you might wanna do so as well.
On top of Snow White’s hair, sew on the ribbon and on top of that the bow.
With some scrap pieces of red yarn, embroider 3 stripes on each sleeve.
Make her facial detail with black felt and glue those on, with some pink pastel of make-up you can apply a light blush on her ‘cheecks’.
Snow White is already done! I always love how quickly you can make Ufufy, tho the Designing of the pattern sometimes takes a lot longer as you would think haha. But I am okay with that, it’s fun to challenge myself to get the right shape.
I hope you enjoyed today’s pattern, I’ll see you again next week!
Love
Danielle


she is lovely! thank you for sharing the pattern 🙂
I am so glad you like it!
Does this line ( | ) mean continue the same thing through these rows ?
Sorry it’s my first time following a pattern 😬
Hi! Yes that’s right, those rows are the same everytime that’s why I use ‘|’ instead of typing the same thing over and over.
And don’t apologize! You can better ask instead of quitting with Crochet/Amigurumi 😉
Also I didnt understand what to do in the first step of part 2 in the hair
ah yeah that sounds maybe a bit confusing, let me try to explain it as clearly as possible for you.
I also saw that I stated you need to make 5 of ‘part 1, that needs to be 3. (sorry for that, I’ll change it)
EDIT: You do need 5 ‘part1’ 3 for row3 and 2 for row7!
Take one of ‘part1’ and crochet 6SC, then Chain5 and continue working on a second ‘part1’ crochet 6SC into that one and Chain5, then take the last ‘part1’and crochet 12SC.
Then continue to work in the other side of the chains and remaining st of the “parts”. So that means, after the 12SC you made on the last ‘part1’ you crochet 5SC into the chain, 6SC in the second ‘part1’, 5SC in the Chain, and lastly 6SC in the first ‘part1’.
I hope this made it more clear for you, good luck!
Thank you so much for posting so lovely free patterns. Unlucky i can’t follow your steps when i am crocheting the hair part. 🙁 especially how to connect the part1 3 times and crochet 5 chains between them. I read your description several times. After that i am confused with this part too : 7: dec, (2SC, dec) 6 times, connect another “part1”, 6sc, connect another “part1”, 6SC. [31]
The stitches you didn’t use in the previous row, you won’t use anymore either.
Sorry for sending you such a long message. But i really love your work and already finished the body and skirt part.
Hello Gia!
First of all, thank you for loving my patterns!
To make her hair, I will try to get you through it step by step. I hope it will be clear for you.
Make 5 of the ‘part1’ of the hair, (I made a mistake there at first, sorry for the confusion.
The last one of the ‘Part1’ you made, you can leave your yarn attached to, on this one we will continue to work on.
Crochet 6SC as normal, Chain 5, now you need to connect the second ‘part1’, you do this by just crocheting a SC into that part, crochet 6sc total on the second part. Again Chain5, and connect the third ‘part1’, same as before, with an SC, Crochet 12SC total on the third ‘part1’.
Now you are back at the Chain part from before, crochet 5SC into those. 6SC on the remaining st of the second ‘part1’. Again, crochet 5SC in the chain part, and the last 6SC on the remaining st at the first ‘part1’.
You completed row3 now, you should be back at where you started to row.
For row 7 you need to 2 remaining ‘part1’.
The row says: dec, (2SC, dec) 6 times, connect another “part1”, 6sc, connect another “part1”, 6SC. [31]
When it says “connect another ‘part1′” you do this the same as row 3, by using an SC in the new part.
The row seems disconnected now, but you continue row8 in the first dec of row7.
You’ll notice that when completing row7 and moving on to row8, you didn’t use a bunch of stitches. Those you won’t use anymore.
I hope it is more clear now and that you will be able to complete Snow White!
If not, please send me a message again.
~Danielle
Thank you though 😊
Thank you so much for your explanation. I will try it.
Beautiful