Delinlea - My little fantasy world
  • ♥ Home
  • ♥ About Me
  • ♥ Blogmas 2021
  • ♥ Free Patterns
    • ♥ Amigurumi; Spring/Easter
    • ♥ Amigurumi; Fall/Halloween
    • ♥ Amigurumi; Winter
    • ♥ Amigurumi Tsum Tsum
    • ♥ Amigurumi Ufufy
    • ♥ Amigurumi Others
    • ♥ Christmas Countdown 2017
    • ♥ Blogmas 2018
    • ♥ Blogmas 2020
  • ♥ Tutorials
    • ♥ Easter
    • ♥ Home Deco
    • ♥ Others
  • ♥ Drawing Lessons
  • ♥ FanFic
    • ♥ Chapter 1
    • ♥ Chapter 2
    • ♥ Chapter 3
    • ♥ Chapter 4
    • ♥ Chapter 5
    • ♥ Chapter 6
    • ♥ Chapter 7
  • ♥ Gallery
    • ♥ Crafts
    • ♥ Drawings
    • ♥ Poseable Art Dolls
  • ♥ Links
  • ♥ Contact
    • Privacy Policy

Author: Delinlea

♥ Drawing Lesson 2; Shading

13 juni 2019 by Delinlea Leave a Comment

Hey Lovelies! It’s the 2nd Thursday of the month and I decided to keep that day for our drawing lessons. I hope you are fine with that. Today I wanted to talk a bit about shading, because last time I talked how you can start drawing, as in the outlines for any subject. Shading is important to get a 3D effect in your drawing.

Shading you can do in many ways, I’ll try to cover most of them. A lot of techniques are avaible, you should just try them all and then figure out with what technique you are comfortable with and, maybe most important, what the outcome must look like. Sometimes it takes a while to get comfortable with a certain technique. Practice will pay off in the end. Don’t give up after one try. Drawing takes time to learn.
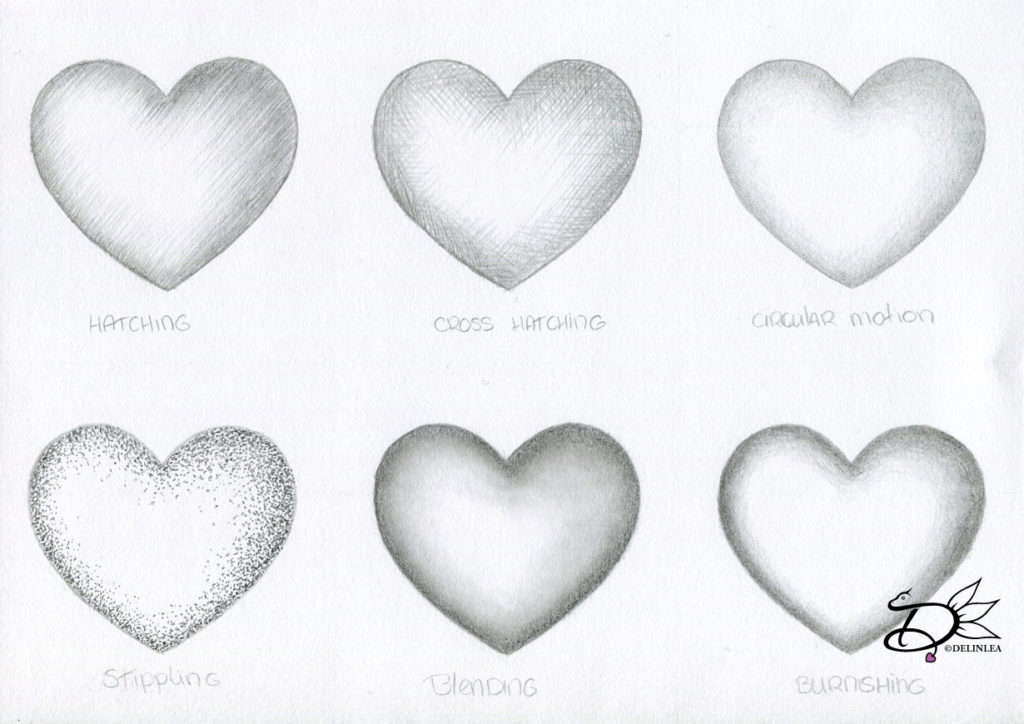
Shading
For all techniques I used a HB pencil except for bleding, there I use a 3B pencil.

Hatching

By drawing short or longer lines you can create depth. You usually draw them in one direction/parallel with this technic. The more lines you draw in one area, the dark the shade will be.

Cross hatching

Is almost the same as hatching, only here, you will draw the lines in different directions. They cross each other in many ways. The same here, more lines in one place is a darker shade.

Circular motion

You basicly draw in small cicles to create depth. By drawing in small circles you won’t have a stop and ending point of your pencil while drawing, so no extra pressure on your pencil. The pressure with circles is usually continues, this will create a smoother outcome. Add more layers to create darker areas.

Stippling/Pointlism

By adding a lot of dots to your drawing, you can also create shades. This is often done with markers. but you can do it with pencil as well, just becareful not to damage either your paper or your pencils. The more dots you add to one spot, the darker the area. This will take a lot of time to do tho, but sometimes the outcome can be very interresting. For example if you need to draw something sparkly.

Smudging/blending

Most of the times this will be used in combination of blending stumps/tissues/qtips/etc. You apply some graphite (or else) lightly to an area you wanna shade, with, for example a blending stump you blend it out for a smooth finish. Repeat until you have the darkness you want.  
(Just a side note, don’t use your fingers. On your fingers are always oils from your skin, this will affect the blending, it won’t be smooth and after some years in can affect your drawing.)

Burnishing

Usually used with colored pencil, not really with graphite. You basicly apply a lot of pressure to your pencil, this way you can get a smooth/darker result. But, there’s a but in this, you damage the tooth of your paper. When there is no tooth left, you can’t apply more layers. If you use thin paper, you can even rip it. Please be careful if you use this technique.

For me, personally, I love to use the circular motion technique. I have never been a fan of anything else. I did smudging with my fingers in the beginning, when I just started out. I just didn’t had the knowledge. Since I am a self-taught artist, I always had to learn things the hard way haha. I wouldn’t have liked to learn it another way tho. Just let me play around with the things around me and I’ll be happy.

I hope you will play around as well, remember, there’s no right or wrong in art. Whatever people will say. All ‘Rules’ are made by humans, why follow them all the time?

Have a wonderful day!

Love
Danielle

Posted in: Drawing Lesson Tagged: drawing, Lesson, shading, technique

♥ Free Pattern; Amigurumi Minnie Ufufy

6 juni 2019 by Delinlea Leave a Comment

Hey Lovelies! How are you doing these days?! We have a lot of thuderstorms lately and they distract me so much haha. I keep watching it, instead of working. It’s so pretty how rough/destructive nature can be. It really shows us that we can’t beat nature, it will beat us one day if we don’t learn to live with it instead of destroying it all the time. It often annoys me how ignorant people can be, we need nature/trees to be able to live, how are we gonna breath without them?! Cutting down all those trees is our main reason why global warming is real. Anyway~~ enough babbling xD let’s get on to today’s pattern. Let’s make Mickey complete, it’s Minnie’s turn today!! A Minnie Ufufy pattern all for you to make.

Minnie Ufufy

For this DIY you’ll need:
♥ Yarn in the colors;  Brown, Pink, Beige, White and Light Yellow. (I used Budgetyarn.com)
♥ Crochet Hook (I used a 2,5mm hook).
♥ Stuffing.
♥ Scissors.
♥ Sewing Pins.
♥ Yarn Needle.
♥ Felt in brown.
♥ (Fabric) Glue.

Stitches used (US Terms):
Magic Ring.
BL = Back Loops.
FL = Front Loops.
CH = Chain.
SLST = Slip Stitch.
SC = Single Crochet.
ST = Stitch.
Inc = Increase.
Dec = Decrease.
(…) = Repeat the space in brackets the given number of times.
[…] = Total number of stitches.

Mickey & Minnie Ufufy

Pattern

Work in continues rounds, use a stitch marker to mark your first stitch of every row. This is for every part, unless stated otherwise.

Body
Start with the color Brown.

1: 6SC in magic ring. [6]
2: 2SC in each ST around. [12]
3: (1SC, inc) 6 times. [18]
4: (2SC, inc) 6 times. [24]
5: 24SC. [24]
From here you will change colors to make the face.
6: Brown; 11SC, Beige; 2SC, Brown; 2SC, Beige; 2SC, Brown; 7SC. [24]
7: Brown; (3SC, inc) 2 times, 3SC, (Beige; Inc, 2SC, Brown, 1SC) 2 times, Brown; inc, 3SC, inc. [30]
8: Brown; 13SC, Beige; 9SC, Brown; 8SC. [30]
9: Brown; 11SC, Beige; 13SC, Brown; 6SC. [30]
10: Repeat row 9.
Change to the color Pink.
11: 30SC. [30]
|
14: 30SC. [30]
Change to the color white
15: Work in Back Loops only, 30SC. [30]
|
17: 30SC. [30]
18: (3SC, dec) 6 times. [24]
19: (2SC, dec) 6 times. [18] Stuff the body here.
20: (1SC, dec) 6 times. [12]
21: Dec all around. [6]
Fasten off and  weave in tail.

Skirt
Use the color Pink.
You will work this directly on the body, find row 14, you only used the back loops of this row, now we are gonna use the front loops.

1: 30SC. [30]
2: 30SC. [30]
3: (SLST & HDC in the next st, 2DC in the next st, HDC & SC in the next st) 10 times.
Fasten off and weave in tail.
With some white yarn or felt you can create the white dots on her skirt!

Legs (make 4)
Make 2 using the color White and 2 using the color Light Yellow.

1: 6SC in Magic Ring. [6]
2: 6SC [6]
Fasten off and leave long tail for sewing. You don’t have to stuff them, just flatten.

Ears (make 4)
Use the color Brown.

1: 6SC in Magic Ring. [6]
2: 2SC in each st around. [12]
3: (1SC, inc) 6 times. [18]
Fasten off and leave a long tail for sewing.
Now, sew 2 of the ears to one ear. You don’t need stuffing in between.

Bow
Use the color Pink.

1: CH22, insert in 3rd chain from hook, 20DC, turn [20]
2: Ch1, 20DC [20]
Fasten off and sew both ends together so you get a circle. On the main part of the bow, make white dots, use either felt or embroider them on.
Now keep the sewn part in the middle, where the middle band of the bow comes and flatten it.

Middle part of the bow
Use the color Pink

1: Ch 9, insert in 2nd chain from hook, 8SC, turn. [8]
2: Ch1, 8SC, turn. [8]
3: Ch1, 8SC. [8]
Fasten off and place it around the middle of the main part of the bow. Sew both ends together. Leave long tail to sew it onto her head.

Minnie Ufufy

Assembling

For all of my amigurumi’s I use sewing pins to place all of the parts, so I can easily move them around until I am happy with how it looks. Then I will sew it on.
First sew on her feet and after her arms. Then sew on her ears, on both sides of his head, about 4rows from the top of the body. Ah, and don’t forget to give her a tail from a piece of yarn.
Last sew on her Bow on top of her head, it will be slightly forward, so it’s in front of the ears a bit.
From brown felt cut out a nose and eyes, and glue those on. You can also choose to embroider them on, but that’s totally up to you!

Mickey & Minnie Ufufy

I hope you enjoyed today’s pattern as well! I just couldn’t leave Mickey sitting alone there. (The pattern for Mickey you can find here!) And if you made them both, or one, show it to me~ I would love to see how yours turned out!

Love
Danielle

Posted in: Crafting, Crochet, Ufufy Tagged: Amigurumi, Crochet, Disney, Free Pattern, haken, Minnie mouse, Ufufy

♥ Free Pattern; Amigurumi Mickey Ufufy

30 mei 2019 by Delinlea Leave a Comment

Hey Lovelies! I was about to make another Tsum Tsum, but when that didn’t work out in the time I had, I changed to plan B. Make an Ufufy! haha. That one did work out. I don’t know, sometimes, I have those days that I can’t figure out how to get the right shape and look of an amigurumi. While on other days I make them as if I had a pattern already. So odd. Do you have those days as well?! Anyway, today we will add a Mickey Ufufy to our collection! Don’t worry, he will get his Minnie soon!

Mickey Ufufy

For this DIY you’ll need:
♥ Yarn in the colors;  Brown, Pink, Beige, White and Light Yellow. (I used Budgetyarn.com)
♥ Crochet Hook (I used a 2,5mm hook).
♥ Stuffing.
♥ Scissors.
♥ Sewing Pins.
♥ Yarn Needle.
♥ Felt in brown.
♥ (Fabric) Glue.

Stitches used (US Terms):
Magic Ring.
CH = Chain.
SC = Single Crochet.
ST = Stitch.
Inc = Increase.
Dec = Decrease.
(…) = Repeat the space in brackets the given number of times.
[…] = Total number of stitches.

Pattern

Work in continues rounds, use a stitch marker to mark your first stitch of every row. This is for every part, unless stated otherwise.

Body
Start with the color Brown.

1: 6SC in magic ring. [6]
2: 2SC in each ST around. [12]
3: (1SC, inc) 6 times. [18]
4: (2SC, inc) 6 times. [24]
5: 24SC. [24]
From here you will change colors to make the face.
6: Brown; 11SC, Beige; 2SC, Brown; 2SC, Beige; 2SC, Brown; 7SC. [24]
7: Brown; (3SC, inc) 2 times, 3SC, (Beige; Inc, 2SC, Brown, 1SC) 2 times, Brown; inc, 3SC, inc. [30]
8: Brown; 13SC, Beige; 9SC, Brown; 8SC. [30]
9: Brown; 11SC, Beige; 13SC, Brown; 6SC. [30]
10: Repeat row 9.
Continue with only the Brown color.
11: 30SC. [30]
|
14: 30SC. [30]
Change to the color Pink.
15: 30SC. [30]
|
17: 30SC. [30]
18: (3SC, dec) 6 times. [24]
19: (2SC, dec) 6 times. [18] Stuff the body here.
20: (1SC, dec) 6 times. [12]
21: Dec all around. [6]
Fasten off and  weave in tail.

Legs (make 4)
Make 2 using the color White and 2 using the color Light Yellow.

1: 6SC in Magic Ring. [6]
2: 6SC [6]
Fasten off and leave long tail for sewing. You don’t have to stuff them, just flatten.

Ears (make 4)
Use the color Brown.

1: 6SC in Magic Ring. [6]
2: 2SC in each st around. [12]
3: (1SC, inc) 6 times. [18]
Fasten off and leave a long tail for sewing.
Now, sew 2 of the ears to one ear. You don’t need stuffing in between.

Mickey Ufufy

Assembling

For all of my amigurumi’s I use sewing pins to place all of the parts, so I can easily move them around until I am happy with how it looks. Then I will sew it on.
First sew on his feet and after his arms. Then sew on his ears, on both sides of his head, about 4rows from the top of the body. Ah, and don’t forget to give him a tail from a piece of yarn.
With a piece of white yarn I embroidered the white dots on his pants. From brown felt you will cut his nose and eyes. Glue all those parts on the amigurumi and your Mickey is done! Cute, right?!

I hope you enjoyed today’s pattern, let me know if you made him. I would love to see your work from my patterns. I always get so excited when I see people using something I designed. Have a lovely day everyone!

Love
Danielle

Posted in: Crafting, Crochet, Ufufy Tagged: Amigurumi, Crochet, cute, Disney, haken, kawaii, Mickey Mouse, Ufufy

♥ Free Pattern; Sulley Tsum Tsum Amigurumi

23 mei 2019 by Delinlea Leave a Comment

Hey Lovelies! How are you doing? I’m doing okay, I made a to do list till the end of June, and it’s quite a bit XD. Also because I wanna join 2 contests, 1 by Hahnemuhle for their 2020 calendar and 1 by WayV. They both include a lot of drawing, so I really I hope I can get that done on time besides all the other stuff. Do you like to join contests?!
Anyway on to today’s post, it’s time for a new Tsum Tsum pattern! I was so excited to make a Tsum again, so expect a few more these weeks haha. It’s Monsters Inc. Sulley’s turn today. This one was requested by someone a while ago, but I can’t remember who. *hides. But here it is, have fun.

Sulley Tsum Tsum

For this DIY you’ll need:
♥ Yarn in the colors;  Turquoise, Purple and Dark Blue. (I used Zeeman Supersoft)
♥ Crochet Hook (I used a 2mm hook).
♥ Stuffing.
♥ Scissors.
♥ Sewing Pins.
♥ Yarn Needle.
♥ Embroidery Needle with black floss.
♥ Felt in Purple.
♥ (Fabric) Glue. (Optional)

Stitches used (US Terms):
Magic Ring.
Color Changing.
Ch = Chain.
SC = Single Crochet.
ST = Stitch.
FSC = Foundation Single Crochet
FHDC = Foundation Half Double Crochet
FDC = Foundation Double Crochet
Inc = Increase.
Dec = Decrease.
(…) = Repeat the space in brackets the given number of times.
[…] = Total number of stitches.

Sulley Tsum Tsum

Pattern

This pattern will be worked in continues round, unless stated otherwise.

Body
Start with the color Turquoise.

1: 6SC in Magic Ring. [6]
2: 2SC in each st around. [12]
3: (1SC, inc) 6 times. [18]
4: (2SC, inc) 6 times. [24]
5: (3SC, inc) 6 times. [30]
6: (4SC, inc) 6 times. [36]
7: (5SC, inc) 6 times. [42]
8: 42SC. [42]
|
16: 10SC, Change to Purple, 2SC, Change to Turquoise, 19SC, Change to Purple, 2SC, Change to Turquoise, 9SC. [42]
17: 9SC, Change to Purple, 4SC, Change to Turquoise, 17SC, Change to Purple, 4SC, Change to Turquoise, 8SC. [42]
18: Repeat row 17.
19: Repeat row 16.
20: 42SC. [24]
21: 5SC, Change to Purple, 2SC, Change to Turquoise, 9SC, Change to Purple, 2SC, Change to Turquoise, 6SC, Change to Purple, 2SC, Change to Turquoise, 9SC, Change to Purple, 2SC, Change to Turquoise, 5SC  [42]
22: 4SC, Change to Purple, 4SC, Change to Turquoise, 7SC, Change to Purple, 4SC, Change to Turquoise, 4SC, Change to Purple, 4SC, Change to Turquoise, 7SC, Change to Purple, 4SC, Change to Turquoise, 4SC  [42]
23: Repeat row 22.
24: Repeat row 21.
25: 42SC. [42]
26: 11SC, Change to Purple, 2SC, Change to Turquoise, 19SC, Change to Purple, 2SC, Change to Turquoise, 8SC. [42]
27: 10SC, Change to Purple, 4SC, Change to Turquoise, 17SC, Change to Purple, 4SC, Change to Turquoise, 7SC. [42]
28: Repeat row 27.
29: Repeat row 26.
30: (5SC, dec) 6 times. [36]
31: (4SC, dec) 6 times. [30]
32: (3SC, dec) 6 times. [24]
33: (2SC, dec) 6 times. [18] Make sure to stuff the body around here.
34: (1SC, dec) 6 times. [12]
35: dec all around. [6]
Fasten off and weave in the tail.

Sulley Tsum Tsum

Legs (Make 4)
Use the color Turquoise.

1: 4SC in magic ring. [4]
2: Inc in each st around. [8]
3: SC in each st around. [8]
|
5: SC in each st around. [8]
Fasten off and leave a long tail for sewing.

Sulley Tsum Tsum

Tail
Use the color Turquoise.

1: 6SC in Magic Ring. [6]
2: (1SC, inc) 3 times. [9]
3: 9SC. [9]
4: (2SC, inc) 3 times. [12]
5: 12SC. [12]
6: (3SC, inc) 3 times. [15]
7: 15SC. [15]
8: 15SC. [15]
9: (4SC, inc) 3 times. [18]
10: 18SC. [18]
11: 18SC. [18]
Fasten off and leave a long tail for sewing. Stuff the tail lightly.

Horns (make 2)
Use the color Purple.

1: 4SC in Magic Ring. [4]
2: (1SC, inc) 2 times. [6]
3: 6SC. [6]
4: 6SC. [6]
5: (2SC, inc) 2 times. [8]
6: (3SC, inc) 2 times. [10]
Fasten off and leave a long tail for sewing. You don’t stuff the horns, you will bend them later and if you stuff them they won’t hold shape.

Eyebrows
Use the color Dark Blue.

Make 2 FSC, for 1 eyebrow you finish with a FHDC and for the other with a FDC.
Fasten off and leave a long tail for sewing.

Sulley Tsum Tsum

Assembling

For assembling I always use pins first to place all the parts, this way I can easily move them around until I am happy with how it looks!
First place the legs, the 2 in front, slightly forward. two at the back, facing outward, sew them on. Make sure that both sides of the body have about 4 purple dots.
Sew on his tail, it’s not centered, slightly more up. Sew on his horns as well.
For his face, you can embroider it on like I did, or use felt, just what you prefer. For his nose I used the same yarn to embroider on as the eyebrows. Last you sew on the Eyebrows, since you know now where they need to go!
Cut out of Purple felt 6 or 7 small triangle to go on his back and tail. Glue those on.

Sulley and Mike Tsum Tsum

And you have finished Sulley! I hope you  like how he turned out and make our collection of Tsum Tsum’s a bit bigger! If you wanna make Mike as well, here can you find the pattern! Show me yours when you made it, on twitter or instagram with the #DelinleaDIY.

Love
Danielle

Posted in: Crafting, Crochet, Tsum Tsum Tagged: Amigurumi, Crochet, cute, Disney, haken, kawaii, Monsters Inc., pixar, Sulley

♥ Free Pattern; Amigurumi Shiber

16 mei 2019 by Delinlea 1 Comment

Hey Lovelies! It’s a lovely new day and time for a new crochet pattern. I quite like this one, tho I think I made it a bit big, as you know, I usually work pretty small xD. I struggled a bit to get this done. But I made it! It’s a Shiba Inu Throw Pillow, still tinier as a normal pillow. The reason I made this is because San of ATEEZ (a Korean pop group) has a plush like this, called Shiber. He’s so adorable! I just had to make one myself with my own twist. I hope you will enjoy this cutie as well.

For this DIY you’ll need:
♥ Yarn in the colors;  Orange and White. (I used budgetyarn.com)
♥ Crochet Hook (I used a 2,5mm hook).
♥ Stuffing.
♥ Scissors.
♥ Sewing Pins.
♥ Yarn Needle.
♥ Safety eyes, 10mm.
♥ Safety nose. (optional, you can also embroider it on or use felt.)
♥ Piece of black yarn or felt.

Stitches used (US Terms):
Magic Ring.
CH = Chain.
SC = Single Crochet.
ST = Stitch.
Inc = Increase.
Dec = Decrease.
(…) = Repeat the space in brackets the given number of times.
[…] = Total number of stitches.

Pattern

Work in continues rounds, use a stitch marker to mark your first stitch of every row. This is for every part, unless stated otherwise.

Body
In the color Orange.

1: Ch38, insert in second ch from hook, 36SC, 3SC in the last CH, work along the other side of the chains now, 35SC, inc. [76]
2: 76SC. [76]
|
39: 76SC. [76]
Fasten off and sew on both side of the open part, about 4-5 cm close. So you have an opening in the middle for the head. Stuff the body lightly.

Belly
Use the color White.

1: Ch10, insert in second ch from hook, 8SC, 3SC in the last Ch, work along the other side of the Chains now, 7SC, inc. [20]
2: Inc, 7SC, (inc) 3 times, 7SC, (Inc) 2 times. [26]
3: 2SC, inc, 6SC, (inc, 2SC) 2 times, inc, 6SC, inc, 2SC, inc. [32]
4: 3SC, inc, 6SC, inc, 8SC, inc, 6SC, inc, 5SC. [36]
5: (5SC, inc) 6 times. [42]
6: (6SC, inc) 6 times. [48]
7: (7SC, inc) 6 times. [54]
8: 54SC. [54]
Fasten off and leave a long tail for sewing. Sew the belly to the middle of the ‘square’ body.

Head
Start with the color Orange.

1: 7SC in Magic Ring. [7]
2: 2SC in each st around. [14]
3: (1SC, inc) 7 times. [21]
4: (2SC, inc) 7 times. [28]
5: (3SC, inc) 7 times. [35]
6: (4SC, inc) 7 times. [42]
7: (5SC, inc) 7 times. [49]
8: 49SC. [49]
|
14: 49SC. [49]
Change to the color White. Put the safety eyes between row 12 and 13, about 5,5cm apart.
15: 49SC. [49]
|
20: 49SC. [49]
21: (5SC, dec) 7 times. [42]
22: (4SC, dec) 7 times. [35]
23: (3SC, dec) 7 times. [28]
24: (2SC, dec) 7 times. [21] Stuff the head around here.
25: (1SC, dec) 7 times. [14]
16: Dec 7 times. [7]
Fasten off and weave in tail.

Ears (make 2)
Use the color Orange.

1: 6SC in Magic Ring. [6]
2: (1SC, inc) 3 times. [9]
3: 9SC. [9]
4: (2SC, inc) 3 times. [12]
5: (3SC, inc) 3 times. [15]
6: (4SC, inc) 3 times. [18]
7: 18SC. [18]
Fasten of and leave a long tail for sewing. Don’t forget to stuff.

Inner ears (make 2)
Use the color White.
You won’t work in continues rounds.

1: Ch6, insert in second ch from hook, 5SC, turn. [5]
2: Ch1, Dec, 1SC, Dec, turn. [3]
3: Ch1, 1SC, Dec, turn. [2]
4: Ch1, Dec. [1]
Fasten off and leave a long tail for sewing.
Sew the inner ear to the main part of the ear.

Snout
Use the color White.

1: Ch8, insert in second Ch from hook, 6SC, 3SC in the last Ch, work along the other side of the Chains now, 5SC, inc. [16]
2: Inc, 5SC, (inc) 3 times, 5SC, (inc) 2 times. [22]
3: 4SC, inc, 10SC, inc, 6SC. [24]
4: 24SC. [24]
5: 24SC. [24]
Fasten off and leave a long tail for sewing.

Orange part of the snout
Use the color Orange. (obviously xD)
You won’t work in continues rounds.

1: Ch6, insert in second Ch from hook, 5SC, turn. [5]
2: Ch1, inc, 3SC, inc, turn. [7]
3: Ch1, inc, 5SC, inc. [9]
Fasten off and sew this to the upper part of the snout.
When this is on you can place the safety nose as well.

Feet (make 4)
Use the color White.

1: 6SC in Magic Ring. [6]
2: 2SC in each st around. [12]
3: (1SC, inc) 6 times. [18]
4: 18SC. [18]
|
7: 18SC. [18]
Fasten off and leave a long tail for sewing.

Tail
Use the color Orange.

1: 6SC in Magic Ring. [6]
2: (1SC, inc) 3 times. [9]
3: 9SC. [9]
4: (2SC, inc) 3 times. [12]
5: 12SC. [12]
6: 12SC, [12]
7: (3SC, inc) 3 times. [15]
8: (4SC, inc) 3 times. [18]
9: 18SC. [18]
10: 18SC. [18]
11: 18SC. [18]
12: (1SC, dec) 6 times. [12]
Fasten off and leave a long tail for sewing.

White part of the tail
Use the color White.
You won’t work in continues rounds.

1: Ch4, insert in second Ch from hook, 3SC, turn. [3]
2: Ch1, inc, 1SC, inc, turn. [5]
3: Ch1, 5SC, turn. [5]
4: Ch1, Dec, 1SC, dec, turn. [3]
5: Ch1, 3SC, turn. [3]
6: Ch1, Dec, 1SC, turn. [2]
7: Ch1, dec. [1]
Fasten off and sew this to the tail.

Assembling

With the use of sewing pins you can position all your parts first, to check if you like the outcome. This way you can easily move them around before sewing them on.

Start with sewing on the feet to each corner of the body. Make them flat and slide the over the corner. You don’t have to stuff them, but you can if you want.
Sew on the tail as well, make sure you keep the belly on the down side.
Sew in the Snout and the ear to the head. Shiber has 2 white dots above his eyes, these you can embroider on with some white yarn or use felt. As for the nose/mouth if you didn’t use a safety nose, you can do the same as for the white dots.
Now, Sew the head to the body. This might be tricky, just make sure to use enough Sewing pins to place it, this will help a lot by sewing it on bit by bit.

And your Shiber is done as well! Adorable, right?! I hope you had fun with this pattern. And I will see you next week. (I know I was a bit late today, I hope you don’t mind!)

Love
Danielle

Posted in: Crafting, Crochet, Geen categorie Tagged: Amigurumi, ATEEZ San, Crochet, cute, Free Pattern, haken, Shiba Inu, shiber
« Vorige 1 2 3 4 5 … 25 26 27 28 29 30 31 32 33 … 49 50 51 52 53 Volgende »

What are you looking for?!

My Socials

Ko-Fi

I love making all these free things for you, tho it would be very helpfull if you can support me on Ko-Fi! (You don’t have to tho, totally up to you!)

Ko-Fi Shop!!

In my Ko-Fi shop you can find PDF Amigurumi Patterns!! You can pay easily with PayPal.
Go to the shop here!!

Recent Blog Posts

  • ♥ Happy 2022!
  • ♥ Day 12; Lights
  • ♥ Day 11; Flower Deco
  • ♥ Day 10; Snowman
  • ♥ Day 9; Gingerbread Houses

Recent Comments

  • Erzsebet M. Marosvari op ♥ My Entry For a Faber Castell Contest
  • Delinlea op ♥ Pietje Gnome Amigurumi
  • Delinlea op ♥ Toy Story Alien TsumTsum Amigurumi
  • Delinlea op ♥ Pua Tsum Tsum Amigurumi
  • Charli op ♥ Free Pattern; CNY Mouse Amigurumi

Categories

  • animation
  • Beadwork
  • Blogmas 2018
  • Blogmas 2020
  • Blogmas 2021
  • Books
  • Bujo
  • Christmas
  • Christmas CAL 2019
  • Christmas Countdown 2017
  • Contest
  • Crafting
  • Crochet
  • Drawing
  • Drawing Lesson
  • Easter
  • Geen categorie
  • Life
  • Miniature
  • Nail Art
  • New Year
  • Paper
  • plush
  • Pokemon
  • Poseable Art Doll
  • Recipe
  • Sewing
  • Shop Pattern
  • Sinterklaas
  • Social Media
  • Tsum Tsum
  • Ufufy

Copyright © 2025 Delinlea - My little fantasy world.

Family WordPress Theme by themehall.com