Delinlea - My little fantasy world
  • ♥ Home
  • ♥ About Me
  • ♥ Blogmas 2021
  • ♥ Free Patterns
    • ♥ Amigurumi; Spring/Easter
    • ♥ Amigurumi; Fall/Halloween
    • ♥ Amigurumi; Winter
    • ♥ Amigurumi Tsum Tsum
    • ♥ Amigurumi Ufufy
    • ♥ Amigurumi Others
    • ♥ Christmas Countdown 2017
    • ♥ Blogmas 2018
    • ♥ Blogmas 2020
  • ♥ Tutorials
    • ♥ Easter
    • ♥ Home Deco
    • ♥ Others
  • ♥ Drawing Lessons
  • ♥ FanFic
    • ♥ Chapter 1
    • ♥ Chapter 2
    • ♥ Chapter 3
    • ♥ Chapter 4
    • ♥ Chapter 5
    • ♥ Chapter 6
    • ♥ Chapter 7
  • ♥ Gallery
    • ♥ Crafts
    • ♥ Drawings
    • ♥ Poseable Art Dolls
  • ♥ Links
  • ♥ Contact

Amigurumi

♥ Free Pattern; Succulent Heart

14 februari 2019 by Delinlea Leave a Comment

Hey Lovelies! Happy Valentines Day!! Ha, I wanted to say Happy V-Day! But, then… I only could think of that it was Taehyung’s/V’s Birthday haha. My ARMY (BTS Fandom name) mind creeped out. So let’s keep it Happy Valentines Day!
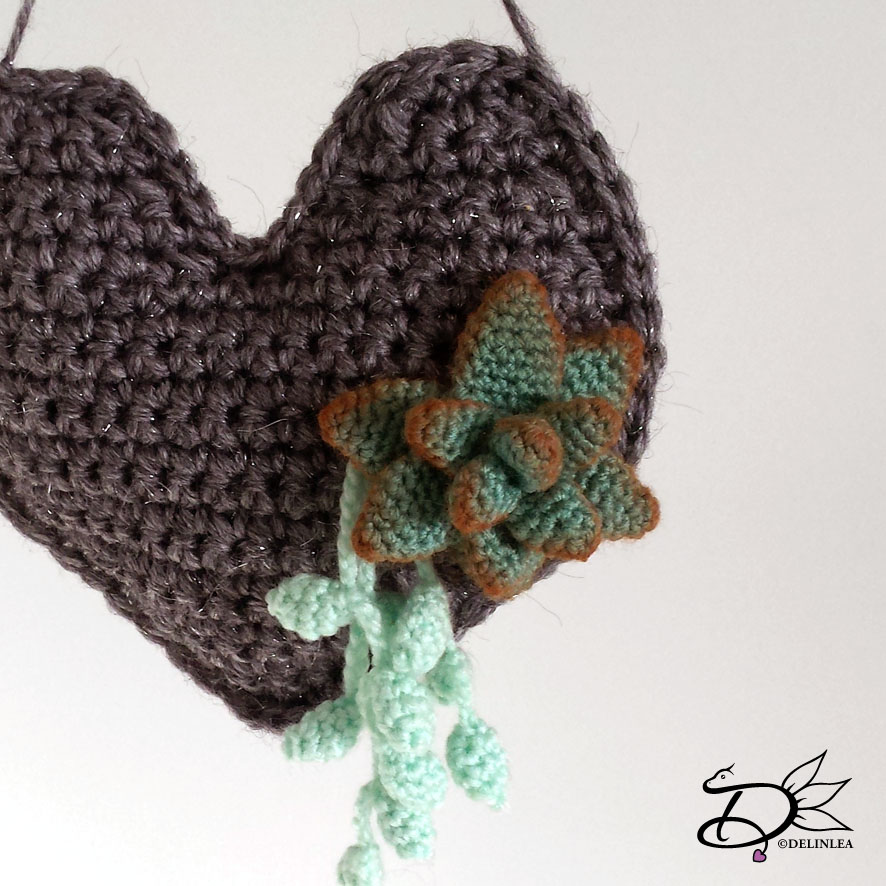
Today I made something to crochet for you, a Succulent heart. I know I am late posting this, but I had a hard time finishing it. I’m sorry for that. But the day hasn’t passed yet! Anyway,  It’s a free pattern for you to enjoy. I didn’t make it too sweet, didn’t felt like it this year, this way you can easily use it as a home deco piece!

For this DIY you’ll need:
♥ Grey Yarn*. (I used Zeeman Luxery Yarn with a 5,5mm hook.)
♥ Green Yarn*. (I used Zeeman SuperSoft with a 2mm hook.)
♥ Crochet Hook.
♥ Stuffing.
♥ Scissors.
♥ Yarn Needle.
♥ Sewing Pins.
♥ Soft Pastel. (optional)

*The Grey yarn should be about 2 a 3 times ticker as the yarn you will use for the plants.

Stitches used (US Terms):
Magic Ring.
Ch = Chain.
SC = Single Crochet.
Inc = Increase.
Dec = Decrease.
(…) = Repeat the space in brackets the given number of times.
[…] = Total number of stitches.

Pattern

Heart (Make 2)
Use the gray Yarn.

1: Ch4, insert in second chain from hook, 3SC, Turn. [3]
2: Ch1, inc, 1SC, inc, Turn. [5]
3: Ch1, inc, 3SC, inc, Turn. [7]
4: Ch1, inc, 5SC, inc, Turn. [9]
5: Ch1, inc, 7SC, inc, Turn. [11]
6: Ch1, inc, 9SC, inc, Turn. [13]
7: Ch1, inc, 11SC, inc, Turn. [15]
8: Ch1, inc, 13SC, inc, Turn. [17]
9: Ch1, inc, 15SC, inc, Turn. [19]
10: Ch1, 19SC, Turn. [19]
|
16: Ch1, 19SC, Turn. [19]
17: Ch1, Dec, 5SC, Dec, Turn. [7]
18: Ch1, 7SC, Turn. [7]
19: Ch1, Dec, 3SC, Dec, Turn. [5]
20: Ch1, 5SC, Turn. [5]
21: Ch1, Dec, 1SC, Dec. [3]

Repeat row 17 to 21 for the other half of the heart shape.
When you are done, make another one. These 2 you will crochet together with Single Crochet (SC). Don’t forget to stuff the heart lightly before entirely closing up. Work away all your tails and make a nice loop to hang the heart at, at the top.

Succulent
Use the Green Yarn.

Small leave (Make 6)

1: 6SC in magic ring. [6]
2: 6SC. [6]
3: 1SC, Inc. [9]
4: 9SC. [9]
5: 9SC. [9]
6: 1SC, Dec. [6]
Fasten off and leave a long tail for sewing.

Big Leave (make 6)

1: 6SC in magic ring. [6]
2: 6SC. [6]
3: 1SC, Inc. [9]
4: 2SC, Inc. [12]
5: 12SC. [12]
|
8: 12 SC. [12]
9: 2SC, Dec. [9]
Fasten off and leave a long tail for sewing.

Assemble the Succulent starting from the small leaves. So you work your way from inside out. You only have the sew the bottom of the leaves together. Make sure you spread them evenly. With some Soft Pastel you can give your succulent a bit more dimension. Just add it with a brush to the edges.

I also added some string of pearls succulent. Which I made a pattern for somewhere last year. You can find it here: Link

Assembling

Now you have your heart and succulents done, you can arrange them how you would like. I just placed them on with some sewing pins until I was happy, and sewed them on.

And you are done! Now you can give it to someone you love of just give it as a present to yourself! It’s good to treat yourself from time to time as well!

Have a wonderful Valentines Day!

Love
Danielle

Posted in: Crafting, Crochet Tagged: Amigurumi, Crochet, haken, heart, succulent, Valentine

♥ Day 8; Amigurumi Pikachu in Santa Sleepingbag

8 december 2018 by Delinlea Leave a Comment

Hey Lovelies! It’s day 8 of Blogmas! And that means that weare already have survived one week! Time really flies! I hope you are havingfun so far. But for today we will have a new amigurumi! Pikachu in a Santasleepingbag! I hope you like him.

For this DIY you will need:
♥  Yarn, in Yellow, Black, Red and Grey.
♥  Plush Yarn in White.
♥  Pompom. (self made of bought)
♥  Crochet hook.
♥  Stitch marker.
♥  Yarn Needle.
♥  Sewing Pins. (optional)
♥  Fiber fill.
♥  Felt in the colors Black, Brown andRed.
♥  Glue.
♥  Scissors.

Stitches used:
CH = Chain.
SC = Single Crochet.
FSC = Foundation Single Crochet.
ST = Stitch.
Inc = Increase.
Dec = Decrease.
Slst = Slip Stitch.
(…) = Repeat the space in brackets the given number of times.
[…] = Total number of stitches.

Pattern

Pikachu Head
In Yellow.

1: 6SC in Magic Ring. [6]
2: 2SC in each ST around. [12]
3: (1SC, inc) 6 times. [18]
4: (2SC, inc) 6 times. [24]
5: (3SC, inc) 6 times. [30]
6: SC in each ST around. [30]
|
9: SC in each ST around. [30]
10: 7SC, inc, 1SC, inc, 4SC, inc, 4SC, inc, 1SC, inc, 8SC. [35]
11: 7SC, inc, 3SC, inc, 10SC, inc, 3SC, inc, 8SC. [39]
12: SC in each ST around. [39]
13: 7SC, dec, 3SC, dec, 10SC, dec, 3SC, dec, 8SC. [35]
14: SC in each ST around. [35]
15: 7SC, dec, 1SC, dec, 4SC, dec, 4SC, dec, 1SC, dec, 8SC. [30]
16: (3SC, dec) 6 times. [24]
17: (2SC, dec) 6 times. [18]
18: (1SC, dec) 6 times. [12]
19: Dec all around. [6]
Fasten off and weave in tail.

Pikachu Ears (2)
Start with Black.

1: 4SC in Magic Ring. [4]
2: (1SC, inc) 2 times. [6]
3: (1SC, inc) 3 times. [9]
4: SC in each ST around. [9]
5: (2SC, inc) 3 times. [12]
Change to Yellow.
6: SC in each ST around. [12]
|
8: SC in each ST around. [12]
9: (2SC, dec) 3 times. [9]
10: SC in each ST around. [9]
|
13: SC in each ST around. [9]
Fasten off and leave a long tail for sewing.

Sleeping Bag
In Red.

1: 6SC in Magic Ring. [6]
2: 2SC in each ST around. [12]
3: (1SC, inc) 6 times. [18]
4: (2SC, inc) 6 times. [24]
5: (3SC, inc) 6 times. [30]
6: (4SC, inc) 6 times. [36]
7: (5SC, inc) 6 times. [42]
8: SC in each ST around. [42]
|
20: SC in each ST around. [42]
21: (5SC, dec) 6 times. [36]
22: (4SC, dec) 6 times. [30]
21: (3SC, dec) 6 times. [24]
22: (2SC, dec) 6 times. [18]
Fasten off and weave in tail.

Hood of the Sleepingbag.
In Red.

1: 6SC in Magic Ring. [6]
2: 6SC. [6]
3: (1SC, inc) 3 times. [9]
4: (2SC, inc) 3 times. [12]
5: (3SC, inc) 3 times. [15]
6: (4SC, inc) 3 times. [18]
7: (5SC, inc) 3 times. [21]
8: (6SC, inc) 3 times. [24]
9: (7SC, inc) 3 times. [27]
10: (8SC, inc) 3 times. [30]
11: (9SC, inc) 3 times. [33]
12: (10SC, inc) 3 times. [36]
13: (11SC, inc) 3 times. [39]
14: (12SC, inc) 3 times. [42]
15: 42SC. [42]
|
24: 42SC. [42]
Change to the White Plush Yarn.
25: 42SC. [42]
If your Plush yarn is thinner as mine, you might need to do 1 or 2 extra layers.
Fasten off and weave in tail.

Belt
In Black.

Crochet 40 FSC! Fasten off and leave a long tail for sewing.

Assembling

Use some sewing pins to pin the hood to the sleepingbag.This will help you to sew it on neathly, and sew it on.
Make a circle of the belt, sew both ends together. Place the belt around thesleepingbag and sew that on. The belt is not placed in the middle, but a littlelower. With some yellow yarn you’ll embroider the belt buckle on.
With some grey yarn you’ll make the zipper, and finish of with a tiny piece of greyfelt.
This to complete his head. Sew on his ears. Make sure you’ll keep the head theright way, the pattern has made the shape for the cheeks already. When the earsare on, you can sew his head to the sleepingbag. This can be a bit tricky, justuse some sewing pins to make sure it’s placed right and then start sewingcarefully.
Now cut out some eyes, nose, mouth and cheeks out of felt and glue those on.For the eyes I used brown felt and colored them black so you’ll have a littleshine in the eyes. With a white dot of felt of acryllic paint in the eyes you’ll finish it off.
Glue or sew a pompom to the tip of his hood.

And you are all done! isn’t he cute?! I hope you’ll have fun making him! and if you did so, share yours with the #DelinleaBlogmas2018DIY or #DelinleaDIY on twitter or insta.

Have a wonderful day and I’ll see you tomorrow.

Love
Danielle

Posted in: Blogmas 2018, Christmas, Pokemon Tagged: Amigurumi, blogmas 2018, Christmas, Crochet, haken, pikachu, Pokemon, Santa

♥ Snowy & SnowSnow

4 december 2018 by Delinlea Leave a Comment

Hey Lovelies! This time I had 1 idea only, usualy I have plenty of ideas! But at first I had just a few things I wanted to include, a baby, clothes or something you can change like a hat or so and probably Fall themed. But Then I realized that when this aired it was almost Winter, so I went for that theme.
I love making Amigurumi’s, I do that all the time! But usually my Amigurumi’s are small, and this one, for the challenge had to be 20 to 30cm! ah! So big!!

Deze keer had ik maar 1 idee, normaal heb ik er tig! Maar in het begin had ik alleen onderdeeltjes die ik er graag in wou verwerken, zoals een baby’tje, kleertjes die je kan veranderen en waarschijnlijk een herfst thema. Maar toen bedacht ik me dat het al bijna winter is als deze aflevering online komt, dus ben ik voor een winter thema gegaan.
Ik vindt het erg leuk om Amigurumi’s te haken, ik doe niet anders! Maar meestal zijn mijn amigurumi’s klein, en deze, voor de opdracht, moest tussen de 20 en 30cm zijn! Zo groot!!

The main challenge for me was when I had to make the body. The feet/legs went very easily, but then I wanted to crochet further, directly on the legs. I have tried that soooooo many times. >_< One week passed and I gave up on that idea. Made the body seperate, and that went so smoothly! That was way more easy to get the shape I wanted! From that moment on I just crochet and crochet, so easy~~.

De grootste uitdaging bij deze opdracht zat hem in het lijfje. De beentjes had ik zo gemaakt, maar ik wou daarop verder haken. Ik heb dat zooooo vaak geprobeerd. >_< Een week was voorbij en ik had opgegeven met dat idee. Ik heb het lijfje apart gemaakt, en dat ging zo makkelijk! Dat was veel makkelijker om de vorm te krijgen die ik wou! Vanaf dat moment kon ik blijven haken, zo gemakkelijk!

Here’s what I made:
Hier is wat ik gemaakt heb:


I loved to make all the small little details in the cape, the baby etc. I could make what I love. With every challenge I tried to keep it close to myself. And I guess that’s something that keeps it interresting and fun!

Ik vond het zo leuk om alle kleine details te maken, in de cape, de baby, etc. Ik kon maken wat ik leuk vind. Met elke opdracht het ik het geprobeerd dicht bij mezelf te houden. En ik denk dat dat het een stuk interessanter en leuker blijft houden.

The ‘clothes’ are removable, that’s something I like, that you can interract more with it then just a plush. This way you can also change it up, so make a summery outfit or something like that. I am not sure if I will make that in the future for this one. Or that I will create a new one. Let’s find out what the future brings.

De kleertjes kun je uit en aan doen, dat is iets wat ik leuk vind, dat je knuffeltje interactiever wordt dan gewoon een knuffel. Op deze manier kun je dus ook de kleertjes aanpassen, of nieuwe maken, zoals een zomer outfit of iets in die richting! Ik weet niet zeker of ik dat voor dit knuffeltje in de toekomst nog ga doen. Of dat ik een nieuwe ontwerp. Laten we zien wat de toekomst brengt.

Love
Danielle

Posted in: Geen categorie Tagged: Amigurumi, Crochet, haken

♥ Day 2; Amigurumi Pikachu Snowman

2 december 2018 by Delinlea Leave a Comment

Hey Lovelies! Day 2 is here! I have a feeling this month is gonna fly like it’s nothing! But I am excited, and I hope you are too! Today is a Amigurumi, a Snowman Pikachu! I love how it turned out. So I really hope you will like it as well~.

For this DIY you will need:
♥  Yarn, in White, Black and Red
♥  Crochet hook.
♥  Stitch marker.
♥  Yarn Needle.
♥  Sewing Pins. (optional)
♥  Fiber fill.
♥  Felt in the colors Black, Brown and Red.
♥  Glue.
♥  Scissors.

Stitches used:
CH = Chain.
SC = Single Crochet.
FSC = Foundation Single Crochet.
ST = Stitch.
Inc = Increase.
Dec = Decrease.
Slst = Slip Stitch.
(…) = Repeat the space in brackets the given number of times.
[…] = Total number of stitches.

Pattern

Pikachu Head
In White.

1: 6SC in Magic Ring. [6]
2: 2SC in each ST around. [12]
3: (1SC, inc) 6 times. [18]
4: (2SC, inc) 6 times. [24]
5: (3SC, inc) 6 times. [30]
6: SC in each ST around. [30]
|
9: SC in each ST around. [30]
10: 7SC, inc, 1SC, inc, 4SC, inc, 4SC, inc, 1SC, inc, 8SC. [35]
11: 7SC, inc, 3SC, inc, 10SC, inc, 3SC, inc, 8SC. [39]
12: SC in each ST around. [39]
13: 7SC, dec, 3SC, dec, 10SC, dec, 3SC, dec, 8SC. [35]
14: SC in each ST around. [35]
15: 7SC, dec, 1SC, dec, 4SC, dec, 4SC, dec, 1SC, dec, 8SC. [30]
16: (3SC, dec) 6 times. [24]
17: (2SC, dec) 6 times. [18]
18: (1SC, dec) 6 times. [12]
19: Dec all around. [6]
Fasten off and weave in tail.

Pikachu Ears (2)
Start with Black.

1: 4SC in Magic Ring. [4]
2: (1SC, inc) 2 times. [6]
3: (1SC, inc) 3 times. [9]
4: SC in each ST around. [9]
5: (2SC, inc) 3 times. [12]
Change to White.
6: SC in each ST around. [12]
|
8: SC in each ST around. [12]
9: (2SC, dec) 3 times. [9]
10: SC in each ST around. [9]
|
13: SC in each ST around. [9]
Fasten off and leave a long tail for sewing.

Body
In White.

1: 6SC in Magic Ring. [6]
2: 2SC in each st around. [12]
3: (1SC, inc) 6 times. [18]
4: (2SC, inc) 6 times. [24]
5: (3SC, inc) 6 times. [30]
6: (4SC, inc) 6 times. [36]
7: (5SC, inc) 6 times. [42]
8: (6SC, inc) 6 times. [48]
9: 48SC. [48]
|
18: 48SC. [48]
19: (6SC, dec) 6 times. [42]
20: (5SC, dec) 6 times. [36]
21: (4SC, dec) 6 times. [30]
22: (3SC, dec) 6 times. [24]
23: (2SC, dec) 6 times. [18]
Fasten off and leave a long tail for sewing.

Shawl
In red.

1: Crochet 55FSC, turn. [55]
2: CH1, 55SC. [55]
Fasten off and weave in tail.

Assembling

Sew the body to the head. Place the ears with some sewing pins, if you are happy with the look, sew them on. Tie the shawl on his neck.
Cut eyes, ears and nose out of felt. The eyes I cutted out of brown felt, and with a black waterproof marker I made the rest of the eye black, this way you get some dimension in the eye. With white acryllic paint I made a white dot in the eye. This is ofcourse optional.

I hope you enjoyed this pattern! Don’t forget to share yours with #DelinleaBlogmas2018DIY on twitter or insta.

I’ll see you tomorrow again!

Love
Danielle


Posted in: Blogmas 2018, Christmas, Crafting, Pokemon Tagged: Amigurumi, blogmas 2018, Christmas, Crochet, haken, pikachu, Pokemon

♥ Rudolf Accident

29 november 2018 by Delinlea Leave a Comment

Hey Lovelies!

I had way to many ideas for this challenge, I could go on and on. BUT i had to make a choice, so I went for my Rudolf accident idea. A lot in de videos of my explanation is not shown. >_< So I’ll explane it here a bit. Rudolf stole Santa’s hat, cause he thought it would fit him better, but it went in front of his eyes! And yeah, there were a lot of presents on the floor, he tripped, and fell down. The Christmas tree landed on his back. And for punishment he had to stay there until after Christmas, Poor thing!

Maar goed, Ik had veels te veel ideeën voor deze opdracht! Ik kon wel blijven door gaan. Maar ik moest een keuze maken, en ben voor mijn Rudolf ongelukje gegaan. In de aflevering is niet echt laten zien wat het verhaal erachter is >_< dus vertel ik dat hier even.
Rudolf had de must van de Kerstman gestolen, want hij dacht dat het hem beter stond, alleen hing die voor zijn ogen! En ja, er lagen heel veel kadootjes op de grond, hij struikelde en viel op de grond. De kerstboom belande op zijn rug en voor straf moest hij daar de rest van de kerst blijven liggen, arm ding.

This is what I made:
Hier is wat ik gemaakt heb:


Coloring Picture!

In this challenge I also made a coloring picture. So I’ll just gonna post it here as a free download ^^ have fun coloring it! (Click here to go to download link)

Bij deze opdracht had ik ook een kleurplaat gemaakt. Dus ga ik het lekker hier erop zetten zodat je die kunt downloaden en inkleuren! Have fun! (klik hier om naar de download te gaan)

Love
Danielle

Posted in: Geen categorie Tagged: Amigurumi, Christmas, coloring picture, Crochet, haken
« Vorige 1 2 3 4 5 … 18 19 20 21 22 23 24 25 26 27 28 29 Volgende »

What are you looking for?!

My Socials

Ko-Fi

I love making all these free things for you, tho it would be very helpfull if you can support me on Ko-Fi! (You don’t have to tho, totally up to you!)

Ko-Fi Shop!!

In my Ko-Fi shop you can find PDF Amigurumi Patterns!! You can pay easily with PayPal.
Go to the shop here!!

Recent Blog Posts

  • ♥ Happy 2022!
  • ♥ Day 12; Lights
  • ♥ Day 11; Flower Deco
  • ♥ Day 10; Snowman
  • ♥ Day 9; Gingerbread Houses

Recent Comments

  • Liane Van der Donck op ♥ Amigurumi Ghost
  • Kimberly Spear op ♥ Free Pattern; Amigurumi Shiber
  • Delinlea op ♥ Pua Tsum Tsum Amigurumi
  • Marfermar op ♥ Free Pattern; Easter Bunny
  • mary op ♥ Pua Tsum Tsum Amigurumi

Categories

  • animation
  • Beadwork
  • Blogmas 2018
  • Blogmas 2020
  • Blogmas 2021
  • Books
  • Bujo
  • Christmas
  • Christmas CAL 2019
  • Christmas Countdown 2017
  • Contest
  • Crafting
  • Crochet
  • Drawing
  • Drawing Lesson
  • Easter
  • Geen categorie
  • Life
  • Miniature
  • Nail Art
  • New Year
  • Paper
  • plush
  • Pokemon
  • Poseable Art Doll
  • Recipe
  • Sewing
  • Shop Pattern
  • Sinterklaas
  • Social Media
  • Tsum Tsum
  • Ufufy

Copyright © 2023 Delinlea - My little fantasy world.

Family WordPress Theme by themehall.com