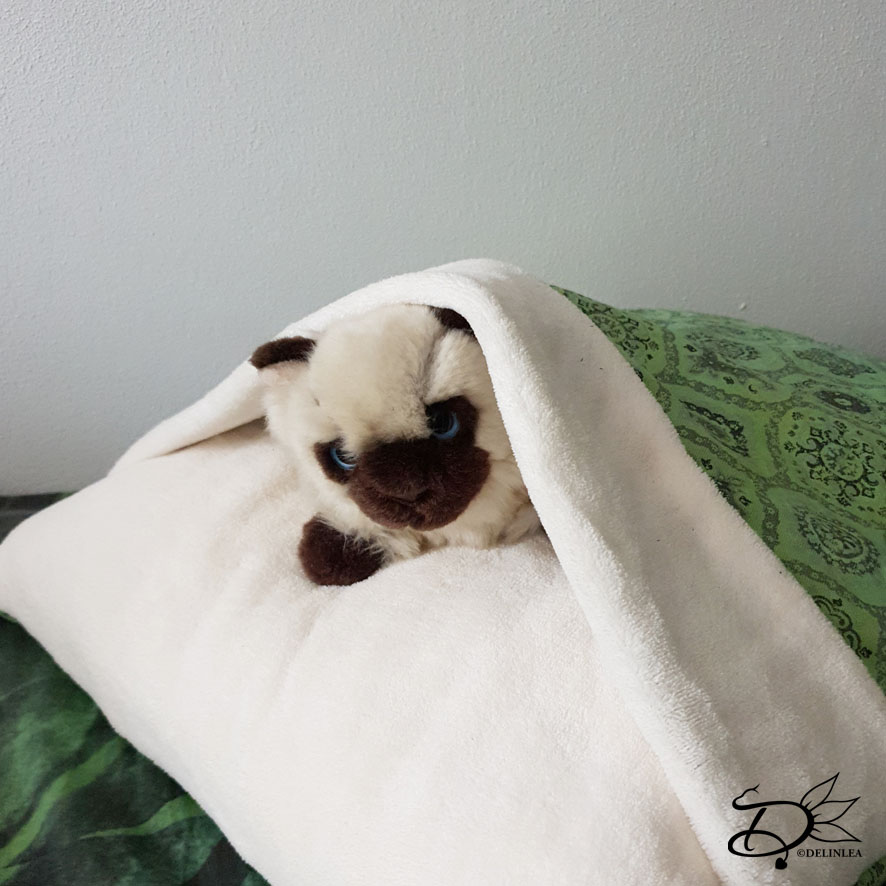
Delinlea - My little fantasy world
  • ♥ Home
  • ♥ About Me
  • ♥ Blogmas 2021
  • ♥ Free Patterns
    • ♥ Amigurumi; Spring/Easter
    • ♥ Amigurumi; Fall/Halloween
    • ♥ Amigurumi; Winter
    • ♥ Amigurumi Tsum Tsum
    • ♥ Amigurumi Ufufy
    • ♥ Amigurumi Others
    • ♥ Christmas Countdown 2017
    • ♥ Blogmas 2018
    • ♥ Blogmas 2020
  • ♥ Tutorials
    • ♥ Easter
    • ♥ Home Deco
    • ♥ Others
  • ♥ Drawing Lessons
  • ♥ FanFic
    • ♥ Chapter 1
    • ♥ Chapter 2
    • ♥ Chapter 3
    • ♥ Chapter 4
    • ♥ Chapter 5
    • ♥ Chapter 6
    • ♥ Chapter 7
  • ♥ Gallery
    • ♥ Crafts
    • ♥ Drawings
    • ♥ Poseable Art Dolls
  • ♥ Links
  • ♥ Contact
    • Privacy Policy

Cat

♥ Cat Pillow Luna

30 september 2021 by Delinlea Leave a Comment

Hey Lovelies! It’s been a long while since I posted something on my blog. I really needed some time off, and still, I can’t promise that there will be a blog next week or every week. We will see what happens. I try to let go of it more, and just see what I feel like doing/making. For today I wanted to make a pillow for my cat, since she loves to crawl under blankets etc. I hope she will use this pillow as well, where she can be cozy.

I tried to write this tutorial down as good as possible, but it might be slightly confusing since I forgot to take pictures often. If you have any questions, just let me know, I’ll try to help you out!

For this DIY you’ll need:
♥ Pillow. (Can be any size, as long as it’s big enough for your cat, mine is 50x60cm)
♥ Cotton Fabric in a color of choice.
♥ Coral Fleece in a color of choice. (You can also choose to skip the cotton fabric and make it out of fleece only).
♥ Zipper, about 30cm.
♥ Sewing Pins.
♥ Scissors.
♥ Sewing Machine.
♥ Iron. (Optional)

Tutorial Cat Bed Pillow

Measure the pillow you wanna use and maybe add a cm, so the pillow stays nice and fluffy ones you put the cover over it. Mine is 50 by 60 cm.

Now I wanted the “blanket” to be slightly bigger on one side so the cat can go in easily and have some space. And I wanted to flip a small part back, about 10cm, so it looks cute! Like they will be sleeping in a small bed.
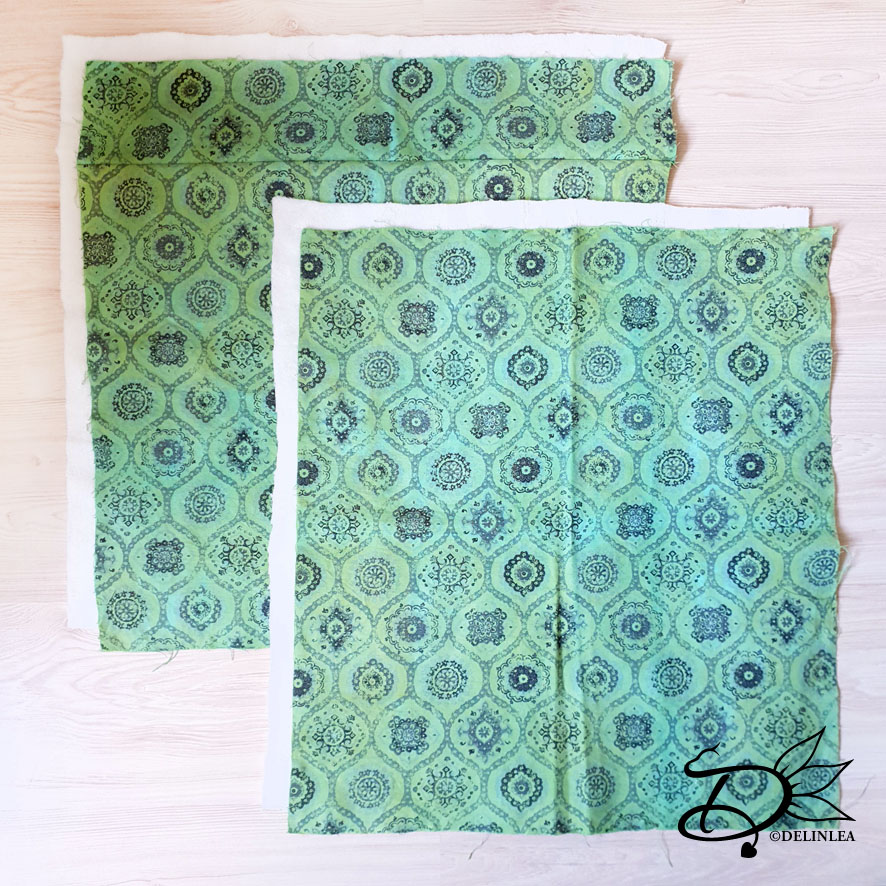
Cutting Fabric

Cut a piece as big as your pillow from cotton (Part A) and one out of fleece (Part B), don’t forget to add seam allowance, about 1cm! This will be the pillow cover.

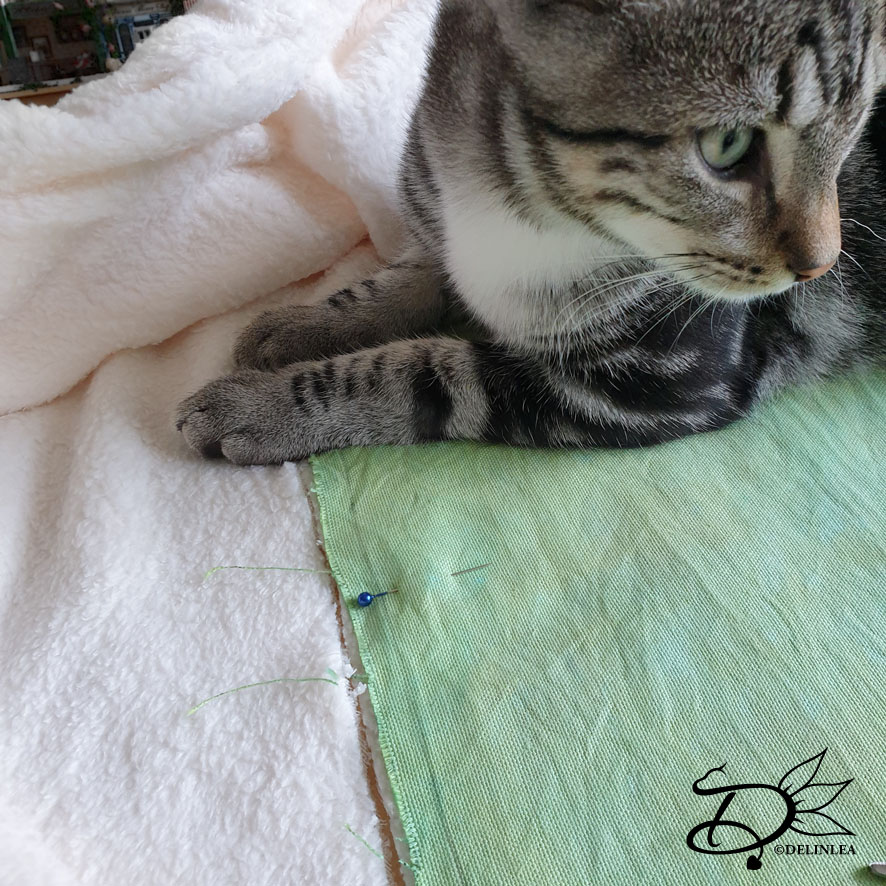
For the blanket, make a template first, from paper. Or draw directly on the cotton fabric if you want to, make sure you do this on the wrong side. Draw the size of your pillow, measure 10cm down one of the short sides, and add 3cm at the 10cm mark to the width. As you can see in the picture one of the shorts sides will be extended a bit as well. But since you might be using a different size pillow, the easiest way to do this is to cut the bottom part with seam allowance already, up to the 10cm mark, fold the fabric on the 10cm line and trace the sides of the bottom. (I did this wrong myself at first and had to cut of that 10cm that you’ll flip back later, and add it with another piece of fabric with the right measurements). When you’ve drawn that right, cut the remaining out as well. The cotton sheet will be Part C. Cut the same from Fleece (Part D).

Diamond was trying to ‘help’ me when I tried to cut the fabric!

Sewing the First Part

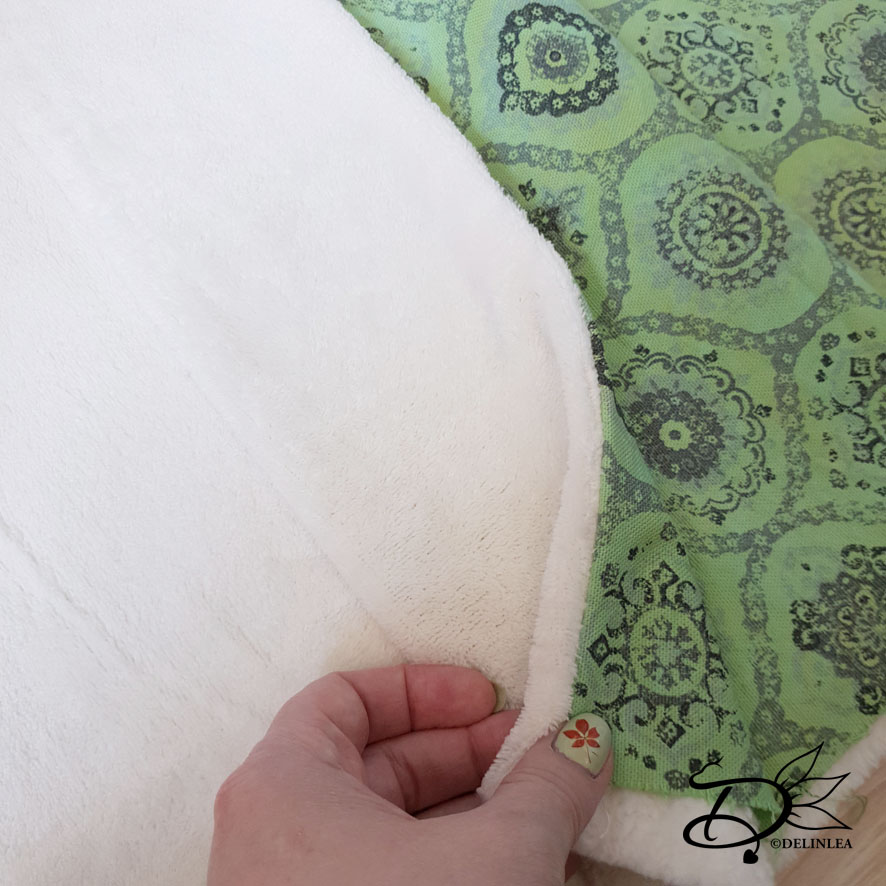
Take part C and D, lay these on top of each other neatly with the right sides on the inside. Sew only the top side together.
Flip the fabric, so the right sides are on the outside now, iron the seam if you want to, or make it at least neat.
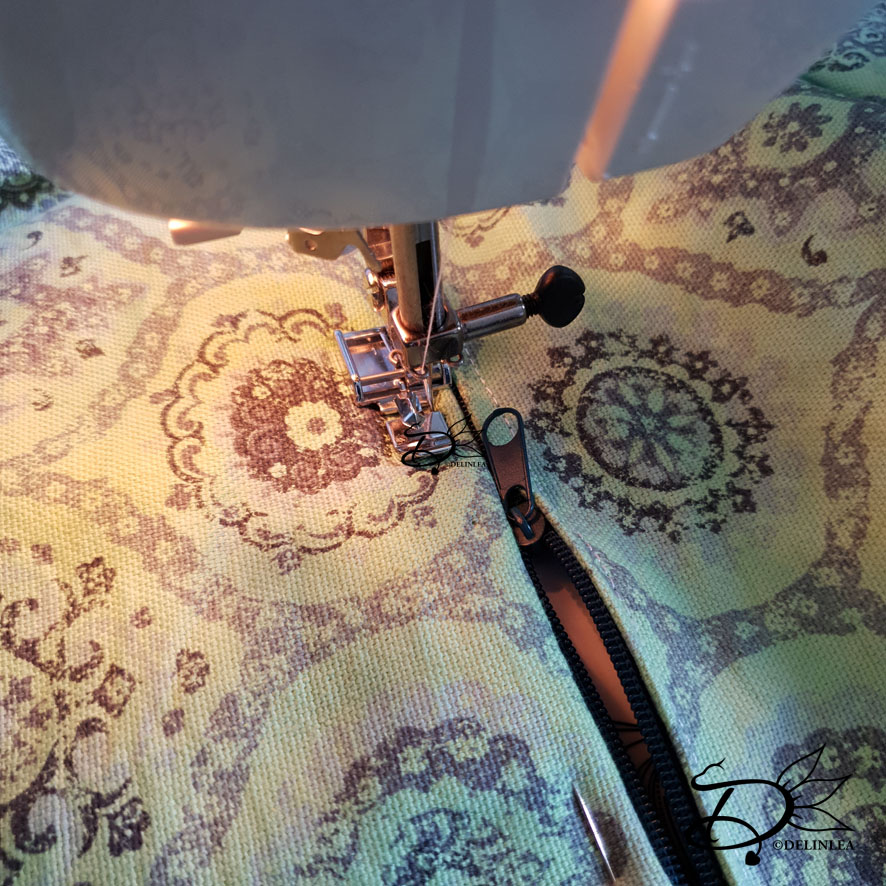
Zipper

Sewing a zipper to a piece of fabric is not something I seriously know how to do, so if you don’t know how, maybe look up a tutorial. Add one part of the zipper, with sewing pins, to one of the short sides of part A, center it neatly. Sew this on using the sewing machine.

The other side of the zipper is a bit harder, the other 3 layers go this part. Part C and D you’ve sewn together just now, you will add the zipper to the bottom side. But before you do this, you’ve to put part B on top of part D, with the right sides together, line it up neatly. I’ve sewn those 3 layers together first, so I was sure it was all attached. Now center the zipper as well with sewing pins, make sure the cotton fabric (Part C) is facing up just like the other side of the zipper, and sew it on.

Finishing off

On to the last part, the zipper is attached. Put part A on top of part C with the right sides together. The pillow should be inside out right now. The hard part is gonna be the blanket at this point, but just make sure that all the sides are lined up and the 10cm part of the blanket should be flipped back now. Take your time to pin all the sides neatly, so you’ll only have a rectangle shape left.
Open the zipper if it wasn’t yet and start sewing around the all the edges but the zipper part. Take your time to sew it neatly, some parts have many layers, not all sewing machines like that. Just be careful. Trim the corners when you are done sewing, so it corners will look nicer after flipping.

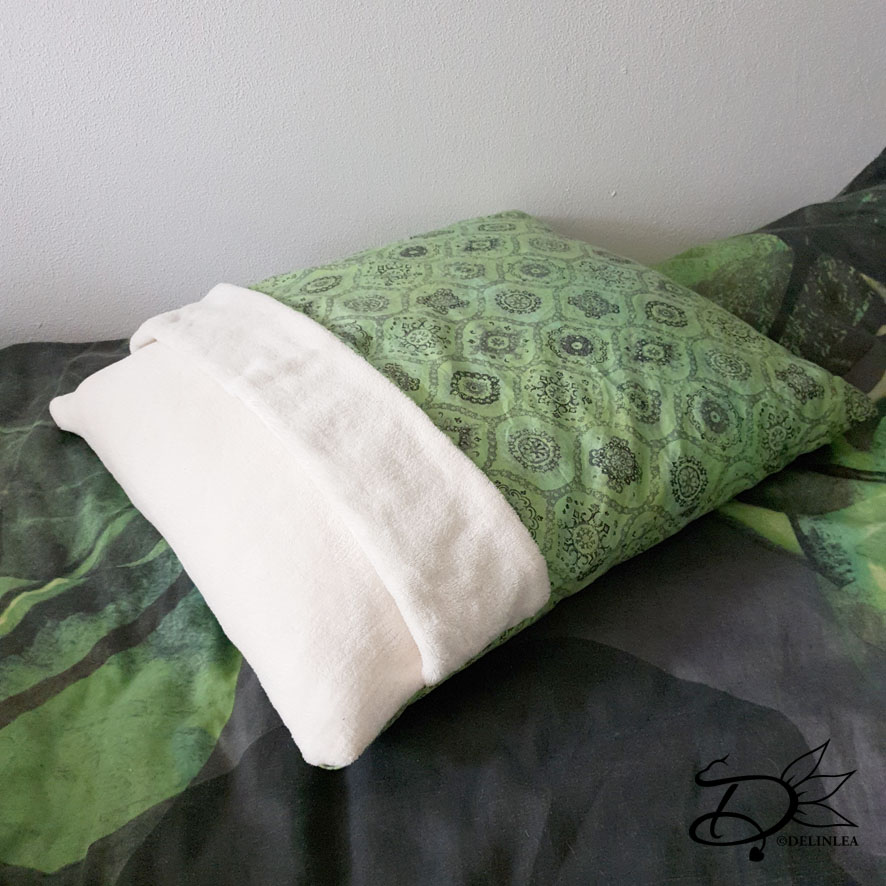
Last is to flip the pillow cover inside out and put the pillow inside! You are done! You made it, I hope your cats will love it a lot. Luna has sit in it for a few seconds and left again, I think it’s not cold enough yet haha. Anyway, if you decided to make one as well, show it to me on Twitter or Instagram, I’d love to see how yours turned out!

I’m sorry for the lack of pictures, I was just in the flow and then I just forget things oops. I hope you don’t mind too much.

Have a wonderful day!

Love
Danielle

PS. if you love those kind of tutorials, maybe you’d like to support me on Ko-Fi?! So I can keep making content like this!

// ©2021 Delinlea / Danielle Kaal // Items made with this pattern may be sold in a limited number. Credit to ‘Delinlea’ is appreciated. Not allowed for mass production or commercial purposes. You may not reproduce, translate, share, freely distribute or sell this pattern as your own in digital or printed from.

Posted in: Crafting, Sewing Tagged: Bed, Cat, DIY, pillow, sewing, Tutorial

♥ Cheshire Cat Ufufy Amigurumi

5 november 2020 by Delinlea Leave a Comment

Hey Lovelies! This month’s planning will be a bit different from usual. Normally I would post Ufufy and Tsum Tsum patterns at the end of the month, but this time I switch it around. I will do those at the beginning of the month so I can do some Sinterklaas blogs at the end of the month. I hope you don’t mind! So today pattern will be a Cheshire Cat Ufufy! I hope you will like this pattern, I had at least fun making him!

Cheshire Cat Ufufy

For this pattern you’ll need:
♥ Yarn in the colors Pink, Light Pink and Purple.
♥ Crochet hook. ( I used a 2mm)
♥ Stuffing.
♥ Yarn Needle.
♥ Sewing Pins.
♥ Stitch Marker.
♥ Dark Brown Felt.
♥ Scissors.

Stitches used (US Terms):
Magic Ring.
CH = Chain.
SLST = Slip Stitch.
FSC = Foundation Single Crochet.
SC = Single Crochet.
ST = Stitch.
Inc = Increase.
Dec = Decrease.
(…) = Repeat the space in brackets the given number of times.
[…] = Total number of stitches.

This pattern is made with continues rounds, unless stated otherwise. Use a stitch marker to mark your first/last stitch of your row.

♥ Pattern Cheshire Cat

Body
Start with the color Pink.

1: 6SC in a Magic Ring. [6]
2: 2SC in each st around. [12]
3: (1SC, inc) 6 times. [18]
4: (2SC, inc) 6 times. [24]
5: 24SC. [24]
6: 24SC. [24]
7: (3SC, inc) 6 times. [30]
8: 30SC. [30]
|
11: 30SC. [30]
Change to the color Light Pink.
12: 30SC. [30]
13: 30SC. [30]
Change to the color Pink.
14: 30SC. [30]
15: 30SC. [30]
Change to the color Light Pink.
16: 30SC. [30]
17: 30SC. [30]
Change to the color Pink.
18: (3SC, dec) 6 times. [24]
19: (2SC, dec) 6 times. [18]
20: (1SC, dec) 6 times. [12]
21: Dec around. [6]
Fasten off and weave in tail.

Snout
Use the color Light Pink.

1: 10FSC,turn. [10]
2: 1SC + 1HDC in the next st, 1HDC, 1SC, 4SlSt, 1SC, 1HDC, 1HDC + 1SC in the next st. [12]
Fasten off and leave a long tail for sewing.

Nose
Use the color Purple.

In a Magic Ring crochet; 1SC, 1HDC, 1SC, 1HDC, 1SC, SlSt in the first st.
Fasten off and leave a long tail for sewing.

Ears (Make 2)
Use the color Pink.

1: 4SC in a Magic Ring. [4]
2: (inc, 1SC) 2 times. [6]
Fasten off and leave a long tail for sewing.

Legs (Make 4)
Use the color Light Pink.

1: 6SC in a Magic Ring. [6]
2: 6SC. [6]
Fasten off and leave a long tail for sewing.

Tail
Start with the color Light Pink.

1: 6SC in a Magic Ring. [6]
2: 6SC. [6]
Change to the color Pink.
3: 6SC. [6]
4: 6SC. [6]
Change to the color Light Pink.
5: 6SC. [6]
6: 6SC. [6]
Change to the color Pink.
7: 6SC. [6]
8: 6SC. [6]
Fasten off and leave a long tail for sewing.

♥ Assembling

Whenever I start assembling Amigurumi’s, I use sewing pins first to put it together. This way I can easily move parts around until I am happy. Then I will sew it on.

I started with sewing on the tail of the Cheshire cat first, where you can see rows switching in the back. After I positioned the legs, and sew those on as well.
Then it’s time to get the snout on, find the top light pink row of the body, then go one row up and above that one you can sew on the snout. Then attach the nose as well.
Last I’ve sewn on the ears.
Now for the fluffy bits by the ears and on his cheeks. I use strands of yarn and tied about 2 or 3 together. With a needle I’ve pulled them to the spot I wanted them to be in. Cut them to about the length you want the fluff to be. Use a needle to unraffle the yarn and brush it out to make it fluffy. Give it a final cut to the right length.
Last make his facial detail out of some felt and use a needle and thread if you prefer.

And the Cheshire Cat is all done! I hope you had fun today and were able to make this cutie. If you did, show me on Twitter and Instagram with #DelinleaDIY. I’d love to see.

Have a wonderful day and I’ll see you next week.

Love
Danielle

Posted in: Crafting, Crochet, Ufufy Tagged: Alice In Wonderland, Amigurumi, Cat, Cheshire, Crochet, cute, Disney, haken, kawaii, Ufufy

♥ BerryCat Amigurumi

7 mei 2020 by Delinlea Leave a Comment

Hey Lovelies! I saw strawberries around in the stores already, and that always gives me the feeling of Summer is near. I love strawberries and cats so I combined them xD.  Here are some adorable BerryCat! Ready to jump into the pattern?!

BerryCat

For this Pattern you’ll need:
♥ Yarn in Pink and Light Green (Or Red and Green). (I used Budgetyarn.com)
♥ Extra White or Light Yellow yarn, around 30-40cm, for the ‘seeds’.
♥ Black Felt or Yarn for the nose.
♥ Crochet Hook, 2,5mm.
♥ Stuffing.
♥ Stitch Markers.
♥ Yarn Needle.
♥ Sewing Pins.

Stitches used (US Terms):
Magic Ring.
CH = Chain.
SLST = Slip Stitch.
SC = Single Crochet.
HDC = Half Double Crochet.
DC = Double Crochet.
Bobble = For 1 Bobble Stitch you work 5 DC in one stitch, but without finishing the last loop of each DC, after you have 6 loops on your hook, yarn over and pull through all 6 loops.
ST = Stitch.
Inc = Increase.
Dec = Decrease.
(…) = Repeat the space in brackets the given number of times.
[…] = Total number of stitches.

Pattern BerryCat

Work in continues rounds, use a stitch marker to mark your first stitch of every row. This is for every part, unless stated otherwise.

Body
Use Pink colored yarn.

1: 6SC in Magic Ring. [6]
2: 2SC in each st around. [12]
3: 12SC. [12]
4: 1SC, Ch8, insert in second ch from hook, 7SlSt, continue working on the ‘base’, 2SC, inc, (Bobble, 2SC, inc) 2 times. [15]
5: 15SC. (You skip working in the ’tail’) [15]
6: (4SC, inc) 3 times. [18]
7: (5SC, inc) 3 times. [21]
8: 6SC, inc, (Bobble, 5SC, inc) 2 times. [24]
9: (7SC, inc) 3 times. [27]
10: (8SC, inc) 3 times. [30]
11: 30SC. [30]
12: 30SC. [30]
13: (3SC, dec) 6 times. [24]
14: (4SC, dec) 6 times. [18] stuff here and place the eyes between row 10 and 11, about 2cm apart.
15: (1SC, dec) 6 times. [12]
16: (dec) 6 times. [6]
Fasten off and weave in tail.

Ears (Make 2)
Use Pink colored yarn.

Ch4, insert in second Ch from hook, 1SC, 1HDC, 1DC.
Fasten off and leave a long tail for sewing.

Stem
Use the light Green colored yarn.

Ch7, insert in second Ch from hook, 6SlSt.
Fasten off and leave along tail for sewing.

Crown
Use the light Green colored yarn.

1: 6SC in Magic Ring. [6]
2: (Ch4, insert in second Ch from hook, 1SlSt, 2SC, 1SlSt in Base) 6 times.
Fasten off and leave a long tail for sewing.

Assembling

Whenever I start assembling amigurumi’s, I prefer to use sewing pins first. This way I can position and reposition all parts until I am happy with how it looks. I recommend you do so as well.

Start sewing the stem to the crown, and then the crown to the top of the strawberry.
Then position the ears and sew them on.
Last with the extra white yarn you can stitch on the ‘seeds’.  With black felt or yarn create a small nose.

That was it already for today’s pattern! I hope you liked this BerryCat! I can imagine them hanging around everywhere!

Have a wonderful day!

Love
Danielle

Posted in: Crafting, Crochet Tagged: Amigurumi, berrycat, Cat, Crochet, cute, haken, kawaii, Strawberry, summer, Virka

♥ Free Pattern; Cat Ghost Amigurumi

3 oktober 2019 by Delinlea Leave a Comment

Hey Lovelies! It’s the first blog of October! Guess what that means, this month I will release only Halloween themed DIY’s or patterns, but they will have something cute over them. I hope you are excited for that! For today I planned this cute Cat Ghost! Very easy to make but so adorable to make a lot of them!

Cat Ghost

For this DIY you’ll need:
♥ Yarn in the color; White (cotton yarn).
♥ Crochet Hook (I used a 2,5mm hook).
♥ Stuffing.
♥ Scissors.
♥ Sewing Pins.
♥ Yarn Needle.
♥ Piece of pink yarn to sew on it’s nose.
♥ Safety Eyes, 5mm.

Stitches used (US Terms):
Magic Ring.
CH = Chain.
SLST = Slip Stitch.
SC = Single Crochet.
ST = Stitch.
Inc = Increase.
Dec = Decrease.
(…) = Repeat the space in brackets the given number of times.
[…] = Total number of stitches.

Pattern

Work in continues rounds, use a stitch marker to mark your first stitch of every row. This is for every part, unless stated otherwise.

Body
Use the color White.

1: 6SC in Magic Ring. [6]
2: 2SC in each st around. [12]
3: (1SC, inc) 6 times. [18]
4: (2SC, inc) 6 times. [24]
5: 24SC. [24]
|
8: 24SC. [24]
9: (6SC, dec) 3 times. [21]
10: 21SC. [21]
11: (5SC, dec) 3 times. [18]
12: 18SC. [18]
13: (4SC, dec) 3 times. [15] Insert the eyes between row 6 and 7, and also stuff the body.
14: (3SC, dec) 3 times. [12]
15: (2SC, dec) 3 times. [9]
16: (1SC, dec) 3 times. [6]
17: 6SC. [6]
18: 4SC, dec. [5]
Fasten off and weave in tail.

Ears (Make 2)
Use the color white.

1: 6SC in Magic Ring. [6]
2: (1SC, inc) 3 times. [9]
3: (2SC, inc) 3 times. [12]
4: 12SC. [12]
Fasten off and leave a long tail for sewing.

Arms (make 2)
Use the color white.

Ch3, insert in second ch from hook, 2SC.
Fasten off and leave a long tail for sewing.

Assembling

By using sewing pins, you can position all parts before sewing them on. This way you can easily move them around until you are happy with how it looks.

Place the ears on top of the body and sew them on. Also position the arms and sew those on as well. With some pink yarn stitch on the nose, or you can use felt to do so.

I hope your Cat Ghost turned out as cute as mine and got you addicted to make a few more as well! BTW I love to see yours if you made it! Please show me on social media or send me an email!

Love
Danielle

Posted in: Crafting, Crochet Tagged: Amigurumi, Cat, Crochet, cute, ghost, haken, kawaii

♥ Free Pattern; Amigurumi Cat Bulb

21 februari 2019 by Delinlea Leave a Comment

Hey Lovelies! Was the weather as beautiful as it was here the past few days?! It was so nice and sunny and cold, I love it! I prefer this weather over hot sunny weather. I just love cold weather, don’t judge me haha. Right now, it’s cloudy while I am writing this, but the past few days really got me into spring feelings. So, I thought it’s a good idea to make something springy! I think this cat bulb turned out adorable, I hope you think so as well. Ready to dive into this Amigurumi pattern?!

For this DIY you’ll need:
♥ Yarn in the colors; Light Brown, Brown, Green and Cream. (I used StyleCraft Special DK in the colors; Camel, Walnut, Spring Green and Cream)
♥ Crochet Hook (I used a 2,5mm hook).
♥ Stuffing.
♥ Scissors.
♥ Sewing Pins.
♥ Yarn Needle.
♥ Safety eyes, 5mm. (Optional

Stitches used (US Terms):
Magic Ring.
Ch = Chain.
SLST = Slip Stitch.
SC = Single Crochet.
HDC = Half Double Crochet.
ST = Stitch.
Inc = Increase.
Dec = Decrease.
(…) = Repeat the space in brackets the given number of times.
[…] = Total number of stitches.

Pattern

Leaves (Make 2)
Use the color Green

1: 6SC in Magic Ring. [6]
2: (1SC, inc) 3 times. [9]
3: 9SC. [9]
|
5: 9SC. [9]
6: (1SC, dec) 3 times. [6]
7: 6SC. [6]
Fasten off and leave a long tail for sewing.

Stem
Use the color Green.

1: 6SC in Magic Ring. [6]
2: 6SC. [6]
|
11: 6SC. [6]
Fasten off and weave in tail.

Bulb
Use the color Light Brown.

1: 6SC in Magic Ring. [6]
2: Inc in each st around. [12]
3: (1SC, inc) 6 times. [18]
4: (2SC, inc) 6 times. [24]
5: (3SC, inc) 6 times. [30]
6: (4SC, inc) 6 times. [36]
7: 36SC. [36]
|
10: 36SC. [36]
11: (4SC, dec) 6 times. [30]
12: 30SC. [30]
Between row 11 and 12 you will add the eyes, about 2,5cm apart. It’s also a good time to add the roots with cream to the bottom of the bulb, I attached 4 strands, and peeled those apart, so it looks a bit more like roots.
13: 30SC. [30]
14: (3SC, dec) 6 times. [24]
15: 24SC. [24]
16: (2SC, dec) 6 times. [18]
17: 18SC. [18]
18: (1SC, dec) 6 times. [12]
19: 1SC, 4HDC, 1SC, SLST. [7]
Fasten off and leave a long tail for sewing.

Arms (make 2)
Use the color Light Brown.

1: 6SC in Magic Ring. [6]
2: 6SC. [6]
Fasten off and leave a long tail for sewing.

Legs (make 2)
Use the colors Light Brown and Brown. (one each)

1: 6SC in Magic Ring. [6]
2: Inc in each st around. [12]
3: 12SC. [12]

Ears (make 2)
Use the colors Light Brown and Brown. (one each)

1: 4SC in Magic Ring. [4]
2: (1SC, inc) 2 times. [6]
3: (2SC, inc) 2 times. [8]
4: (3SC, inc) 2 times. [10]
Fasten off and leave a long tail for sewing.

Assembling

Sew the 2 leaves to the stem, at the point you started the stem.
With Sewing pins, it’s easier to see where you wanna place all the parts. With pinning them down to the place you wanna have the legs for example, you can see if it looks good. If not, you can easily replace them. What you can’t do easily when you already sew them on.
If you are happy with how your Cat Bulb looks, you can sew on all parts.
Lastly add the plant to the blub, insert it in the hole of the bulb and sew it on.  I used the yarn tail from the blub, I thought this was easier, but do what feels good for you.
Don’t forget to make a nose, you can embroider it on or use felt. With some soft pastel I added some pink to the cheecks, maybe you wanna do that as well, just apply it with a brush.

I hope you enjoyed this Cat Bulb Pattern! And if so, show me yours on social media, love to see it!
Have a wonderful day everyone!

Love
Danielle

Posted in: Crafting, Crochet Tagged: Amigurumi, bulb, Cat, Crochet, cute, Free Pattern, kawaii, spring
1 2 Volgende »

What are you looking for?!

My Socials

Ko-Fi

I love making all these free things for you, tho it would be very helpfull if you can support me on Ko-Fi! (You don’t have to tho, totally up to you!)

Ko-Fi Shop!!

In my Ko-Fi shop you can find PDF Amigurumi Patterns!! You can pay easily with PayPal.
Go to the shop here!!

Recent Blog Posts

  • ♥ Happy 2022!
  • ♥ Day 12; Lights
  • ♥ Day 11; Flower Deco
  • ♥ Day 10; Snowman
  • ♥ Day 9; Gingerbread Houses

Recent Comments

  • Delinlea op ♥ Pietje Gnome Amigurumi
  • Delinlea op ♥ Toy Story Alien TsumTsum Amigurumi
  • Delinlea op ♥ Pua Tsum Tsum Amigurumi
  • Charli op ♥ Free Pattern; CNY Mouse Amigurumi
  • Peter Pesch op ♥ Pietje Gnome Amigurumi

Categories

  • animation
  • Beadwork
  • Blogmas 2018
  • Blogmas 2020
  • Blogmas 2021
  • Books
  • Bujo
  • Christmas
  • Christmas CAL 2019
  • Christmas Countdown 2017
  • Contest
  • Crafting
  • Crochet
  • Drawing
  • Drawing Lesson
  • Easter
  • Geen categorie
  • Life
  • Miniature
  • Nail Art
  • New Year
  • Paper
  • plush
  • Pokemon
  • Poseable Art Doll
  • Recipe
  • Sewing
  • Shop Pattern
  • Sinterklaas
  • Social Media
  • Tsum Tsum
  • Ufufy

Copyright © 2025 Delinlea - My little fantasy world.

Family WordPress Theme by themehall.com