Delinlea - My little fantasy world
  • ♥ Home
  • ♥ About Me
  • ♥ Blogmas 2021
  • ♥ Free Patterns
    • ♥ Amigurumi; Spring/Easter
    • ♥ Amigurumi; Fall/Halloween
    • ♥ Amigurumi; Winter
    • ♥ Amigurumi Tsum Tsum
    • ♥ Amigurumi Ufufy
    • ♥ Amigurumi Others
    • ♥ Christmas Countdown 2017
    • ♥ Blogmas 2018
    • ♥ Blogmas 2020
  • ♥ Tutorials
    • ♥ Easter
    • ♥ Home Deco
    • ♥ Others
  • ♥ Drawing Lessons
  • ♥ FanFic
    • ♥ Chapter 1
    • ♥ Chapter 2
    • ♥ Chapter 3
    • ♥ Chapter 4
    • ♥ Chapter 5
    • ♥ Chapter 6
    • ♥ Chapter 7
  • ♥ Gallery
    • ♥ Crafts
    • ♥ Drawings
    • ♥ Poseable Art Dolls
  • ♥ Links
  • ♥ Contact
    • Privacy Policy

Christmas

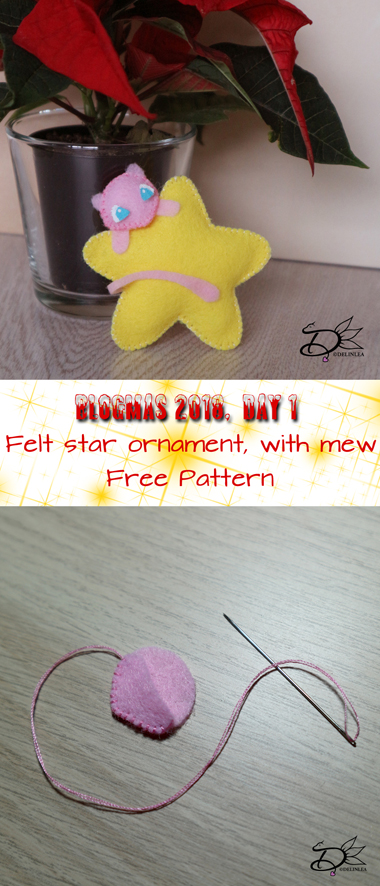
♥ Day 1; Mew Felt Ornament

1 december 2018 by Delinlea Leave a Comment

Hey Lovelies! Today is the start of Blogmas 2018!! That means, from today on, until dec 24!! A new blog with DIY will be uploaded daily! So 24 free DIYs for you this month! This whole month is Christmas X Pokémon themed! I hope you like that!? I promise they are all very cute. There might be 1 exception, that’s not gonna be Pokémon themed, but you will find out =P.

I will kick off this blogmas with a felt ornament! I choose to put Mew with a star as the first DIY. Let’s go into it! Shall we?!


For this DIY you’ll need:
♥  Felt in the colors Yellow, Pink and White/Blue.
♥  Sewing thread in matching colors to the felt.
♥  Sewing Needle.
♥  Trick Marker or anything else where you can copy the pattern with onto your felt.
♥  Pattern.
♥  Scissors.
♥  Stuffing.
♥  Fabric Glue. (optional)
♥  Acryllic Paint. (optional)

DIY

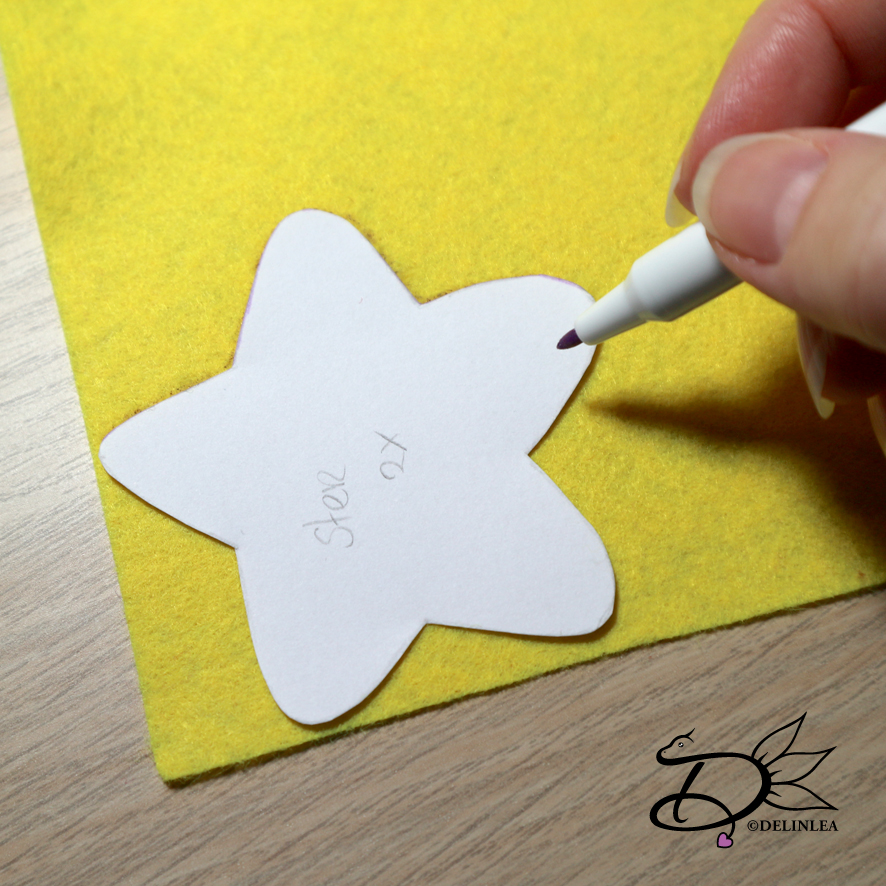
First off all, download the pattern HERE! And print it out (or draw it from your screen). The good thing is, you can make it as big as you want! Then cut out all the pieces. On every piece is stated how many times you need to cut it out.

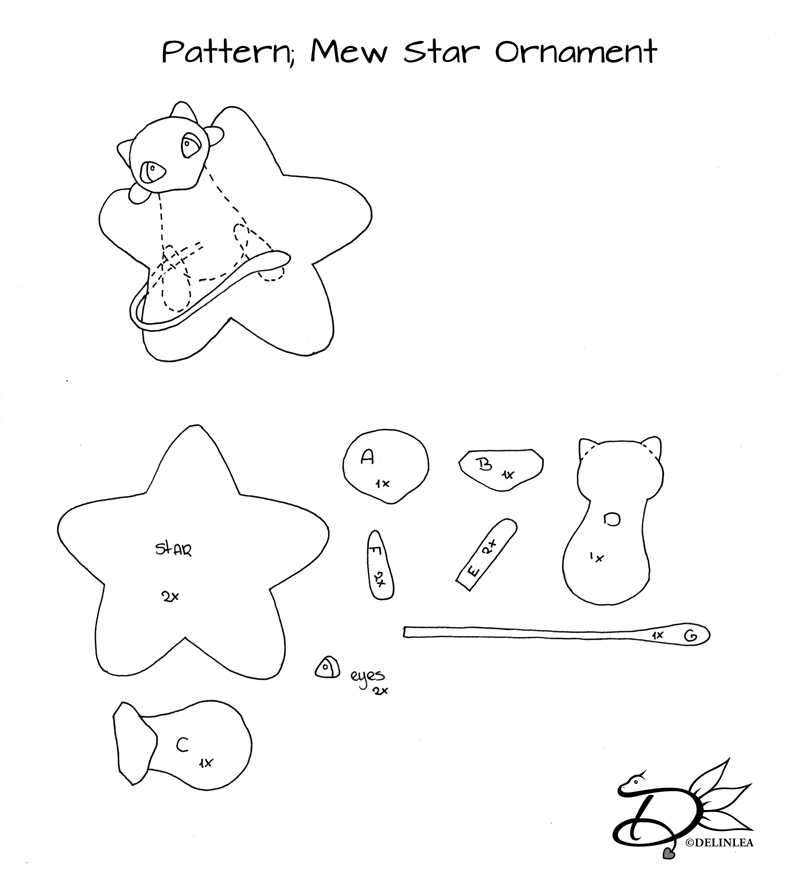
The star you copy and cut out of Yellow felt, The eyes out of white (and blue if you decide not to use paint like I did) and the rest of the pieces you copy on Pink felt and cut them out. Make sure you don’t loose track of what pieces are which.

Sewing

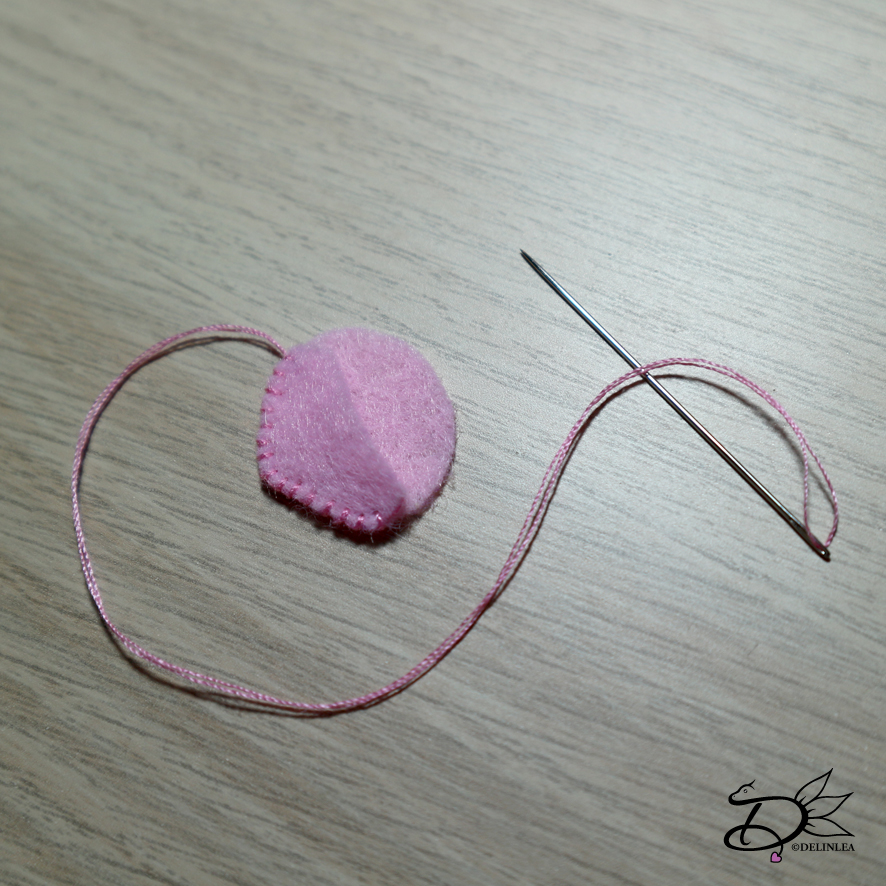
Sew the star together, using the Blanket stitch! (This stitch will use all the time) Make sure before closing the whole star, that you stuff it, to give it a little bit more dimension.

Then sew part A and B together of Mew. Then line up part C with part B and sew those together. You don’t have to do this very neathly since it doesn’t show anyway!

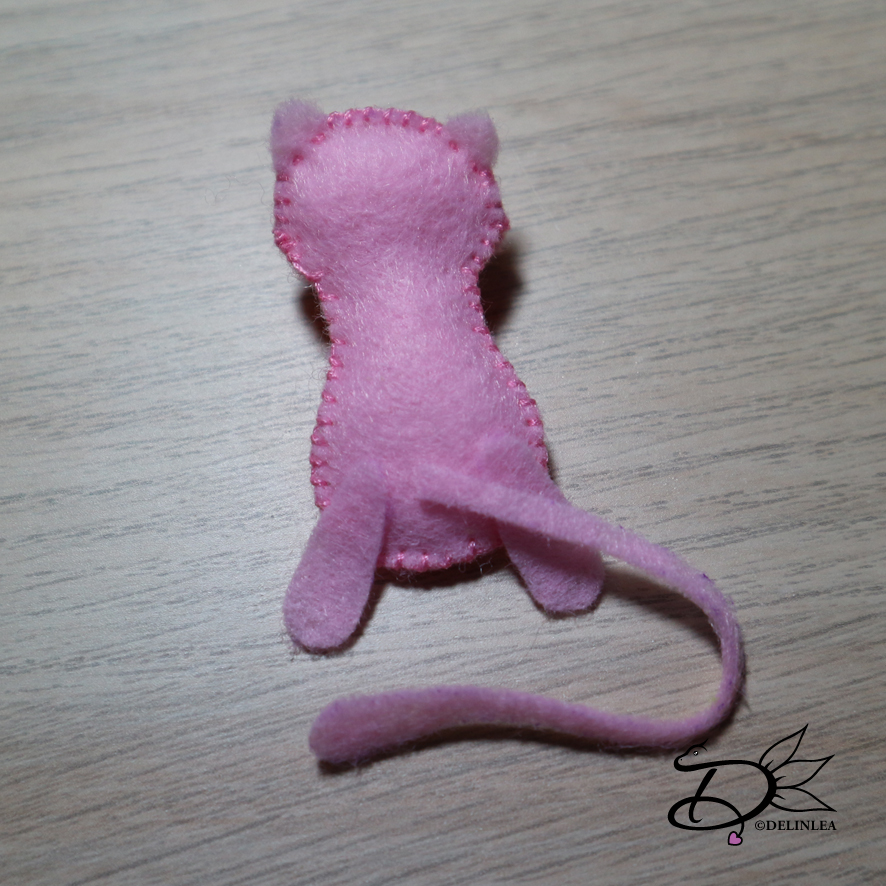
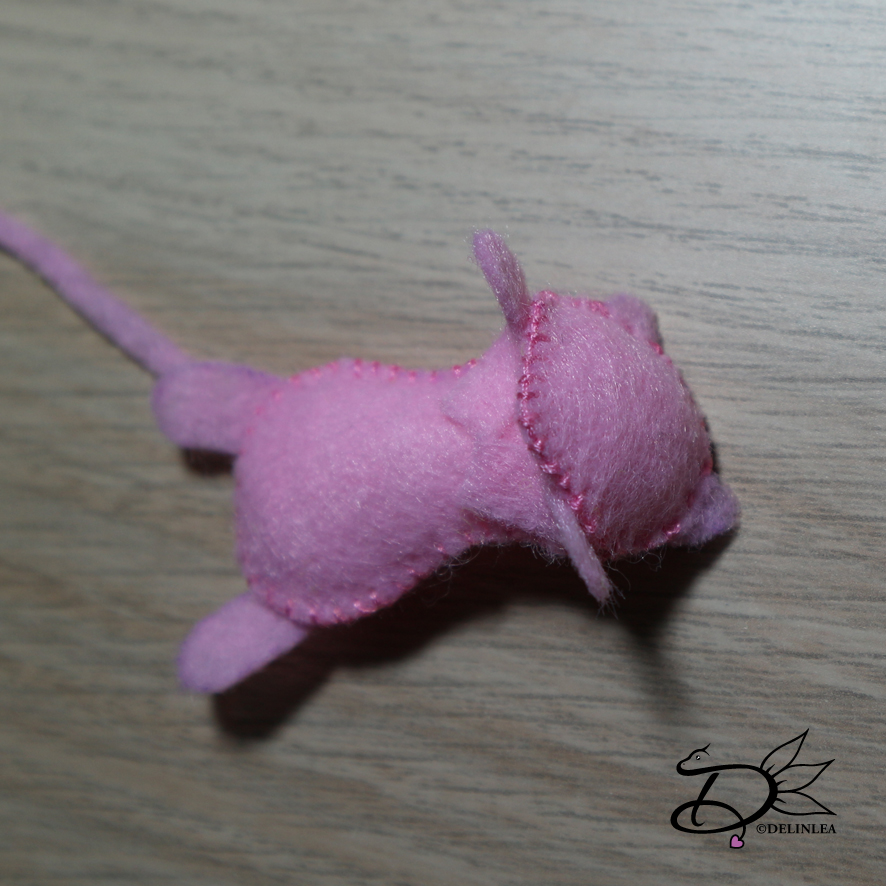
Now sew on the back of the body, part D, start by the head, by the ears you sew both parts together with a running stitch, you don’t sew around them. And stuff the head before you start with the body. Then sew the body together as well, and before entirely closing, stuff this as wel.

Now I used Glue to attach the remaining parts, but you can ofcourse choose to sew this on as well, I went for the quick option xD. Glue on the legs, part F, to the back of Mew. (Use the drawn image on the pattern for reference). Then glue on the tail, part E, inbetween the legs.
Glue on the arms as wel, just under the head, as shown in the picture.

Now it’s time to attach mew to the star, start by his head and arms, glue this on, in the position you like. Then glue the body to the star, so it’s won’t move anymore. Now you bring the tail to the front of the star and position it the way you like! Glue on when you are happy with how it looks.

And last but not least, glue on the eyes! If you didn’t use the blue felt and went for the paint option like I did. This is the moment to paint them.

With a lilttle pieces of sewing thread make a loop to hang it on. Just pull your length of thread through the star with a needle. Till you reached the middle of the thread, put both ends together and tie a knot.

And you are done with mew! How cute will it look in your christmas tree?! Adorable right?!
Share yours with #DelinleaBlogmas2018DIY on twitter or insta! Love to see yours!

I will see you tomorrow!

Love
Danielle

Posted in: Blogmas 2018, Christmas, Crafting Tagged: blogmas 2018, Christmas, DIY, felt, Free, mew, ornament, Pokemon, star

♥ Rudolf Accident

29 november 2018 by Delinlea Leave a Comment

Hey Lovelies!

I had way to many ideas for this challenge, I could go on and on. BUT i had to make a choice, so I went for my Rudolf accident idea. A lot in de videos of my explanation is not shown. >_< So I’ll explane it here a bit. Rudolf stole Santa’s hat, cause he thought it would fit him better, but it went in front of his eyes! And yeah, there were a lot of presents on the floor, he tripped, and fell down. The Christmas tree landed on his back. And for punishment he had to stay there until after Christmas, Poor thing!

Maar goed, Ik had veels te veel ideeën voor deze opdracht! Ik kon wel blijven door gaan. Maar ik moest een keuze maken, en ben voor mijn Rudolf ongelukje gegaan. In de aflevering is niet echt laten zien wat het verhaal erachter is >_< dus vertel ik dat hier even.
Rudolf had de must van de Kerstman gestolen, want hij dacht dat het hem beter stond, alleen hing die voor zijn ogen! En ja, er lagen heel veel kadootjes op de grond, hij struikelde en viel op de grond. De kerstboom belande op zijn rug en voor straf moest hij daar de rest van de kerst blijven liggen, arm ding.

This is what I made:
Hier is wat ik gemaakt heb:


Coloring Picture!

In this challenge I also made a coloring picture. So I’ll just gonna post it here as a free download ^^ have fun coloring it! (Click here to go to download link)

Bij deze opdracht had ik ook een kleurplaat gemaakt. Dus ga ik het lekker hier erop zetten zodat je die kunt downloaden en inkleuren! Have fun! (klik hier om naar de download te gaan)

Love
Danielle

Posted in: Geen categorie Tagged: Amigurumi, Christmas, coloring picture, Crochet, haken

♥ Contest Winner!

1 februari 2018 by Delinlea Leave a Comment

Hey Lovelies!

Do you remember that contest from my Christmas Countdown! Well it ended last week and it’s time to announce the winner!

Only 2 people joined, but it wasn’t about the amount of people who would join. I wanted to draw this lineart dragon tree for a long time, and I finally did, so I am already happy 2 people joined! And I think they enjoyed coloring this picture!

So these were the entries I got.

This one by k.fanart_r.art (Salma)

And I had another one by jr_panda2778 on twitter, but she deleted her entry. So I guess that means she’s out.

So yeah that makes it very easy for me to choose a winner!! it’s Salma (k.fanart_r.art) Congratulations girl!! You will get the prizes as soon asap. I’ll contact you soon.

Have a wonderful day everyone!

Love
Danielle

Posted in: Christmas, Christmas Countdown 2017, Contest Tagged: Christmas, christmascountdown, contest, winner

♥ Day 25: Bambi Tsum Tsum Amigurumi

25 december 2017 by Delinlea Leave a Comment

Hey Lovelies!

It’s Christmas!! Merry Christmas to you all!! And that also means this is the last day of the Disney Christmas Countdown! And right now I have used the word Christmas too much haha. For the last one for this years countdown we are gonna make a Bambi Tsum Tsum. I have to admit, he stole Piglet’s hat xD Okay, maybe I was lazy… xD

I hope you have a wonderful Christmas! Let’s go to the pattern now ^-^.

For this DIY you will need:
♥  Yarn: in the colors Light Brown, Dark Brown, Light Yellow, Black, Pink and Red.
♥  Cloud yarn in White (optional)
♥  Small Pompom.
♥  Crochet hook.
♥  Stitch marker.
♥  Fiber fill.
♥  Yarn needle.
♥  Embroidery needle with black thread or black felt.
♥  Scissors.
♥  Glue.

Stitches used:
SC = Single Crochet.
TR = Triple Crochet
ST = Stitch.
Inc = Increase.
Dec = Decrease.
Slst = Slip Stitch.
(…) = Repeat the space in brackets the given number of times.
[…] = Total number of stitches.

♥ Pattern:

Body:
Start with Light Brown

1: 6SC in magic ring. [6]
2: Inc in each st around. [12]
3: (1SC, inc), 6 times. [18]
4: (2SC, inc), 6 times. [24]
5: (3SC, inc), 6 times. [30]
6: (4SC, inc), 6 times. [36]
7: (5SC, inc), 2 times, 4SC, Change to Dark Brown, 1SC, inc, 1SC, Change to Light Brown, 4SC, inc, (5SC, inc), 2 times. [42]
8: 17SC, Change to Dark Brown, 6SC, Change to Light Brown, 19SC. [42]
9: 9SC, Change to Dark Brown, 23SC, Change to Light Brown, 10SC. [42]
10: 8SC, Change to Dark Brown, 25SC, Change to Light Brown, 9SC. [42]
|
13: 8SC, Change to Dark Brown, 25SC, Change to Light Brown, 9SC. [42]
14: 10SC, Change to Dark Brown, 21SC, Change to Light Brown, 11SC. [42]
15: SC in each st around. [42]
|
29: SC in each st around. [42]
30: (5SC, dec), 6 times. [36]
31: (4SC, dec), 6 times. [30]
32: (3SC, dec), 6 times. [24]
33: (2SC, dec), 6 times. [18] Stuff the body here.
34: (1SC, dec), 6 times. [12]
35: Dec around. [6]
Fasten off and weave in tail.

Legs: (4)
In Light Brown

1: 4SC in magic ring. [4]
2: Inc in each st around. [8]
3: SC in each st around. [8]
|
5: SC in each st around. [8]
Fasten off and leave a long tail for sewing. You don’t have to stuff them.

Stripe on his back:
In Dark Brown.

1: Chain 20, insert in 4th chain from hook, 17TR, turn. [17]
2: SC in each st around. (First in 17DC st and then in 20 Chain st). [37]
Fasten off and leave long tail for sewing.

Dots on his back: (6)

Make 6SC in magic ring, with Light Yellow. Fasten off and leave long tail for sewing.

Nose:
In Light Yellow.

1: 6SC in magic ring. [6]
2: Inc in each st around. [12]
3: (1SC, inc), 6 times. [18]
4: SC in each st around. [18]
Fasten off and leave long tail for sewing. Stuff the nose lightly.

Ears: (2)
Start with Black.
1: 6SC in magic ring. [6]
2: (1SC, inc), 3 times. [9]
Change to Dark Brown.
3: (2SC, inc), 3 times. [12]
4: (1SC, inc), 6 times. [18]
5: SC in each st around. [18]
|
8: SC in each st around. [18]
9: (1SC, dec), 6 times. [12]
Fasten off and leave long tail for sewing. Don’t stuff the ears, just flatten them.

Inside Ears: (2)
In Pink.

1: Chain 4, insert in 2nd chain from hook, 3SC, turn. [3]
2: Chain 1, 1SC, inc, 1SC, turn. [4]
3: Chain 1, 4SC. [4]
Fasten off and sew to the ear.

Tail:
Start with Dark Brown

1:  2SC, Change to Light Brown, 2SC in magic ring. [4]
2: Change to Dark Brown, 1SC, inc, Change to light Brown, 1SC, inc. [6]
3: Change to Dark Brown, 1SC, inc, 2SC, Change to Light Brown, 1SC in the same st as the last SC, 1SC, inc. [9]
4: Change to Dark Brown, 5SC, Change to Light Brown, 4SC. [9] Stuff lightly.
5: Change to Dark Brown, (1SC, dec) 2 times, Change to Light Brown, 1SC, dec. [6]
Fasten off and leave long tail for sewing.

Santa Hat:
Start with red.

1: 6SC in magic ring. [6]
2: (2SC, inc), 2 times. [8]
3: (3SC, inc), 2 times. [10]
4: (4SC, inc), 2 times. [12]
5: (5SC, inc), 2 times. [14]
6: (6SC, inc), 2 times. [16]
7: (7SC, inc), 2 times. [18]
8: (8SC, inc), 2 times. [20]
9: (9SC, inc), 2 times. [22]
10: (10SC, inc), 2 times. [24]
11: (11SC, inc), 2 times. [26]
Change to white cloud yarn.
12: SC in each st around. [26]
Fasten off and weave in tail. Glue the pompom on the tip of the hat.

♥ Assembling:

To make sure you sew all parts in the right place, you can use some sewing pins to position them. When you are happy with the position, you can sew them on.
Sew the legs on to the bottom of the body, the front legs are pointing to the front. The back legs are pointing to the side.
From the Dark Brown part of his head, add the stripe over his back up till his but. Sew it on, when done, sew the tail to the end of the stripe.
Along the stripe place 3 dots on each side and sew them on.
For his nose, place it just under the middle of the face. and sew it on.
Position the ears on both sides of the ears, keep the in the Dark Brown part of his head and sew them on.
Put his Santa hat on.
For the eyes you can either choose to use felt or you can embroider them on. I chose to embroider them on, cause yeah why choose the easy way haha. But which way you choose, Bambi will look cute.

And that’s a wrap! ^-^ I love how Bambi turned out, and now I wanna watch the movies haha, let’s relax a bit with Christmas ^^ Have a wonderful day everyone! And if you have the time to make one of my DIYs, share them with #DelinleaDIY on Twitter or Instagram!

Love
Danielle


Posted in: Christmas, Christmas Countdown 2017, Crafting, Tsum Tsum Tagged: Amigurumi, Bambi, Christmas, Christmas Countdown, Crochet, Disney, DIY

♥ Day 24: Christmas Wish

24 december 2017 by Delinlea Leave a Comment

Hey Lovelies!

It’s almost Christmas Eve~ it’s approaching so fast! For today I have no DIY planned, I just wanna wish you A very mery Christmas! I made a handlettering piece for you to enjoy! you can copy it if you like ^^

Have a lovely day all~~!

Love
Danielle

Posted in: Christmas, Christmas Countdown 2017, Drawing Tagged: Christmas, Christmas Countdown, Hand lettering, Wish
« Vorige 1 2 3 4 5 … 7 8 9 10 11 12 13 14 15 16 Volgende »

What are you looking for?!

My Socials

Ko-Fi

I love making all these free things for you, tho it would be very helpfull if you can support me on Ko-Fi! (You don’t have to tho, totally up to you!)

Ko-Fi Shop!!

In my Ko-Fi shop you can find PDF Amigurumi Patterns!! You can pay easily with PayPal.
Go to the shop here!!

Recent Blog Posts

  • ♥ Happy 2022!
  • ♥ Day 12; Lights
  • ♥ Day 11; Flower Deco
  • ♥ Day 10; Snowman
  • ♥ Day 9; Gingerbread Houses

Recent Comments

  • Liane Van der Donck op ♥ Amigurumi Ghost
  • Kimberly Spear op ♥ Free Pattern; Amigurumi Shiber
  • Delinlea op ♥ Pua Tsum Tsum Amigurumi
  • Marfermar op ♥ Free Pattern; Easter Bunny
  • mary op ♥ Pua Tsum Tsum Amigurumi

Categories

  • animation
  • Beadwork
  • Blogmas 2018
  • Blogmas 2020
  • Blogmas 2021
  • Books
  • Bujo
  • Christmas
  • Christmas CAL 2019
  • Christmas Countdown 2017
  • Contest
  • Crafting
  • Crochet
  • Drawing
  • Drawing Lesson
  • Easter
  • Geen categorie
  • Life
  • Miniature
  • Nail Art
  • New Year
  • Paper
  • plush
  • Pokemon
  • Poseable Art Doll
  • Recipe
  • Sewing
  • Shop Pattern
  • Sinterklaas
  • Social Media
  • Tsum Tsum
  • Ufufy

Copyright © 2023 Delinlea - My little fantasy world.

Family WordPress Theme by themehall.com