Delinlea - My little fantasy world
  • ♥ Home
  • ♥ About Me
  • ♥ Blogmas 2021
  • ♥ Free Patterns
    • ♥ Amigurumi; Spring/Easter
    • ♥ Amigurumi; Fall/Halloween
    • ♥ Amigurumi; Winter
    • ♥ Amigurumi Tsum Tsum
    • ♥ Amigurumi Ufufy
    • ♥ Amigurumi Others
    • ♥ Christmas Countdown 2017
    • ♥ Blogmas 2018
    • ♥ Blogmas 2020
  • ♥ Tutorials
    • ♥ Easter
    • ♥ Home Deco
    • ♥ Others
  • ♥ Drawing Lessons
  • ♥ FanFic
    • ♥ Chapter 1
    • ♥ Chapter 2
    • ♥ Chapter 3
    • ♥ Chapter 4
    • ♥ Chapter 5
    • ♥ Chapter 6
    • ♥ Chapter 7
  • ♥ Gallery
    • ♥ Crafts
    • ♥ Drawings
    • ♥ Poseable Art Dolls
  • ♥ Links
  • ♥ Contact
    • Privacy Policy

DIY

♥ Pietjes Lucky Charms

29 november 2018 by Delinlea Leave a Comment

Hey Lovelies! Sinterklaas is in town! If you don’t know what Sinterklaas is, it’s a Dutch celebration similar to Christmas, only celebrated on the 5th of Dec. (Fun fact: Christmas is actually based on Sinterklaas xD).
Anyway I just had to make a DIY for this and I planned to make a whole bunch of lucky charms. But I ended up making only de ‘Zwarte Piet’ ones. I ran out of time to maken Sinterklaas en Amerigo. I’m so sorry, maybe I’ll make a DIY on that next year!

For this DIY you’ll need:
♥  Wooden beads in 2 sizes. (you can make them as big as you want)
♥  Air Dry Clay.
♥  PVA Glue.
♥  Scewer.
♥  Acryllic paints in colors of choice.
♥  Paintbrush.
♥  Matching pieces of thread, to the paint.
♥  Tiny piece of a Feather.
♥  Scissors.

DIY

First, glue the 2 different sized beads together, make sure the holes line up. Let that dry.

Make with clay a snake and make a circle around the smaller bead aka head. Use glue eventually to make it stick better, that’s what I did.

Now make a ball of some clay, about 1cm, and flatten this on to the head, until it touches the snake you put on there earlier. Use a scewer to poke through the hole on top. and make some creases with the scewer into the hat. Let the clay dry now.


Painting

Now it’s time to paint your pieces. I used 2 colors of choise, light brown, dark brown and white. It doesn’t really matter where you start, just make them cute and nice. The only thing you paint on last is the eyes!
Optional, varnish the beads so they are nice and protected. But you don’t have to.

Finishing off.

Cut a tiny piece of the top of a normal sized feather and glue this on his hat.
Then cut of about 30 cm of thread, in 2 colors. put this through the body of the Zwarte Piet, tie a knot at the bottom and you are done.

Blogmas 2018

From dec 1, Saturday! YES, you are reading that right! This Saturday will start Blogmas 2018 on this blog, that means 25 DIYs up till Christmas will be there for you, all for free! Every day a new DIY, Good news right?!

Have a lovely day!

Love
Danielle

Posted in: Crafting Tagged: DIY, gelukspoppetjes, Lucky Charm, sinterklaas, zwarte piet

♥ Amigurumi Pumpkin Ghost

27 september 2018 by Delinlea Leave a Comment

Hey Lovelies! It’s Thursday again and that means time for a new DIY. Is it too early to make Halloween decorations already?! Oh well, you can never start early enough xD. But you can use this one as fall decoration as well, so who cares xD. Today we are going to make a pumpkin ghost. It’s cute, believe me.

For this DIY you will need:
♥  Yarn, in Orange, Black and Green.
♥  Crochet hook.
♥  Stitch marker.
♥  Yarn Needle.
♥  Sewing Pins. (optional)
♥  Fiber fill.
♥  Felt in Black.
♥  Scissors.
♥  Glue.

Stitches used (US):
CH = Chain.
SC = Single Crochet.
DC = Double Crochet.
ST = Stitch.
Inc = Increase.
Dec = Decrease.
Slst = Slip Stitch.
FL = Front Loop.
(…) = Repeat the space in brackets the given number of times.
[…] = Total number of stitches.

Pattern

Pumpkin
Use the color Orange.

1: 8SC in Magic Ring. [8]
2: 2SC in each st around. [16]
3: (1SC, inc) 8 times. [24]
4: (2SC, inc) 8 times. [32]
5: (3SC, inc) 8 times. [40]
6: 40SC. [40]
|
13: 40SC. [40]
14: (3SC, dec) 8 times. [32]
15: (2SC, dec) 8 times. [24]
16: (1SC, dec) 8 times. [16] Stuff the Pumpkin here.
17: dec all around. [8]
Fasten off and leave a very long tail. Use this tail to go through the middle and around, and pull tight to get those parts of the typical Pumpkin look. you can do this as many times as you want, I did about 8 times.

Granny Square
Start with the color Orange. You start each row with 2CH, this counts as the first DC. Use SlSt after every row to go to the next ch space.

1: (3DC, CH2) 4 times in Magic Ring. [4ch space, 12DC]
2: (3DC, CH2, 3DC, CH1) 4 times. [8ch space, 24DC]
3: (3DC, CH2, (3DC, CH1) 2 times.) 4 times. [12ch space, 36DC]
4: (3DC, CH2, (3DC, CH1) 3 times.) 4 times. [16ch space, 48DC]
5: (3DC, CH2, (3DC, CH1) 4 times.) 4 times. [20ch space, 60DC]
6: (3DC, CH2, (3DC, CH1) 5 times.) 4 times. [24ch space, 72DC]
7: (3DC, CH2, (3DC, CH1) 6 times.) 4 times. [28ch space, 84DC]
8: (3DC, CH2, (3DC, CH1) 7 times.) 4 times. [32ch space, 96DC]
Change to the color Green.
9: (3DC, CH2, (3DC, CH1) 8 times.) 4 times. [36ch space, 108DC]
Fasten off and weave in tail.

Witch hat
Start with the color Green.

1: 4SC in Magic Ring. [4]
2: (1SC, inc) 2 times. [6]
3: (1SC, inc) 3 times. [9]
4: (2SC, inc) 3 times. [12]
5: (3SC, inc) 3 times. [15]
6: (4SC, inc) 3 times. [18]
7: (5SC, inc) 3 times. [21]
8: 21SC. [21]
9: (6SC, inc) 3 times. [24]
Change to the color Black.
10: (7SC, inc) 3 times. [27]
11: (8SC, inc) 3 times. [30]
Change back to the color Green.
12: Work in front loops only, (2SC, inc) 10 times. [40]
13: 40SC. [40]
14: 40SC. [40]
Fasten off and weave in tail.

Assembling.

Sew the granny square to the bottom on the pumpkin.
Make a loop on the witch hat and place the hat on the pumpkin, if you are happy with the look, sew it on.
Cut some eyes and mouth out of black felt en glue this on the pumpkin.

And you are done!! I hope you enjoyed this pattern. This will be a series of 3, so, look forward for the other 2. And don’t forget to show me yours if you made it, use the #DelinleaDIY on instagram or twitter!

Love
Danielle

Posted in: Crafting, Crochet Tagged: Amigurumi, Autumn, Crochet, cute, decoration, DIY, fall, Free Pattern, ghost, haken, kawaii, pumpkin

♥ Amigurumi Bunny Pumpkin

13 september 2018 by Delinlea Leave a Comment

Hey Lovelies! As you probably know by now, I love fall! I think it’s my favorite season of the year! (But I love winter as well.. hmm) So today another Amigurumi for fall but this will work for Halloween as well, can’t start early enough with decorations, right?! SO, Let’s go~~! Let’s make this Amigurumi Bunny Pumpkin!

For this DIY you will need:
♥  Yarn, in Orange and Light Brown or Green.
♥  Crochet hook.
♥  Stitch marker.
♥  Yarn Needle.
♥  Sewing Pins. (optional)
♥  Fiber fill.
♥  Felt in Black.
♥  Scissors.
♥  Glue.

Stitches used (US):
CH = Chain.
SC = Single Crochet.
ST = Stitch.
Inc = Increase.
Dec = Decrease.
Slst = Slip Stitch.
(…) = Repeat the space in brackets the given number of times.
[…] = Total number of stitches.

Pattern

Pumpkin
In Orange.

1: 8SC in Magic Ring. [8]
2: 2SC in each st around. [16]
3: (1SC, inc) 8 times. [24]
4: (2SC, inc) 8 times. [32]
5: (3SC, inc) 8 times. [40]
6: 40SC. [40]
|
13: 40SC. [40]
14: (3SC, dec) 8 times. [32]
15: (2SC, dec) 8 times. [24]
16: (1SC, dec) 8 times. [16]
17: dec around. [6]
Fasten off and leave a very long tail. Use this tail to go through the middle and around, and pull tight to get those parts of the typical Pumpkin look. you can do this as many times as you want, I did about 8 times.

Ears (2)
In orange.

1: 6SC in Magic Ring. [6]
2: (1SC, inc) 3 times. [9]
3: 9SC. [9]
6: 9SC. [9]
Fasten off and leave a long tail for sewing.

Stem
In Light Brown or Green.

1: 5SC in Magic Ring. [5]
2: 5SC. [5]
3: 5SC. [5]
4: inc, 4SC. [6]
Fasten off and leave a long tail for sewing.

Assembling

Sew the stem to the pumpkin, in the middle. Now position the ears with some sewing pins, place them slightly to the front, and when you are happy, sew them on.
Now cut out some eyes and a cute mouth out of felt and glue those on!

Quick and easy to make! But it’s so adorable! I can imagine a whole bunch of these as decoration for fall and Halloween! Love it! I hope you too~~ and If you made them, I would love to see yours, share them with #DelinleaDIY on Twitter or Instagram! Love you~

Love
Danielle

Posted in: Crafting, Crochet Tagged: Amigurumi, Autumn, Crochet, cute, DIY, fall, Free Pattern, haken, Halloween, kawaii, pumpkin

Amigurumi; Autumn Spirit

7 september 2018 by Delinlea Leave a Comment

Hey Lovelies! I am so sorry that I didn’t upload a blog last week! It was my birthday and so many other things were going on. I just had no time to make something for you!

But today I do have something cute for Autumn! I can’t wait for Autumn to start tho! haha well rain started and it’s cloudy, but the temperature is still to high to feel like fall >_< I’m way to excited for the weather to cool down.
To get into the autumn spirit already, let’s make this cutie~!

For this DIY you will need:
♥  Yarn, in Beige and an Autumn tint like Red, Yellow or Orange
♥  Crochet hook.
♥  Stitch marker.
♥  Yarn Needle.
♥  Sewing Pins. (optional)
♥  Fiber fill.
♥  Safety Eyes, 6 mm.
♥  Scissors.

Stitches used (US):
CH = Chain.
SC = Single Crochet.
HDC = Half Double Crochet.
DC = Double Crochet.
TS = Treble Crochet.
Picot
ST = Stitch.
Inc = Increase.
Dec = Decrease.
Slst = Slip Stitch.
(…) = Repeat the space in brackets the given number of times.
[…] = Total number of stitches.

Pattern

Leaf (2)
In a Fall color you prefer.

1: 6SC in Magic Ring. [6]
2: 2SC in each ST around. [12]
3: (1SC, inc) 6 times. [18]
4: 2SC,
1SC + HDC + Picot in the next ST,
HDC + DC in the next ST,
TR + Picot + TR in the next ST,
DC + HDC in the next ST,
SC + HDC in the next ST,
DC + TR in the next ST,
2TR + Picot in the next ST,
2TR in the next ST,
TR + DC in the next ST,
HDC + SC in the next ST,
HDC + DC in the next ST,
TR + Picot + TR in the next ST,
DC + HDC + Picot in the next ST,
HDC + SC in the next ST,
2SC. [37]
Fasten off and leave a long tail for sewing on one of the 2 leaves.

Head
Make this in Beige.

1: 6SC in Magic Ring. [6]
2: 2SC in each ST around. [12]
3: (1SC, inc) 6 times. [18]
4: (2SC, inc) 6 times. [24]
5: 24SC. [24]
|
8: 24SC. [24]
9: (2SC, dec) 6 times. [18]
10: (1SC, dec) 6 times. [12] place the eyes between row 7 and 8 and stuff the head.
11: Dec all around. [6]
Fasten off and weave in tail.

Hat
Use a Fall Color for this.

1: 6SC in Magic Ring. [6]
2: (1SC, inc) 3 times. [9]
3: (2SC, inc) 3 times. [12]
4: 12SC. [12]
5: (3SC, inc) 3 times. [15]
6: (4SC, inc) 3 times. [18]
7: (5SC, inc) 3 times. [21]
8: (6SC, inc) 3 times. [24]
9: 24SC. [24]
10: 24SC. [24]
Fasten off and leave a long tail for sewing.

Assembling

Sew the 2 leaves together, make sure you stuff it lightly before fully closing.
Then sew the head on to the leaves, where normally the stem would be. When done, also sew on a nose inbetween the eyes with the same beige color.
Last, sew on his hat! (you can also leave it loose if you are not planning to hang it, but I wanted to be able to hang it somewhere.)

I hope you enjoyed this pattern!

Love
Danielle

Posted in: Crafting, Crochet Tagged: Amigurumi, Autumn, Crochet, cute, DIY, fall, Free Pattern, spirit, yarn

♥ Amigurumi Dilly Duck

12 juli 2018 by Delinlea Leave a Comment

Hey Lovelies!

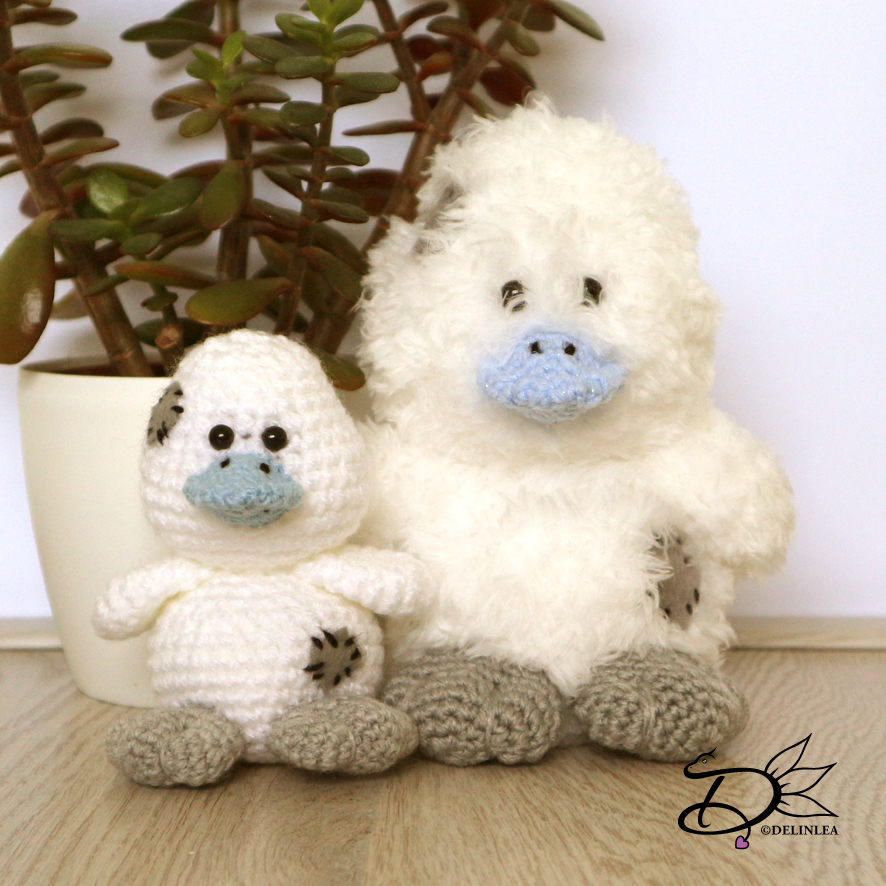
It’s about time to make something cute again, right?! Well I was brainstorming a bit of what to make for upcoming blogs, and I saw one of my Blue Nose Friends plushies. I got it long ago and I remembered there are more around. When I looked them up on the internet, I found out that there are so many now! I only don’t know where to get them. The store I got this one, long ago, is now closed. So, what I can’t buy, I’ll make myself haha. Also a good reason to use my plush yarn!

Let’s make Dilly Duck of My Blue Nose Friends. I believe it’s No 4 of these series.

For this DIY you’ll need:
♥  Acryllic Yarn, in Light Blue and Grey.
♥  Plush Yarn in White.*
♥  Crochet hook, 2 sizes.
♥  Stitch marker.
♥  Yarn needle.
♥  Sewing pins. (optional)
♥  Scissors.
♥  Fiber Fill.
♥  Grey Felt.
♥  Safety Eyes.
♥  Glue (optional).

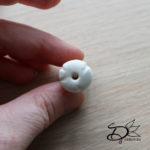
*Note: You can use regular yarn as well, but just make sure you have 2 sizes of yarn, White must be thick and the light blue and grey thin. This was you’ll be able to make him too without the plush yarn. (Scroll down for a picture)

Stitches used:
CH = Chain.
SC = Single Crochet.
ST = Stitch.
Inc = Increase.
Dec = Decrease.
Slst = Slip Stitch.
(…) = Repeat the space in brackets the given number of times.
[…] = Total number of stitches.

Pattern:

Body
In White Plush Yarn.

1: 6SC in Magic Ring [6]
2: 2SC in each st around. [12]
3: (1SC, inc) 6 times. [18]
4: (2SC, inc) 6 times. [24]
5: (3SC, inc) 6 times. [30]
6: SC in each ST around. [30]
|
10: SC in each ST around. [30]
11: (3SC, dec) 6 times. [24]
12: SC in each ST around. [24]
13: (2SC, dec) 6 times. [18]
14: (1SC, dec) 6 times. [12]
Fasten off and leave long tail for sewing. Don’t forget to stuff the body!

Head
In White Plush Yarn.

1: 1: 6SC in Magic Ring [6]
2: 2SC in each st around. [12]
3: (1SC, inc) 6 times. [18]
4: (2SC, inc) 6 times. [24]
5: (3SC, inc) 6 times. [30]
6: (9SC, inc) 3 times. [33]
7: SC in each ST around. [33]
8: SC in east ST around. [33]
9: (9SC, dec) 3 times. [30]
10: SC in each ST around. [30]
11: (3SC, dec) 6 times. [24]
12: SC in each ST around. [24]
13: (2SC, dec) 6 times. [18]
14: SC in each ST around. [18]
15: SC in each ST around. [18]
16: (1SC, dec) 6 times. [12] Stuff the head here, and if you use Safety Eyes, place them inbetween row 10 and 11.
17: Dec all around. [6]
Fasten off and weave in tail.

Wings (2)
In White Plush Yarn.

1: 6SC in Magic Ring. [6]
2: 2SC in each ST around. [12]
3: SC in each ST around. [12]
|
7: SC in each ST around. [12]
Fasten off and leave a long tail for sewing. You don’t have to stuff the wings.

Beak
In Light Blue.

1: 4SC in Magic Ring. [4]
2: 2SC in each ST around. [8]
3: (1SC, inc) 2 times. [12]
4: SC in each ST around. [12]
5: (5SC, inc) 2 times. [14]
6: (6SC, inc) 2 times. [16]
7: SC in each ST around. [16]
8: SC in each ST around. [16]
Fasten off, leave an extra long tail for sewing. Now flatten the beak and sew around the edge, about 0,5CM of the edge, this way you make a rim in the beak. When you have done that, stuff the remaining middle part.

Feet (2)
In Grey.

1: 6SC in Magic Ring. [6]
2: 2SC in each ST around. [12]
3: (inc) 2 times, 4SC, (inc) 2 times, 4SC. [16]
4: (inc) 4 times, 4SC, (inc) 4 times, 4SC. [24]
5: SC in each ST around. [24]
6: (3SC, dec, 7SC) 2 times. [22]
7: (2SC, dec, 7SC) 2 times. [20]
8: (2SC, dec, 6SC) 2 times. [18]
9: SC in each ST around. [18]
Fasten off and leave long tail for sewing. Stuff lightly.
Cut of some extra grey yarn and tie a knot on one side. With a yarn needle your gonna devide the foot in 3 toes. Skip the last 3 rows, and insert the needle from the inside, wrap the yarn around the foot (make sure it’s 1/3 and 2/3), and go in the foot and out at the place you started, pull tight and fasten it off. Do this on the other side, of the foot, again. Repeat for the other foot.

Assembling.

Sew the head to the body. With some sewing pins you can place the wings in the right place, just were you’ve sewn the head to the body. When you are happy, sew those one as well.
Do the same for the feet, and sew them on tightly.
Sew the beak on as well, just under the eyes. Make some markings with black yarn on top of his beak.
Now cut 3 Squares from grey felt. You can make them as big as you want, but don’t over do. Now, with some black yarn, sew one on his head, one on the side of his belly and one on his back.
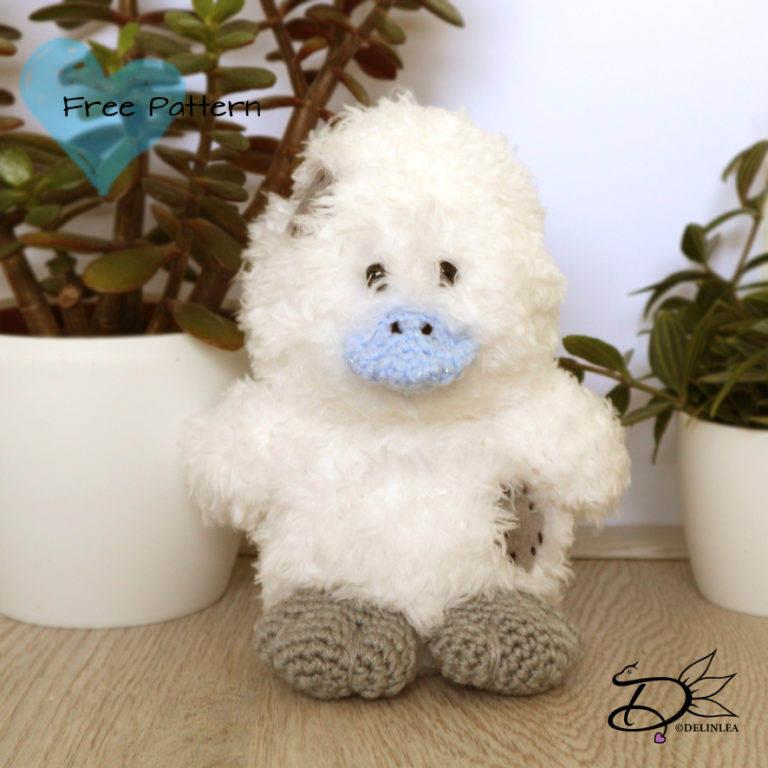
And you are done! Yay!

I hope you enjoyed this pattern! I certainly did, I love how he looks! If you made one or more too, show me with #DelinleaDIY I love to see how yours turned out! Now, enjoy the rest of your day!

Love
Danielle

Posted in: Crafting, Crochet, plush Tagged: Amigurumi, Crochet, Dilly Duck, DIY, Free Pattern, haken, My Blue Nose Friends
« Vorige 1 2 3 4 5 6 7 8 9 10 11 12 13 14 15 16 17 Volgende »

What are you looking for?!

My Socials

Ko-Fi

I love making all these free things for you, tho it would be very helpfull if you can support me on Ko-Fi! (You don’t have to tho, totally up to you!)

Ko-Fi Shop!!

In my Ko-Fi shop you can find PDF Amigurumi Patterns!! You can pay easily with PayPal.
Go to the shop here!!

Recent Blog Posts

  • ♥ Happy 2022!
  • ♥ Day 12; Lights
  • ♥ Day 11; Flower Deco
  • ♥ Day 10; Snowman
  • ♥ Day 9; Gingerbread Houses

Recent Comments

  • Delinlea op ♥ Pietje Gnome Amigurumi
  • Delinlea op ♥ Toy Story Alien TsumTsum Amigurumi
  • Delinlea op ♥ Pua Tsum Tsum Amigurumi
  • Charli op ♥ Free Pattern; CNY Mouse Amigurumi
  • Peter Pesch op ♥ Pietje Gnome Amigurumi

Categories

  • animation
  • Beadwork
  • Blogmas 2018
  • Blogmas 2020
  • Blogmas 2021
  • Books
  • Bujo
  • Christmas
  • Christmas CAL 2019
  • Christmas Countdown 2017
  • Contest
  • Crafting
  • Crochet
  • Drawing
  • Drawing Lesson
  • Easter
  • Geen categorie
  • Life
  • Miniature
  • Nail Art
  • New Year
  • Paper
  • plush
  • Pokemon
  • Poseable Art Doll
  • Recipe
  • Sewing
  • Shop Pattern
  • Sinterklaas
  • Social Media
  • Tsum Tsum
  • Ufufy

Copyright © 2025 Delinlea - My little fantasy world.

Family WordPress Theme by themehall.com