Delinlea - My little fantasy world
  • ♥ Home
  • ♥ About Me
  • ♥ Blogmas 2021
  • ♥ Free Patterns
    • ♥ Amigurumi; Spring/Easter
    • ♥ Amigurumi; Fall/Halloween
    • ♥ Amigurumi; Winter
    • ♥ Amigurumi Tsum Tsum
    • ♥ Amigurumi Ufufy
    • ♥ Amigurumi Others
    • ♥ Christmas Countdown 2017
    • ♥ Blogmas 2018
    • ♥ Blogmas 2020
  • ♥ Tutorials
    • ♥ Easter
    • ♥ Home Deco
    • ♥ Others
  • ♥ Drawing Lessons
  • ♥ FanFic
    • ♥ Chapter 1
    • ♥ Chapter 2
    • ♥ Chapter 3
    • ♥ Chapter 4
    • ♥ Chapter 5
    • ♥ Chapter 6
    • ♥ Chapter 7
  • ♥ Gallery
    • ♥ Crafts
    • ♥ Drawings
    • ♥ Poseable Art Dolls
  • ♥ Links
  • ♥ Contact
    • Privacy Policy

Crochet

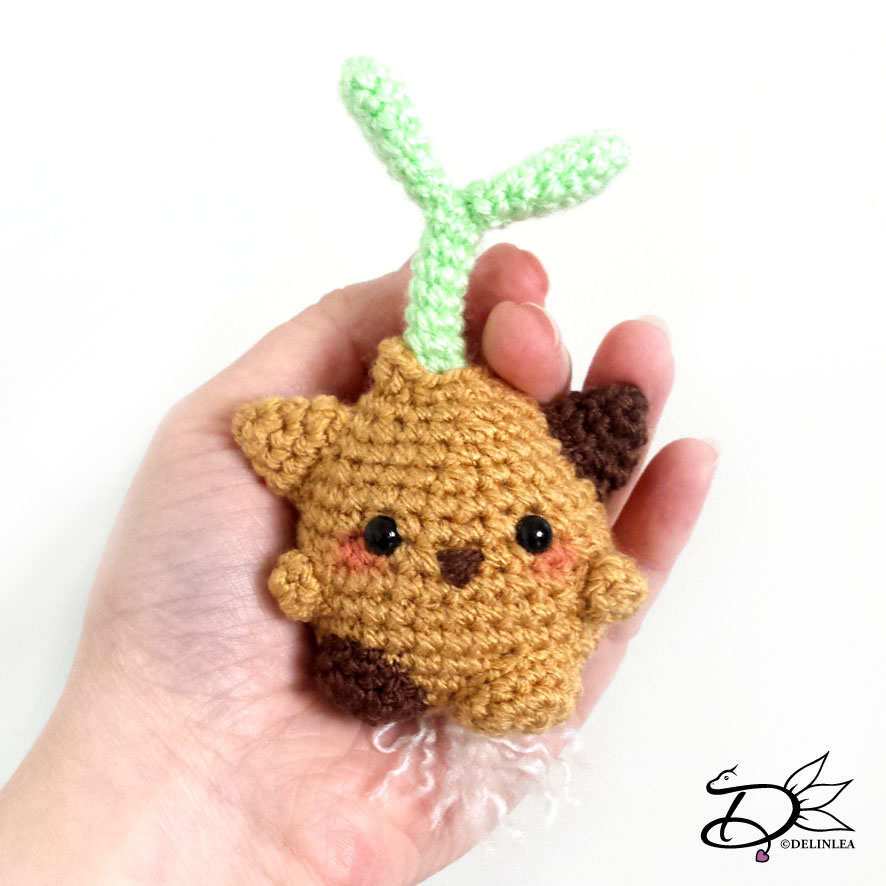
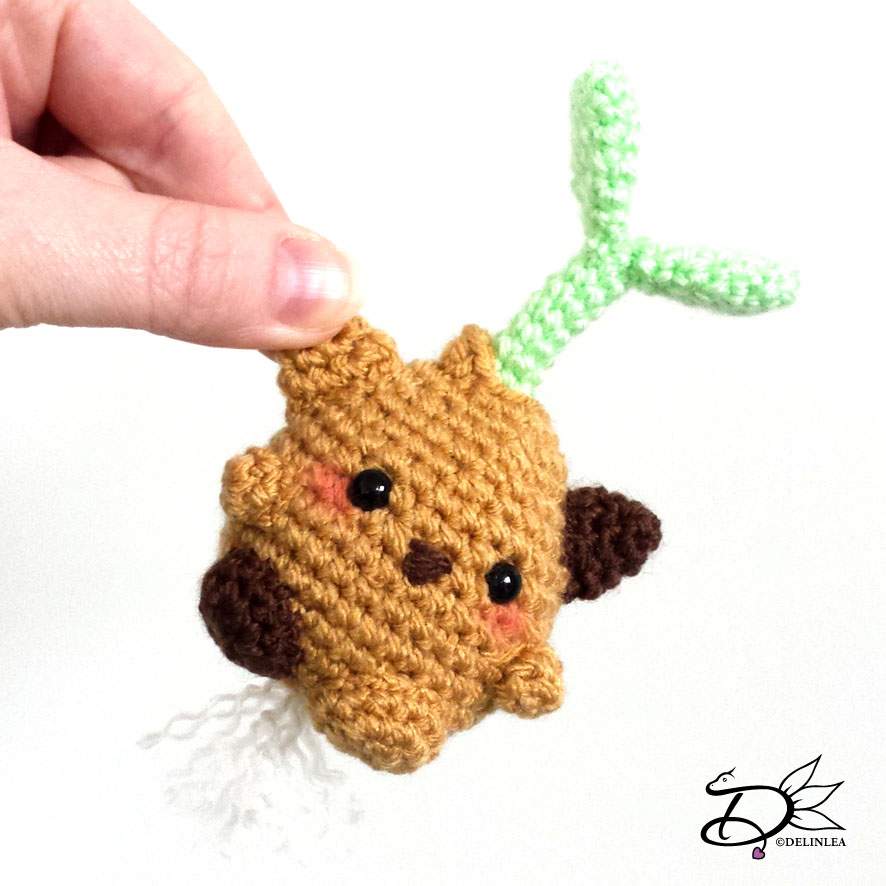
♥ Free Pattern; Amigurumi Cat Bulb

21 februari 2019 by Delinlea Leave a Comment

Hey Lovelies! Was the weather as beautiful as it was here the past few days?! It was so nice and sunny and cold, I love it! I prefer this weather over hot sunny weather. I just love cold weather, don’t judge me haha. Right now, it’s cloudy while I am writing this, but the past few days really got me into spring feelings. So, I thought it’s a good idea to make something springy! I think this cat bulb turned out adorable, I hope you think so as well. Ready to dive into this Amigurumi pattern?!

For this DIY you’ll need:
♥ Yarn in the colors; Light Brown, Brown, Green and Cream. (I used StyleCraft Special DK in the colors; Camel, Walnut, Spring Green and Cream)
♥ Crochet Hook (I used a 2,5mm hook).
♥ Stuffing.
♥ Scissors.
♥ Sewing Pins.
♥ Yarn Needle.
♥ Safety eyes, 5mm. (Optional

Stitches used (US Terms):
Magic Ring.
Ch = Chain.
SLST = Slip Stitch.
SC = Single Crochet.
HDC = Half Double Crochet.
ST = Stitch.
Inc = Increase.
Dec = Decrease.
(…) = Repeat the space in brackets the given number of times.
[…] = Total number of stitches.

Pattern

Leaves (Make 2)
Use the color Green

1: 6SC in Magic Ring. [6]
2: (1SC, inc) 3 times. [9]
3: 9SC. [9]
|
5: 9SC. [9]
6: (1SC, dec) 3 times. [6]
7: 6SC. [6]
Fasten off and leave a long tail for sewing.

Stem
Use the color Green.

1: 6SC in Magic Ring. [6]
2: 6SC. [6]
|
11: 6SC. [6]
Fasten off and weave in tail.

Bulb
Use the color Light Brown.

1: 6SC in Magic Ring. [6]
2: Inc in each st around. [12]
3: (1SC, inc) 6 times. [18]
4: (2SC, inc) 6 times. [24]
5: (3SC, inc) 6 times. [30]
6: (4SC, inc) 6 times. [36]
7: 36SC. [36]
|
10: 36SC. [36]
11: (4SC, dec) 6 times. [30]
12: 30SC. [30]
Between row 11 and 12 you will add the eyes, about 2,5cm apart. It’s also a good time to add the roots with cream to the bottom of the bulb, I attached 4 strands, and peeled those apart, so it looks a bit more like roots.
13: 30SC. [30]
14: (3SC, dec) 6 times. [24]
15: 24SC. [24]
16: (2SC, dec) 6 times. [18]
17: 18SC. [18]
18: (1SC, dec) 6 times. [12]
19: 1SC, 4HDC, 1SC, SLST. [7]
Fasten off and leave a long tail for sewing.

Arms (make 2)
Use the color Light Brown.

1: 6SC in Magic Ring. [6]
2: 6SC. [6]
Fasten off and leave a long tail for sewing.

Legs (make 2)
Use the colors Light Brown and Brown. (one each)

1: 6SC in Magic Ring. [6]
2: Inc in each st around. [12]
3: 12SC. [12]

Ears (make 2)
Use the colors Light Brown and Brown. (one each)

1: 4SC in Magic Ring. [4]
2: (1SC, inc) 2 times. [6]
3: (2SC, inc) 2 times. [8]
4: (3SC, inc) 2 times. [10]
Fasten off and leave a long tail for sewing.

Assembling

Sew the 2 leaves to the stem, at the point you started the stem.
With Sewing pins, it’s easier to see where you wanna place all the parts. With pinning them down to the place you wanna have the legs for example, you can see if it looks good. If not, you can easily replace them. What you can’t do easily when you already sew them on.
If you are happy with how your Cat Bulb looks, you can sew on all parts.
Lastly add the plant to the blub, insert it in the hole of the bulb and sew it on.  I used the yarn tail from the blub, I thought this was easier, but do what feels good for you.
Don’t forget to make a nose, you can embroider it on or use felt. With some soft pastel I added some pink to the cheecks, maybe you wanna do that as well, just apply it with a brush.

I hope you enjoyed this Cat Bulb Pattern! And if so, show me yours on social media, love to see it!
Have a wonderful day everyone!

Love
Danielle

Posted in: Crafting, Crochet Tagged: Amigurumi, bulb, Cat, Crochet, cute, Free Pattern, kawaii, spring

♥ Free Pattern; Succulent Heart

14 februari 2019 by Delinlea Leave a Comment

Hey Lovelies! Happy Valentines Day!! Ha, I wanted to say Happy V-Day! But, then… I only could think of that it was Taehyung’s/V’s Birthday haha. My ARMY (BTS Fandom name) mind creeped out. So let’s keep it Happy Valentines Day!
Today I made something to crochet for you, a Succulent heart. I know I am late posting this, but I had a hard time finishing it. I’m sorry for that. But the day hasn’t passed yet! Anyway,  It’s a free pattern for you to enjoy. I didn’t make it too sweet, didn’t felt like it this year, this way you can easily use it as a home deco piece!

For this DIY you’ll need:
♥ Grey Yarn*. (I used Zeeman Luxery Yarn with a 5,5mm hook.)
♥ Green Yarn*. (I used Zeeman SuperSoft with a 2mm hook.)
♥ Crochet Hook.
♥ Stuffing.
♥ Scissors.
♥ Yarn Needle.
♥ Sewing Pins.
♥ Soft Pastel. (optional)

*The Grey yarn should be about 2 a 3 times ticker as the yarn you will use for the plants.

Stitches used (US Terms):
Magic Ring.
Ch = Chain.
SC = Single Crochet.
Inc = Increase.
Dec = Decrease.
(…) = Repeat the space in brackets the given number of times.
[…] = Total number of stitches.

Pattern

Heart (Make 2)
Use the gray Yarn.

1: Ch4, insert in second chain from hook, 3SC, Turn. [3]
2: Ch1, inc, 1SC, inc, Turn. [5]
3: Ch1, inc, 3SC, inc, Turn. [7]
4: Ch1, inc, 5SC, inc, Turn. [9]
5: Ch1, inc, 7SC, inc, Turn. [11]
6: Ch1, inc, 9SC, inc, Turn. [13]
7: Ch1, inc, 11SC, inc, Turn. [15]
8: Ch1, inc, 13SC, inc, Turn. [17]
9: Ch1, inc, 15SC, inc, Turn. [19]
10: Ch1, 19SC, Turn. [19]
|
16: Ch1, 19SC, Turn. [19]
17: Ch1, Dec, 5SC, Dec, Turn. [7]
18: Ch1, 7SC, Turn. [7]
19: Ch1, Dec, 3SC, Dec, Turn. [5]
20: Ch1, 5SC, Turn. [5]
21: Ch1, Dec, 1SC, Dec. [3]

Repeat row 17 to 21 for the other half of the heart shape.
When you are done, make another one. These 2 you will crochet together with Single Crochet (SC). Don’t forget to stuff the heart lightly before entirely closing up. Work away all your tails and make a nice loop to hang the heart at, at the top.

Succulent
Use the Green Yarn.

Small leave (Make 6)

1: 6SC in magic ring. [6]
2: 6SC. [6]
3: 1SC, Inc. [9]
4: 9SC. [9]
5: 9SC. [9]
6: 1SC, Dec. [6]
Fasten off and leave a long tail for sewing.

Big Leave (make 6)

1: 6SC in magic ring. [6]
2: 6SC. [6]
3: 1SC, Inc. [9]
4: 2SC, Inc. [12]
5: 12SC. [12]
|
8: 12 SC. [12]
9: 2SC, Dec. [9]
Fasten off and leave a long tail for sewing.

Assemble the Succulent starting from the small leaves. So you work your way from inside out. You only have the sew the bottom of the leaves together. Make sure you spread them evenly. With some Soft Pastel you can give your succulent a bit more dimension. Just add it with a brush to the edges.

I also added some string of pearls succulent. Which I made a pattern for somewhere last year. You can find it here: Link

Assembling

Now you have your heart and succulents done, you can arrange them how you would like. I just placed them on with some sewing pins until I was happy, and sewed them on.

And you are done! Now you can give it to someone you love of just give it as a present to yourself! It’s good to treat yourself from time to time as well!

Have a wonderful Valentines Day!

Love
Danielle

Posted in: Crafting, Crochet Tagged: Amigurumi, Crochet, haken, heart, succulent, Valentine

♥ Love Yourself Blanket

11 december 2018 by Delinlea Leave a Comment

Hey Lovelies! The last challenge was 4 weeks, and we had to make something for HomeDeco! A pretty wide challenge you would think. But when you know what you are allowed to use, and what not, there is not much left anymore. Because we were only allowed to order Yarn.. was that also the only thing you were alowed to use. So, no stuffing, no glass, no stools, no lampshades etc. So all the fun things were not allowed, Great! I even asked if it really wasn’t allowed.. *sigh. Oh well, we should do it with what we have right?!

De laatste opdracht was 4 weken, en we mochten iets maken wat te maken had met HomeDeco! Een vrij ruime opdracht zou je denken. Maar als je bedacht wat we mochten gebruiken, en wat niet, bleef er niet zo heel veel meer over. Omdat we alleen garen mochten bestellen.. was dat ook het enige wat we mochten gebruiken. Dus, geen vulling, geen glas, geen krukjes, geen lampenkappen, enz. Dus alle leuke dingen waren niet toegestaan, great! Ik heb het nog nagevraagd of het echt niet mocht… *zucht. Ach ja, we moeten het doen met wat we hebben.

Because one of my ideas was to make a set of plants, but there you need stuffing for.. so, bye idea. I also thought about a carpet, but I know, I would not use that because of my cat. So, I ended up making a huge Blanket. I thought that was a good idea… but…

1 van mijn ideeën was om een planten set te maken, maar daar heb je vulling voor nodig, dus, doei idee. Ik had ook nog gedacht aan een vloerkleed, maar ik weet, dat ik die zelf nooit zou gebruiken vanwege mijn kat. Dus heb ik uiteidelijk gekozen om een mega woondeken te maken. Ik dacht dat dat een goed idee was… maar..

The first 2 weeks, I only designed 2 large squares. More.. I couldn’t do. I was done, no energy left at all and my body hurted so much. I was about to give up on this contest several times. What you don’t really see in the episodes is that this contest has really tight deadlines, where we have to come up with a plan, order yarn, make the item, block it if needed, write the pattern and make all the pictures. It is too much if you still have a life besides it. I felt often like I had no time to breath, and in my head it was often ‘No rest for the wicked’.

De eerste 2 weken, heb ik alleen 2 grote vierkanten ontworpen. Meer.. kon ik niet doen. Ik was op, geen energie meer en mijn lichaam deed overal pijn. Wat je niet echt ziet in de afleveringen is dat deze wedstrijd hele strakke deadlines heeft. In die tijd moet je een plan bedenken,garen bestellen, alles maken, blokken als nodig, patroon schrijven en de fotografie. Het is teveel als je daarnaar nog een normaal leven hebt. Ik had heel vaak het gevoel dat ik niet eens tijd had om te ademen. Er ging ook heel vaak door m’n hoofd, ‘No rest for the wicked’.

Anyway, My idea for the blanket was inspired by the theme Love Yourself, by BTS, A Korean pop group. It’s so important to love yourself, but there’s create such a ‘perfect image’ you need to have. That, when you are different, have an illeness or what so ever, we usually hide it. How can we love ourself then?! We need to be able to be ourself, Love Ourself, and it’s a must people get aware of that!

Anyway, mijn idee voor de woondeken was geïnspireerd op het thema Love Yourself bij BTS, een Koreaanse Pop Groep. Het is zo belangrijk om jezelf lief te hebben, maar er is zo’n perfect plaatje gecreëerd in de hedendaagse cultuur, dat, als je anders bent, ziek bent of iets anders, we het meestal verstoppen, hoe kun je dan jezelf lief hebben?! We moeten onszelf kunnen zijn, onszelf lief kunnen hebben, het is zo belangrijk dat mensen hier bewust van worden!

I love the colors I used, I was about to use white white, but I am glad I didn’t. This way, the look of it,  it’s warmer, with the use of cream. It would be colors I would pick myself, but BTS also used it. So perfect match!

I love de kleuren die ik heb gebruikt. Ik had bijna wit wit gebruikt, maar ik ben zo blij dat ik dat niet gedaan heb! Met Cream, lijkt de deken warmer te ogen. En de rest van de kleuren zijn kleuren die ik zelf zou kiezen, Maar BTS had deze kleuren ook gebruikt. Dus perfecte match!

In the end I made my blanket of 180 by 150 cm in about 2weeks. It’s ridiculous, and I have no clue how I managed to get that done. But I did, it’s a miracle. (If something is in my head, I will make it that way, no matter what) I changed some parts up tho. Like where the hearts are, should have been flowers, and the hearts should be in the other 2 parts. And I also wanted to use BTS logo in there, but that didn’t look right, and became stripesxD.

Uiteindelijk heb ik een woondeken van 180 bij 150cm in ongeveer 2 weken gemaakt. Het is te gek voor woorden, en ik heb geen idee hoe ik dat gedaan heb. Maar ik heb het toch echt gedaan, het is een Miracle. (Als ik iets in mijn hoofd heb, krijg je het er niet meer uit, hoe dan ook, zal het gebeuren) Ik heb wel wat aanpassingen moeten maken. Zoals waar de harten nu zijn, daar hadden eigenlijk bloemen gemoeten en de harten in de andere 2 delen. En ik wou eigenlijk ook het logo van BTS er in verwerken, maar dat zag raar, en werden strepen xD.

Anyway I am happy with how it turned out, even though there are some flaws, that if I had more time, I could have done better. But who cares xD only me probably xD.

Ach ja, ik ben blij met hoe het eruit ziet, ook al zitten er wat foutjes in, dat, als ik meer tijd had gehad, beter had kunnen doen. Maar who cares, waarschijnlijk alleen ikzelf xD.

Here’s my blanket:
Hier is mijn woondeken:

I hope you like what I created, even with knowing the story behind it now! Make this one for yourself, or for someone that deserves the love! Wrap yourself in it, keep yourself warm, that’s already a tiny thing you can do, on your way to love yourself.

Ik hoop dat je het mooi vindt wat ik gemaakt heb. Zelfs nu met het verhaal erachter! Maak deze deken voor jezelf of voor iemand waarvan jij vindt dat die wat liefde verdiend! Wikkel jezelf erin, hou jezelf warm. Dat is al een klein iets wat je kunt doen, op jou weg om van jezelf te houden.

I love you all! No matter how you look, what your gender is, how you indentify or not, have an illness and all the others things I forgot to write down. YOU ARE GOOD THE WAY YOU ARE, FEEL LOVED!!

Ik hou van jullie allemaal! Het maakt niet uit hoe je er uit ziet, wat je geslacht is, hoe je je indentificeer, ziek bent en alle andere dingen die ik heb vergeten op te schrijven. JE BENT GOED ZOALS JE BENT, VOEL JE GELIEFD!!

Love
Danielle

Posted in: Geen categorie Tagged: Afghan, Blanket, bts, Crochet, haken, Love Yourself

♥ Day 8; Amigurumi Pikachu in Santa Sleepingbag

8 december 2018 by Delinlea Leave a Comment

Hey Lovelies! It’s day 8 of Blogmas! And that means that weare already have survived one week! Time really flies! I hope you are havingfun so far. But for today we will have a new amigurumi! Pikachu in a Santasleepingbag! I hope you like him.

For this DIY you will need:
♥  Yarn, in Yellow, Black, Red and Grey.
♥  Plush Yarn in White.
♥  Pompom. (self made of bought)
♥  Crochet hook.
♥  Stitch marker.
♥  Yarn Needle.
♥  Sewing Pins. (optional)
♥  Fiber fill.
♥  Felt in the colors Black, Brown andRed.
♥  Glue.
♥  Scissors.

Stitches used:
CH = Chain.
SC = Single Crochet.
FSC = Foundation Single Crochet.
ST = Stitch.
Inc = Increase.
Dec = Decrease.
Slst = Slip Stitch.
(…) = Repeat the space in brackets the given number of times.
[…] = Total number of stitches.

Pattern

Pikachu Head
In Yellow.

1: 6SC in Magic Ring. [6]
2: 2SC in each ST around. [12]
3: (1SC, inc) 6 times. [18]
4: (2SC, inc) 6 times. [24]
5: (3SC, inc) 6 times. [30]
6: SC in each ST around. [30]
|
9: SC in each ST around. [30]
10: 7SC, inc, 1SC, inc, 4SC, inc, 4SC, inc, 1SC, inc, 8SC. [35]
11: 7SC, inc, 3SC, inc, 10SC, inc, 3SC, inc, 8SC. [39]
12: SC in each ST around. [39]
13: 7SC, dec, 3SC, dec, 10SC, dec, 3SC, dec, 8SC. [35]
14: SC in each ST around. [35]
15: 7SC, dec, 1SC, dec, 4SC, dec, 4SC, dec, 1SC, dec, 8SC. [30]
16: (3SC, dec) 6 times. [24]
17: (2SC, dec) 6 times. [18]
18: (1SC, dec) 6 times. [12]
19: Dec all around. [6]
Fasten off and weave in tail.

Pikachu Ears (2)
Start with Black.

1: 4SC in Magic Ring. [4]
2: (1SC, inc) 2 times. [6]
3: (1SC, inc) 3 times. [9]
4: SC in each ST around. [9]
5: (2SC, inc) 3 times. [12]
Change to Yellow.
6: SC in each ST around. [12]
|
8: SC in each ST around. [12]
9: (2SC, dec) 3 times. [9]
10: SC in each ST around. [9]
|
13: SC in each ST around. [9]
Fasten off and leave a long tail for sewing.

Sleeping Bag
In Red.

1: 6SC in Magic Ring. [6]
2: 2SC in each ST around. [12]
3: (1SC, inc) 6 times. [18]
4: (2SC, inc) 6 times. [24]
5: (3SC, inc) 6 times. [30]
6: (4SC, inc) 6 times. [36]
7: (5SC, inc) 6 times. [42]
8: SC in each ST around. [42]
|
20: SC in each ST around. [42]
21: (5SC, dec) 6 times. [36]
22: (4SC, dec) 6 times. [30]
21: (3SC, dec) 6 times. [24]
22: (2SC, dec) 6 times. [18]
Fasten off and weave in tail.

Hood of the Sleepingbag.
In Red.

1: 6SC in Magic Ring. [6]
2: 6SC. [6]
3: (1SC, inc) 3 times. [9]
4: (2SC, inc) 3 times. [12]
5: (3SC, inc) 3 times. [15]
6: (4SC, inc) 3 times. [18]
7: (5SC, inc) 3 times. [21]
8: (6SC, inc) 3 times. [24]
9: (7SC, inc) 3 times. [27]
10: (8SC, inc) 3 times. [30]
11: (9SC, inc) 3 times. [33]
12: (10SC, inc) 3 times. [36]
13: (11SC, inc) 3 times. [39]
14: (12SC, inc) 3 times. [42]
15: 42SC. [42]
|
24: 42SC. [42]
Change to the White Plush Yarn.
25: 42SC. [42]
If your Plush yarn is thinner as mine, you might need to do 1 or 2 extra layers.
Fasten off and weave in tail.

Belt
In Black.

Crochet 40 FSC! Fasten off and leave a long tail for sewing.

Assembling

Use some sewing pins to pin the hood to the sleepingbag.This will help you to sew it on neathly, and sew it on.
Make a circle of the belt, sew both ends together. Place the belt around thesleepingbag and sew that on. The belt is not placed in the middle, but a littlelower. With some yellow yarn you’ll embroider the belt buckle on.
With some grey yarn you’ll make the zipper, and finish of with a tiny piece of greyfelt.
This to complete his head. Sew on his ears. Make sure you’ll keep the head theright way, the pattern has made the shape for the cheeks already. When the earsare on, you can sew his head to the sleepingbag. This can be a bit tricky, justuse some sewing pins to make sure it’s placed right and then start sewingcarefully.
Now cut out some eyes, nose, mouth and cheeks out of felt and glue those on.For the eyes I used brown felt and colored them black so you’ll have a littleshine in the eyes. With a white dot of felt of acryllic paint in the eyes you’ll finish it off.
Glue or sew a pompom to the tip of his hood.

And you are all done! isn’t he cute?! I hope you’ll have fun making him! and if you did so, share yours with the #DelinleaBlogmas2018DIY or #DelinleaDIY on twitter or insta.

Have a wonderful day and I’ll see you tomorrow.

Love
Danielle

Posted in: Blogmas 2018, Christmas, Pokemon Tagged: Amigurumi, blogmas 2018, Christmas, Crochet, haken, pikachu, Pokemon, Santa

♥ Sea Wave Mosiac Triangular Scarf

5 december 2018 by Delinlea 1 Comment

First of all, I was scared this challenge would come. I never made a triangular shawl before. Well ones before, from a pattern. But that took me ages to make! And we had just 3 weeks for this one. HOW?! I really needed to come up with an idea!

Allereerst was ik zo bang dat deze opdracht zou komen! Ik had nog nooit een omslagdoek zelf bedacht. Wel 1 keer een van een patroon gemaakt, en daar hield het op. Het heeft me heel lang gekost om die af te maken en nu hebben we maar 3 weken. HOE DAN?! Ik moest echt snel met een idee komen!

I saw mosaic crochet before, and I love those patterns they made with it. But how do you do that?! I never done it before, but it looked okay to try. Also what colors do I want. I wanna make something that I would wear, so the colors need to be close to me. Then I remembered a blanket that used turquoise and some brown, sandy tones. I knew I wanted to go for those colors. I could choose for stylcraft yarns again, but I did that for several challenges already and really wanted to try something else. A lot of yarns I could pick from where with wool, and I am not a person that likes wool… So I went for Yarn & Colors Super Charming. Such pretty yarn, a bit like Scheepjes Stonewashed only thicker.

Ik heb wel vaker mosiac haken gezien, en ik vindt het zo mooi wat ze daar mee maken. Maar hoe doe je dat?! Ik heb dat zelf nog nooit gedaan, maar het zag wel makkelijk om te proberen. En ook kleuren, wat wil ik?! Ik wou wel iets maken wat ik zelf ook zou willen dragen, dus dan hoef ik niet met fel roze aan te komen. Toen herinnerde ik me een deken in turqiouse en zand kleurtjes. En toen wist ik dat dat het ging worden! Ik kon weer kiezen voor Stylecraft garen, maar dat heb ik al voor meerdere opdrachten gebruikt, dus wou ik nu voor wat anders gaan. Veel garens waar we uit mochten kiezen waren met wol, en daar hou ik zelf niet zo van. Dus ben ik uiteindelijk gegaan voor Yarn & Colors Super Charming, heel mooi garen! Een beetjes zoals Scheepjes Stonewashed.

With starting the triangular shawl, it went kinda smoothly, it was getting a nice triangle, nothing really bothered me. And then there was the Mosiac part xD Gah! I thought I can do this in one go xD NOT. At first I had chosen a pattern that was impossible with this technic, so I had to go for something else. That went well, the first part was finally done.

Aan het begin van mijn omslagdoek ging het vrij makkelijk, de driehoek werd mooi, niks aan de hand. Tot het mosaic gedeelte xD ha! Ik dacht dat doe ik even, NIET. Eerst had ik een patroon gekozen die onmogelijk was met deze techniek, dus moest ik iets anders kiezen/ontwerpen. Gelukkig gind dat wel goed, en het eerste mosaic stuk was klaar.

I also noticed my yarn went pretty quick, so I had to make those hole thingies to make sure I would end up with the right size. the second mosaic part didn’t went well either. Wrong choise of pattern again, teehee, so had to undo a pretty big part and start over again.

Ik merkte ook dat mijn garen vrij snel ging, dus moest ik wel gaatjes maken in mijn patroon, iets wat ik eerst niet echt wou. Maar ik moest eindigen met het juiste formaat, dus ja, moest wel. Het tweede mosaic stuk ging weer niet goed, verkeerde keus van patroon, alweer, teehee. Dus moest ik een flink stuk uithalen en overnieuw beginnen.

When I finally finished I was so happy with it, only it got a bit round at the top part, instead of straight. So I had to block it.. something I never had done before, and is was so big (185 by 135cm), how a where am I gonna do that?! The solution was in a youtube video, simply cardboard, now fancy stuff needed. And that went well, it only took ages to dry xD. Oh well. I’m happy with how it looks, it’s so warm, perfect for the winter times.

Toen ik eindelijk klaar was, was ik zo blij met het resultaat. Alleen had het iets van een bolling aan de bovenkant. Dus moest ik het blokken, iets wat ik nog nooit gedaan had, en hij is nogal groot (185 bij 135cm). Hoe en waar ga ik dat in vredesnaam doen?! Het antwoord lag in een youtube video, gewoon karton, geen fancy spullen nodig. En dat ging goed, het duurde alleen heel lang voor het droog was xD Ach ja, Ik ben blij met hoe het er nu uit ziet, het is lekker warm, perfect voor de winter.

This is what I made:
Hier is wat ik gemaakt heb:


What do you think of my design?! Something you will make?

Wat vindt je van mijn ontwerp?! Iets wat jij wilt maken?

Love
Danielle

PS. My cat really loves it too~~

Posted in: Geen categorie Tagged: Crochet, haken, mosaic, scarf, triangular
« Vorige 1 2 3 4 5 … 18 19 20 21 22 23 24 25 26 27 28 29 30 Volgende »

What are you looking for?!

My Socials

Ko-Fi

I love making all these free things for you, tho it would be very helpfull if you can support me on Ko-Fi! (You don’t have to tho, totally up to you!)

Ko-Fi Shop!!

In my Ko-Fi shop you can find PDF Amigurumi Patterns!! You can pay easily with PayPal.
Go to the shop here!!

Recent Blog Posts

  • ♥ Happy 2022!
  • ♥ Day 12; Lights
  • ♥ Day 11; Flower Deco
  • ♥ Day 10; Snowman
  • ♥ Day 9; Gingerbread Houses

Recent Comments

  • Delinlea op ♥ Pietje Gnome Amigurumi
  • Delinlea op ♥ Toy Story Alien TsumTsum Amigurumi
  • Delinlea op ♥ Pua Tsum Tsum Amigurumi
  • Charli op ♥ Free Pattern; CNY Mouse Amigurumi
  • Peter Pesch op ♥ Pietje Gnome Amigurumi

Categories

  • animation
  • Beadwork
  • Blogmas 2018
  • Blogmas 2020
  • Blogmas 2021
  • Books
  • Bujo
  • Christmas
  • Christmas CAL 2019
  • Christmas Countdown 2017
  • Contest
  • Crafting
  • Crochet
  • Drawing
  • Drawing Lesson
  • Easter
  • Geen categorie
  • Life
  • Miniature
  • Nail Art
  • New Year
  • Paper
  • plush
  • Pokemon
  • Poseable Art Doll
  • Recipe
  • Sewing
  • Shop Pattern
  • Sinterklaas
  • Social Media
  • Tsum Tsum
  • Ufufy

Copyright © 2025 Delinlea - My little fantasy world.

Family WordPress Theme by themehall.com