Hey Lovelies! I have been watching the Crane Couple on YouTube lately.. Don’t ask me why tho, I just love all those plush they win! It gives me so much inspiration.. somehow xD. I wan’t all those plush as well haha!
Anyway I saw those Pikachu Plush in sleeping bags that were Pokémons as well! They are so adorable!! I love them. SO! Today we are going to make a Pikachu in a Umbreon sleeping bag! I hope you will love it as much as I do. I deffinitely love them and gonna make more patterns for them! Be prepared haha.
For this DIY you will need:
♥ Yarn, in Yellow, Black and Grey.
♥ Crochet hook.
♥ Stitch marker.
♥ Yarn Needle.
♥ Sewing Pins. (optional)
♥ Fiber fill.
♥ Felt of Felting wool with felting needle, in the colors Black, White, Red and Grey.
♥ Glue (optional, in case you use felt)
♥ Scissors.
Stitches used:
CH = Chain.
SC = Single Crochet.
ST = Stitch.
Inc = Increase.
Dec = Decrease.
Slst = Slip Stitch.
(…) = Repeat the space in brackets the given number of times.
[…] = Total number of stitches.
Pattern
Pikachu Head
In Yellow.
1: 6SC in Magic Ring. [6]
2: 2SC in each ST around. [12]
3: (1SC, inc) 6 times. [18]
4: (2SC, inc) 6 times. [24]
5: (3SC, inc) 6 times. [30]
6: SC in each ST around. [30]
|
9: SC in each ST around. [30]
10: 7SC, inc, 1SC, inc, 4SC, inc, 4SC, inc, 1SC, inc, 8SC. [35]
11: 7SC, inc, 3SC, inc, 10SC, inc, 3SC, inc, 8SC. [39]
12: SC in each ST around. [39]
13: 7SC, dec, 3SC, dec, 10SC, dec, 3SC, dec, 8SC. [35]
14: SC in each ST around. [35]
15: 7SC, dec, 1SC, dec, 4SC, dec, 4SC, dec, 1SC, dec, 8SC. [30]
16: (3SC, dec) 6 times. [24]
17: (2SC, dec) 6 times. [18]
18: (1SC, dec) 6 times. [12]
19: Dec all around. [6]
Fasten off and weave in tail.
Pikachu Ears (2)
Start with Black.
1: 4SC in Magic Ring. [4]
2: (1SC, inc) 2 times. [6]
3: (1SC, inc) 3 times. [9]
4: SC in each ST around. [9]
5: (2SC, inc) 3 times. [12]
Change to Yellow.
6: SC in each ST around. [12]
|
8: SC in each ST around. [12]
9: (2SC, dec) 3 times. [9]
10: SC in each ST around. [9]
|
13: SC in each ST around. [9]
Fasten off and leave a long tail for sewing.

Sleeping Bag Umbreon
In Black.
1: 6SC in Magic Ring. [6]
2: 2SC in each ST around. [12]
3: (1SC, inc) 6 times. [18]
4: (2SC, inc) 6 times. [24]
5: (3SC, inc) 6 times. [30]
6: (4SC, inc) 6 times. [36]
7: (5SC, inc) 6 times. [42]
8: SC in each ST around. [42]
|
20: SC in each ST around. [42]
21: (5SC, dec) 6 times. [36]
22: (4SC, dec) 6 times. [30]
21: (3SC, dec) 6 times. [24]
22: (2SC, dec) 6 times. [18]
Fasten off and weave in tail.
Hood of the Sleeping Bag
In Black.
Use the same pattern of the Sleeping Bag part, but up until row 17.
Fasten off and leave a long tail for sewing.
Sleeping Bag Umbreon Tail
Start with Black.
1: 5SC in Magic Ring. [5]
2: 2SC in each ST around. [10]
3: SC in each ST around. [10]
4: (1SC, inc) 5 times. [15]
5: SC in each ST around. [15]
6: SC in each ST around. [15]
Change to Yellow.
7: SC in each ST around. [15]
|
9: SC in each ST around. [15]
Change to Black.
10: SC in each ST around. [15]
11: (1SC, dec) 5 times. [10]
Fasten off and leave a long tail for sewing.
Sleeping Bag Umbreon Ears (2)
Start with Black.
1: 4SC in Magic Ring. [4]
2: (1SC, inc) 2 times. [6]
3: (1SC, inc) 3 times. [9]
4: SC in each ST around. [9]
5: (2SC, inc) 3 times. [12]
6: SC in each ST around. [12]
Change to Yellow.
7: SC in each ST around. [12]
|
9: SC in each ST around. [12]
Change to Black.
10SC in each ST around. [12]
11: (2SC, dec) 3 times. [9]
12: SC in each ST around. [9]
13: SC in each ST around. [9]
Fasten off and leave a long tail for sewing.
Sleeping Bag Circles (5)
In Yellow.
1: Chain 13, insert hook in the first CH, SLST to make a circle.
2: Chain 1, 13 SC
Fasten off and leave a long tail for sewing.

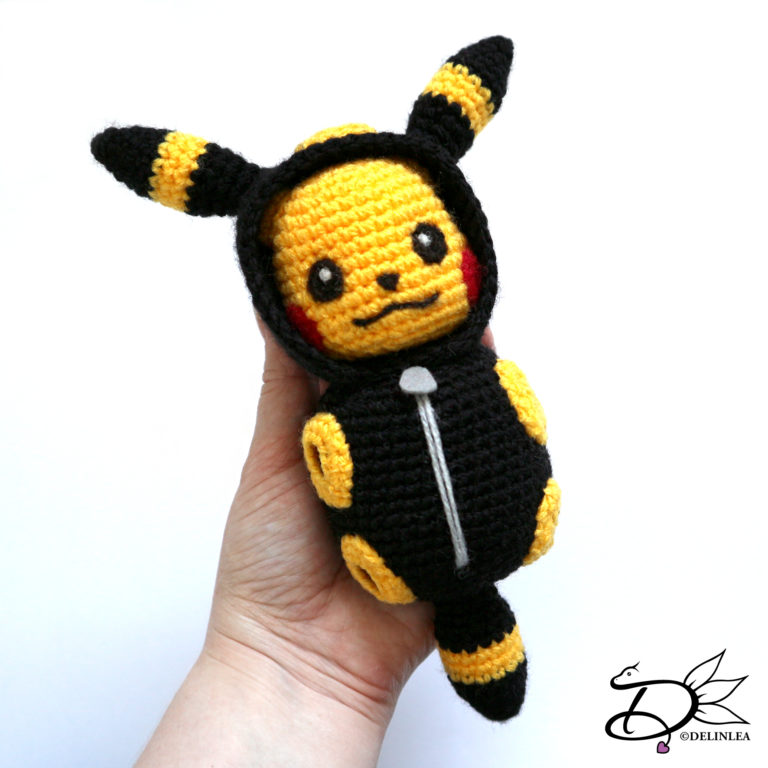
Assembling
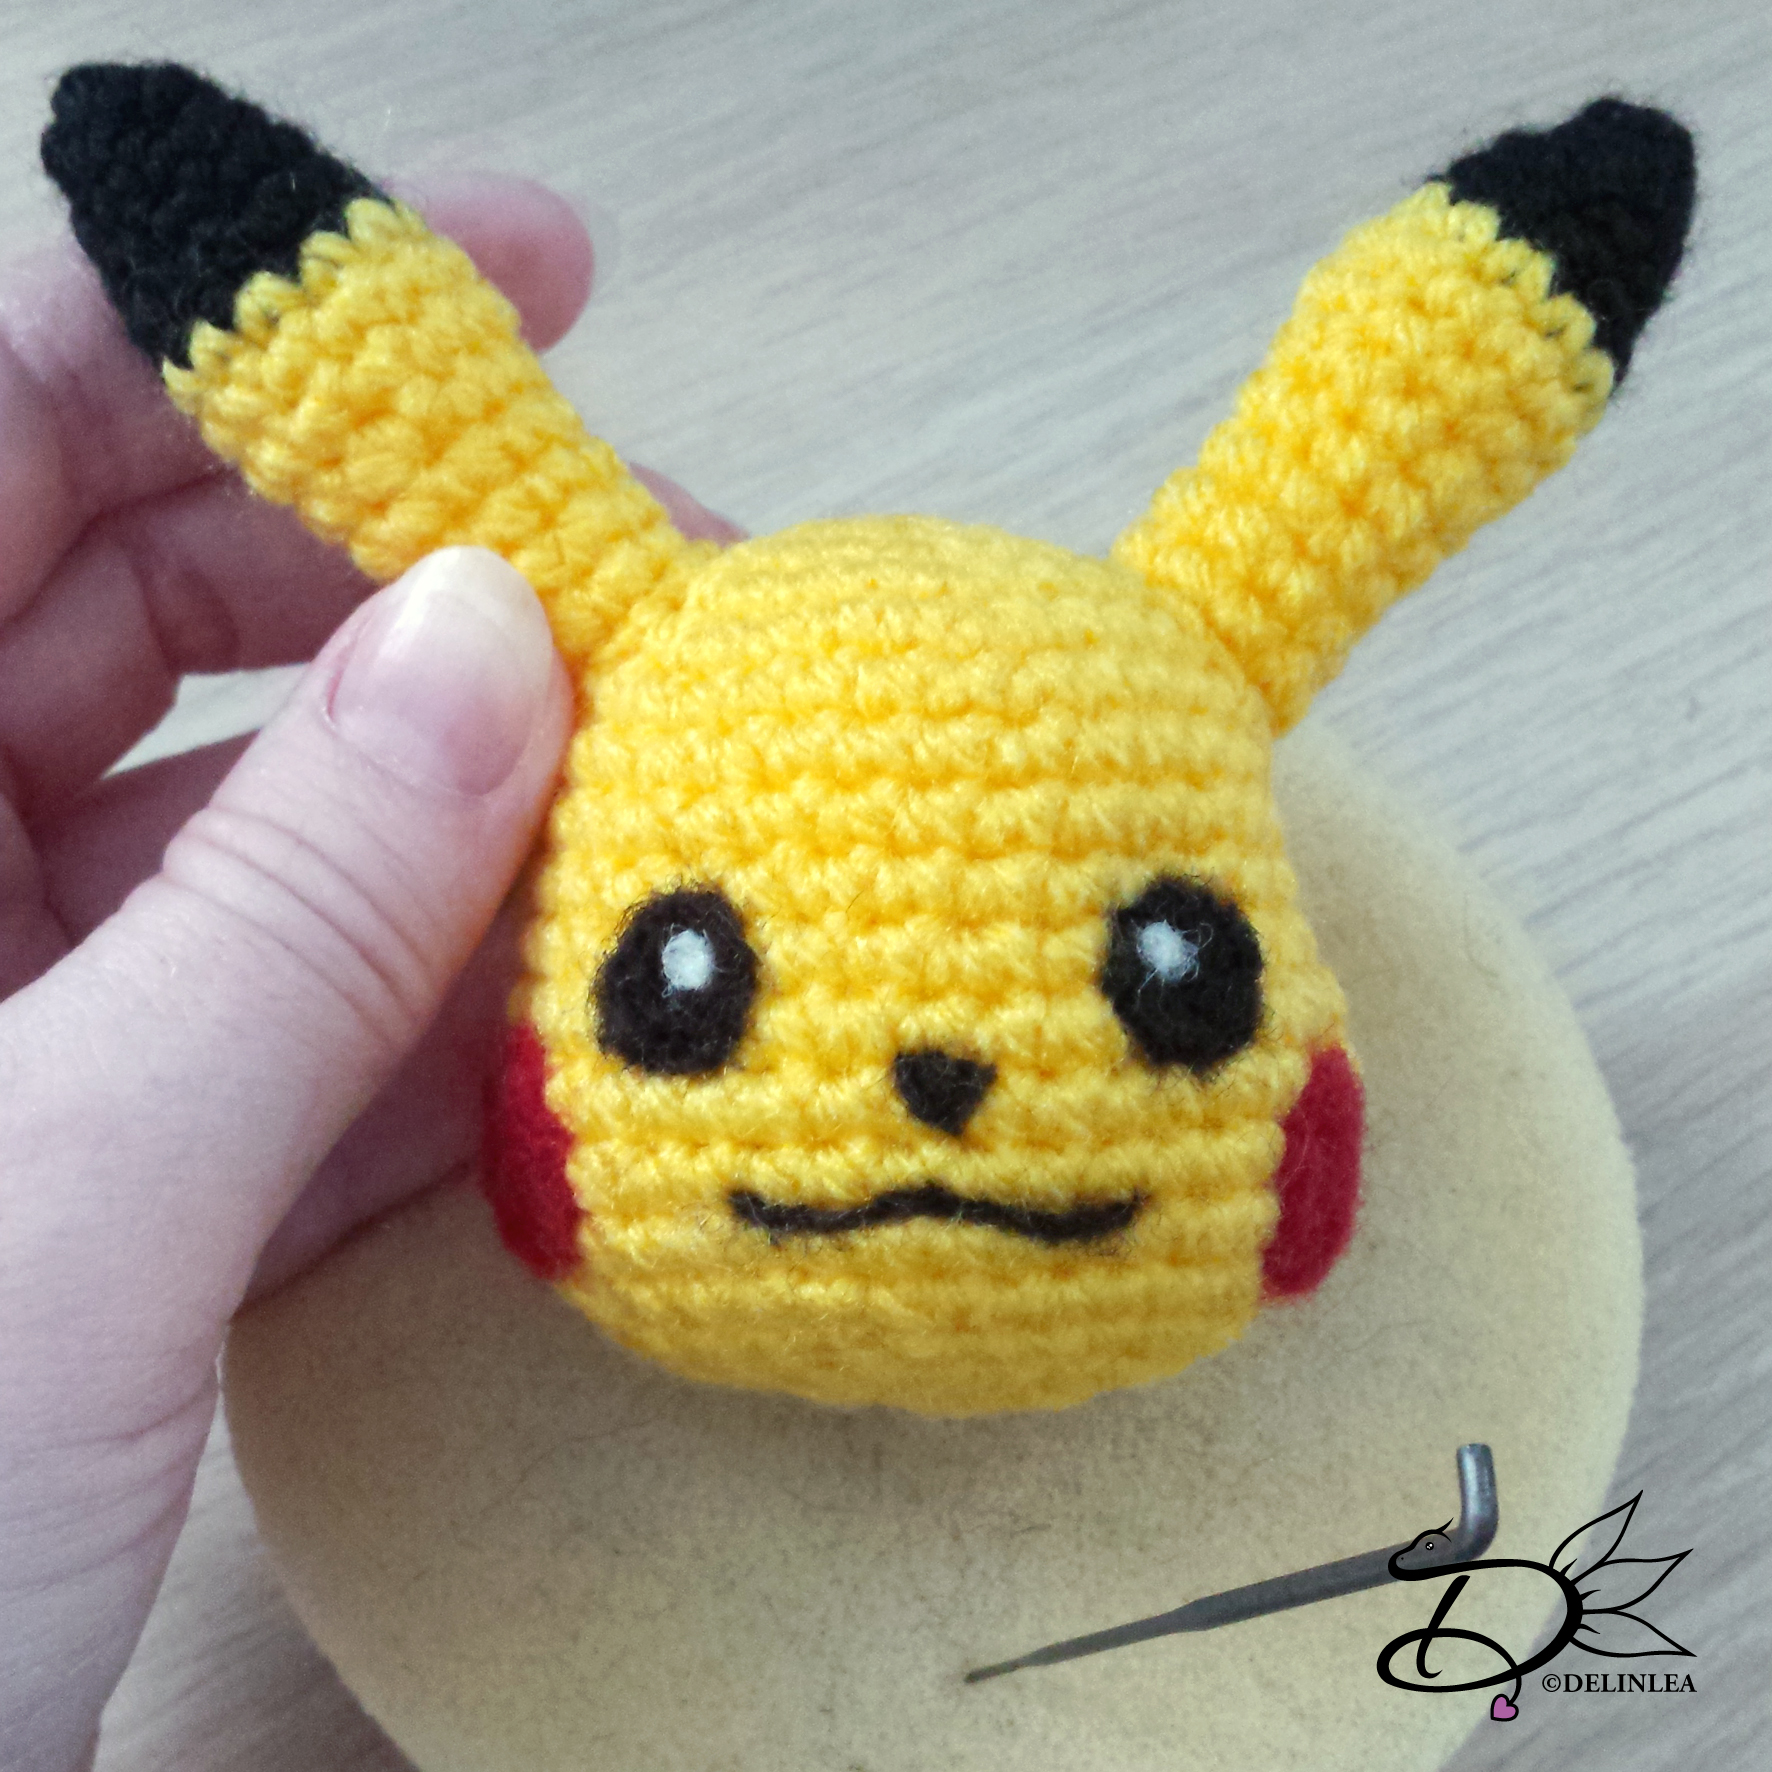
First sew Pikachu’s ears to his head. Make sure you keep the head the right way, with the inc’s we created the cheeks and a sort of nose, so be aware of that.
With felting wool and the needle felt technic I made his face, but you can ofcourse use felt instead, depends on what you want. It was my first time trying needle felting on one of my amigurumi’s and I must say it’s kinda tricky.
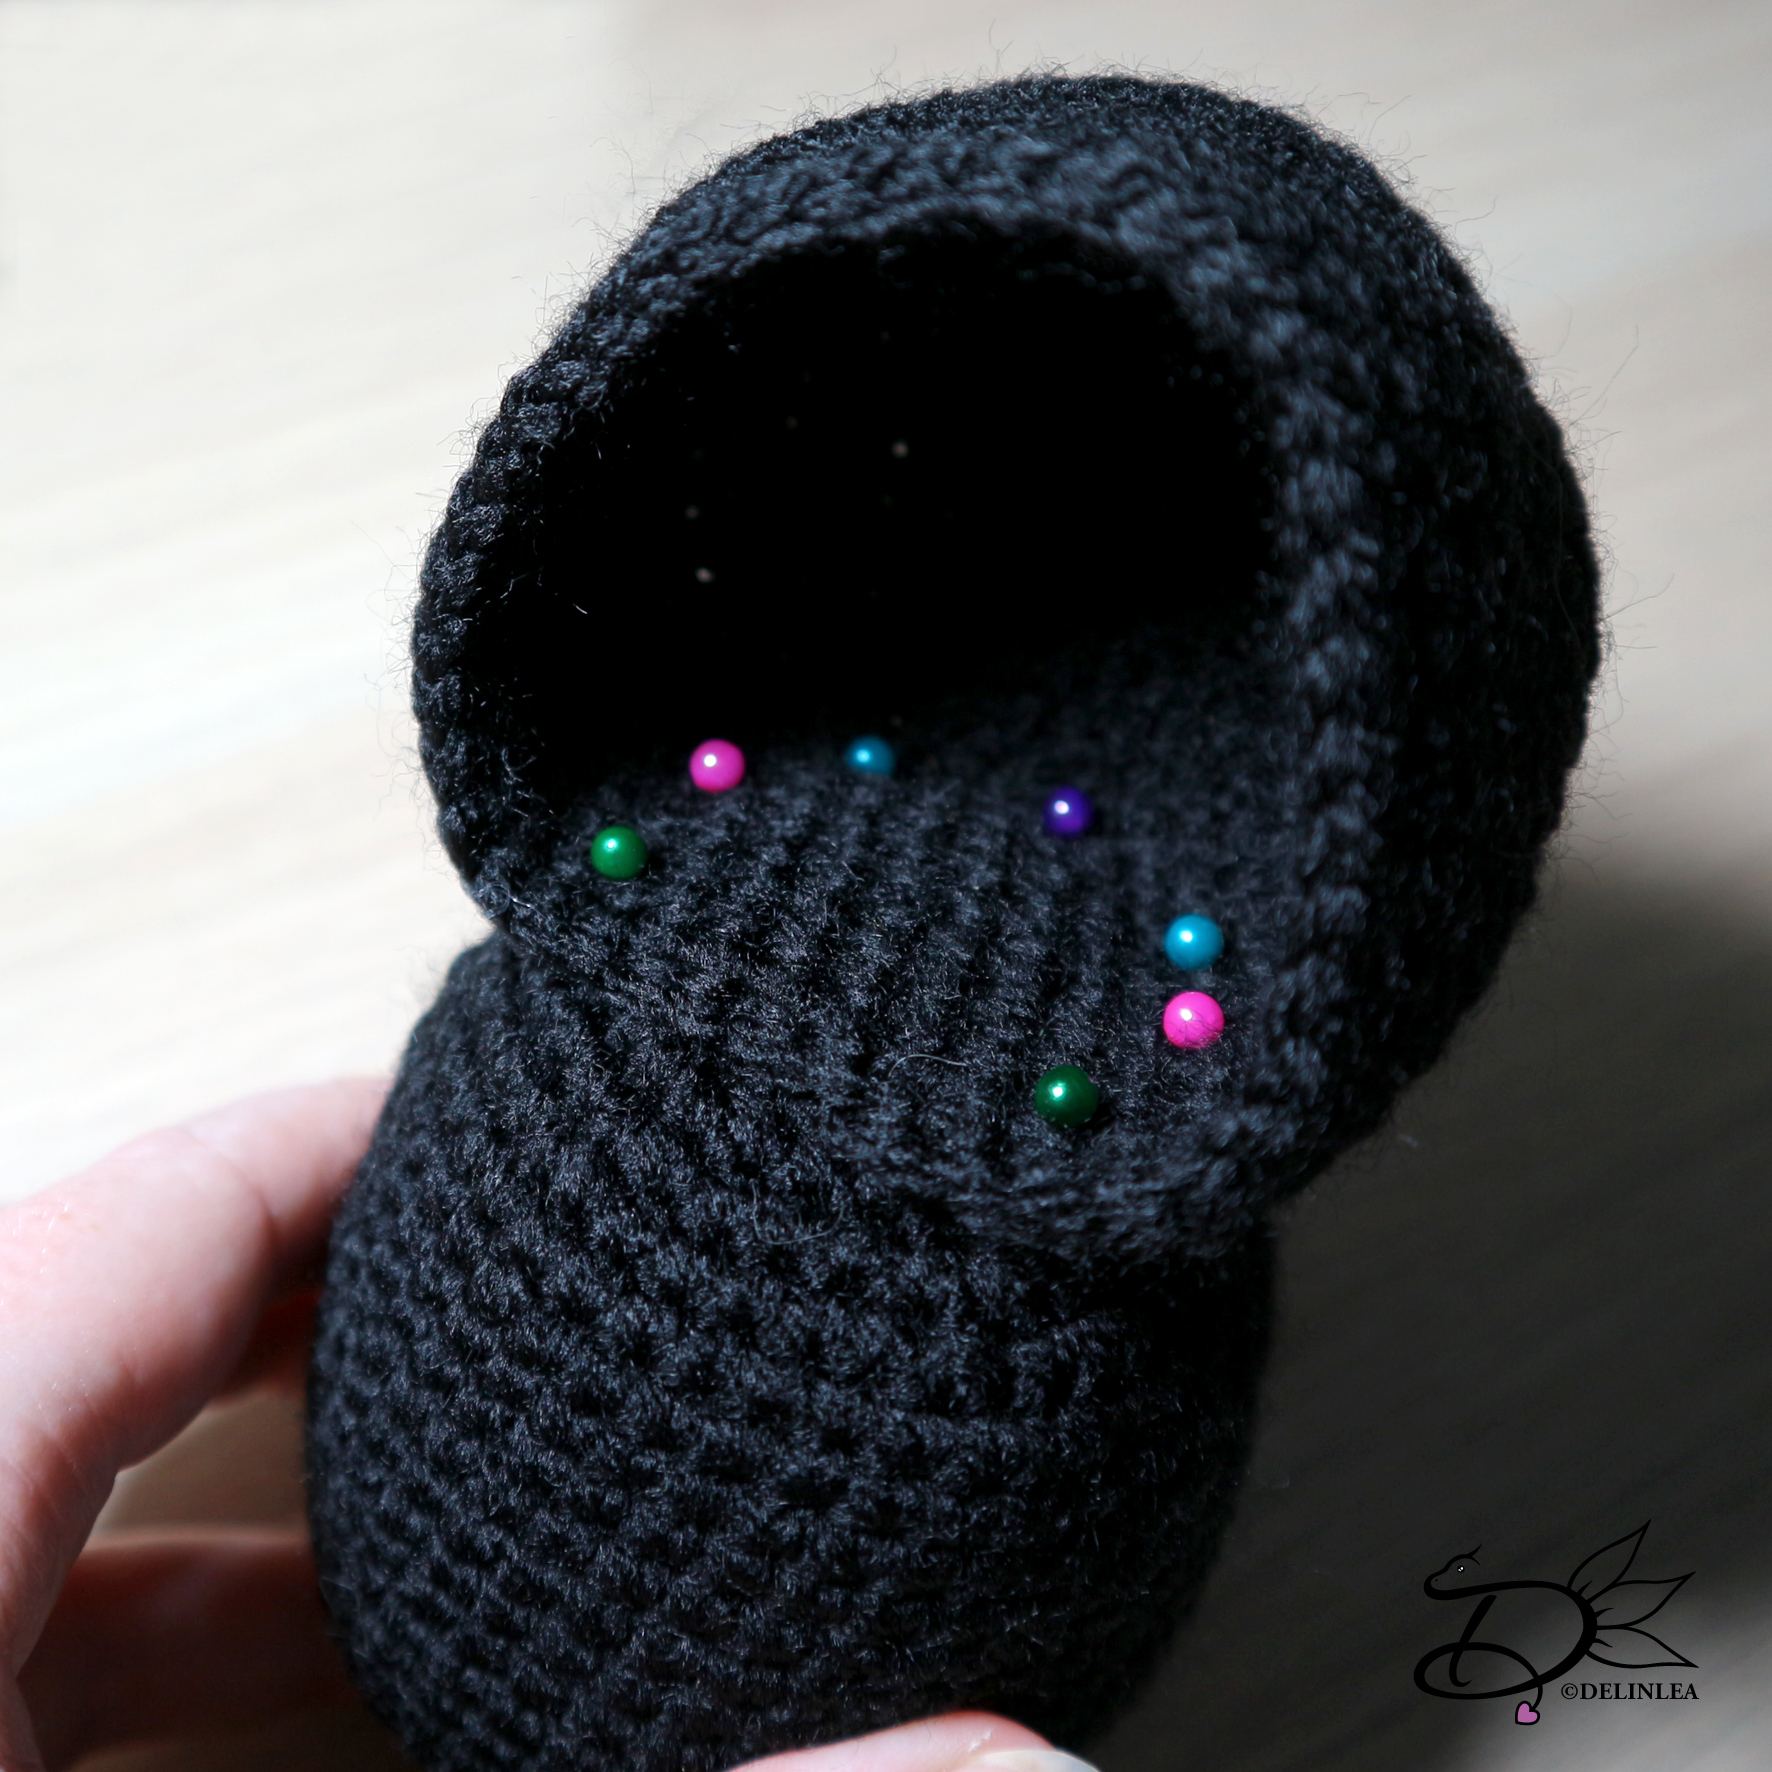
Now sew the Hood to the Sleeping Bag. This can be a bit tricky, check my pics to see how I placed it and then sew it on. At this point, sewing pins are your best friend.
Sew Umbreon’s ears to the hood and his tail at the bottom of the sleeping bag. Now position 4 dots/circles on the base of the sleeping bag and 1 dot/circle between the ears of Umbreon. I only sew around the outside, but you can sew around the inside as well. Make with some grey yarn a ‘zipper’. I wanted to make it way to detailed at first, but that didn’t work out. Two strokes of yarn looks fine to. And I forgot the name of the thing you pull the zipper up and down with, but don’t forget to cute that out of felt and put it on.
Last but not least, sew on Pikachu’s head in the hood, best way yo do that is to pull the hood down, so you have plenty of space to work.
I hope I covered everything with the assembling but if anything is unclear, please comment down below of send me an email through the contact page, and I’ll get back to you!
Hopefully you like this one as much as I do! I wanna make more versions, and I hope you want more of them too! Don’t forget to share with #DelinleaDIY on Twitter/Instagram!
Love Danielle