Delinlea - My little fantasy world
  • ♥ Home
  • ♥ About Me
  • ♥ Blogmas 2021
  • ♥ Free Patterns
    • ♥ Amigurumi; Spring/Easter
    • ♥ Amigurumi; Fall/Halloween
    • ♥ Amigurumi; Winter
    • ♥ Amigurumi Tsum Tsum
    • ♥ Amigurumi Ufufy
    • ♥ Amigurumi Others
    • ♥ Christmas Countdown 2017
    • ♥ Blogmas 2018
    • ♥ Blogmas 2020
  • ♥ Tutorials
    • ♥ Easter
    • ♥ Home Deco
    • ♥ Others
  • ♥ Drawing Lessons
  • ♥ FanFic
    • ♥ Chapter 1
    • ♥ Chapter 2
    • ♥ Chapter 3
    • ♥ Chapter 4
    • ♥ Chapter 5
    • ♥ Chapter 6
    • ♥ Chapter 7
  • ♥ Gallery
    • ♥ Crafts
    • ♥ Drawings
    • ♥ Poseable Art Dolls
  • ♥ Links
  • ♥ Contact
    • Privacy Policy

Amigurumi

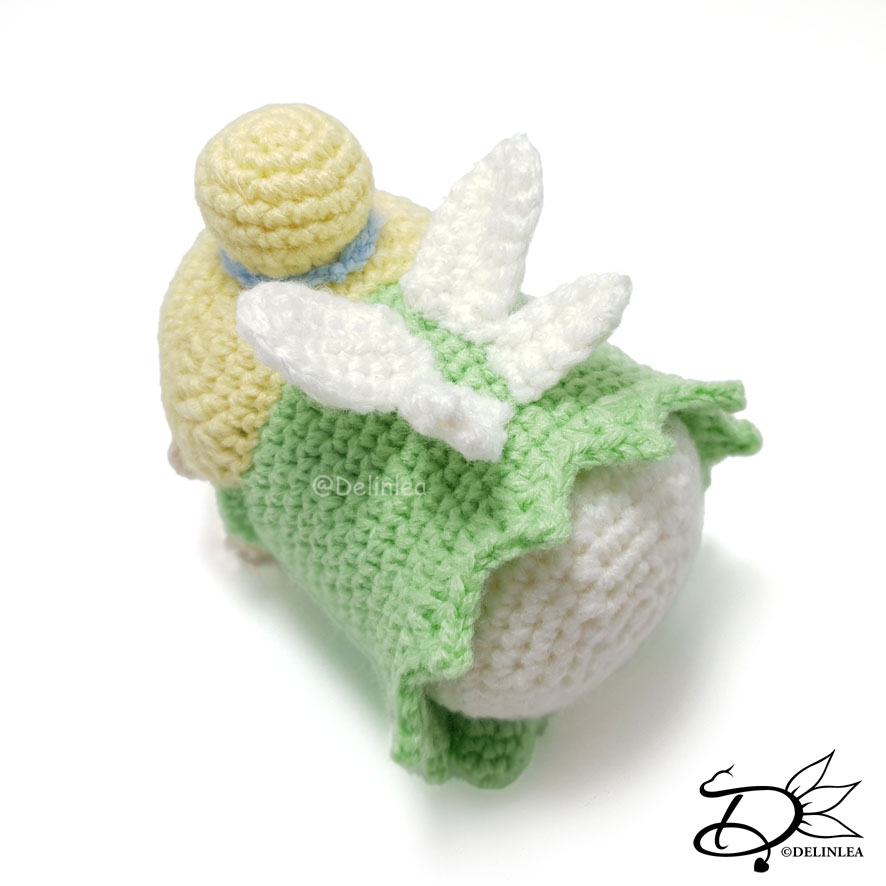
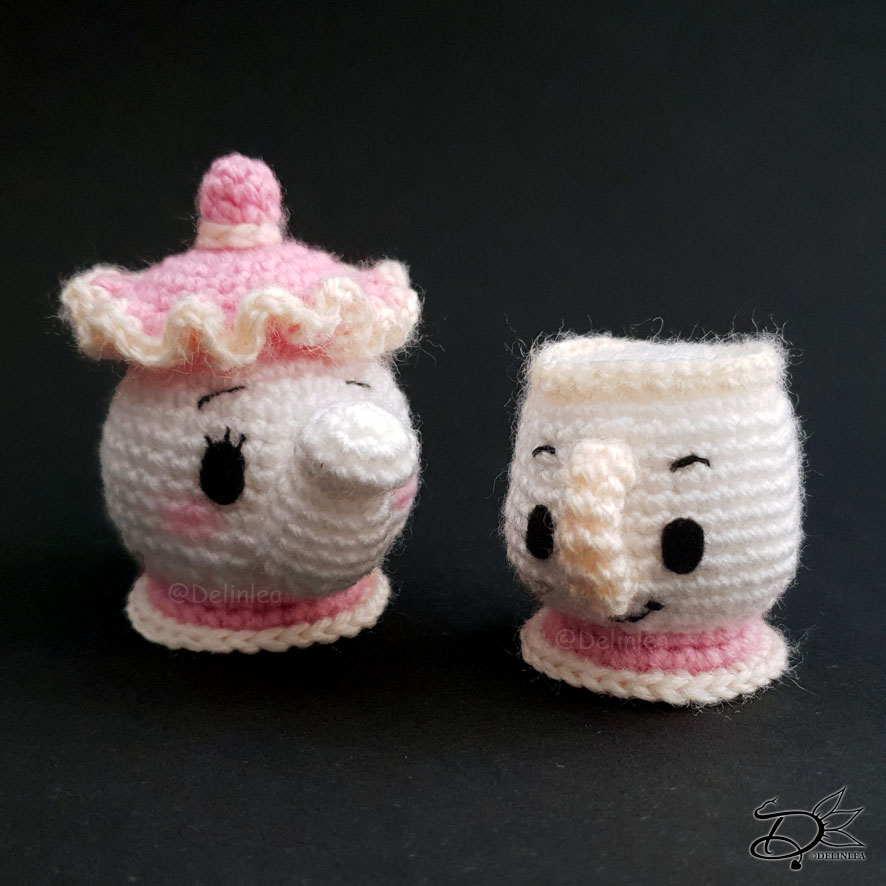
♥ Mrs. Potts Ufufy Amigurumi

17 september 2020 by Delinlea 2 Comments

Hey Lovelies! Are you ready for a new Ufufy Pattern? You know I made Chip Mug before, right? Well today it’s Mrs. Potts turn. Those don’t really look like an egg, as all ufufy’s do, but they are still really adorable! I tried to keep them the same size, so they fit in our collection!

Mrs. Potts Ufufy

For this Pattern you’ll need;
♥ Yarn in the colors White, Pink and Yellow. (I used Zeeman Supersoft)
♥ Crochet hook. ( I used a 2mm)
♥ Stuffing.
♥ Black Felt and Thread for facial details.
♥ Yarn Needle.
♥ Sewing Pins.
♥ Stitch Marker.
♥ (Fabric) Glue.

Stitches used (US Terms):
Magic Ring.
CH = Chain.
SLST = Slip Stitch.
SC = Single Crochet.
ST = Stitch.
BL = Back Loops.
FL = Front Loops.
Inc = Increase.
Dec = Decrease.
(…) = Repeat the space in brackets the given number of times.
[…] = Total number of stitches.

Chip Mug Pattern can be found here.

♥ Pattern Mrs. Potts Ufufy

This pattern is made with continues rounds, unless stated otherwise. Use a stitch marker to mark your first/last stitch of your row.

Body
Start with the color White.

1: 6SC in a Magic Ring. [6]
2: 2SC in each st around. [12]
3: (1SC, inc) 6 times. [18]
4: (2SC, inc) 6 times. [24]
5: (3SC, inc) 6 times. [30]
6: (4SC, inc) 6 times. [36]
7: 36SC. [36]
|
14: 36SC. [36]
15: (4SC, dec) 6 times. [30]
16: (3SC, dec) 6 times. [24]
17: BL, (2SC, dec) 6 times. [18]
18: (1SC, dec) 6 times. [12] Stuff the body.
19: dec all around. [6]
Fasten off and weave in tail.

Foot of the Pot
Start with the color Pink.

At row 17 of the body you worked in BL, now rejoin with Pink yarn in the FL.
1: 24SC. [24]
2: (3SC, inc) 6 times. [30]
Change to the color Yellow.
3: BL, 30SC. [30]
Fasten off and weave in tail

Nose
Use the color White.

1: 6SC in a Magic Ring. [6]
2: 2SC in each st around. [12]
3: 12SC. [12]
4: 3SC, (dec) 3 times, 3SC. [9]
5: 9SC. [9]
6: (2SC, inc) 3 times. [12]
7: 12SC. [12]
|
10: 12SC. [12] Stuff lightly.
11: (2SC, dec) 3 times. [9]
12: (1SC, dec) 3 times. [6]
Fasten off and leave a long tail for sewing.

Lid
Use the color Pink.

1: 4SC in a Magic Ring. [4]
2: 2SC in each st around. [8]
3: 8SC. [8]
4: Dec around. [4]
5: (1SC, inc) 2 times. [6]
6: 2SC in each st around. [12]
7: (1SC, inc) 6 times. [18]
8: (2Sc, inc) 6 times. [24]
9: 24SC. [24]
10: 24SC. [24]
11: BL 24SC. [24]
12: (2SC, dec) 6 times. [18]
Fasten off and leave a long tail for sewing.
If you want, you can stuff the lid lightly, but don’t put in their too much. You’ll get too much space between the body and the lid if you put too much stuffing.
Around the tip of the lid you have an Yellow accent, make a small chain that fits around there and sew it on.

Ruffles
Start with the color Pink.

At row 11 of the lid you worked in BL, rejoin with pink yarn in the FL.
1: 4SC in each st around. [96]
Change to the color Yellow.
2: 96SC. [96]
Fasten off and weave in tail.

Handle
Use the color Yellow.

1: 6SC in a Magic Ring. [6]
2: 6SC. [6]
Repeat row 2 until you have 15 rows.
Fasten off and leave a long tail for sewing.

Assembling

Whenever I assemble a Amigurumi, I’d like to use sewing pins first. This way you can move parts around easily until you are happy. Then sew it on.

First sew the lid to the body of Mrs. Potts, try to center it on top. Then sew on the nose, flatten the bottom lightly to do so. Last sew on the handle. But before you do, the side where you started with the magic ring will be curled. As you can see in the picture, I’ve sewn this, so it stays in place. After this you can sew it to the body.
Last make eyes from felt and use thread to make the eyelashes and eyebrows. With a bit of pink on the cheeks, finishes off this cute Mrs. Potts.

I hope you had fun making Mrs. Potts ! It looks maybe harder to make as it actually is. If you made on for your own, show me on Instagram or Twitter with the #DelinleaDIY, I’d love to see!

Have a wonderful day and I’ll see you next week!

Love
Danielle

Posted in: Crafting, Crochet, Ufufy Tagged: Amigurumi, Beauty and the Beast, Crochet, Disney, haken, mrs. potts, Tsum Tsum, Ufufy

♥ Autumn Amigurumi’s

3 september 2020 by Delinlea Leave a Comment

Hey Lovelies! Are you seeing signs of Autumn arriving where you live as well?! Here the weather is acting like it’s fall. I love it a lot. Because of Fall coming I thought of making a overview with Amigurumi patterns I made over time! Some you might remember, other you might have forgotten. So, let’s do this.

♥ Autumn Spirit

This adorable spirit I made some years ago, and I still love it a lot, it’s not too hard to make, and quite fun that hang everywhere as decoration. Now looking him up, I realized that I had a lot more ideas to make as spirits.. hmm maybe it’s time to make some more. The pattern you can find here!

♥ Adorable Acorn

Do you like picking up Acorns as well in Autumn? I usually do, and put them everywhere. It’s magical what Nature can create, and I often think we don’t enjoy it enough. Nature gives us so much, and what do we give back?!

Anyway, this little one you should definitely make, it will keep you company during the cold days! The pattern you can find here!

♥ Little Foxy

Why did I only make a fox related to Autumn?! I guess I need to do something about that. Any suggestions?! Leave them below if you have. But this foxy is really sweet and always want’s to be around you, maybe as a keychain, so he can travel around with you to see the worlds. He’s really curious! The pattern you can find here!

Little Foxy

♥ Mushroom Buddy

Why do I feel like this mushroom buddy needs some friends?! Maybe because there are so many types of Mushrooms! I can probably can come up with a few more designs. But for now you have to do it with this one only! The pattern you can find here!

Mushroom Buddy

I won’t post the Halloween related amigurumi’s here, since I will make a post about those next month! So wait a little for that or go here, if you are looking for those already.

I hope you enjoy those patterns. Some have been a while since I made them, and then remembering how many more ideas I have. I guess I will be busy for a while! (I’ve some huge yarn stash that really needs to decrease xD) Let’s get crafty!

Ah, and if you made any, don’t forget to show me on Instagram or Twitter with #DelinleaDIY

Have a wonderful /Autumn/ day and I’ll see you next week!

Love
Danielle

Posted in: Crafting, Crochet Tagged: Amigurumi, Autumn, Crochet, cute, fall, haken, kawaii

♥ Tinkerbell Tsum Tsum Amigurumi

28 augustus 2020 by Delinlea Leave a Comment

Hey Lovelies! How’s your week going?! I still have to get back in my productive mode. Still, procrastinating a lot, oops. That’s why my blog is also late today. But here it is, finally. I made a Tinkerbell Tsum Tsum this time. I struggled a lot with making her hair, so annoying, not sure what was going on. Usually I make patterns easily. Oh well, enough babbling, let’s go to the pattern.

Tinkerbell Tsum Tsum

For this Pattern you’ll need:
♥ DK Yarn in Beige, Light Green, White and Yellow. (I used Budgetyarn.com, not sponsored)
♥ Bit of Blue yarn.
♥ Black felt for details.
♥ Crochet Hook. (I used a 2,5mm hook)
♥ Stuffing.
♥ Stitch Markers.
♥ Yarn Needle.
♥ Sewing Pins.
♥ (Fabric)Glue.

Stitches used (US Terms):
Magic Ring.
CH = Chain.
SLST = Slip Stitch.
SC = Single Crochet.
HDC = Half Double Crochet.
DC = Double Crochet.
TR = Treble.
Picot = Chain 3 and slst in the first st.
ST = Stitch.
Inc = Increase.
Dec = Decrease.
(…) = Repeat the space in brackets the given number of times.
[…] = Total number of stitches.

Tinkerbell Tsum Tsum

♥ Pattern Tinkerbell

This pattern is made with continues rounds, unless stated otherwise. Use a stitch marker to mark your first/last stitch of your row.

Body
Start with the color Beige.

1: 6SC in a Magic Ring. [6]
2: 2SC in each st around. [12]
3: (1SC, inc) 6 times. [18]
4: (2SC, inc) 6 times. [24]
5: (3SC, inc) 6 times. [30]
6: (4SC, inc) 6 times. [36]
7: (5SC, inc) 6 times. [42]
8: 42SC. [42]
|
14: 42SC. [42]
Change to the color Light Green.
15: 42SC. [42]
16: BL, 42SC. [42]
17: 42SC. [42]
|
25: 42SC. [42]
Change to the color White.
26: BL, 42SC. [42]
27: 42SC. [42]
|
29: 42SC. [42]
30: (5SC, dec) 6 times. [36]
31: (4SC, dec) 6 times. [30]
32: (3SC, dec) 6 times. [24]
33: (2SC, dec) 6 times. [18] Stuff the body.
34: (1SC, dec) 6 times. [12]
35: dec all around. [6]
Fasten off and weave in tail.
At row 16 of the body you worked in back loops only. Now rejoin your yarn in the front loops, and crochet 42SC around. Fasten off and weave in tail.

Skirt
Use the color Light Green.

At row 26 of Tinkerbell her body you worked in the back loops only. Rejoin your yarn now in the front loops.
1: 42SC. [42]
2: 42SC. [42]
3: (1SC, 1HDC, 1DC + Picot + 1DC in the next st, 1HDC) 10 times, 1SC, SLST. [62]
Fasten off and weave in tail.

Ears (Make 2)
Use the color Beige.

1: 6SC in a Magic Ring. [6]
Fasten off and leave a long tail for sewing.

Hair
Use the color Yellow.

1: Ch15, insert in second ch from hook, 13SC, 3SC in the next st, work along the other side of the chain now, 12SC, inc. [30]
2: Inc, 12SC, (inc) 3 times, 12SC, (inc) 2 times. [36]
3: 1SC, inc, 12SC, (1SC, inc) 3 times, 12SC, (1SC, inc) 2 times. [42]
4: Ch3, 2DC inc the next st, 1HDC, 16SC, 1HDC, 2DC in the next st, 2TR in the next st, 2DC in the next st, 1HDC, 16SC, 2DC in the next st, 1HDC, 1TR. [48] (the first 3Ch counts as the first TR).
Break the yarn.
5: Skip 5st, rejoin the yarn, 13SC, turn. [13]
6: Dec, 9SC, dec, turn. [11]
7: 7SC, dec, turn. [8] Mark the last 2 remaining stitches from the previous row.
8: Dec, 6SC, turn. [7]
9: Dec, 3SC, dec, turn. [5]
10: Dec, 3SC, turn. [4]
11: (Dec) 2 times, turn. [2]
12: Dec. [1]
Fasten off and leave along tail for sewing.

Go back to the 2 stitches you marked.
1: inc, 1SC, turn. [3] (the 1sc should be at the outside of the hair).
2: Dec, 1SC, turn. [2]
3: Dec. [1]
Fasten off and weave in tail.

Bun
Use the color Yellow.

1: 6SC in a Magic Ring. [6]
2: 2SC in each st around. [12]
3: (1SC, inc) 6 times. [18]
4: 18SC. [18]
|
6: 18SC. [18]
7: (1SC, dec) 6 times. [12]
Fasten off and leave a long tail for sewing. Don’t forget to stuff the bun.

Hairband
Use the color Blue.

Make a chain that can fit around the base of the bun.

Wings (Make 2)
Use the color White. (Optional, use metallic/glitter thread along with the yarn, to create a sparkle effect).
The wings won’t be worked in continues rounds.

1: Ch7, insert in second ch from hook, 5SC, 3SC in the next st, now work along the other side of the chain, 5SC, turn. [13]
2: 4SC, (inc, 1sc) 2 times, inc, 4SC. [16]
3: Ch6, insert in second ch from hook, 5SC, turn. [5]
4: 5SC, turn. [5]
5: Dec, 3SC. [4]
Fasten off and leave a long tail for sewing.

Legs (Make 4)
Use the color Beige for 2 legs and for the other 2 use the color Light Green.

1: 4SC in Magic Ring. [4]
2: 2SC in each st around. [8]
3: 8SC. [8]
|
4: 8SC. [8]
Fasten off and leave a long tail for sewing. 
You don’t have to stuff the legs, but you can if you want.

♥ Assembling

Whenever I start to assemble Amigurumi’s, I use sewing pins first to position all parts. This way you can easily move things around until you are happy and sew it on. I recommend you would do this as well.

First sew on Tinkerbell her legs, the 2 back legs go under her skirt and the beige ones, near her face. Now you now that the top of her body is, position her hair nicely and sew it on, then add the bun and put the hairband around it. Then sew on her ears as well. Last sew on her wings!
From felt make her eyes and eyebrows (Or use yarn to create her eyebrows). Glue those on and let dry.

Tinkerbell is finished! I hope it wasn’t too hard? I don’t think so. I hope you had fun. If you decided to make her, make sure to show me on Twitter or Instagram with the #DelinleaDIY.

Have a wonderful day and I’ll see you next week!

Love
Danielle

Posted in: Crafting, Crochet, Tsum Tsum Tagged: Amigurumi, Crochet, cute, Disney, haken, kawaii, tinkerbell, Tsum Tsum

♥ Tigger Ufufy Amigurumi

20 augustus 2020 by Delinlea Leave a Comment

Hey lovelies! We have to more hot days and then it should go back to normal for this time of year. They expect rain! Yay! I can’t wait I’m so done with hot, sunny weather. I wonder what Tigger would think about this weather. Yes, that’s right, today I’ve a Tigger Ufufy pattern for you to enjoy! Are you ready?

Tigger Ufufy

For this Pattern you’ll need:
♥ DK Yarn in Orange, Light Yellow and Brown.
♥ Pink and Brown felt for details.
♥ Crochet Hook. (I used a 3mm hook)
♥ Stuffing.
♥ Stitch Markers.
♥ Yarn Needle.
♥ Sewing Pins.
♥ (Fabric)Glue.

Stitches used (US Terms):
Magic Ring.
CH = Chain.
SLST = Slip Stitch.
SC = Single Crochet.
ST = Stitch.
Inc = Increase.
Dec = Decrease.
(…) = Repeat the space in brackets the given number of times.
[…] = Total number of stitches.

♥ Pattern Tigger

This pattern is made with continues rounds, unless stated otherwise. Use a stitch marker to mark your first/last stitch of your row.

Body
Start with the color Orange.

1: 6SC in a Magic Ring. [6]
2: 2SC in each st around. [12]
3: (1SC, inc) 6 times. [18]
4: (2SC, inc) 6 times. [24]
5: 24SC. [24]
6: 24SC. [24]
7: (3SC, inc) 6 times. [30]
8: 30SC. [30]
|
11: 30SC. [30]
From here on you will alternate colors to create the belly.
12: Orange; 13SC, Light Yellow; 9SC, Orange; 8SC. [30]
|
14: Orange; 13SC, Light Yellow; 9SC, Orange; 8SC. [30]
15: Orange; 12SC, inc, Light Yellow; dec, 5SC, dec, Orange; inc, 7SC. [30]
16: Orange; 13SC, inc, Light Yellow; dec, 3SC, dec, Orange; inc, 8SC. [30]
Continue with Orange only.
17: 30SC. [30]
18: (3SC, dec) 6 times. [24]
19: (2SC, dec) 6 times. [18] Stuff the body nicely.
20: (1SC, dec) 6 times. [12]
21: (dec) 6 times. [6]
Fasten off and weave in tail.

Face
Use the color Light Yellow.

1: 6SC in a Magic Ring. [6]
2: (inc) 3 times, turn. [6]
3: Ch1, inc, 5SC, inc, turn. [8]
4: Ch1, 8SC. [8]
Fasten off and leave a long tail for sewing.

Ears (Make 2)
Use the color Orange.

1: Ch4, insert in second ch from hook, 2SC, 3SC in the next st, continue along the other side of the chain, 1SC, inc. [8]
2: 8SC. [8]
3: (Dec, 2SC) 2 times. [6]
4: 6SC. [6]
Fasten off and leave a long tail for sewing.

Snout
Use the color Light Yellow.

1: 6SC in a Magic Ring. [6]
2: 2SC in each st around. [12]
3: 12SC. [12]
Fasten off and leave a long tail for sewing.

Legs (Make 4)
Use the color Orange.

1: 6SC in a Magic Ring. [6]
2: 6SC. [6]
Fasten off and leave a long tail for sewing.

Tail
Start with Brown.
This one you won’t work in continues rounds.

1: 6SC in magic ring, SlSt in the first st. [6]
2: Chain 1, 6SC, SlSt in the first st.  [6]
Change to Orange.
3: Chain 1, 6SC, SlSt in the first st.  [6]
Change to Brown.
4: Chain 1, 6SC, SlSt in the first st.  [6]
Repeat row 3 and 4 until you have 9 rows total.
Fasten off and leave long tail for sewing.

Tigger Ufufy

♥ Assembling

Whenever I start assembling a Amigurumi, I’d like to use sewing pins first to position all part. This way you can easily move everything around until you are happy. Then you can sew it on.

Start with Tigger’s legs, two just under his belly and two on the side. Then position his face, keep the snout near to check if it is positioned right, since the snout will go partially over the face. Make sure, in the end, that the snout will be just above the belly.
Then sew on his ears and tail.
Now it is time to make his stripes, there are a lot, so check my pictures for references. You can make the stripes with either felt or yarn, use whatever you are most comfortable with.
Last make his eyes, nose and inside of the ears.

Tigger is done! I hope you enjoyed following along this pattern! If you made him, don’t forget to show me on Twitter or Instagram with the #DelinleaDIY.

I hope you have a wonderful day! I’ll see you next week with a TsumTsum pattern.

Love
Danielle

Posted in: Crafting, Crochet, Ufufy Tagged: Amigurumi, Crochet, cute, Disney, Free Pattern, haken, kawaii, Tigger, Tsum Tsum, Ufufy, Winnie the pooh

♥ Strawberry Sea Bunny Amigurumi

6 augustus 2020 by Delinlea 2 Comments

Hey Lovelies! Today I have a VERY cute pattern for you. I love sea slugs, that sounds maybe weird, but have you ever googled them?! So pretty and some are adorable, like the sea bunny. On that one is my pattern based today. I made this Strawberry Sea Bunny amigurumi! It’s so quick to make and way too cute to resist! I’ve made a Sea Bunny from fabric before, and I am clueless why I never made one from yarn. XD Oh well, it’s here now. Let’s see what you need for him.

Strawberry Sea Bunny

For this Pattern you’ll need:
♥ Fluffy Yarn in White.
♥ Yarn in Light Green, Light Yellow and White. (I used Budgetyarn.com, a DK yarn)
♥ Safety Eyes, 1cm.
♥ Crochet Hook. (I used a 2,5mm hook for the DK yarn and a 4,5mm for the fluffy yarn)
♥ Stuffing.
♥ Stitch Markers.
♥ Yarn Needle.
♥ Sewing Pins.
♥ Pink Marker. (Optional)

Stitches used (US Terms):
Magic Ring.
CH = Chain.
SLST = Slip Stitch.
SC = Single Crochet.
HDC = Half Double Crochet.
DC = Double Crochet.
Picot = 3Ch, Slst in the first st.
ST = Stitch.
Inc = Increase.
Dec = Decrease.
(…) = Repeat the space in brackets the given number of times.
[…] = Total number of stitches.

♥ Pattern Strawberry Sea Bunny

The body is made with continues rounds. Use a stitch marker to mark your first/last stitch of your row.

Body
Use the White Fluffy yarn.

The body is made with continues rounds. Use a stitch marker to mark your first/last stitch of your row.

1: 6SC in a Magic Ring. [6]
2: 2SC in each st around. [12]
3: (1SC, inc) 6 times. [18]
4: 18SC. [18]
|
11: 18SC. [18] Place the eyes and stuff the body.
12: (1SC, dec) 6 times. [12]
13: Dec around. [6]
Fasten off and weave in tail.

Ears/Leaves (Make 2)
Use the color Light Green.

Chain7, insert in second chain from hook, 1SC, 1HDC, 2DC, 1HDC, 1SC, Picot, 1SC, 1HDC, 2DC, 1HDC, 1SC.
Fasten off and leave a long tail for sewing.

Tail/Flower
Start with the color Light Yellow.

1: 5SC in a Magic Ring. [5]
Change to white.
2: (SlSt, Ch1, 3DC, Ch1) 5 times. [30]
Fasten off and leave a long tail for sewing.

Strawberry Sea Bunny

♥ Assembling

I always use sewing pins first to assemble my amigurumi’s, this way I can position all parts until I like how it looks. When I am happy, I’ll sew them on.

For the body I used a pink marker and colored the upper part lightly. You might wanna brush it out when it’s dry, to get back the soft fluffiness. To color it is of course optional, you can leave him white as well!
Then add the ears to your strawberry sea bunny, almost behind the eyes, but see what works for you. And Last sew on his tail as well.

That was it already for today’s pattern! I know fluffy yarn is quit tricky to use, but just practice a bit with it, you will get the hang of it. I hope you enjoyed making this Strawberry Sea Bunny, and if you did, make sure to show me on Twitter or Instagram, I’d love to see!

Have a wonderful day and I’ll see you next week!

Love
Danielle

Posted in: Crafting, Crochet Tagged: Amigurumi, Crochet, cute, haken, kawaii, Sea Bunny, Sea Slug, Strawberry, Virka
« Vorige 1 2 3 4 5 … 8 9 10 11 12 13 14 15 16 … 25 26 27 28 29 Volgende »

What are you looking for?!

My Socials

Ko-Fi

I love making all these free things for you, tho it would be very helpfull if you can support me on Ko-Fi! (You don’t have to tho, totally up to you!)

Ko-Fi Shop!!

In my Ko-Fi shop you can find PDF Amigurumi Patterns!! You can pay easily with PayPal.
Go to the shop here!!

Recent Blog Posts

  • ♥ Happy 2022!
  • ♥ Day 12; Lights
  • ♥ Day 11; Flower Deco
  • ♥ Day 10; Snowman
  • ♥ Day 9; Gingerbread Houses

Recent Comments

  • Delinlea op ♥ Pietje Gnome Amigurumi
  • Delinlea op ♥ Toy Story Alien TsumTsum Amigurumi
  • Delinlea op ♥ Pua Tsum Tsum Amigurumi
  • Charli op ♥ Free Pattern; CNY Mouse Amigurumi
  • Peter Pesch op ♥ Pietje Gnome Amigurumi

Categories

  • animation
  • Beadwork
  • Blogmas 2018
  • Blogmas 2020
  • Blogmas 2021
  • Books
  • Bujo
  • Christmas
  • Christmas CAL 2019
  • Christmas Countdown 2017
  • Contest
  • Crafting
  • Crochet
  • Drawing
  • Drawing Lesson
  • Easter
  • Geen categorie
  • Life
  • Miniature
  • Nail Art
  • New Year
  • Paper
  • plush
  • Pokemon
  • Poseable Art Doll
  • Recipe
  • Sewing
  • Shop Pattern
  • Sinterklaas
  • Social Media
  • Tsum Tsum
  • Ufufy

Copyright © 2025 Delinlea - My little fantasy world.

Family WordPress Theme by themehall.com