Delinlea - My little fantasy world
  • ♥ Home
  • ♥ About Me
  • ♥ Blogmas 2021
  • ♥ Free Patterns
    • ♥ Amigurumi; Spring/Easter
    • ♥ Amigurumi; Fall/Halloween
    • ♥ Amigurumi; Winter
    • ♥ Amigurumi Tsum Tsum
    • ♥ Amigurumi Ufufy
    • ♥ Amigurumi Others
    • ♥ Christmas Countdown 2017
    • ♥ Blogmas 2018
    • ♥ Blogmas 2020
  • ♥ Tutorials
    • ♥ Easter
    • ♥ Home Deco
    • ♥ Others
  • ♥ Drawing Lessons
  • ♥ FanFic
    • ♥ Chapter 1
    • ♥ Chapter 2
    • ♥ Chapter 3
    • ♥ Chapter 4
    • ♥ Chapter 5
    • ♥ Chapter 6
    • ♥ Chapter 7
  • ♥ Gallery
    • ♥ Crafts
    • ♥ Drawings
    • ♥ Poseable Art Dolls
  • ♥ Links
  • ♥ Contact
    • Privacy Policy

Amigurumi

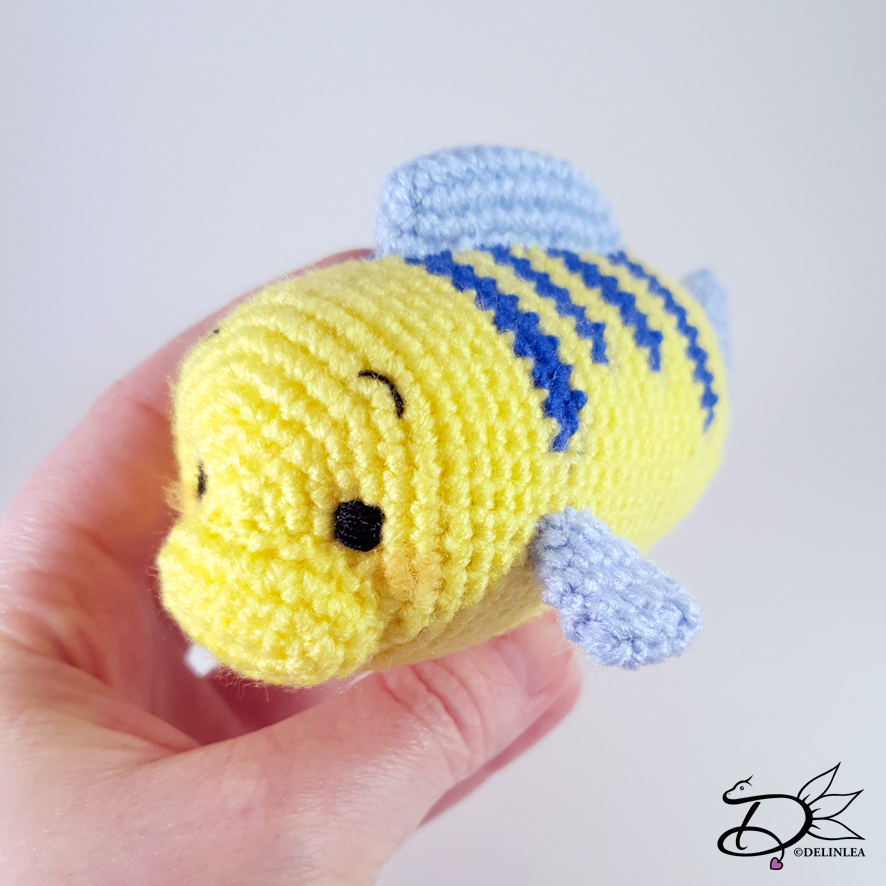
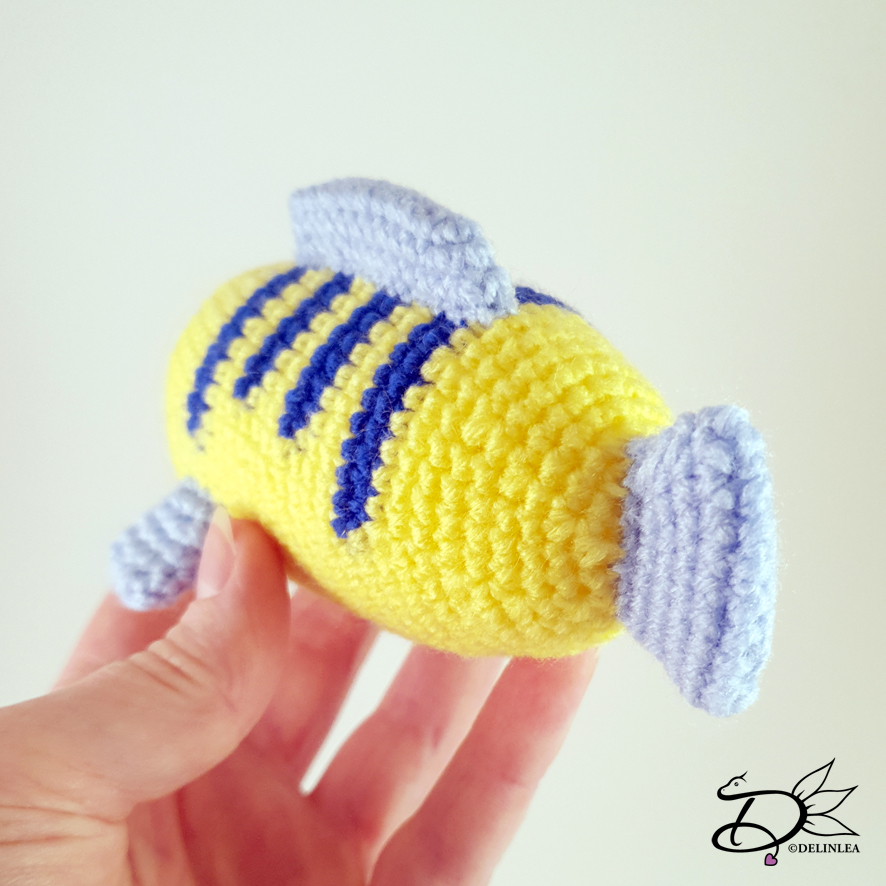
♥ Flounder Tsum Tsum

30 april 2020 by Delinlea Leave a Comment

Hey Lovelies! I was wondering, what’s your favorite Disney movie?! Mine, not sure, but as a kid, the little mermaid xD. So, today’s Tsum Tsum brought back some memories, I probably should watch the movie again! I always love flounder the most, he’s so cute! And that’s the main character of today’s blog! Flounder! Let’s make him together now.

Flounder Tsum Tsum

For this Pattern you’ll need:
♥ Yarn in Yellow, Light Blue and Dark Blue. (I used Zeeman SuperSoft)
♥ Crochet Hook, 2mm.
♥ Stuffing.
♥ Embroidery Thread and Needle.
♥ Stitch Markers.
♥ Yarn Needle.
♥ Sewing Pins.

Stitches used (US Terms):
Magic Ring.
CH = Chain.
SLST = Slip Stitch.
SC = Single Crochet.
ST = Stitch.
Inc = Increase.
Dec = Decrease.
(…) = Repeat the space in brackets the given number of times.
[…] = Total number of stitches.

Pattern Flounder Tsum Tsum

Work in continues rounds, use a stitch marker to mark your first stitch of every row. This is for every part, unless stated otherwise.

Body
Start with Yellow colored yarn.

1: 6SC in a Magic Ring. [6]
2: 2SC in each st around. [12]
3: (1SC, inc) 6 times. [18]
4: (2SC, inc) 6 times. [24]
5: (3SC, inc) 6 times. [30]
6: (4SC, inc) 6 times. [36]
7: (5SC, inc) 6 times. [42]
8: 42SC. [42]
|
13: 42SC. [42]
From now on you will change yarn color constantly to make the stripes, so, I will state the amount of stitches for that particular color.
14: Yellow; 11SC, Dark Blue: 20SC, Yellow; 11SC. [42]
15: Yellow; 12SC, Dark Blue: 1SlSt, 16SC, 1SlSt, Yellow; 12SC. [42]
16: Yellow, 42SC. [42]
17: Yellow, 42SC. [42]
18: Yellow; 14SC, Dark Blue: 15SC, Yellow; 13SC. [42]
19: Yellow; 15SC, Dark Blue: 1SlSt, 11SC, 1SlSt, Yellow; 14SC. [42]
20: Yellow, 42SC. [42]
21: Yellow, 42SC. [42]
22: Same as row 18.
23: Same as row 19.
24: Yellow, 42SC. [42]
25: Yellow, 42SC. [42]
26: Yellow; 12SC, Dark Blue: 20SC, Yellow; 10SC. [42]
27: Yellow; 13SC, Dark Blue: 1SlSt, 16SC, 1SlSt, Yellow; 11SC. [42]
From here on you’ll work with the Yellow colored yarn only again.
28: (5SC, dec) 6 times. [36]
29: 36SC. [36]
30: 36SC. [36]
31: (4SC, dec) 6 times. [30]
32: 30SC. [30]
33: (3SC, dec) 6 times. [24]
34: 24SC. [24]
35: (2SC, dec) 6 times. [18] Stuff the body.
36: (1SC, dec) 6 times. [12]
37: (dec) 6 times. [6]
Fasten off and weave in tail.

Beak
Use the Yellow colored yarn.

1: Ch7, insert in 2nd chain from hook, 5SC, 3SC in the next st, continue working along the other side of the chain, 4SC, inc, slst in the first st. [14]
2: Ch1, inc, 4SC, inc 3 times, 4SC, inc 2 times, slst in the first st. [20]
3: Ch1, 20SC [20]
Fasten off and leave a long tail for sewing.

Side Fins (Make 2)
Use the Light Blue colored yarn.

1: Ch5, insert in second ch from hook, 3SC, 3SC in the next st, continue working along the other side of the chain, 2SC, inc. [10]
2: 10SC. [10]
3: 10SC. [10]
4: (dec, 3SC) 2 times. [8]
5: 8SC. [8]
Fasten off and leave a long tail for sewing.

Tail Fin.
Use the Light Blue colored yarn.

1: Ch10, insert in second ch from hook, 8SC, 3SC in the next st, continue working along the other side of the chain, 7SC, inc. [20]
2: 20SC. [20]
3: (Dec, 8SC) 2 times. [18]
4: (Dec, 7SC) 2 times. [16]
5: (Dec, 6SC) 2 times. [14]
Fasten off and leave a long tail for sewing.

Back Fin
Use the Light Blue colored yarn.

1: Ch12, insert in second ch from hook, 10SC, 3SC in the next st, continue working along the other side of the chain, 9SC, inc. [24]
2: 10SC, (inc) 3 times, 11SC. [27]
3: 12SC, (inc) 2 times, 13SC. [29]
Fasten off and leave a long tail for sewing.

Assembling

Whenever I start assembling amigurumi’s, I prefer to use sewing pins first. This way I can position and reposition all parts until I am happy with how it looks. I recommend you do so as well.

First position Flounders snout, just under the middle of the face and sew it on. Along sewing the snout on, make sure to stuff it slightly.
His side fins go just under the first stripe on his back. His back fin start from the first stripe as well. His tail, obviously goes on his behind, or however you wanna call it. Sew all those parts on.
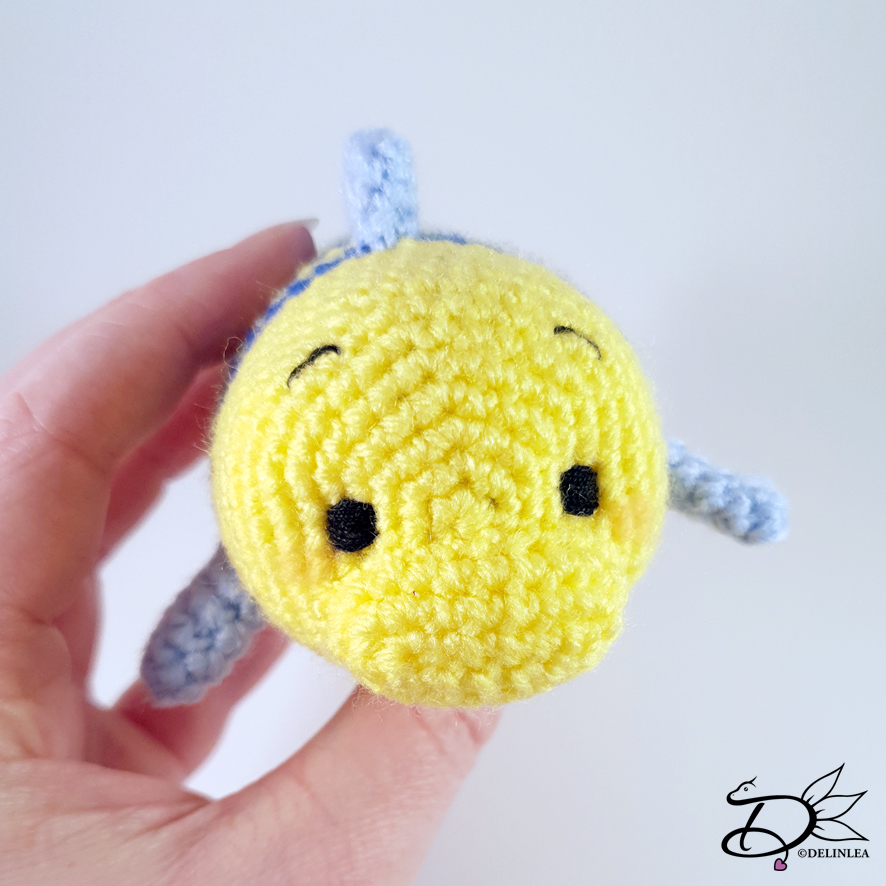
I used embroidery to make his face, but of course you can use felt or anything else instead, just what you prefer. With a bit of pink pastel dust you can make his blushy cheeks.

Optional, to make Flounder’s eyes a bit deeper into the amigurumi, use some yarn on a needle. Make sure to tie a good knot at the end. Now go from a random spot, where you can get the knot through the body, to his eyes, without going through the eye, but just behind the yarn used there. The do the same with the other eye and pull the yarn tightly. You can see you pull the eyes slightly inward. Secure the yarn somewhere tightly where it’s not visible and finish off.

I hope you had fun making Flounder! I think it’s such a fun TsumTsum to make!

Have a wonderful day!

Love
Danielle

Posted in: Crafting, Crochet, Tsum Tsum Tagged: Amigurumi, Crochet, cute, Disney, Flounder, Free Pattern, haken, kawaii, The little mermaid

♥ Chip Mug Ufufy

23 april 2020 by Delinlea Leave a Comment

Hey Lovelies! Are you ready for a new Ufufy pattern?! I hope you do. Today’s Ufufy, doesn’t have that typical oval shape, but it’s still cute. Can you already guess which one it will be? Well, I’m gonna tell you now, it’s gonna be Chip Mug! This one just happened when I saw a picture of it. Let’s dive into the pattern.

Chip Mug Ufufy

For this Pattern you’ll need:
♥ Yarn in White, Light Yellow and pink (I used Zeeman Supersoft)
♥ Crochet Hook, 2mm.
♥ Stuffing.
♥ Felt in black and some thread for facial details.
♥ Stitch Markers.
♥ Yarn Needle.
♥ Sewing Pins.

Stitches used (US Terms):
Magic Ring.
CH = Chain.
SLST = Slip Stitch.
SC = Single Crochet.
ST = Stitch.
BL = Back Loops.
FL = Front Loops.
Inc = Increase.
Dec = Decrease.
(…) = Repeat the space in brackets the given number of times.
[…] = Total number of stitches.

Pattern Chip Mug

Work in continues rounds, use a stitch marker to mark your first stitch of every row. This is for every part, unless stated otherwise.

Body
Use the color White.

1: 6SC in Magic Ring. [6]
2: 2SC in each st around. [12]
3: (1SC, inc) 6 times. [18]
4: (2SC, inc) 6 times. [24]
5: (3SC, inc) 6 times. [30]
6: BL, 30SC. [30]
7: 30SC. [30]
8: (9SC, inc) 3 times. [33]
9: 33SC. [33]
10: (10SC, inc) 3 times. [36]
11: 36SC. [36]
12: (11SC, inc) 3 times. [39]
13: 39SC. [39]
14: 39SC. [39]
15: (11SC, dec) 3 times. [36]
16: (4SC, dec) 6 times. [30]
17: (3SC, dec) 6 times. [24]
18: BL, (2SC, dec) 6 times. [18]
19: (1SC, dec) 6 times. [12]
20: (dec) 6 times. [6]
Fasten off and weave in tail.
At row 6 you worked in the Back Loops only, rejoin now in the Front Loops with Light Yellow yarn  and make 30SC. You can also make one SC less on the spot you want the ‘chip’ to be, make sure to start at that point.

Foot of the Mug
Start with the color Pink.

Rejoin in the front loops of row 18 of the body.
1: FL, 18SC.
2: (2SC, inc) 6 times. [24]
Change to the color Light Yellow.
3: FL, 24SC. [24]
Fasten off and weave in tail.

Handle of the Mug
Use the color Light Yellow.

1: 5SC in Magic Ring. [5]
2: 5SC. [5]
|
8: 5SC. [5]
Fasten off and leave a long tail for sewing.

Assembling

There is not much to assemble, only the handle of the mug. Place it with sewing pins on the spot you like it. Make sure that there is space the make the mouth underneath. Sew it on.
With felt and/or thread make his facial features.

And Chip Mug is already done, and I love him so much! I had a lot of fun making him, and I hope you too!

Have a wonderful day!

Love
Danielle

Posted in: Crafting, Crochet, Ufufy Tagged: Amigurumi, Beauty and the Beast, Chip Mug, Crochet, cute, Disney, Free Pattern, haken, Ufufy

♥ Dibo Amigurumi

16 april 2020 by Delinlea Leave a Comment

Hey Lovelies! Meet Dibo! Dibo it this very active creature that jumps around all the time! He loves to sit in high places, preferably in trees or plants. He loves that. Sometimes you can get really tired of his presence, jumping around you all the time, he can’t sit still.
This creature was born from my imagination, I just started crocheting and went with the flow. First I thought it was gonna be a dino, but it didn’t look like that in the end. I still love him, or is he to weird?! xD Anyway, you just need 1 color of yarn and really quick to make, so I hope you will enjoy him as well!

Dibo

For this Pattern you’ll need:
♥ Yarn in a color of choice! (I used budgetyarn.com)
♥ Crochet Hook, 2,5mm.
♥ Stuffing.
♥ Safety Eyes, 5mm.
♥ Stitch Markers.
♥ Yarn Needle.
♥ Sewing Pins.

Stitches used (US Terms):
Magic Ring.
CH = Chain.
SLST = Slip Stitch.
SC = Single Crochet.
HDC = Half Double Crochet.
ST = Stitch.
Inc = Increase.
Dec = Decrease.
(…) = Repeat the space in brackets the given number of times.
[…] = Total number of stitches.

Pattern Dibo

Work in continues rounds, use a stitch marker to mark your first stitch of every row. This is for every part, unless stated otherwise.

Body

Before you start, prepare 3 strands of yarn, about 6cm. Tie them together with knot and put them aside. This will be for his hair.

1: 6SC in a Magic Yarn. [6] Before closing the magic ring, put in the 3 strands you prepared earlier, with the knot on the inside. now close the magic ring.
2: 2SC in each st around. [12]
3: (3SC, inc) 3 times. [15]
4: (4SC, inc) 3 times. [18]
5: 18SC. [18]
6: (5SC, inc) 3 times. [21]
7: 21SC. [21]
8: (6SC, inc) 3 times. [24]
9: 24SC. [24]
|
11: 24SC. [24]
12: (2SC, dec) 6 times. [18]
13: (1SC, dec) 6 times. [12] Place the eyes between row 5 and 6, about 2cm apart. Stuff the body firmly.
14: Dec all around. [6]
Fasten off and weave in tail.

Snout

1: Ch4, insert in second Chain from hook, 2SC, 3SC in the next st, continue along the other side of the chain, 1SC, inc. [8]
2: 8SC. [8]
Fasten off and leave a long tail for sewing.

Tail

1: 6SC in Magic Ring. [6]
2: 6SC. [6]
3: (1SC, inc) 3 times. [9]
4: 9SC. [9]
5: 9SC. [9]
6: 9SC. [9]
7: (2SC, inc) 3 times. [12]
8: 6HDC, 6SC. [12]
9: 6HDC, 6SC. [12]
10: 6HDC, 1SC. [7]
Fasten off and leave a long tail for sewing. Don’t forget to stuff the tail.

Assembling

Whenever I start assembling Amigurumi’s, I use sewing pins to put all things together first. This way I can move them around until I am happy with how it looks.

Put his snout in between his eyes, slightly lower, and sew it on. Eventually, make, with some black yarn, his nostrils.
Put his tail on his lower back, pointing downwards. And sew it on.

And that was it already for Dibo! Quick and easy pattern for you to enjoy!

Have a wonderful day!

Love
Danielle

Posted in: Crafting, Crochet Tagged: Amigurumi, Creature, Crochet, cute, Dibo, Fantasy, Free Pattern, haken, kawaii

♥ Free Pattern; Sakura Flower Amigurumi

5 maart 2020 by Delinlea Leave a Comment

Hey Lovelies! Spring is on its way!! Although the weather is more acting like it’s Fall xD. We’ll just have to deal with it. But we can make our own little Spring world, to give us those Spring vibes. That’s why I made this adorable pattern of a Sakura flower! Don’t you wanna make a whole bunch and decorate everything with it, so we can make up for the bad weather?! Well, I think, I will xD. Let’s get quickly into this pattern.

Sakura Flower

For this Pattern you’ll need:
♥ Yarn in the colors;  Pink and Green. (I used Zeeman Supersoft)
♥ Crochet Hook (I used a 2mm hook).
♥ Safety Eyes, 5mm.
♥ Stuffing.
♥ Scissors.
♥ Sewing Pins.
♥ Yarn Needle.
♥ Piece of dark colored yarn for the mouth.

Stitches used (US Terms):
Magic Ring.
CH = Chain.
SLST = Slip Stitch.
SC = Single Crochet.
HDC = Half Double Crochet.
DC = Double Crochet.
Picot = Ch3 and SlSt into the first Ch again.
ST = Stitch.
Inc = Increase.
Dec = Decrease.
(…) = Repeat the space in brackets the given number of times.
[…] = Total number of stitches.

Pattern Sakura Flower

Sakura Flower (Make 2)
Use the color Pink.

1: 5SC in Magic Ring, SlSt in the first st. [5]
2: Ch1, 2SC in each st around, SlSt in the first st. [10]
3: Ch1, (1SC, inc) 6 times, SlSt in the first st. [15]
4: Ch1, (2SC, inc) 6 times. [20]
From here you will work the patals, repeat row 5-7, 5 times.
5: Ch1, 3SC, inc, turn. [5]
6: 5SC, turn. [5]
7: Dec, Picot, 1SC, Picot, dec. [5]
Fasten off and weave in tail.

Leaves (Make 2)
Use the color Green.

Ch8, insert in 2nd ch from hook, 1SC, 1HDC, 2DC in the next st, 2HDC, 1SC,  1SC + Picot + 1SC in the next st, continue to work along the other side of the chain, 1SC, 2HDC, 2DC in the next st, 1HDC, 1SC, SlSt.
Fasten off and leave a long tail for sewing.

Assembling

Whenever I make Amigurumi’s, I like to use sewing pins first to add all parts together. This way I can easily move them around until I am happy with how it looks.

On one of the ‘Sakura Flower’ add the eyes and the mouth, I put the eyes between row 3 and 4. Next sew both sides of the flower together.
Add the leaves however you like and sew those on as well.

And your Sakura Flower is already done! Easy right? And so cute, are you gonna make some? I hope you will, and show me on social media if you do!

Have a wonderful day~

Love
Danielle

Posted in: Crafting, Crochet Tagged: Amigurumi, Crochet, cute, flower, Free Pattern, haken, kawaii, Sakura

♥ Free Pattern; Dumbo TsumTsum

27 februari 2020 by Delinlea 4 Comments

Hey Lovelies! It’s time for a new TsumTsum Pattern. My plan is to make 1 TsumTsum every month, so hopefully I can keep that up! I’m excited to do so. Today we will make Dumbo! I hope you will love him.
Anyone else waiting for snow?! Gosh, they said it might snow today, but I only see rain, I’m sad. We haven’t had any snow this winter yet. But I won’t give up on it yet xD. Anyway, let’s dive into the Dumbo pattern.

Dumbo Tsum Tsum

For this Pattern you’ll need:
♥ Yarn in the colors;  Grey, Pink, Red and Yellow. (I used Zeeman Supersoft)
♥ Crochet Hook (I used a 2mm hook).
♥ Stuffing.
♥ Scissors.
♥ Sewing Pins.
♥ Yarn Needle.
♥ Felt for the facial details.
♥ (Fabric) Glue.

Stitches used (US Terms):
Magic Ring.
BL = Back Loops.
FL = Front Loops.
CH = Chain.
SLST = Slip Stitch.
SC = Single Crochet.
HDC = Half Double Crochet.
DC = Double Crochet.
ST = Stitch.
Inc = Increase.
Dec = Decrease.
(…) = Repeat the space in brackets the given number of times.
[…] = Total number of stitches.

Pattern

Work in continues rounds, use a stitch marker to mark your first stitch of every row. This is for every part, unless stated otherwise.

Body
Use the color Grey.

1: 6SC in Magic Ring. [6]
2: 2SC in each st around. [12]
3: (1SC, inc) 6 times. [18]
4: (2SC, inc) 6 times. [24]
5: (3SC, inc) 6 times. [30]
6: (4SC, inc) 6 times. [36]
7: (5SC, inc) 6 times. [42]
8: 42SC. [42]
|
29: 42SC. [42]
30: (5SC, dec) 6 times. [36]
31: (4SC, dec) 6 times. [30]
32: (3SC, dec) 6 times. [24]
33: (2SC, dec) 6 times. [18]Stuff the body here.
34: (1SC, dec) 6 times. [12]
35: Dec all around. [6]
Fasten off and weave in tail.

Snout
Use the color Grey.

1: 6SC in Magic Ring. [6]
2: (1SC, inc) 3 times. [9]
3: 9SC. [9]
4: 9SC. [9]
5: (2SC, inc) 3 times. [12]
6: 12SC. [12]
7: (3SC, inc) 3 times. [15]
8: 15SC. [15]
Fasten off and leave a long tail for sewing. Stuff the snout lightly

Tail
Use the color Grey.

Ch7, insert in the second Ch from hook, 6SC. [6]
Fasten off and leave a long tail for sewing.

Legs (Make 4)
Use the color Grey

1: 4SC in Magic Ring. [4]
2: 2SC in each st around. [8]
3: 8SC. [8]
|
5: 8SC. [8]
Fasten off and leave a long tail for sewing.

Ears (Make 2)
Use the color Grey.
The ears excist out of several parts, so read well how many you need and how and when to add them.

Part 1 (Make 2):
1: 6SC in Magic Ring. [6]
2: 2SC in each st around. [12]
3: (1SC, inc) 6 times. [18]
Cut the yarn on one, and leave it on the other.
Part2:
4: Continue on the ‘part1’ you left the yarn on. 9SC, Ch2, Connect the second ‘part1’ 18SC, 2SC in the 2Ch you made earlier, 9SC. [40]
5: 40SC. [40]
6: 40SC. [40]
7: 9SC, dec, 18SC, dec, 9SC. [38]
8: 9SC, dec) 17SC, dec, 8SC. [36]
9: (4SC, dec) 6 times. [30]
10: 30SC. [30]
11: (3SC, dec) 6 times. [24]
12: 24SC. [24]
13: (2SC, dec) 6 times. [18]
14: 18SC. [18]
Fasten off and leave a long tail for sewing.

Inside of the Ears. (Make 2)
Use the color Pink.

1: Ch9, insert in de second Ch from hook, 8SC, turn. [8]
2: Inc, 6SC, inc, turn. [10]
3: Inc, 8SC, inc, turn. [12]
4: Inc, 10SC, inc, turn. [14]
5: Inc, 12SC, inc, turn. [16]
6: 16SC, turn. [16]
7: 16SC, turn. [16]
8: Dec, 1SC, 1HDC, 1DC, 1HDC, 1SC, 2SlSt, 1SC, 1HDC, 1DC, 1SC, dec.
Fasten off and leave a long tail for sewing.

Hat
Use the color Yellow

1: 4SC in Magic Ring. [4]
2: (1SC, inc) 2 times. [6]
3: (2SC, inc) 2 times. [8]
4: (3SC, inc) 2 times. [10]
5: (4SC, inc) 2 times. [12]
6: FL, 12SC. [12]
7: 12SC. [12]
Fasten off and leave a long tail for sewing.
At the row you worked in the front loops only, you can fold it outward to create the rim of the hat. Stuff lightly.

Collar
Use the color Red.

1: Ch42, make it into a circle and make 42SC. [42]
2: (1SC+1HDC in the next st, 2DC in the next St, 1HDC+1SC in the next st) 14 times. [84]
Fasten off and leave a long tail for sewing. (you could put it on loose, but I preferred to sew it on.
Around the edge of the collar, stitch on a yellow border, just like how Dumbo’s collar should look like.

Assembling

For every Amigurumi I put together, I use sewing pins first. This way you can easily move the parts around until you are happy.

Sew the inside of the ears to the outside of the ears, if you do this first, you can just move on to complete it.
Sew the snout on first, just under the middle of the face. This way you have a point to measure the other parts from.
The Collar will go on next, between row 14/15 of the body. In front of the collar you will position the hat and the ears and sew those on too.
just behind the Collar, around his belly his 2 front legs will go, the other to near the end of the body.
And last but not least, sew on his tail!
Make his eyes and other facial features from either felt or you can choose to embroider them on, just what look you like more and what you are comfortable with.

And Dumbo is already Finished, he is so cute and I am so happy I finally finished him. To be honest, I started him years ago and I just never finished it, weird. Oh well, at least we have him all done now! I hope you enjoyed this pattern and I’ll see you next week.

Love
Danielle

Posted in: Crafting, Crochet, Tsum Tsum Tagged: Amigurumi, Crochet, cute, Disney, dumbo, haken, kawaii, Tsum Tsum
« Vorige 1 2 3 4 5 … 11 12 13 14 15 16 17 18 19 … 25 26 27 28 29 Volgende »

What are you looking for?!

My Socials

Ko-Fi

I love making all these free things for you, tho it would be very helpfull if you can support me on Ko-Fi! (You don’t have to tho, totally up to you!)

Ko-Fi Shop!!

In my Ko-Fi shop you can find PDF Amigurumi Patterns!! You can pay easily with PayPal.
Go to the shop here!!

Recent Blog Posts

  • ♥ Happy 2022!
  • ♥ Day 12; Lights
  • ♥ Day 11; Flower Deco
  • ♥ Day 10; Snowman
  • ♥ Day 9; Gingerbread Houses

Recent Comments

  • Delinlea op ♥ Pietje Gnome Amigurumi
  • Delinlea op ♥ Toy Story Alien TsumTsum Amigurumi
  • Delinlea op ♥ Pua Tsum Tsum Amigurumi
  • Charli op ♥ Free Pattern; CNY Mouse Amigurumi
  • Peter Pesch op ♥ Pietje Gnome Amigurumi

Categories

  • animation
  • Beadwork
  • Blogmas 2018
  • Blogmas 2020
  • Blogmas 2021
  • Books
  • Bujo
  • Christmas
  • Christmas CAL 2019
  • Christmas Countdown 2017
  • Contest
  • Crafting
  • Crochet
  • Drawing
  • Drawing Lesson
  • Easter
  • Geen categorie
  • Life
  • Miniature
  • Nail Art
  • New Year
  • Paper
  • plush
  • Pokemon
  • Poseable Art Doll
  • Recipe
  • Sewing
  • Shop Pattern
  • Sinterklaas
  • Social Media
  • Tsum Tsum
  • Ufufy

Copyright © 2025 Delinlea - My little fantasy world.

Family WordPress Theme by themehall.com