Delinlea - My little fantasy world
  • ♥ Home
  • ♥ About Me
  • ♥ Blogmas 2021
  • ♥ Free Patterns
    • ♥ Amigurumi; Spring/Easter
    • ♥ Amigurumi; Fall/Halloween
    • ♥ Amigurumi; Winter
    • ♥ Amigurumi Tsum Tsum
    • ♥ Amigurumi Ufufy
    • ♥ Amigurumi Others
    • ♥ Christmas Countdown 2017
    • ♥ Blogmas 2018
    • ♥ Blogmas 2020
  • ♥ Tutorials
    • ♥ Easter
    • ♥ Home Deco
    • ♥ Others
  • ♥ Drawing Lessons
  • ♥ FanFic
    • ♥ Chapter 1
    • ♥ Chapter 2
    • ♥ Chapter 3
    • ♥ Chapter 4
    • ♥ Chapter 5
    • ♥ Chapter 6
    • ♥ Chapter 7
  • ♥ Gallery
    • ♥ Crafts
    • ♥ Drawings
    • ♥ Poseable Art Dolls
  • ♥ Links
  • ♥ Contact

Christmas Countdown 2017

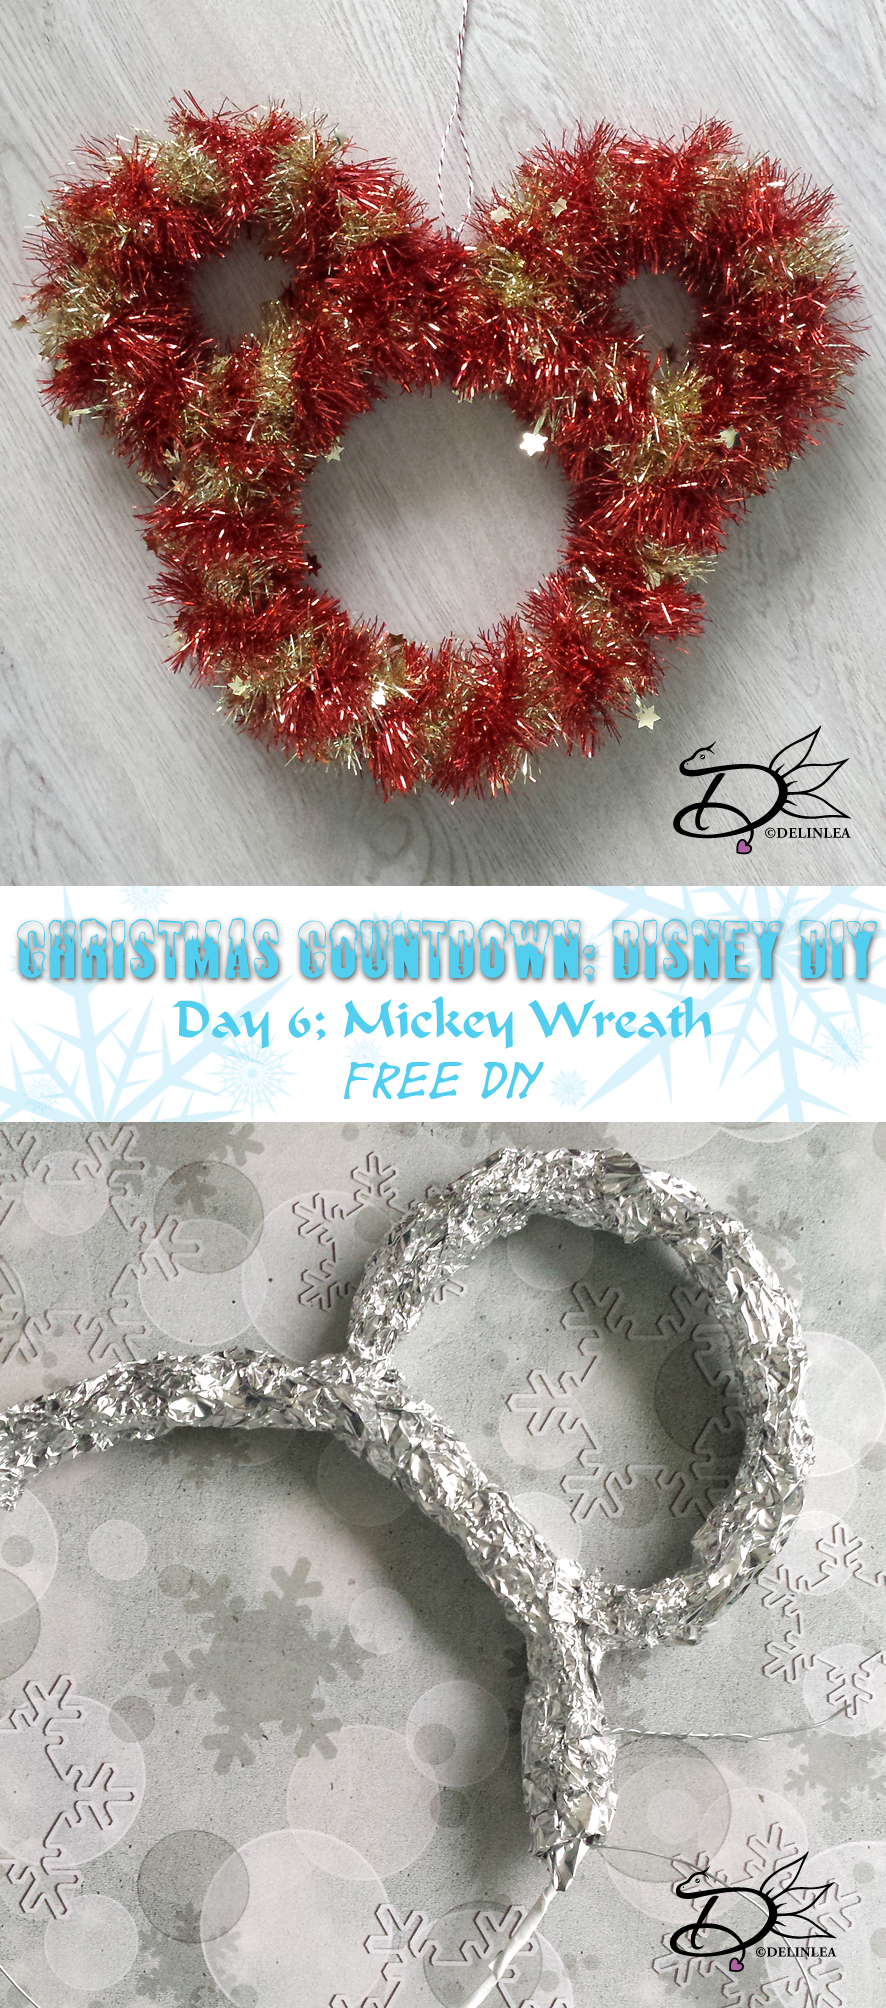
♥ Day 6: Mickey Wreath

6 december 2017 by Delinlea Leave a Comment

Hey Lovelies!

It’s Mickey Wreath time!! This easy, yet cute wreath is so much fun to make, and quit fast. You can use any color of garlands you want. The good thing with this DIY is that you probably have most materials at home already. So you can start right away! ^-^

Mickey Wreath

For this DIY you’ll need:
♥ A Red and a Gold Garland (about 270cm in length).
♥ Wire.
♥ Aluminum foil.
♥ Paper. (optional)
♥ Pencil. (optional)
♥ Hot glue gun and glue.
♥ Something to cut the wire with.

♥ How to make the Wreath

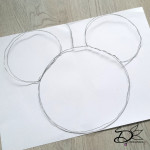
Start with drawing the shape you want, on to a piece of paper (I used 2 sheets of A4 and sticked them together). This template you will use to see if you bend the wire the right way. If you feel comfortable to bend the wire without template, go ahead!
The big circle of my Mickey head is about 20cm in section, to give you an idea how big mine is. Ofcourse you can make yours bigger or smaller.

Mickey Wreath Base

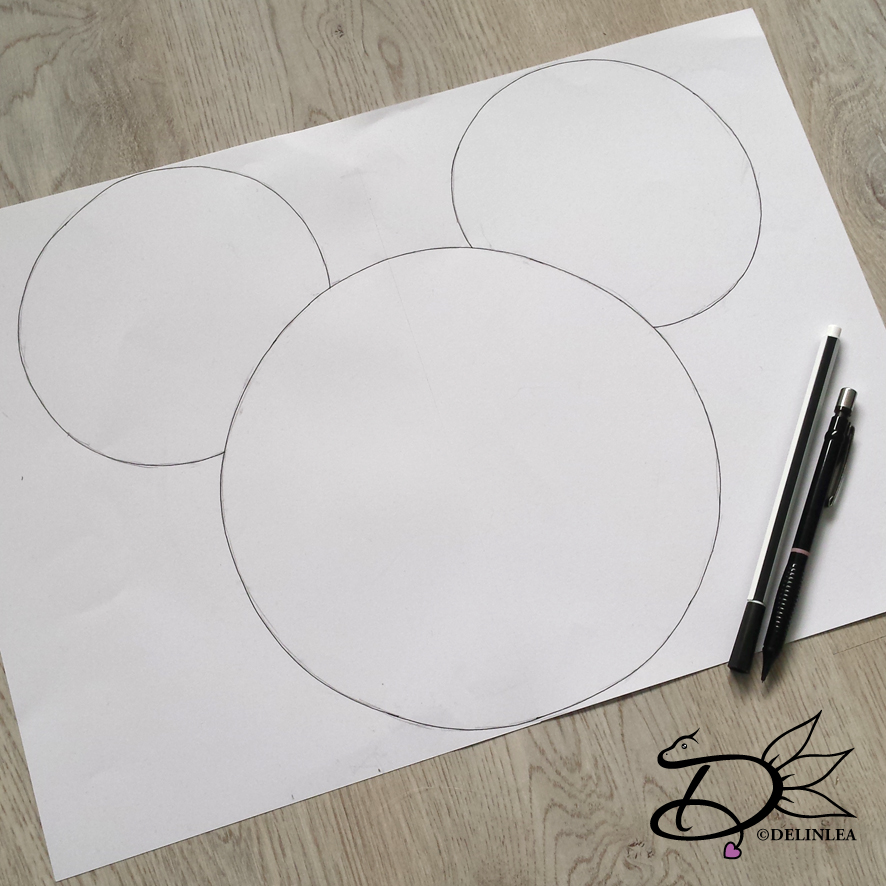
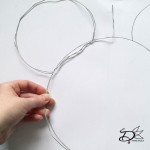
Next you will start bending the wire, if you use a template place these underneath. Just follow the lines and twist the wire where needed (the 1st picture underneath is a small schedule where to start and where to end). To secure the wire where I twisted it, I added some tape, but you can totally skip that.


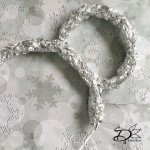
When you have the shape in wire you will start adding the aluminum foil around it, just add small strokes until you are happy with the thickness. I didn’t add to much, cause you need to keep in mind, that the garland will add to the thickness as well!


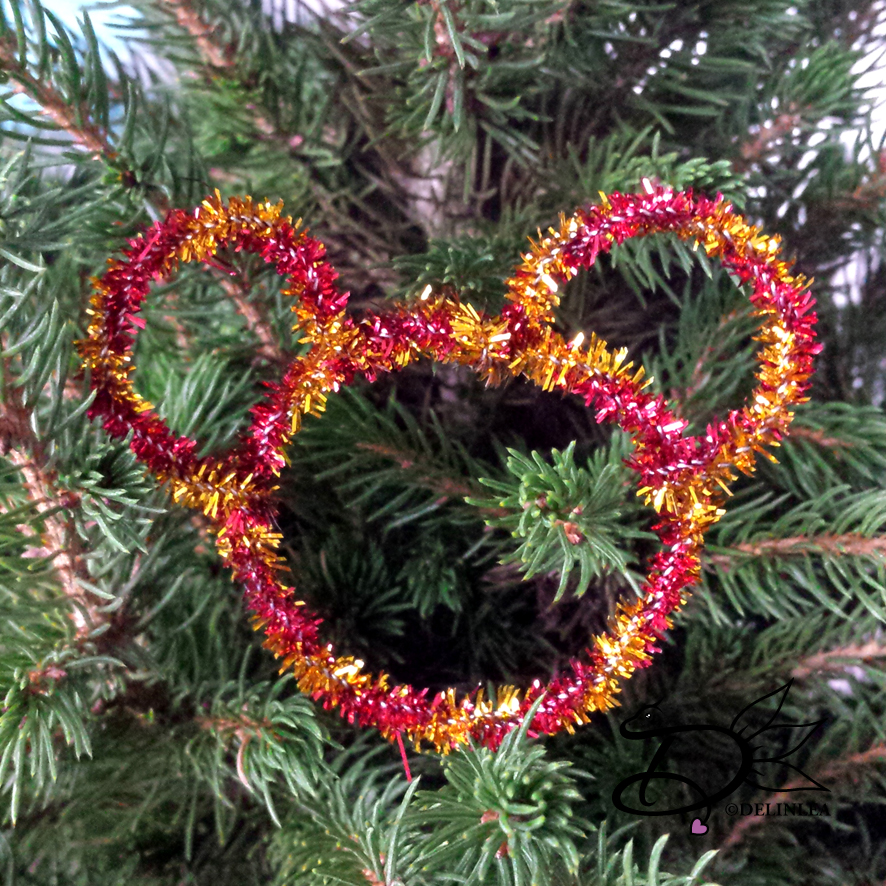
Now it’s time for the fun part! Wrapping the garlands around the base of wire and aluminum foil. Glue both of the garlands to the back of the base (at our starting point) and start wrapping it around. I did first a part of the big circle and then I did an ear and cutted it off and glued it to the base. Glued the Garlands to the base again and wrapped the rest of the big circle and did the other ear. When everything is covered with Garland you are pretty much done.

Mickey Wreath

The only thing left to do is, make a hook of the left over of the wire at the top of the head. Just bend it down in the middel so you have your hook, add yarn to it and hang it wherever you like in your home! And now, while writing this, I’m like how cute would it look with some light around the wreath as well..hmm..

And a little bonus, I made some small wreath to hang in the tree! Just take 2 pipe cleaners of 30 and twist them together and just like with the wire, bend them in the shape you want and you are ready ^-^

Mickey wreath small

Have a beautiful day everyone!
And don’t forget to show me your work with the #delinleaDIY

Love
Danielle


Posted in: Christmas, Christmas Countdown 2017, Crafting Tagged: Christmas, Christmas Countdown, Disney, DIY, Free, Mickey, Wreath

♥ Day 5: Pluto Tsum Tsum Amigurumi

5 december 2017 by Delinlea Leave a Comment

Hey Lovelies!

A new day has started so that means a new DIY is here! Today we will make Pluto, in his adorable Christmas outfit~! I always loved Pluto from when I was young, and I actually still do love him, always making a mess of everything! How can you not love him!?
What was your favorite character growing up?!

Lets’s go on the the pattern now!

So for this DIY you will need:
♥  Yarn: in the colors White, Yellow, Red and Black.
♥  Cloud Yarn in white (optional).
♥  Crochet hook.
♥  Stitch marker.
♥  Fiber fill.
♥  Yarn needle.
♥  Embroidery needle with thread or felt.(Black)
♥  Scissors.

Stitches used:
SC = Single Crochet.
ST = Stitch.
Inc = Increase.
Dec = Decrease.
Slst = Slip Stitch.
(…) = Repeat the space in brackets the given number of times.
[…] = Total number of stitches.

Pluto Tsum Tsum Amigurumi

♥ Pattern:

Body:
Start with White.

1: 6SC in magic ring. [6]
2: Inc in each st around. [12]
3: (1SC, inc), 6 times. [18]
4: (2SC, inc), 6 times. [24]
5: (3SC, inc) 2 times, 3SC, (1SC White and 1SC Yellow in the same st) Change back to White, (3SC, inc)3 times. [30]
6: (4SC, inc) 2 times, 3SC, change to Yellow, 1SC, inc, 1SC, Change back to White, 3SC, inc, (4SC, inc) 2 times. [36]
Change to Yellow.
7: SC in each st around. [42]
|
14: SC in each st around. [42]
Change to White Cloud Yarn.
15: SC in each st around. [42]
16: SC in each st around. [42]
Change to Red
17: SC in each st around. [42]
|
29: SC in each st around. [42]
30: (5SC, dec), 6 times. [36]
31: (4SC, dec), 6 times. [30]
32: (3SC, dec), 6 times. [24]
33: (2SC, dec), 6 times. [18] Stuff the body here.
34: (1SC, dec), 6 times. [12]
35: Dec around. [6]
Fasten off and weave in tail.

Snout:
In yellow, you won’t work in continues rounds.

1: Ch7, insert in 2nd chain from hook, 5SC, 3SC in the next st, 4SC, inc, slst in the first st. [14]
2: Ch1, inc, 4SC, inc 3 times, 4SC, inc 2 times, slst in the first st. [20]
3: Ch1, 20SC [20]
4: Ch1, 20SC [20]
Fasten off, leave long tail for sewing. Stuff the snout lightly.

Bump on his head:
in yellow.

1: 6SC in magic ring. [6]
2: Inc in each st around. [12]
3: (3SC, inc), 3 times. [15]
Fasten off and leave long tail for sewing, you don’t have to stuff this.

Pluto Tsum Tsum Amigurumi

Legs: (4)
In yellow.

1: 4SC in magic ring. [4]
2: Inc in each st around. [8]
3: SC in each st around. [8]
|
5: SC in each st around. [8]
Fasten off and leave a long tail for sewing. You don’t have to stuff the legs.

Ears: (2)
In black.

1: 6SC in magic ring. [6]
2: Inc in each st around. [12]
3: (3SC, inc), 3 times. [15]
4: SC in each st around. [15]
|
6: SC in each st around. [15]
7: (3SC, dec), 3times. [12]
8: SC in each st around. [12]
9: SC in each st around. [12]
10: (2SC, dec), 3 times. [9]
11: SC in each st around. [9]
16: SC in each st around. [9]
Fasten off and leave long tail for sewing. Stuff the ears lightly.

Tail:
In black.

Chain 9, insert in second chain from hook and make 8 slst. Fasten off and leave long tail for sewing.

Dots: (7)
In white.

5SC in magic ring. Fasten off and leave long tail for sewing.

Pluto Tsum Tsum Amigurumi

♥ Assembling:

To make sure you sew all parts in the right place, you can use some sewing pins to position them. When you are happy with the position, you can sew them on.
Sew the legs on to the bottom of the body, the front legs are pointing to the front. The back legs are pointing to the side.
His snout you will sew on covering the lower part of the white, which you used for the face. this way you create the shape of the eyes.
Sew the bump on his head, right in the middle. Then you sew on the ears, sew them to the sides of his head.
The tail you’ll sew on his butt. right where you like it.
Sew the dots on his jacket, nicely spread around.
For the eyes and nose you can either choose to use felt or you can embroider them on. I chose to embroider them on, cause yeah why choose the easy way haha. But which way you choose, Pluto will look cute.

I hope you had fun with this patten and I hope my pattern is clear.  If you have any questions, leave a comment below and I’ll get back to you.

I would love to see what yours look like! Leave a link in the comments below or tag me on Twitter or Instagram and use the #DelinleaDIY.

And to those who live in the Netherland, Fijne Sinterklaas!!

Have fun and Good luck~

Love
Danielle


Posted in: Christmas, Christmas Countdown 2017, Crafting, Tsum Tsum Tagged: Christmas, Christmas Countdown, Disney, DIY, Free Pattern, Pluto, Tsum Tsum

♥ Day 4: Christmas Card

4 december 2017 by Delinlea Leave a Comment

Hey Lovelies!!

With the days around Christmas we always wanna wish many people a Merry Christmas. The most traditional way is to send out cards to everyone we love. So I couldn’t let this Countdown go without making a Christmas card tutorial. Imagine how happy people would be to receive a card that’s made personally, where time has been spend on, instead of buying and send it away. I know, I would feel loved with a card that’s handmade! That people would have spend their precious time to make something for me.

Tsum Tsum Christmas card

Just follow the steps in the picture, and color it the way you want!

Tsum Tsum Christmas Card Doodle

But how fun would it be to alternate the picture a bit, that instead that you draw mickey, you draw Winnie the Pooh or Olaf. Or go loose on the bauble, Stripes, dots or even apply glitter.

Here is the card I made, just an example of how you can color it. And I just couldn’t help myself, I had to draw a Baby Dragon with a Mickey Tsum, so cute, right!?

Tsum Tsum Christmas Card and Dragon

Have fun with this little tutorial! And remember, I would love to see what you create! Leave a link in the comments below or tag me on twitter or instagram. #DelinleaDIY

Love
Danielle

Posted in: Christmas, Christmas Countdown 2017, Crafting, Tsum Tsum Tagged: Card, Christmas, Christmas Countdown, Disney, DIY, Tsum Tsum

♥ Day 3: Minnie Tsum Tsum Amigurumi

3 december 2017 by Delinlea 2 Comments

Hey Lovelies!

Since we have made a Mickey Tsum Tsum, we need to make Minnie Tsum Tsum as well. You can’t have a Mickey without Minnie, right?!
Anyway, time is going so fast haha, I hope you have some time to make at least a few of the DIYs I post. These days are always so hectic. So, lets relax a bit with making these cuties. Here’s the pattern for Minnie.

Minnie tsum tsum

So for this DIY you will need:
♥  Yarn: in the colors Beige, Black, Red, Yellow and White.
♥  Cloud Yarn in white (optional).
♥  Crochet hook.
♥  Stitch marker.
♥  Fiber fill.
♥  Yarn needle.
♥  Embroidery needle with thread or felt.(Black)
♥  Scissors.

Stitches used:
SC = Single Crochet.
DC = Double Crochet.
ST = Stitch.
Inc = Increase.
Dec = Decrease.
Slst = Slip Stitch.
(…) = Repeat the space in brackets the given number of times.
[…] = Total number of stitches.

Minnie Tsum Tsum

♥ Pattern:

Body:
Start with Beige.

1: 6SC in magic ring. [6]
2: Inc in each st around. [12]
3: (1SC, inc), 6 times. [18]
4: (2SC, inc), 6 times. [24]
5: (3SC, inc) 2 times, 3SC, (1SC Beige and 1SC Black in the same st) Change back to Beige, (3SC, inc)3 times. [30]
6: (4SC, inc) 2 times, 3SC, change to Black, 1SC, inc, 1SC, Change back to Beige, 3SC, inc, (4SC, inc) 2 times. [36]
7: 5SC, inc, 2SC, change to Black, 3SC, inc, (5SC, inc) 2 times, 3SC, change Back to Beige, 2SC inc, 5SC inc. [42]
8: 8SC, change to black, 24SC, Change to Beige, 10SC. [42]
Change to Black.
9: SC in each st around. [42]
14: SC in each st around. [42]
Change to Red.
15: SC in each st around. [42]
16: Work in back loops only, SC in each st around. [42]
17: SC in each st around. [42]
|
26: SC in each st around. [42]
Change to White
27: Work in back loops onlu, SC in each st around. [42]
28: SC in each st around. [42]
29: SC in each st around. [42]
30: (5SC, dec), 6 times. [36]
31: (4SC, dec), 6 times. [30]
32: (3SC, dec), 6 times. [24]
33: (2SC, dec), 6 times. [18] Stuff the body here.
34: (1SC, dec), 6 times. [12]
35: Dec around. [6]
Fasten off and weave in tail.

Now join in the front loops of row 16 with Cloud yarn (or white if you don’t have the fluffy stuff) and Crochet 42 SC. Fasten off and weave in tail.

For her Skirt, join in the front loops of row 27 with Red.
1: SC in each st around. [42]
2: SC in each st around. [42]
3: (1SC, skip 1 st, 6DC in the next st, skip one st) 10 times. [66]
Fasten off and weave in tail.

Dots on her dress: (10)

Crochet 5SC in magic ring and fasten off. leave a long tail for sewing.

Minnie Tsum Tsum

Legs: (4)
Make 2 with white and 2 with yellow.

1: 4SC in magic ring. [4]
2: Inc in each st around. [8]
3: SC in each st around. [8]
|
5: SC in each st around. [8]
Fasten off and leave a long tail for sewing. You don’t have to stuff the legs.

Ears: (4)
In black.

1: 6SC in magic ring. [6]
2: Inc in each st around. [12]
3: (1SC, inc), 6 times. [18]
4: (2SC, inc), 5 times. [21] Fasten off.

Now sew 2 of the ears together so you get nice puffy ears, don’t stuff them tho.

Tail:

Chain 9, insert in second chain from hook and make 8 slst. Fasten off and leave long tail for sewing.

Bow:
In red.

1: CH22, insert in 3rd chain from hook, 20DC, turn [20]
2: Ch1, 20DC, turn [20]
3: Ch1, 20DC. [20]
Fasten off and sew both ends together so you get a circle. Keep the sewd together part in the middle wher the middle band of the bow comes and flatten it.

Middle part of the bow:
In red.

1: Ch 9, insert in 2nd chain from hook, 8SC, turn. [8]
2: Ch1, 8SC, turn. [8]
3: Ch1, 8SC. [8]
Fasten off and sew both ends together and place it in the middle of the main part of the bow. The easiest way to do this to sew it around it. Leave long tail to sew it onto her head.

Minnie Tsum Tsum

♥ Assembling

To make sure you sew all parts in the right place, you can use some sewing pins to position them. When you are happy with the position, you can sew them on.
Sew the legs on to the bottom of the body, the front legs are pointing to the front. The back legs are pointing to the side.
As for the ears, sew them about 2 or 3 layers from the face. Use my photo’s as a guideline to place them on the right spot.
In the middle of the ears, sew the bow. and fluff it up a bit.
The tail you’ll sew on her butt.
Sew the Dots on her skirt.
For the eyes and nose you can either choose to use felt or you can embroider them on. I chose to embroider them on, cause yeah why choose the easy way haha. But which way you choose, Minnie will look cute.

I hope my pattern is clear.  If you have any questions, leave a comment below and I’ll get back to you.

I would love to see what yours look like! Leave a link in the comments below or tag me on Twitter or Instagram and use the #DelinleaDIY.

Have fun making Minnie! Good luck~

Love
Danielle


Posted in: Christmas, Christmas Countdown 2017, Contest, Crafting, Tsum Tsum Tagged: Amigurumi, Christmas, Christmas Countdown, Disney, DIY, Minnie mouse, Tsum Tsum

♥ Day 2: Contest Time

2 december 2017 by Delinlea Leave a Comment

Hey Lovelies!

Edit: Contest deadline extended!

So today is a little bit different from all the other DIYs I have planned. It doesn’t involve any Disney characters, but Dragons, baby Dragons! I just couldn’t do a Christmas countdown without any dragon, I love them to much for that.
Also if you join this one, you can win some prizes! Are you getting excited already?!

Okay, so, it’s coloring contest time! I have drawn this baby dragon Christmas tree, and it’s up to you how you color it. You can use anything you want, colored pencils, markers, glitter, flowers..well anything xD let the creative juices flow~. (You can color it digitally, but I prefer the traditional way, just saying xD). Just download your PDF or JPEG from this link, and print it out on the paper you prefer, and start!

Dragon Christmas Tree

There will be one winner. But maybe if there are a lot of people joining, I’ll extend that to 3. Now to the question that’s in your mind, yes, I know it’s there. (secretly I can read minds xD)

What can you win?!
♥  A Crochet Baby Dragon, made by me.
♥  4 Mechanical pencils HB.
♥  24 Mini gelpens.
♥  A print of Choise.
♥  Pretty colored paper.

I hope you like those prizes. ^-^
Now on to the important, but boring part. The rules.

Rules:

♥ The contest is World Wide!
♥  If you are under 18 make sure you have permission from your parents or legal guirdian to give me your adress in case you win.
♥  You can enter only 1 time.
♥  Deadline is 25 december 2017  January 2018, 23:59 CET.
♥  To enter, send me an e-mail (delinlea@gmail.com) with a scan or picture of your work. Or you can post it on instagram/twitter with the #DelinleaChristmasContest and tag me.

I can’t wait to see what you all will create with the line art I drew! I hope many of you will join, Good luck to everyone!

Love
Danielle

Disclaimer: You are only allowed to use this line art for this contest or for personal use. You are not allowed to use it in any other way.

Dragon Christmas Tree

Posted in: Christmas, Christmas Countdown 2017, Contest, Crafting, Tsum Tsum Tagged: Christmas, Christmas Countdown, Coloring Contest, Dragon, Fantasy
« Vorige 1 2 3 4 5 6 Volgende »

What are you looking for?!

My Socials

Ko-Fi

I love making all these free things for you, tho it would be very helpfull if you can support me on Ko-Fi! (You don’t have to tho, totally up to you!)

Ko-Fi Shop!!

In my Ko-Fi shop you can find PDF Amigurumi Patterns!! You can pay easily with PayPal.
Go to the shop here!!

Recent Blog Posts

  • ♥ Happy 2022!
  • ♥ Day 12; Lights
  • ♥ Day 11; Flower Deco
  • ♥ Day 10; Snowman
  • ♥ Day 9; Gingerbread Houses

Recent Comments

  • Delinlea op ♥ Pua Tsum Tsum Amigurumi
  • Marfermar op ♥ Free Pattern; Easter Bunny
  • mary op ♥ Pua Tsum Tsum Amigurumi
  • Delinlea op ♥ Life Update + Kittens
  • Delinlea op ♥ Amigurumi Ghost

Categories

  • animation
  • Beadwork
  • Blogmas 2018
  • Blogmas 2020
  • Blogmas 2021
  • Books
  • Bujo
  • Christmas
  • Christmas CAL 2019
  • Christmas Countdown 2017
  • Contest
  • Crafting
  • Crochet
  • Drawing
  • Drawing Lesson
  • Easter
  • Geen categorie
  • Life
  • Miniature
  • Nail Art
  • New Year
  • Paper
  • plush
  • Pokemon
  • Poseable Art Doll
  • Recipe
  • Sewing
  • Shop Pattern
  • Sinterklaas
  • Social Media
  • Tsum Tsum
  • Ufufy

Copyright © 2023 Delinlea - My little fantasy world.

Family WordPress Theme by themehall.com