Delinlea - My little fantasy world
  • ♥ Home
  • ♥ About Me
  • ♥ Blogmas 2021
  • ♥ Free Patterns
    • ♥ Amigurumi; Spring/Easter
    • ♥ Amigurumi; Fall/Halloween
    • ♥ Amigurumi; Winter
    • ♥ Amigurumi Tsum Tsum
    • ♥ Amigurumi Ufufy
    • ♥ Amigurumi Others
    • ♥ Christmas Countdown 2017
    • ♥ Blogmas 2018
    • ♥ Blogmas 2020
  • ♥ Tutorials
    • ♥ Easter
    • ♥ Home Deco
    • ♥ Others
  • ♥ Drawing Lessons
  • ♥ FanFic
    • ♥ Chapter 1
    • ♥ Chapter 2
    • ♥ Chapter 3
    • ♥ Chapter 4
    • ♥ Chapter 5
    • ♥ Chapter 6
    • ♥ Chapter 7
  • ♥ Gallery
    • ♥ Crafts
    • ♥ Drawings
    • ♥ Poseable Art Dolls
  • ♥ Links
  • ♥ Contact
    • Privacy Policy

flowers

♥ Spring Wreath from Scratch

9 april 2020 by Delinlea Leave a Comment

Hey Lovelies! I love making wreath’s, they just give that little extra to your home. And the fun thing is that you can make them however you like. Since we had some cuttings from the garden that I didn’t wanna waste. I decide to make a wreath with it. And I’ll gonna try to explain to you how to make your own. And also give you an idea how you can decorate it with links to tutorials I used.

For this DIY you’ll need:
♥ 100-200cm Twigs, preferably those that are flexible, like from a Willow. Freshly cut twigs are easier to work with. It depends on what you go for on how many twigs you need, but make sure to have plenty.
♥ Pruning Shears.
♥ Things to decorate, like flowers, greens, succulents, etc.

Tutorial

Start with one of you longest twigs, keep your hand at the thick side and bend this one carefully in a circle to the size you want. Mine is about 22cm. When you are happy with the size, wrap the end of the twig around itself. This way it will hold it shape, sorta, without the need of using glue or wire.

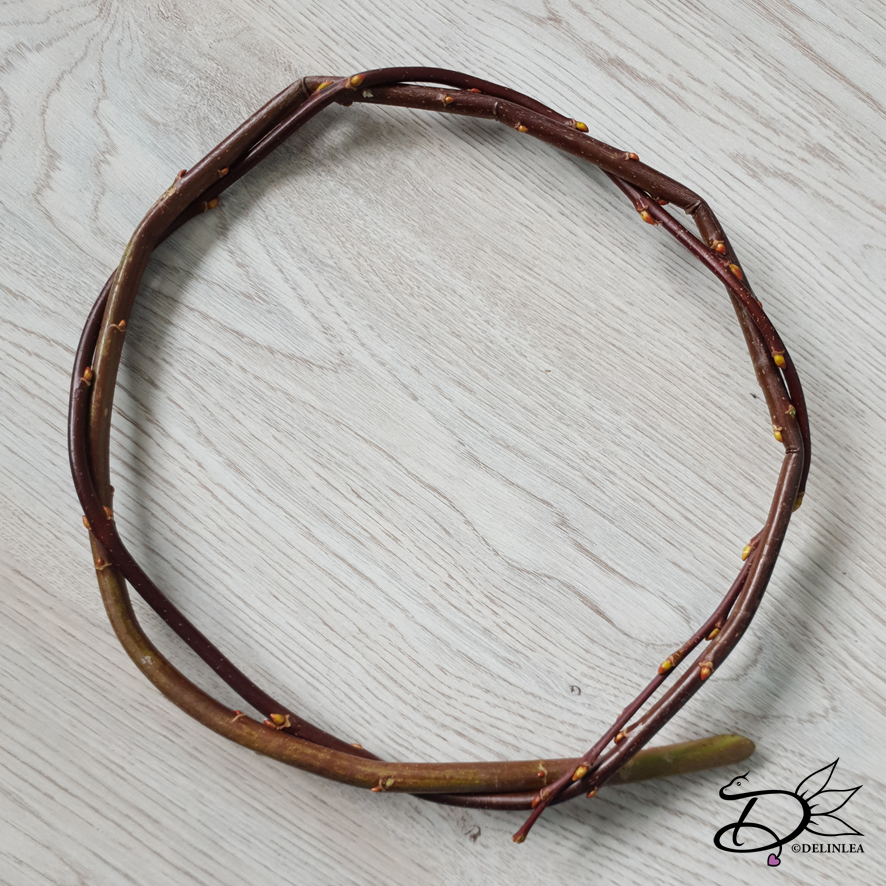
Don’t worry if your circle isn’t perfect, you can adjust that along the way.

Now start adding more twigs, I always added the thick side of the twig, at what you choose to be the back, and wrap it around the base circle you made.  If you keep the same flow as the first one, you get one like I made. But you can also make it more messy if you prefer.  Let’s just have fun and see what you can make with materials from nature!

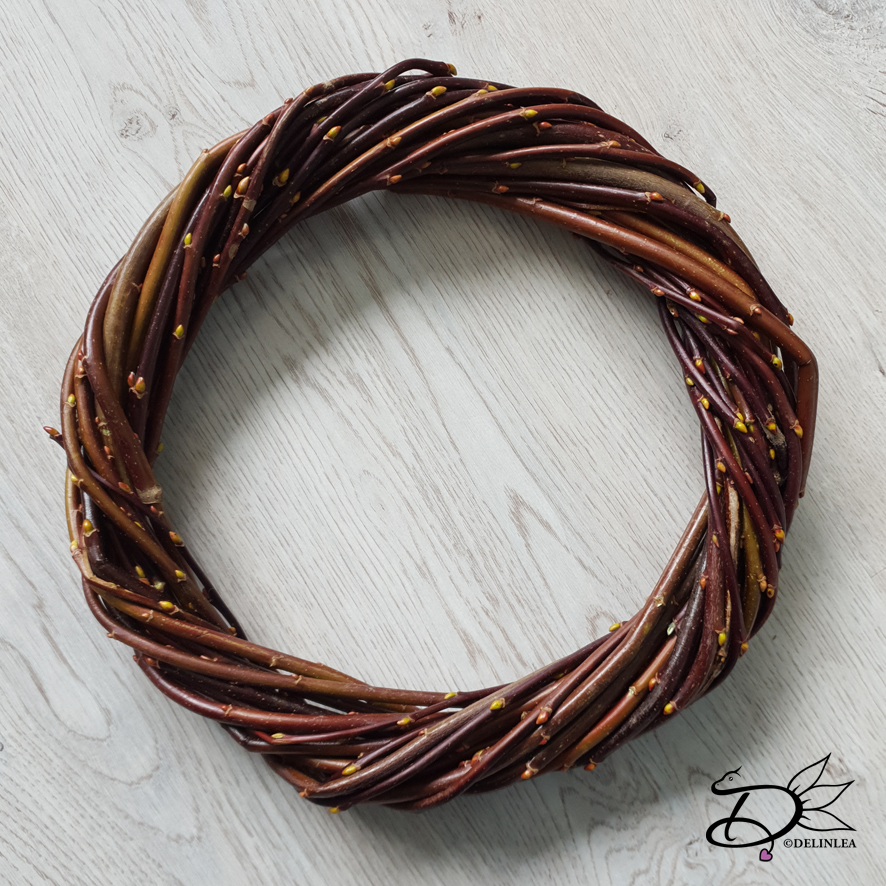
Like I said, along the way you can adjust the shape into a more perfect circle, keep checking what your wreath needs. Add twigs until you are happy with the size and thickness of the whole thing.

And that’s basically it for a basic wreath! it’s not that hard, just need to be careful not to break the twigs. But practice makes perfect!
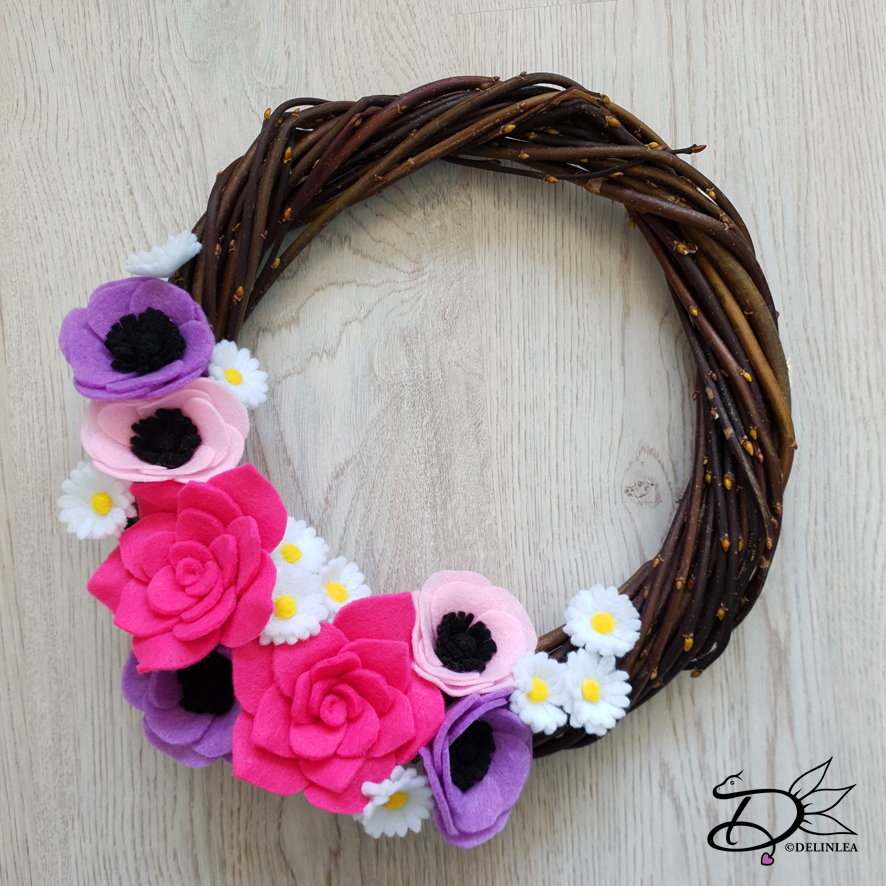
Decorating

For decorating you can use anything that suits you, I chose to make flowers from felt and add those. Since it’s spring, I wanted to use more pastel tints and  flowers that would bloom now. These are the ones I made, some kind of Rose, Anemone and Daisies.

Here are the tutorials I used, but as usual, I didn’t really followed them along and just modified to whatever I wanted xD. I’m always this person that just start something and then follow along my own rules. Haha.

Link to Rose tutorial.
Link to Anemone tutorial.
Link to Daisy tutorial.

I hope you will have fun making your own wreath!! I love to make things from scratch and be happy with the end result. Plus this really makes you home looks happier!

Have a wonderful day!

Love
Danielle

Posted in: Crafting, Easter Tagged: DIY, felt, flowers, Tutorial, twigs, Wreath

♥ Paper Quilled Egg

12 maart 2020 by Delinlea Leave a Comment

Hey Lovelies! I hope you are doing well with all the virus stuff going on! It’s getting pretty critical here in the Netherlands, but it doesn’t bother me much. Since I can craft all day, every day, I have no time to be bored! xD. For today’s blog I found my quilling stuff back, it’s been ages since I used it, but it’s paper, and anything paper, I love. Not sure why xD just a little obsession I guess. I will explain to you how to make a 3D quilled egg, which works awesome for easter! I hope you will enjoy this tutorial!

Paper Quilled Egg

For this DIY you’ll need:
♥ 5 Purple Strokes of 3mm by 7cm.
♥ 25 Pink Strokes of 3mm by 10,5cm.
♥ Green Strokes of 3mm by 10,5cm, as many as you want.
♥ Quilling Tools, but you can use alternatives, in the past I never used quilling tools.
♥ Glue.
♥ Styrofoam Egg, about 4cm in height. (You can use larger, but then you’ll need more of the other supplies as well).
♥ Tweezers. (optional)
♥  (Sewing) Pins.

Tutorial Paper Quilled Egg

If you don’t know what Quilling or paper Quilled things are, I suggest you to look some up! It’s really fun!

Rolling the Papers

Start with rolling up all the paper strokes. The Purple ones you just keep them as is and use some glue at the end of the stroke to keep it from unwinding.

The Greens and Pinks you’ll let them expand to a width of 8mm. I had a quilling board with different size circles, which made it really easy to get the right size every time. As for those as well, glue the end of the stroke so it won’t unwind any further.

Shaping

The pink ones you pinch at one side. The Green at two sides.  See the image below to see the shapes they need to have. Continue this for all the pinks and greens.

Making the Egg

Now you need the Styrofoam egg, you need to decide now if you wanna leave the egg in or that you wanna be able to remove it. If you wanna remove it, like I did, make sure you won’t glue the pieces to the egg.

Start off with drawing a line on the egg, as you can see in the picture, my egg already had a line from the making process. Divide this line in 3 even parts. Take the 5 purple parts and add those with a pin. so 3 on the line, 1 on top and 1 on the bottom.

Around the Purple parts, glue 5 Pink parts, so you will create some kind of flowers. Use pins to keep all parts in place until it’s dry.

Lastly, in between the flowers you just made, add the green parts. They will be the leaves. Those you can glue however you want, but you want to connect all flowers together. If you won’t connect everthing, it will fall apart, and that’s not what you want. (If you decided to keep the egg in the inside, it doesn’t matter if it’s connected or not).
However, in order to be able to remove the egg, don’t use glue around the line from earlier. This way you’ll have a upper and lower half which you will glue together after removing the egg. Make sure to make some marks to which part goes where, or the shape will be lost.

Before you remove the egg though, make sure everything has dried well and is hard enough to hold its shape. So glue’s take 24hours to be completely hardened.

You could add a piece of thread to the top of the egg to be able to hang it as decoration!

I hope you liked this Quilled Paper Egg tutorial! It’s fun to do something else a crocheting all the time xD. It’s funny, that before I figured out how to crochet, I only used paper to create things. Now I barely use paper, while I have a huge stack  *Hides

Have a wonderful day everyone!

Love
Danielle

Posted in: Crafting, Easter, Paper Tagged: Easter, egg, flowers, paper, papierfilligraan, quilled, Quilling, Tutorial

What are you looking for?!

My Socials

Ko-Fi

I love making all these free things for you, tho it would be very helpfull if you can support me on Ko-Fi! (You don’t have to tho, totally up to you!)

Ko-Fi Shop!!

In my Ko-Fi shop you can find PDF Amigurumi Patterns!! You can pay easily with PayPal.
Go to the shop here!!

Recent Blog Posts

  • ♥ Happy 2022!
  • ♥ Day 12; Lights
  • ♥ Day 11; Flower Deco
  • ♥ Day 10; Snowman
  • ♥ Day 9; Gingerbread Houses

Recent Comments

  • Delinlea op ♥ Pietje Gnome Amigurumi
  • Delinlea op ♥ Toy Story Alien TsumTsum Amigurumi
  • Delinlea op ♥ Pua Tsum Tsum Amigurumi
  • Charli op ♥ Free Pattern; CNY Mouse Amigurumi
  • Peter Pesch op ♥ Pietje Gnome Amigurumi

Categories

  • animation
  • Beadwork
  • Blogmas 2018
  • Blogmas 2020
  • Blogmas 2021
  • Books
  • Bujo
  • Christmas
  • Christmas CAL 2019
  • Christmas Countdown 2017
  • Contest
  • Crafting
  • Crochet
  • Drawing
  • Drawing Lesson
  • Easter
  • Geen categorie
  • Life
  • Miniature
  • Nail Art
  • New Year
  • Paper
  • plush
  • Pokemon
  • Poseable Art Doll
  • Recipe
  • Sewing
  • Shop Pattern
  • Sinterklaas
  • Social Media
  • Tsum Tsum
  • Ufufy

Copyright © 2025 Delinlea - My little fantasy world.

Family WordPress Theme by themehall.com