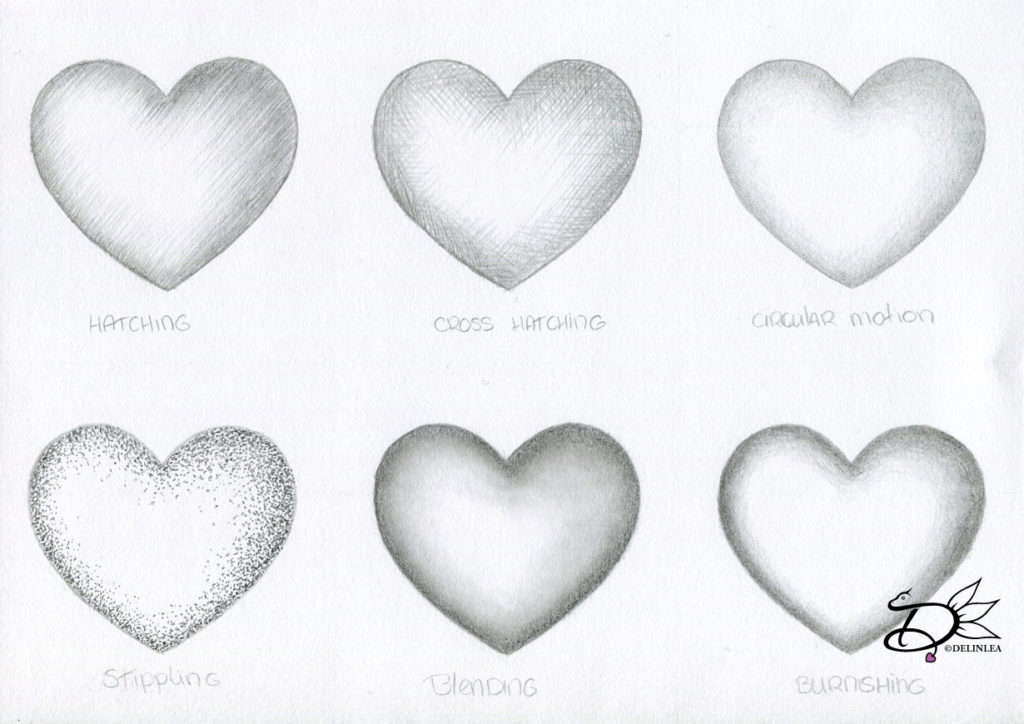
Hey Lovelies! It’s the 2nd Thursday of the month and I decided to keep that day for our drawing lessons. I hope you are fine with that. Today I wanted to talk a bit about shading, because last time I talked how you can start drawing, as in the outlines for any subject. Shading is important to get a 3D effect in your drawing.
Shading you can do in many ways, I’ll try to cover most of them. A lot of techniques are avaible, you should just try them all and then figure out with what technique you are comfortable with and, maybe most important, what the outcome must look like. Sometimes it takes a while to get comfortable with a certain technique. Practice will pay off in the end. Don’t give up after one try. Drawing takes time to learn.

Hatching
By drawing short or longer lines you can create depth. You usually draw them in one direction/parallel with this technic. The more lines you draw in one area, the dark the shade will be.
Cross hatching
Is almost the same as hatching, only here, you will draw the lines in different directions. They cross each other in many ways. The same here, more lines in one place is a darker shade.
Circular motion
You basicly draw in small cicles to create depth. By drawing in small circles you won’t have a stop and ending point of your pencil while drawing, so no extra pressure on your pencil. The pressure with circles is usually continues, this will create a smoother outcome. Add more layers to create darker areas.
Stippling/Pointlism
By adding a lot of dots to your drawing, you can also create shades. This is often done with markers. but you can do it with pencil as well, just becareful not to damage either your paper or your pencils. The more dots you add to one spot, the darker the area. This will take a lot of time to do tho, but sometimes the outcome can be very interresting. For example if you need to draw something sparkly.
Smudging/blending
Most of the times this will be used in combination of
blending stumps/tissues/qtips/etc. You apply some graphite (or else) lightly to
an area you wanna shade, with, for example a blending stump you blend it out
for a smooth finish. Repeat until you have the darkness you want.
(Just a side note, don’t use your fingers. On your fingers are always oils from
your skin, this will affect the blending, it won’t be smooth and after some
years in can affect your drawing.)
Burnishing
Usually used with colored pencil, not really with graphite. You basicly apply a lot of pressure to your pencil, this way you can get a smooth/darker result. But, there’s a but in this, you damage the tooth of your paper. When there is no tooth left, you can’t apply more layers. If you use thin paper, you can even rip it. Please be careful if you use this technique.
For me, personally, I love to use the circular motion technique. I have never been a fan of anything else. I did smudging with my fingers in the beginning, when I just started out. I just didn’t had the knowledge. Since I am a self-taught artist, I always had to learn things the hard way haha. I wouldn’t have liked to learn it another way tho. Just let me play around with the things around me and I’ll be happy.
I hope you will play around as well, remember, there’s no right or wrong in art. Whatever people will say. All ‘Rules’ are made by humans, why follow them all the time?
Have a wonderful day!
Love
Danielle
