Delinlea - My little fantasy world
  • ♥ Home
  • ♥ About Me
  • ♥ Blogmas 2021
  • ♥ Free Patterns
    • ♥ Amigurumi; Spring/Easter
    • ♥ Amigurumi; Fall/Halloween
    • ♥ Amigurumi; Winter
    • ♥ Amigurumi Tsum Tsum
    • ♥ Amigurumi Ufufy
    • ♥ Amigurumi Others
    • ♥ Christmas Countdown 2017
    • ♥ Blogmas 2018
    • ♥ Blogmas 2020
  • ♥ Tutorials
    • ♥ Easter
    • ♥ Home Deco
    • ♥ Others
  • ♥ Drawing Lessons
  • ♥ FanFic
    • ♥ Chapter 1
    • ♥ Chapter 2
    • ♥ Chapter 3
    • ♥ Chapter 4
    • ♥ Chapter 5
    • ♥ Chapter 6
    • ♥ Chapter 7
  • ♥ Gallery
    • ♥ Crafts
    • ♥ Drawings
    • ♥ Poseable Art Dolls
  • ♥ Links
  • ♥ Contact
    • Privacy Policy

haken

♥ Crochet Plant Pots, Senecio rowleyanus part 3

15 februari 2018 by Delinlea Leave a Comment

Hey Lovelies!

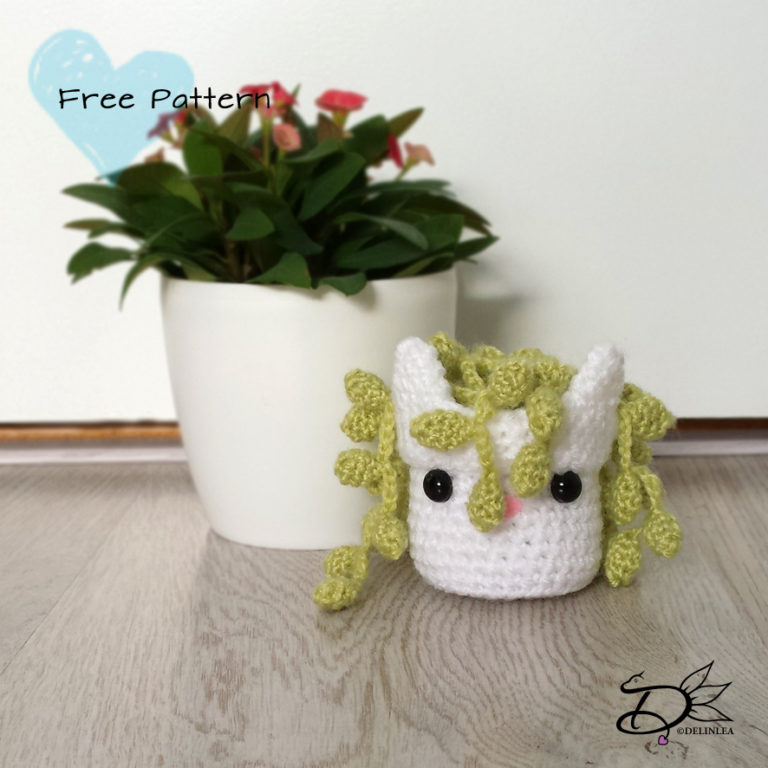
A new week for a new DIY! For this weeks DIY I will continue the plant pots! We will make a Senecio rowleyanus plant! I always loved these succulents, but I thought I never would own a real one. Never saw one in our stores.. until, some time ago! I bought a tiny plant, it will grow bigger soon I hope! haha I just love these! Anyway I wanted to crochet one as well so here we go!

Oh BTW, before we start, here you can find how to make the plant pot itself, and here you can find how to make a Sanseviera Plant.

For this DIY you’ll need.
♥  Wool, in Green and Brown.
♥  Crochet hook.
♥  Stitch marker.
♥  Yarn needle.
♥  Scissors.
♥  Toilet roll tube. (optional)

Stitches used:
CH = Chain.
SC = Single Crochet.
ST = Stitch.
Inc = Increase.
Dec = Decrease.
Slst = Slip Stitch.
(…) = Repeat the space in brackets the given number of times.
[…] = Total number of stitches.

Pattern:

Soil/ground:
in Brown.

1: 1: 6SC in magic ring. [6]
2: SC in each ST around. [12]
3: (1SC, inc), 6 times. [18]
4: (2SC, inc), 6 times. [24]
5: SC in each st around. [24]
Fasten off and leave long tail for sewing.

Senecio rowleyanus small chain: (5)
In Green.

1: Chain 20
2: Insert hook in 2nd chain, 4SC, insert hook in 1st ST. [4]
3: Inc in each ST around. [8]
4: SC in each ST around. [8]
5: Dec all around. [4]
Fasten Off and weave in tail. Now, repeat row 2-5, two more times. Space them evenly on the chain. I did them in about every 5th chain. You will end up with 3 balls/leaves on the chain.

To make different lengths of the leave chains. I have used a count of 25CH and 35CH. For the 25CH I have 4 balls/leaves, make these 4 times. For the 35CH I have 6 balls/leaves, make these 3 times.

Assembling

Cut down your toilet roll tube to about 4 cm long, and place this inside you plant pot. I did this, so the pot will keep it’s shape. This is optional, you don’t have to do it.
Sew all of the Leave chains one by one to the soil/ground. I spaced them kinda evenly in the middle, but you can do it however you like them best.
Now sew in your soil/ground just above the toilet roll tube, or if you didn’t use it, just a bit under the edge of the pot. Make Sure to stuff the pot lightly before you entirly closed it with the soil/ground.

And you are done with your adorable plant pot with plant. Next week I will teach you how to make another plant, the last one. After we are done with the plant pots I will come up with something new! ^-^ And don’t forget to share your Senecio rowleyanus plant with the #DelinleaDIY

Have a nice day everyone!

Love
Danielle


Posted in: Crafting, Crochet Tagged: Amigurumi, Crochet, DIY, Free Pattern, haken, plant, Senecio rowleyanus

♥ Crochet Plant Pots, Sanseviera part 2

1 februari 2018 by Delinlea Leave a Comment

Hey Lovelies!

Last week I gave you a pattern of adorable crochet plant pots! You could make 3 versions, and leave them as they are.

But as promised I will teach you to make a fake plant for them! The best thing is that when you finish it, you don’t have to care for it at all, and it will stay as pretty as it is! Awesome, right?!

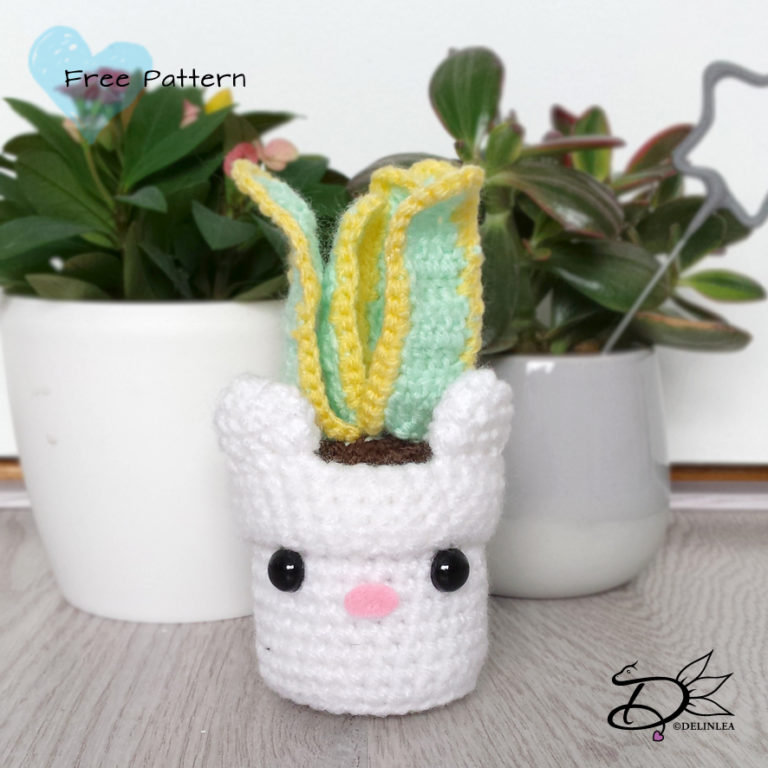
So, I decided to make a Sanseviera today. It’s a pretty easy plant to crochet but looks still cute. I made it with pastel colors but you are free to change it up to your likings! ^-^

For this DIY you’ll need.
♥  Wool, in Pastel Green and Pastel Yellow and Brown
♥  Crochet hook.
♥  Stitch marker.
♥  Yarn needle.
♥  Scissors.
♥  Toilet roll tube. (optional)

Stitches used:
SC = Single Crochet.
DC = Double Crochet.
ST = Stitch.
Inc = Increase.
Dec = Decrease.
Slst = Slip Stitch.
(…) = Repeat the space in brackets the given number of times.
[…] = Total number of stitches.

Pattern:

Soil/ground:
in Brown.

1: 1: 6SC in magic ring. [6]
2: SC in each ST around. [12]
3: (1SC, inc), 6 times. [18]
4: (2SC, inc), 6 times. [24]
5: SC in each st around. [24]
Fasten off and leave long tail for sewing.

Sanseviera leave small: (3)
Start with Pastel Green.

1: Chain 6, insert in 3rd chain from hook, 4DC, Turn. [5]
2: Chain 2 (this will count as the first DC), 4DC, Turn. [5]
|
4: Chain 2, 4DC, Turn. [5]
5: Chain 2, 2DC, Dec, Turn. [4]
6: Chain 2, 1DC, Dec, Turn. [3]
7: Chain 2, Dec,  [2]
Fasten Off and leave long tail for sewing.
Now, crochet with Pastel Yellow, SC around the 2 long sides of the leave, Fasten off and weave in tail.

Sanseviera leave large: (3)
Start with Pastel Green.

1: Chain 6, insert in 3rd chain from hook, 4DC, Turn. [5]
2: Chain 2 (this will count as the first DC), 4DC, Turn. [5]
|
6: Chain 2, 4DC, Turn. [5]
7: Chain 2, 2DC, Dec, Turn. [4]
8: Chain 2, 1DC, Dec, Turn. [3]
9: Chain 2, Dec,  [2]
Fasten Off and leave long tail for sewing.
Now, crochet with Pastel Yellow, SC around the 2 long sides of the leave, Fasten off and weave in tail.

Assembling

Cut down your toilet roll tube to about 4 cm long, and place this inside you plant pot. I did this, so the pot will keep it’s shape. This is optional, you don’t have to do it.
Now sew in your soil/ground just above the toilet roll tube, or if you didn’t use it, just a bit under the edge of the pot. Make Sure to stuff the pot lightly before you entirly closed it with the soil/ground.
Get your 3 small leave and sew those together, you only have to sew the short side of the leaves together. Now sew your 3 large leaves around the 3 small ones.
When all the leaves are sewn together to your likings, then sew them to the soil/ground. You can also use (hot) Glue if you are lazy haha.

And you are done with your adorable plant pot with plant. Next week I will teach you how to make another plant, or maybe the week after, since Valentines day is coming up as well, maybe I’ll do a DIY for that.

Until then, and stay Healthy and Safe!

Love
Danielle
Bonus picture, my cat didn’t give me the plant back anymore, Dangerous xD.

Posted in: Crafting, Crochet Tagged: Amigurumi, Crochet, cute, DIY, Free Pattern, haken, plant, sanseviera

♥ Crochet Plant pots Part 1

25 januari 2018 by Delinlea Leave a Comment

Hey Lovelies!

I’m sorry, I’m a bit late with today’s post, had a lot to do. I also went to the opening of Pipoos Alkmaar today, only due to traffic jam we missed the ribbon cutting *cries*. But I love how the store looks, maybe a bit more ‘gezelligheid’ needs to be added, ha I don’t know a word for that in English! Anyway, I didn’t buy to much, only things I needed now. But I’m sure I’ll go there more often haha. RIP wallet.

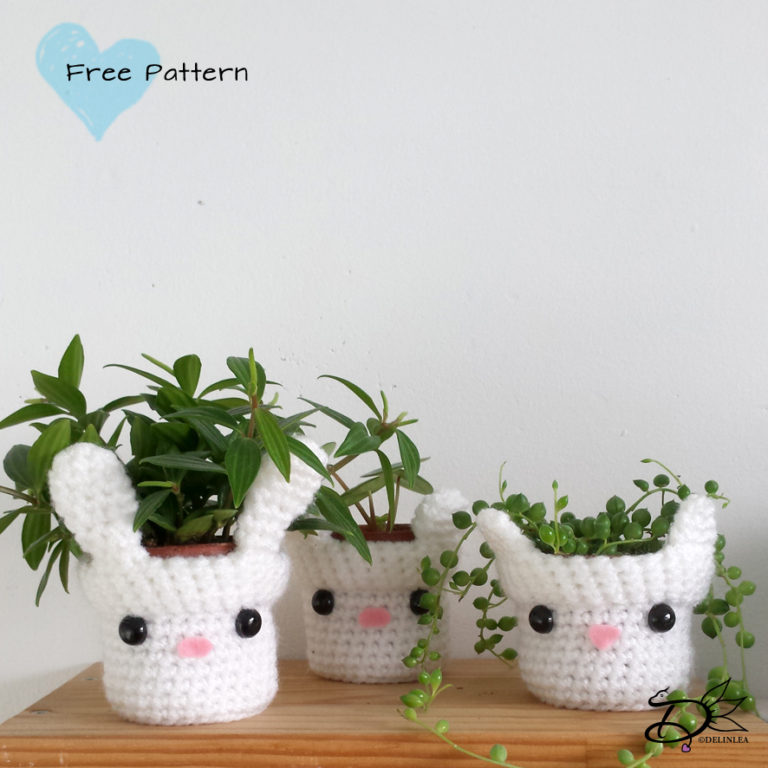
For today’s DIY I split it up in parts. So today we will crochet some plant pots, you can use them like this as plant pot covers, but in some follow up DIYs I will explane how you can crochet plants for them as well, not sure how many it gonna be for now, but we will see.

For this DIY you’ll need.
♥  Wool, in white. (I used Royal from the Zeeman, 100g/241m.)
♥  Crochet hook.
♥  Stitch marker.
♥  Yarn needle.
♥  Scissors.
♥  (Safety) Eyes. (I cutted of the pins and glued them on).
♥  Pink Felt.
♥  (Hot) Glue (+ Glue Gun.)

Stitches used:
SC = Single Crochet.
ST = Stitch.
Inc = Increase.
Dec = Decrease.
Slst = Slip Stitch.
(…) = Repeat the space in brackets the given number of times.
[…] = Total number of stitches.

Pattern:

Pot Base:

1: 6SC in magic ring. [6]
2: SC in each ST around. [12]
3: (1SC, inc), 6 times. [18]
4: (2SC, inc), 6 times. [24]
5: (3SC, inc), 6 times. [30]
6: 30 SC in Back Loops only. [30]
7: 30 SC in each ST around. [30]
|
20: 30 SC in each ST around. [30]
Fasten off and weave in tail. Now fold about 3 rows back, so you’ll get that pot idea.

I made 3 different sets of ears, you can either make them all of choose which you like the most. You can choose from, Bunny, Bear or Cat.

Bunny Ears: (2)

1: 6SC in magic ring. [6]
2: (1SC, inc), 3 times. [9]
3: SC in each ST around. [9]
|
5: SC in each ST around. [9]
5: (1SC, dec), 3 times. [6]
6: SC in each ST atound. [6]
|
9: SC in each ST around. [6]
Fasten off and leave long tail for sewing.

Bear Ears: (2)

1: 6SC in magic ring. [6]
2: Inc in each ST around. [12]
3: SC in each ST around. [12]
4: (1SC, dec), 4 times. [9]
Fasten off and leave long tail for sewing.

Cat Ears: (2)

1: 4SC in magic ring. [4]
2: (1SC, inc), 2 times. [6]
3: (2SC, inc), 2 times. [8]
4: (3SC, inc), 2 times. [10]
Fasten off and leave long tail for sewing.

Assembling:

When you are done with making all the parts, you can now sew on the ears on top of the place where the fold is, on top of the pot. You can use safety pins to check if you like the position before you sew them on.
Glue on the eyes where you like them best and cut a nose from the fabric, glue those on as well! Now you have a cute plant pot cover. Or you can wait for my blog next week, to make a fake and easy plant to put in.

I hope you enjoyed this weeks DIY. And see you next week.

Love
Danielle.


Posted in: Crafting, Crochet Tagged: Amigurumi, cover, Crochet, cute, Free Pattern, haken, kawaii, Plant pot
« Vorige 1 2 3 4 5 … 24 25 26 27 28

What are you looking for?!

My Socials

Ko-Fi

I love making all these free things for you, tho it would be very helpfull if you can support me on Ko-Fi! (You don’t have to tho, totally up to you!)

Ko-Fi Shop!!

In my Ko-Fi shop you can find PDF Amigurumi Patterns!! You can pay easily with PayPal.
Go to the shop here!!

Recent Blog Posts

  • ♥ Happy 2022!
  • ♥ Day 12; Lights
  • ♥ Day 11; Flower Deco
  • ♥ Day 10; Snowman
  • ♥ Day 9; Gingerbread Houses

Recent Comments

  • Delinlea op ♥ Pietje Gnome Amigurumi
  • Delinlea op ♥ Toy Story Alien TsumTsum Amigurumi
  • Delinlea op ♥ Pua Tsum Tsum Amigurumi
  • Charli op ♥ Free Pattern; CNY Mouse Amigurumi
  • Peter Pesch op ♥ Pietje Gnome Amigurumi

Categories

  • animation
  • Beadwork
  • Blogmas 2018
  • Blogmas 2020
  • Blogmas 2021
  • Books
  • Bujo
  • Christmas
  • Christmas CAL 2019
  • Christmas Countdown 2017
  • Contest
  • Crafting
  • Crochet
  • Drawing
  • Drawing Lesson
  • Easter
  • Geen categorie
  • Life
  • Miniature
  • Nail Art
  • New Year
  • Paper
  • plush
  • Pokemon
  • Poseable Art Doll
  • Recipe
  • Sewing
  • Shop Pattern
  • Sinterklaas
  • Social Media
  • Tsum Tsum
  • Ufufy

Copyright © 2025 Delinlea - My little fantasy world.

Family WordPress Theme by themehall.com