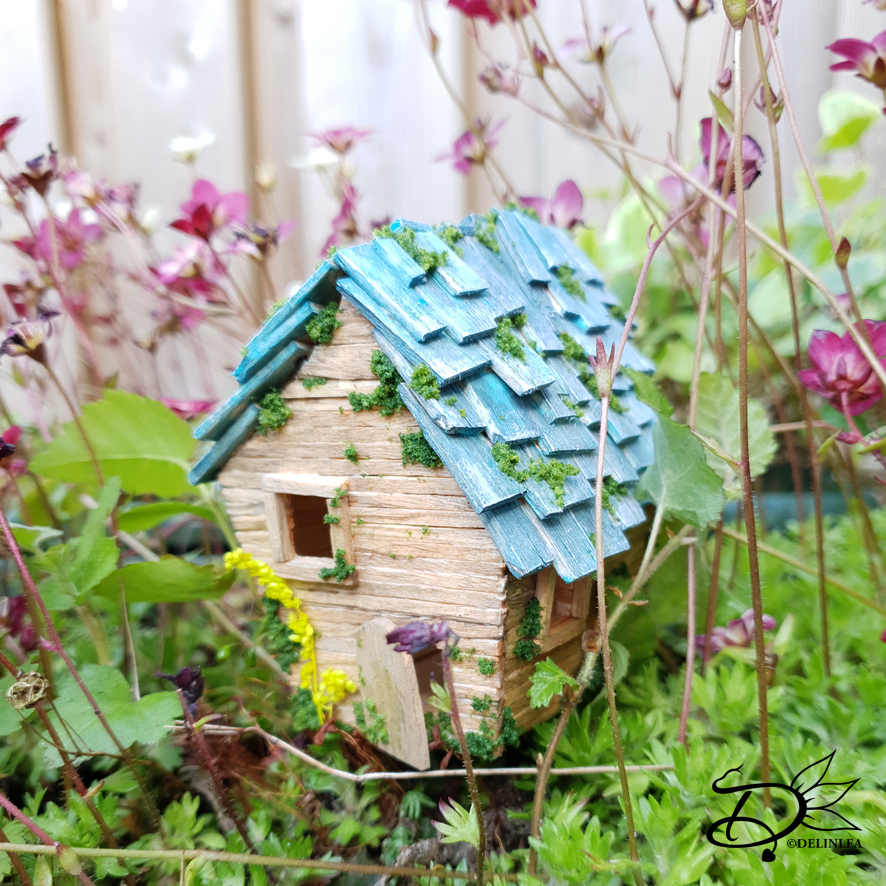
Delinlea - My little fantasy world
  • ♥ Home
  • ♥ About Me
  • ♥ Blogmas 2021
  • ♥ Free Patterns
    • ♥ Amigurumi; Spring/Easter
    • ♥ Amigurumi; Fall/Halloween
    • ♥ Amigurumi; Winter
    • ♥ Amigurumi Tsum Tsum
    • ♥ Amigurumi Ufufy
    • ♥ Amigurumi Others
    • ♥ Christmas Countdown 2017
    • ♥ Blogmas 2018
    • ♥ Blogmas 2020
  • ♥ Tutorials
    • ♥ Easter
    • ♥ Home Deco
    • ♥ Others
  • ♥ Drawing Lessons
  • ♥ FanFic
    • ♥ Chapter 1
    • ♥ Chapter 2
    • ♥ Chapter 3
    • ♥ Chapter 4
    • ♥ Chapter 5
    • ♥ Chapter 6
    • ♥ Chapter 7
  • ♥ Gallery
    • ♥ Crafts
    • ♥ Drawings
    • ♥ Poseable Art Dolls
  • ♥ Links
  • ♥ Contact
    • Privacy Policy

Author: Delinlea

♥ Fairy House

14 mei 2020 by Delinlea Leave a Comment

Hey Lovelies! I always love those fairy house, you can place with you plants or in your garden. And since I am a plant lover, I needed those in my life. When I was cleaning my room I found a bunch of those popsicle sticks and matchsticks. I thought these were the perfect materials to make a fairy house with. And, sure, while writing this, I could also have used fake leaves for the roof or so. Okay, I guess I will make more in the future haha. Those are much fun to make. I hope you will have fun as well!

For this DIY you’ll need:
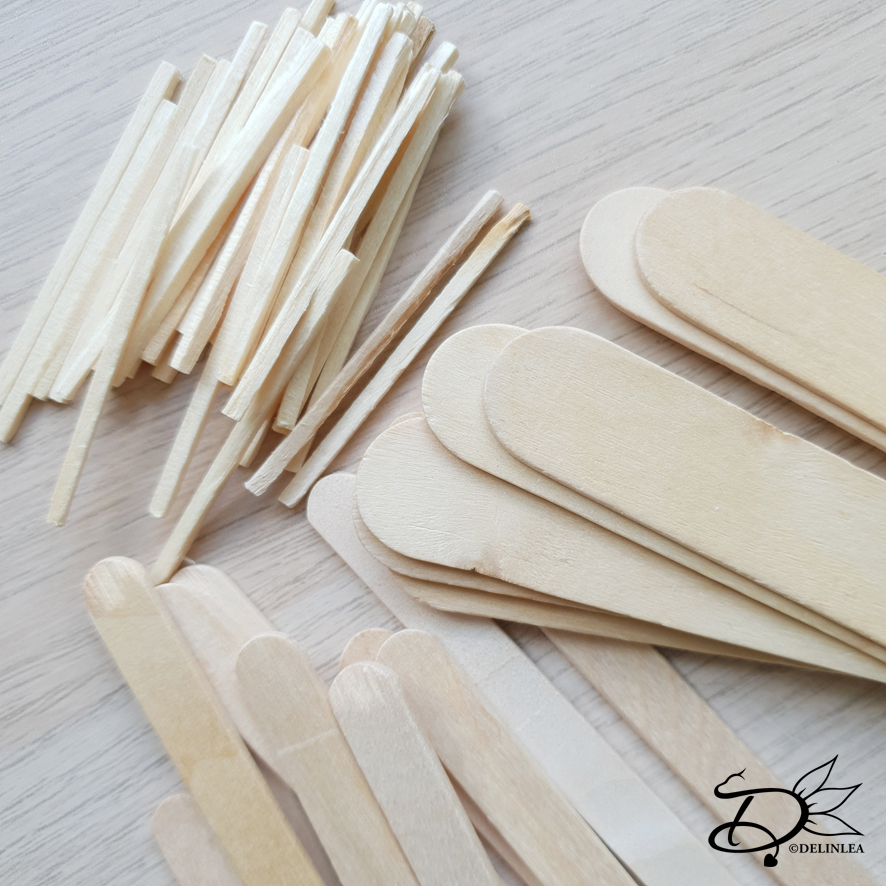
♥ Popsicle sticks.
♥ Matchsticks.
 ♥ Glue.
♥ This Template. (Or draw something yourself)
♥  (Masking) Tape.
♥ Paint.
♥ Brushes.
♥ Scissors where you’ll be able to cute the popsicle and matchsticks with.
♥ Cutting Mat. (Optional)
♥ Cling Film. (Optional)
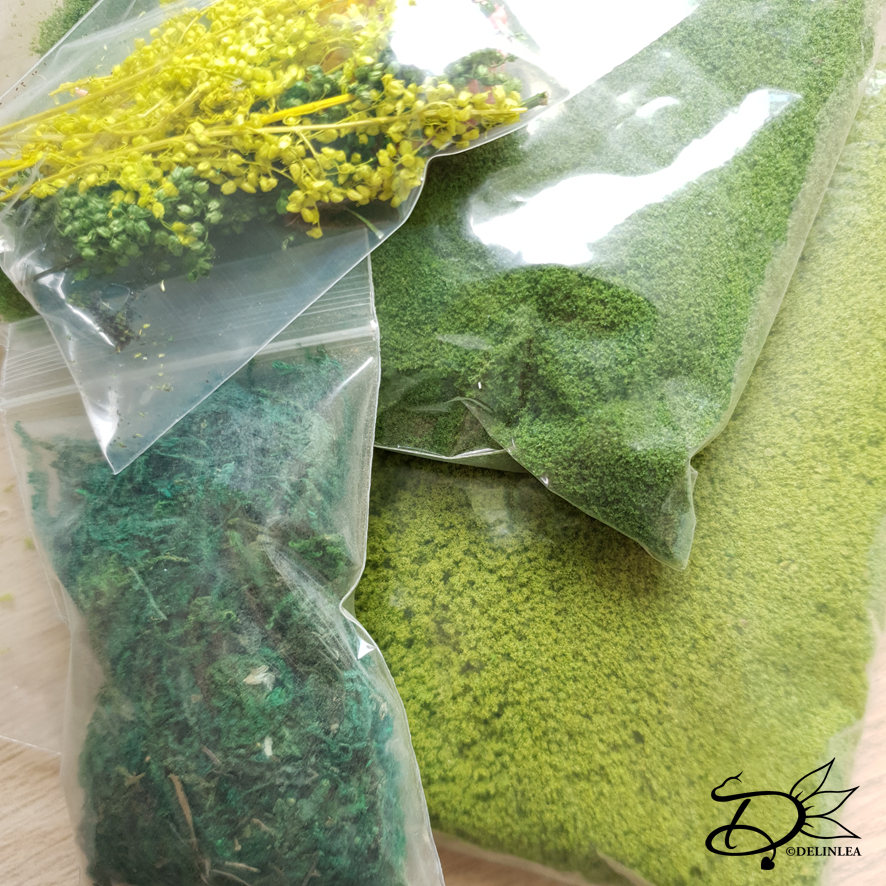
♥ Fake Moss. (Optional)
♥ Anything else you wanna decorate with. (Optional)

Tutorial Fairy House

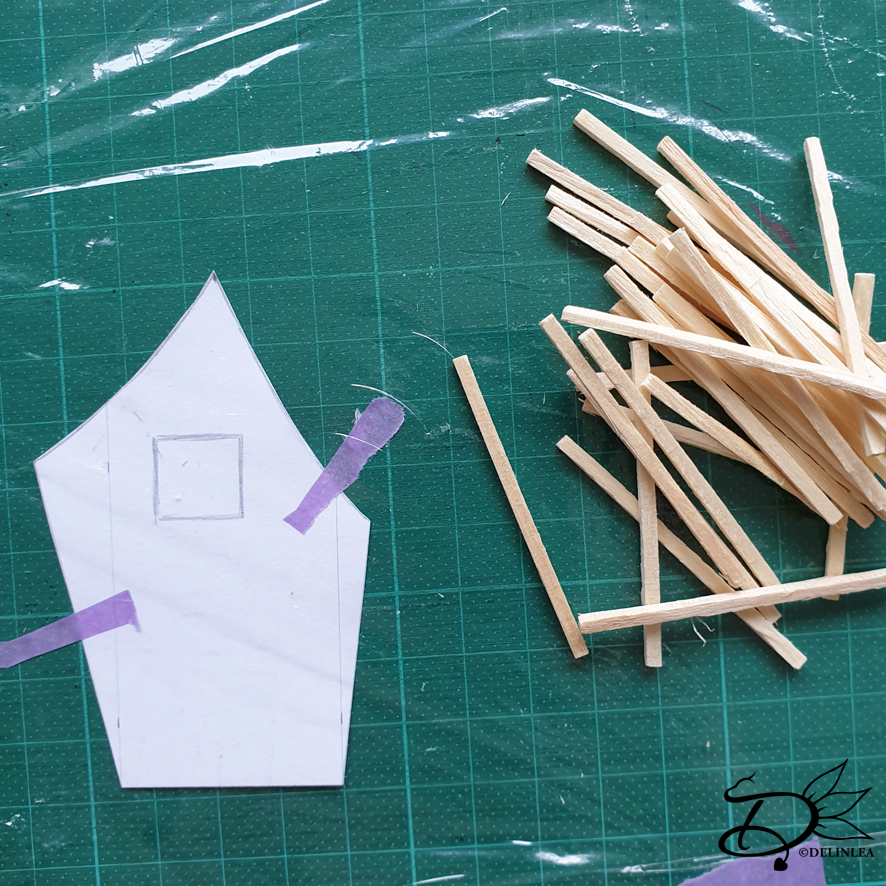
Start with cutting out this template or your self-drawn template. (Yes, there is no template for the roof, I’ll explain that later). Tape this to a flat surface you don’t mind to get glue on. I used my cutting mat. Over the template I used some cling film to make sure to wooden sticks won’t get glued to the template. (Cling film I could easily remove even it was glued together).

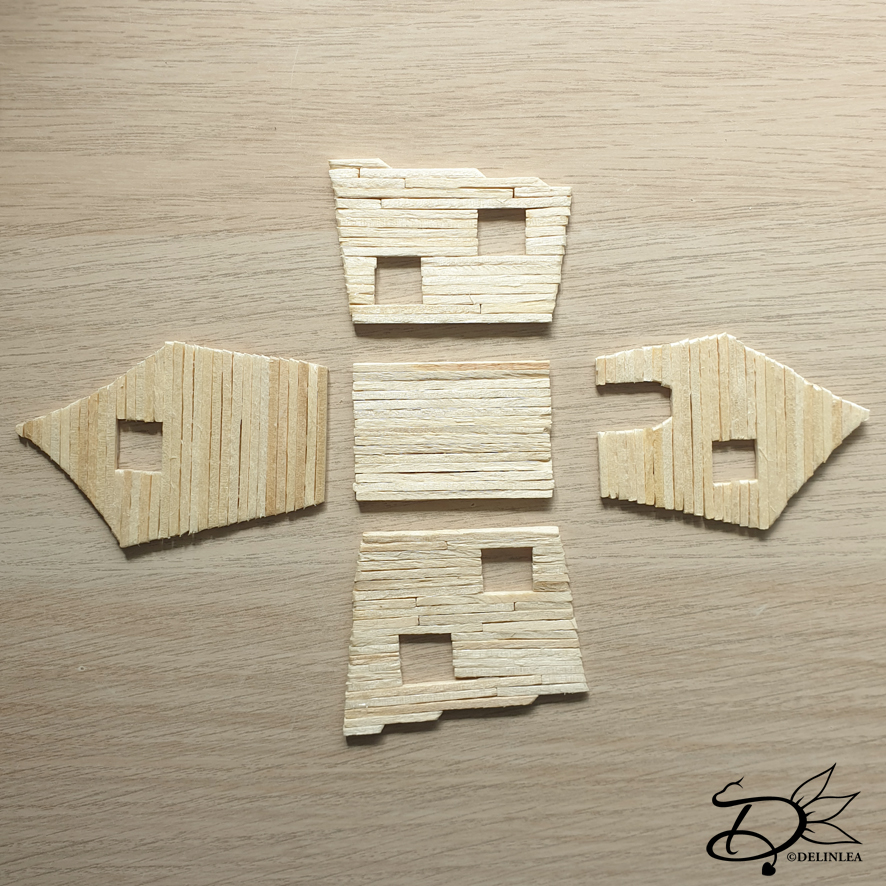
Make all parts of the house

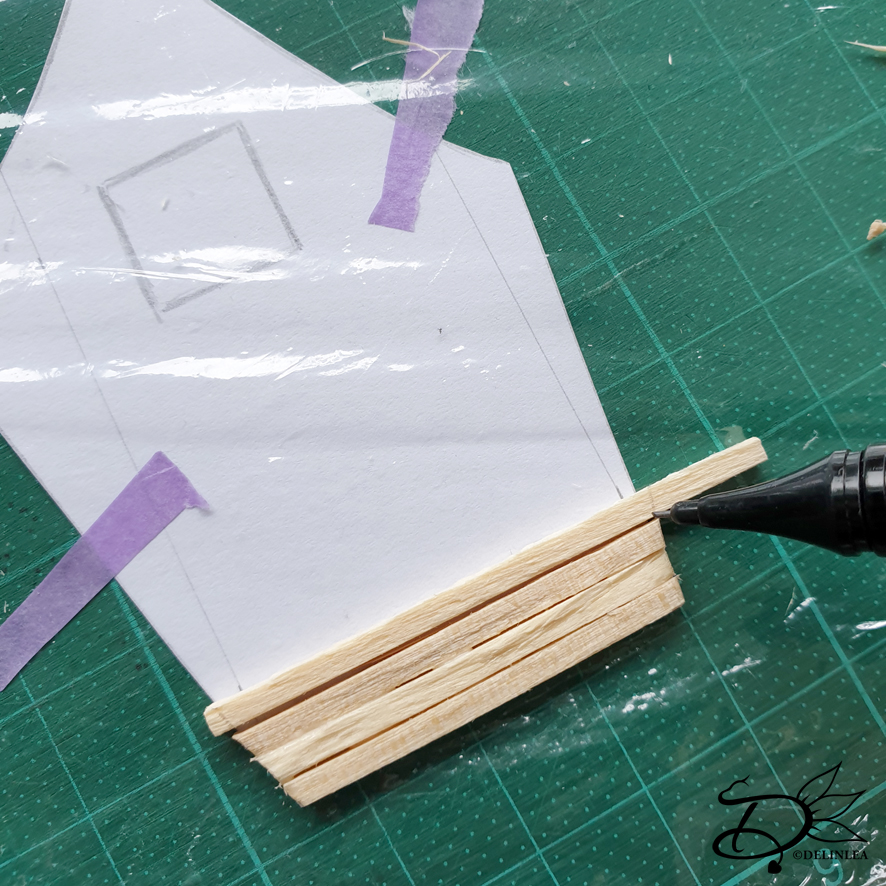
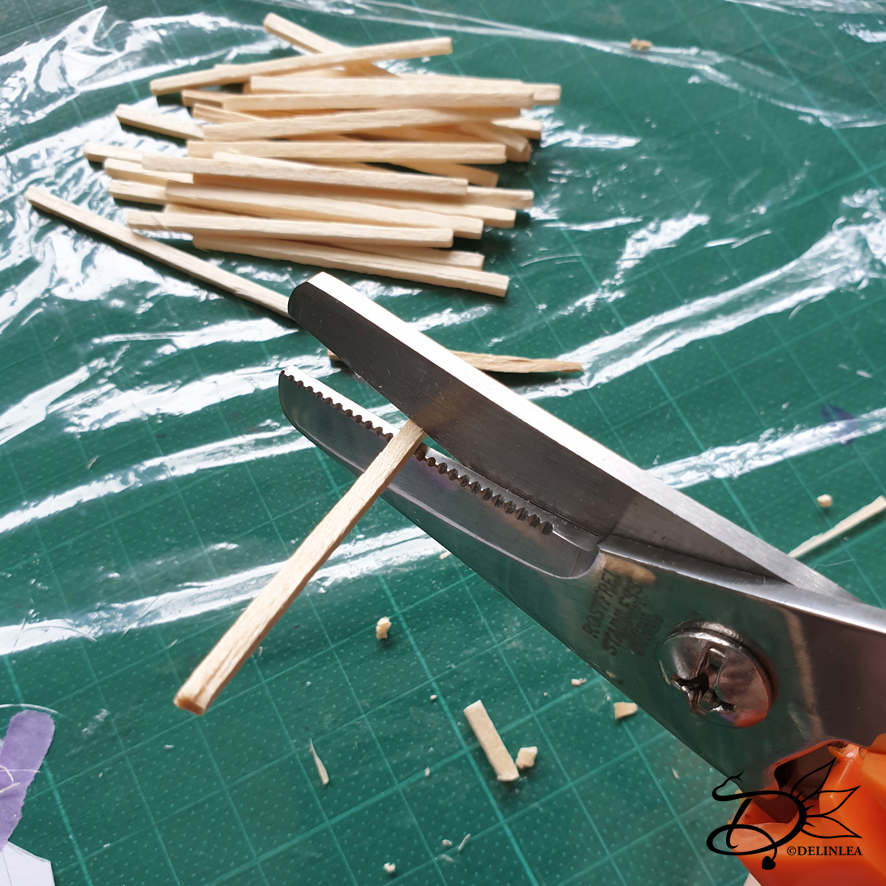
Place the sticks one by one on the template, draw a line if your stick is too long and trim it down with sharp scissors. Glue them one by one each time on top of the other, following the template.

When you have one side done, leave it to dry and continue to make all the other side’s as well. If you made all sides, before moving on, make sure they dry properly, preferably over night.
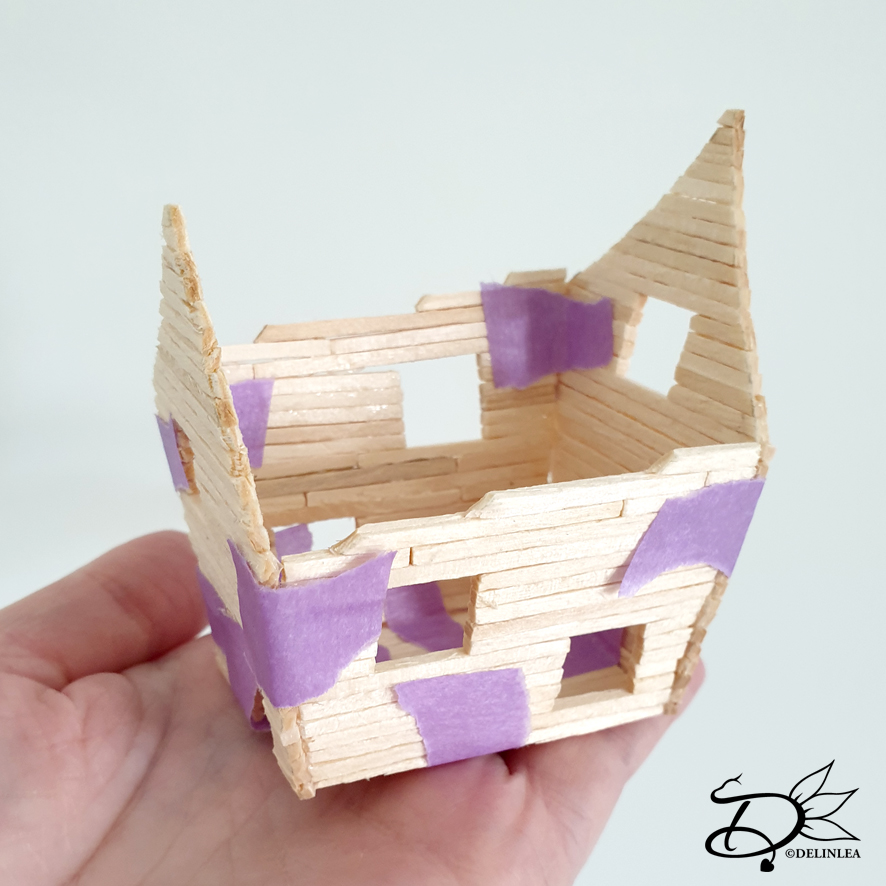
Build the house

All parts are dry, now it’s time to build the house! I placed the floor on a flat surface, and start to glue the front and the back of the house first. Put some glue on the place that touch each other and use tape, that you can remove later, to hold the piece together until it dried. Then place the sides of the house, with glue, between the front and back. Use more tape to hold those pieces together as well. it can be a bit of a stuggle, sometimes you need to let a piece dry before you continue. Just try what works for you.

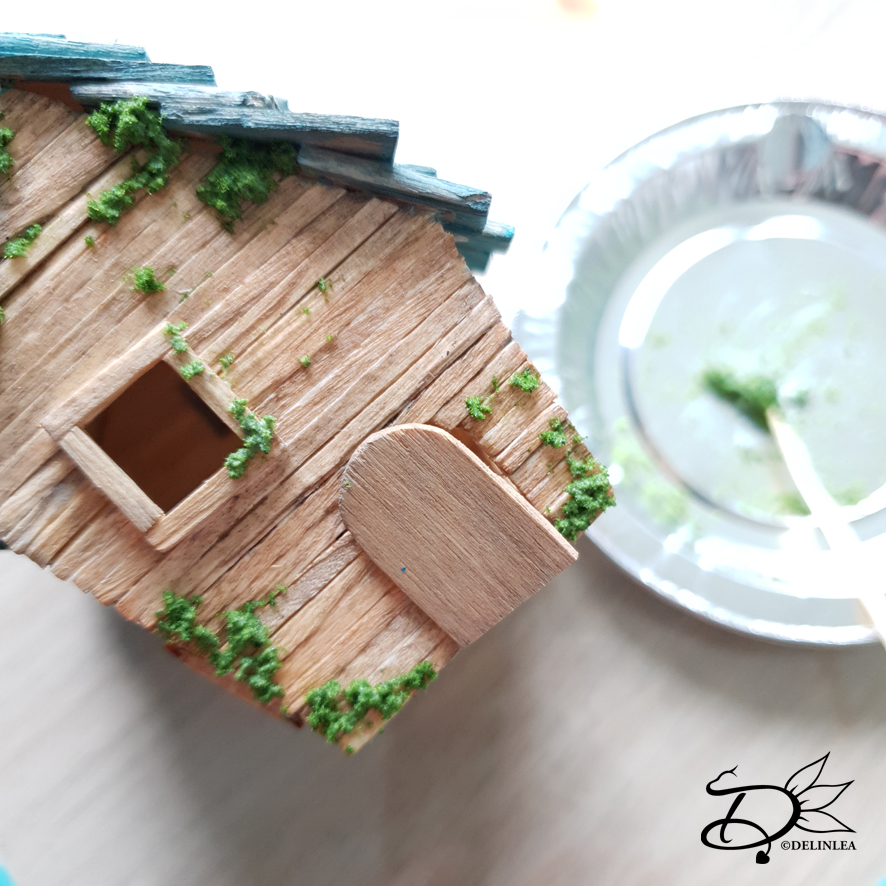
I decided to add window seals and a door as well. the windows the same technique as the walls and the door from a popsicle stick.
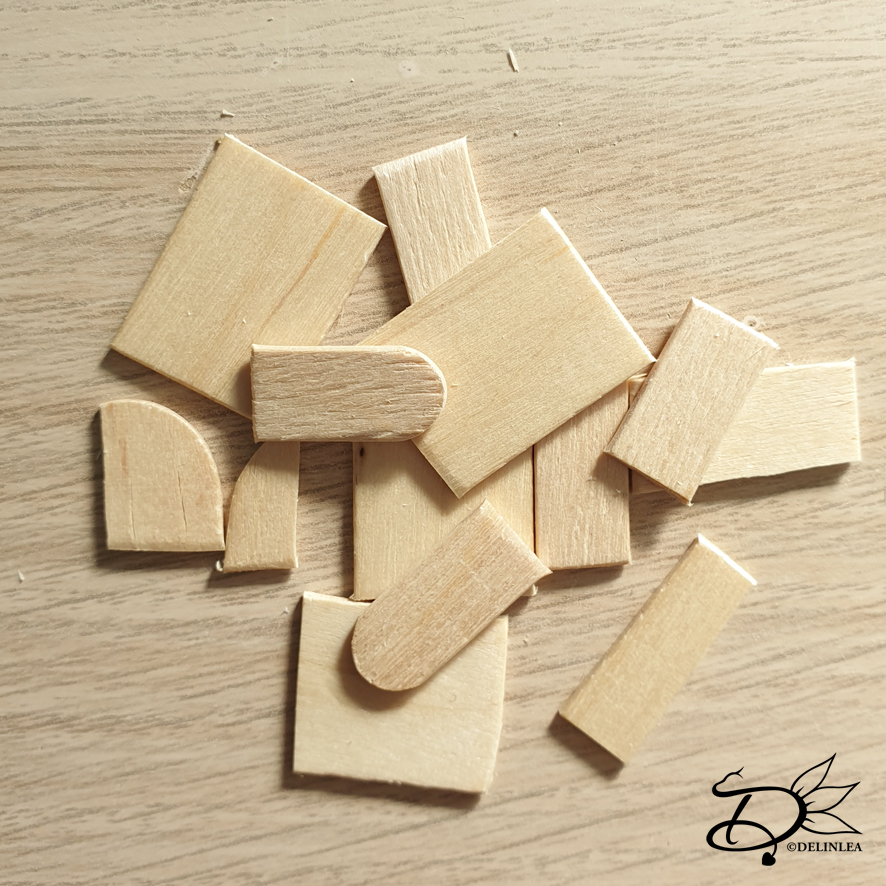
Roof

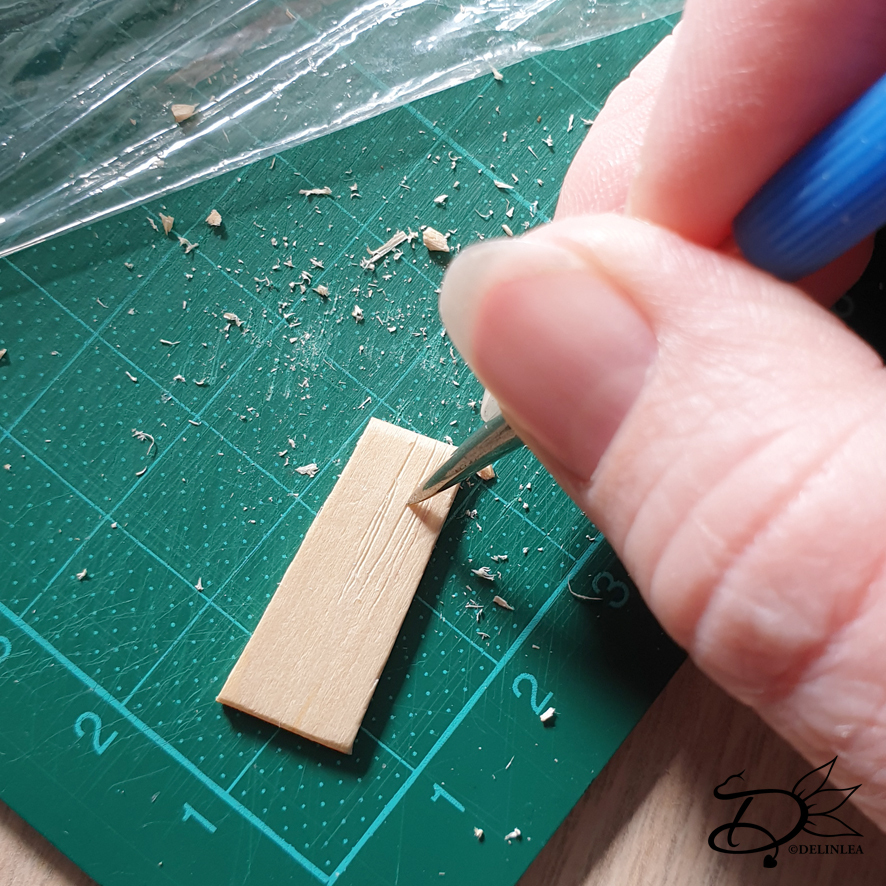
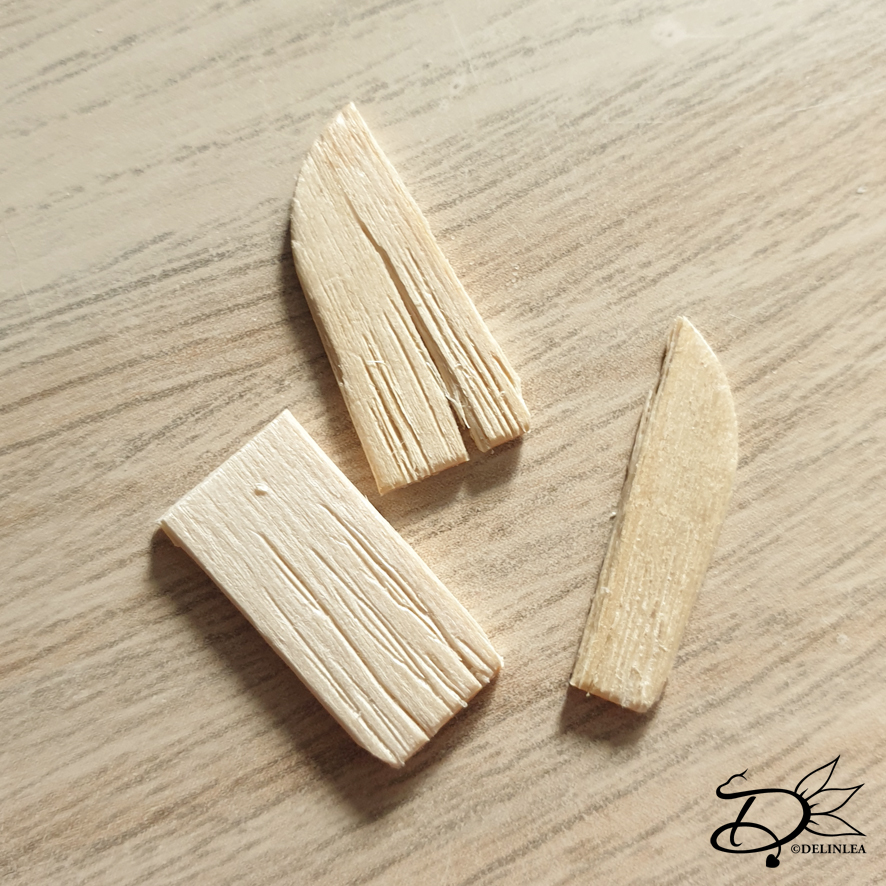
Now it’s time to make the roof tiles! I used 2 sizes of popsicle sticks for those. Cut them to about 1,5cm in length. It doesn’t really need to be exact that size. It gives the house more of an aged look when they are all different. Like those you will find in a story where the with lives or something xD.

It’s totally fine when the tiles break in half, you can still use those, and the roof will look more fun. Distress all of the pieces with something sharp like a big needle or a knife. But be careful to not hurt yourself! Check the picture if you’re not sure what I mean.

Make enough to cover the roof, and that’s probably more than you would think xD.

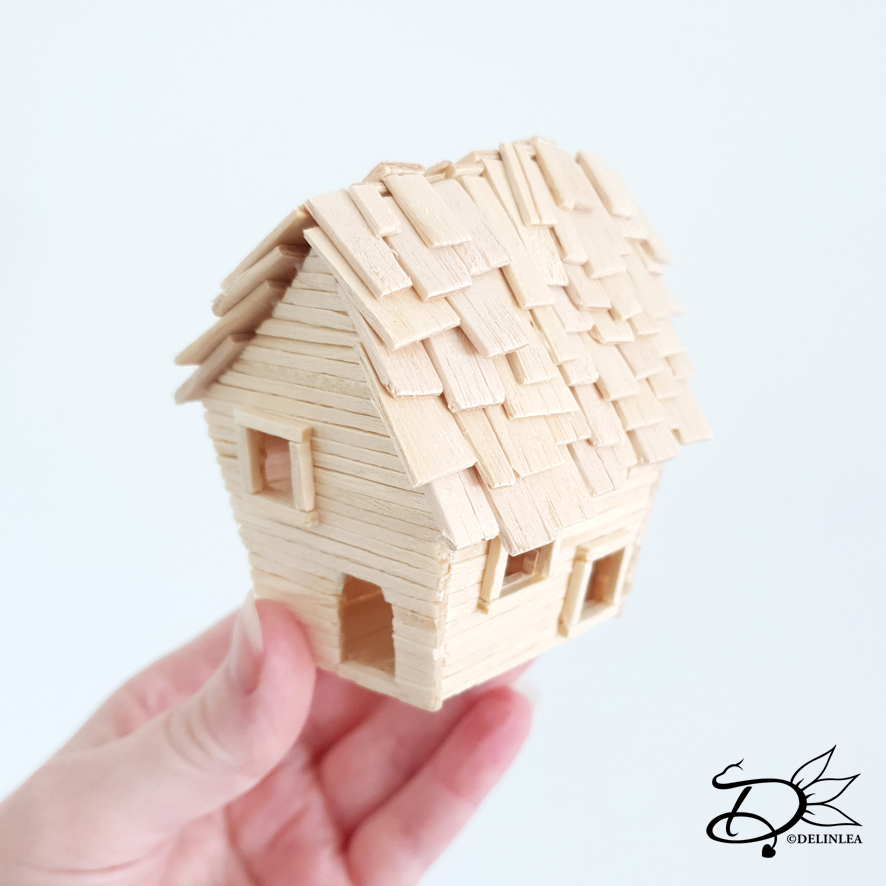
Glue the roof tiles on the house one by one, this process can take a while, especially in the beginning you have to wait to let the pieces dry before being able to continue. Don’t try to make it perfect, just make sure that you will be able to meet both sides of the roof on top.

When you are done, let it dry completely.

Painting

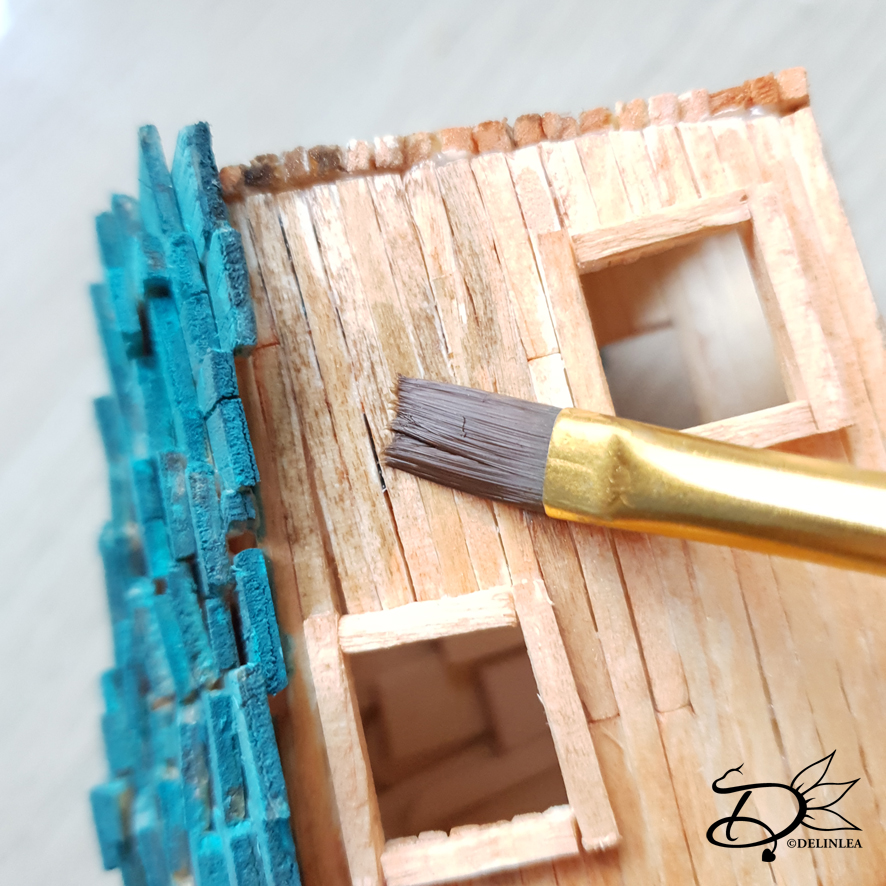
To paint the house, I used watered down acrylics. I started with a base color, Brown for the walls and Turquoise for the roof. I made sure to be able to see the wood through the paint. I let the first layer dry completely first. Then I moved on to a second later, watered down Black acrylics this time, for both the roof and walls. Let dry completely.

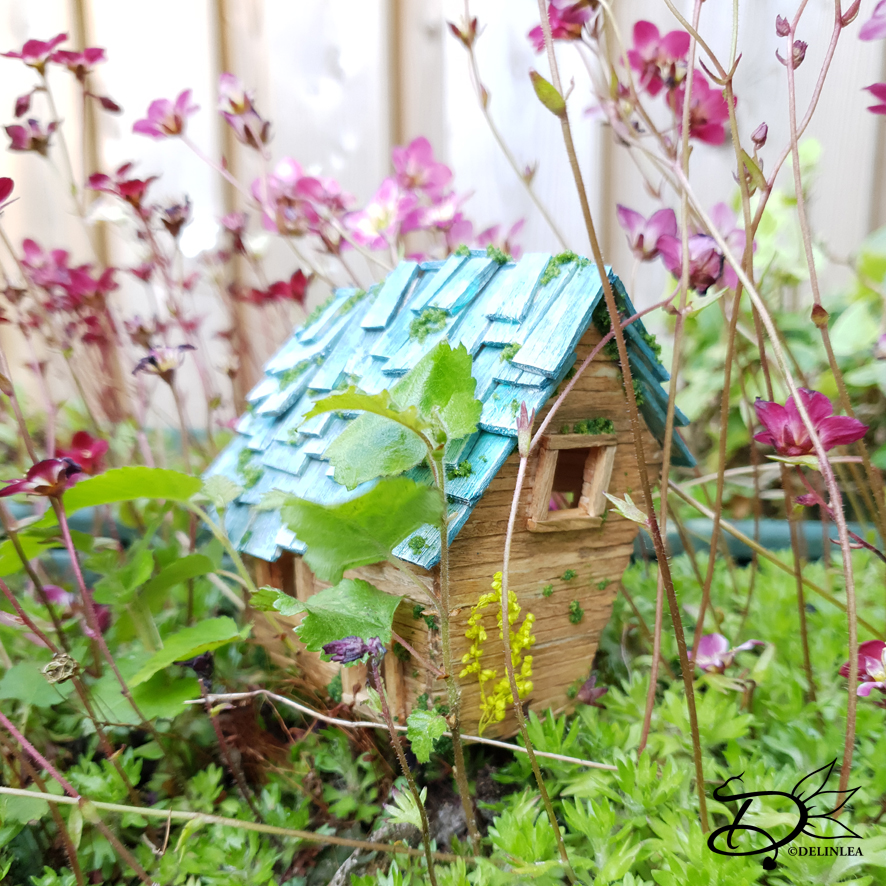
For the roof I also dry brushed some White acrylic to bring out the texture a bit more. If  you don’t know how to dry brush, try to find a tutorial first.
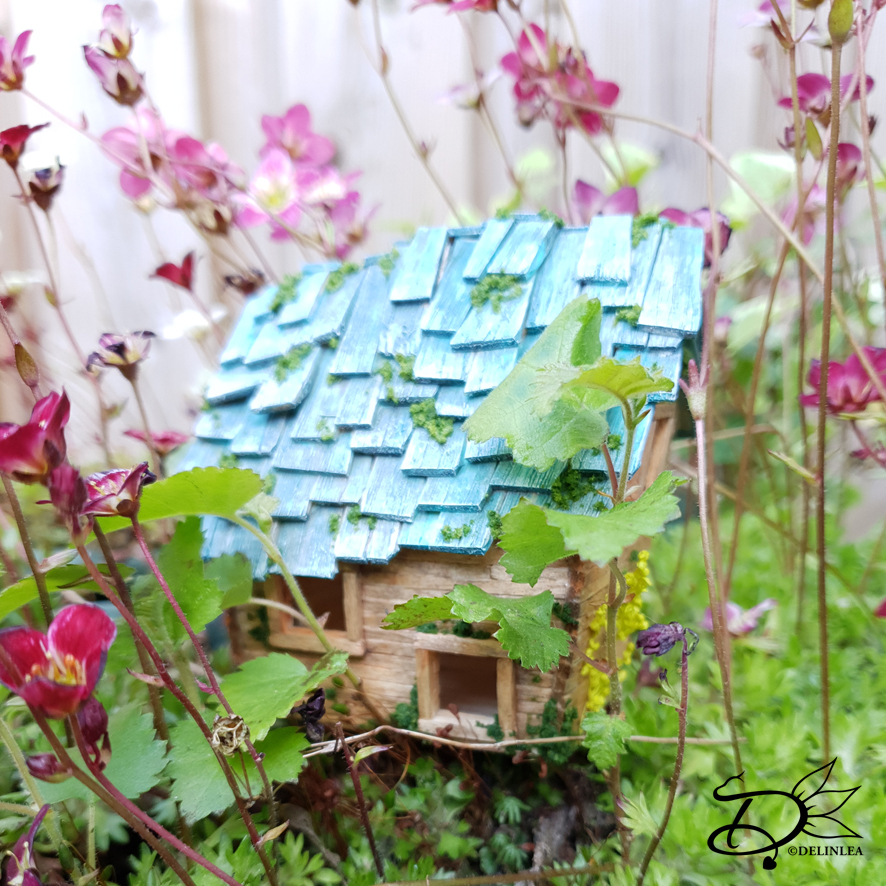
Decorating

I have used fake moss and dried plants. You can basically anything you like. But I would recommend the fake moss, that really makes the house look likes it’s been there for a while. It’s all in the details! xD

  • Fairy House

I hope you enjoyed today’s tutorial. I sure had fun making this fairy house and wanna make more so badly. I’ll gonna have a problem I guess xD, maybe I can sell them if I make too many! Don’t forget to show me yours if you followed along, on my Instagram or Twitter and use the #DelinleaDIY.

Love
Danielle

Posted in: Crafting, Miniature Tagged: DIY, Fairy House, Matchsticks, Miniature, Popsicle sticks, Tutorial, Wood

♥ BerryCat Amigurumi

7 mei 2020 by Delinlea Leave a Comment

Hey Lovelies! I saw strawberries around in the stores already, and that always gives me the feeling of Summer is near. I love strawberries and cats so I combined them xD.  Here are some adorable BerryCat! Ready to jump into the pattern?!

BerryCat

For this Pattern you’ll need:
♥ Yarn in Pink and Light Green (Or Red and Green). (I used Budgetyarn.com)
♥ Extra White or Light Yellow yarn, around 30-40cm, for the ‘seeds’.
♥ Black Felt or Yarn for the nose.
♥ Crochet Hook, 2,5mm.
♥ Stuffing.
♥ Stitch Markers.
♥ Yarn Needle.
♥ Sewing Pins.

Stitches used (US Terms):
Magic Ring.
CH = Chain.
SLST = Slip Stitch.
SC = Single Crochet.
HDC = Half Double Crochet.
DC = Double Crochet.
Bobble = For 1 Bobble Stitch you work 5 DC in one stitch, but without finishing the last loop of each DC, after you have 6 loops on your hook, yarn over and pull through all 6 loops.
ST = Stitch.
Inc = Increase.
Dec = Decrease.
(…) = Repeat the space in brackets the given number of times.
[…] = Total number of stitches.

Pattern BerryCat

Work in continues rounds, use a stitch marker to mark your first stitch of every row. This is for every part, unless stated otherwise.

Body
Use Pink colored yarn.

1: 6SC in Magic Ring. [6]
2: 2SC in each st around. [12]
3: 12SC. [12]
4: 1SC, Ch8, insert in second ch from hook, 7SlSt, continue working on the ‘base’, 2SC, inc, (Bobble, 2SC, inc) 2 times. [15]
5: 15SC. (You skip working in the ’tail’) [15]
6: (4SC, inc) 3 times. [18]
7: (5SC, inc) 3 times. [21]
8: 6SC, inc, (Bobble, 5SC, inc) 2 times. [24]
9: (7SC, inc) 3 times. [27]
10: (8SC, inc) 3 times. [30]
11: 30SC. [30]
12: 30SC. [30]
13: (3SC, dec) 6 times. [24]
14: (4SC, dec) 6 times. [18] stuff here and place the eyes between row 10 and 11, about 2cm apart.
15: (1SC, dec) 6 times. [12]
16: (dec) 6 times. [6]
Fasten off and weave in tail.

Ears (Make 2)
Use Pink colored yarn.

Ch4, insert in second Ch from hook, 1SC, 1HDC, 1DC.
Fasten off and leave a long tail for sewing.

Stem
Use the light Green colored yarn.

Ch7, insert in second Ch from hook, 6SlSt.
Fasten off and leave along tail for sewing.

Crown
Use the light Green colored yarn.

1: 6SC in Magic Ring. [6]
2: (Ch4, insert in second Ch from hook, 1SlSt, 2SC, 1SlSt in Base) 6 times.
Fasten off and leave a long tail for sewing.

Assembling

Whenever I start assembling amigurumi’s, I prefer to use sewing pins first. This way I can position and reposition all parts until I am happy with how it looks. I recommend you do so as well.

Start sewing the stem to the crown, and then the crown to the top of the strawberry.
Then position the ears and sew them on.
Last with the extra white yarn you can stitch on the ‘seeds’.  With black felt or yarn create a small nose.

That was it already for today’s pattern! I hope you liked this BerryCat! I can imagine them hanging around everywhere!

Have a wonderful day!

Love
Danielle

Posted in: Crafting, Crochet Tagged: Amigurumi, berrycat, Cat, Crochet, cute, haken, kawaii, Strawberry, summer, Virka

♥ Flounder Tsum Tsum

30 april 2020 by Delinlea Leave a Comment

Hey Lovelies! I was wondering, what’s your favorite Disney movie?! Mine, not sure, but as a kid, the little mermaid xD. So, today’s Tsum Tsum brought back some memories, I probably should watch the movie again! I always love flounder the most, he’s so cute! And that’s the main character of today’s blog! Flounder! Let’s make him together now.

Flounder Tsum Tsum

For this Pattern you’ll need:
♥ Yarn in Yellow, Light Blue and Dark Blue. (I used Zeeman SuperSoft)
♥ Crochet Hook, 2mm.
♥ Stuffing.
♥ Embroidery Thread and Needle.
♥ Stitch Markers.
♥ Yarn Needle.
♥ Sewing Pins.

Stitches used (US Terms):
Magic Ring.
CH = Chain.
SLST = Slip Stitch.
SC = Single Crochet.
ST = Stitch.
Inc = Increase.
Dec = Decrease.
(…) = Repeat the space in brackets the given number of times.
[…] = Total number of stitches.

Pattern Flounder Tsum Tsum

Work in continues rounds, use a stitch marker to mark your first stitch of every row. This is for every part, unless stated otherwise.

Body
Start with Yellow colored yarn.

1: 6SC in a Magic Ring. [6]
2: 2SC in each st around. [12]
3: (1SC, inc) 6 times. [18]
4: (2SC, inc) 6 times. [24]
5: (3SC, inc) 6 times. [30]
6: (4SC, inc) 6 times. [36]
7: (5SC, inc) 6 times. [42]
8: 42SC. [42]
|
13: 42SC. [42]
From now on you will change yarn color constantly to make the stripes, so, I will state the amount of stitches for that particular color.
14: Yellow; 11SC, Dark Blue: 20SC, Yellow; 11SC. [42]
15: Yellow; 12SC, Dark Blue: 1SlSt, 16SC, 1SlSt, Yellow; 12SC. [42]
16: Yellow, 42SC. [42]
17: Yellow, 42SC. [42]
18: Yellow; 14SC, Dark Blue: 15SC, Yellow; 13SC. [42]
19: Yellow; 15SC, Dark Blue: 1SlSt, 11SC, 1SlSt, Yellow; 14SC. [42]
20: Yellow, 42SC. [42]
21: Yellow, 42SC. [42]
22: Same as row 18.
23: Same as row 19.
24: Yellow, 42SC. [42]
25: Yellow, 42SC. [42]
26: Yellow; 12SC, Dark Blue: 20SC, Yellow; 10SC. [42]
27: Yellow; 13SC, Dark Blue: 1SlSt, 16SC, 1SlSt, Yellow; 11SC. [42]
From here on you’ll work with the Yellow colored yarn only again.
28: (5SC, dec) 6 times. [36]
29: 36SC. [36]
30: 36SC. [36]
31: (4SC, dec) 6 times. [30]
32: 30SC. [30]
33: (3SC, dec) 6 times. [24]
34: 24SC. [24]
35: (2SC, dec) 6 times. [18] Stuff the body.
36: (1SC, dec) 6 times. [12]
37: (dec) 6 times. [6]
Fasten off and weave in tail.

Beak
Use the Yellow colored yarn.

1: Ch7, insert in 2nd chain from hook, 5SC, 3SC in the next st, continue working along the other side of the chain, 4SC, inc, slst in the first st. [14]
2: Ch1, inc, 4SC, inc 3 times, 4SC, inc 2 times, slst in the first st. [20]
3: Ch1, 20SC [20]
Fasten off and leave a long tail for sewing.

Side Fins (Make 2)
Use the Light Blue colored yarn.

1: Ch5, insert in second ch from hook, 3SC, 3SC in the next st, continue working along the other side of the chain, 2SC, inc. [10]
2: 10SC. [10]
3: 10SC. [10]
4: (dec, 3SC) 2 times. [8]
5: 8SC. [8]
Fasten off and leave a long tail for sewing.

Tail Fin.
Use the Light Blue colored yarn.

1: Ch10, insert in second ch from hook, 8SC, 3SC in the next st, continue working along the other side of the chain, 7SC, inc. [20]
2: 20SC. [20]
3: (Dec, 8SC) 2 times. [18]
4: (Dec, 7SC) 2 times. [16]
5: (Dec, 6SC) 2 times. [14]
Fasten off and leave a long tail for sewing.

Back Fin
Use the Light Blue colored yarn.

1: Ch12, insert in second ch from hook, 10SC, 3SC in the next st, continue working along the other side of the chain, 9SC, inc. [24]
2: 10SC, (inc) 3 times, 11SC. [27]
3: 12SC, (inc) 2 times, 13SC. [29]
Fasten off and leave a long tail for sewing.

Assembling

Whenever I start assembling amigurumi’s, I prefer to use sewing pins first. This way I can position and reposition all parts until I am happy with how it looks. I recommend you do so as well.

First position Flounders snout, just under the middle of the face and sew it on. Along sewing the snout on, make sure to stuff it slightly.
His side fins go just under the first stripe on his back. His back fin start from the first stripe as well. His tail, obviously goes on his behind, or however you wanna call it. Sew all those parts on.
I used embroidery to make his face, but of course you can use felt or anything else instead, just what you prefer. With a bit of pink pastel dust you can make his blushy cheeks.

Optional, to make Flounder’s eyes a bit deeper into the amigurumi, use some yarn on a needle. Make sure to tie a good knot at the end. Now go from a random spot, where you can get the knot through the body, to his eyes, without going through the eye, but just behind the yarn used there. The do the same with the other eye and pull the yarn tightly. You can see you pull the eyes slightly inward. Secure the yarn somewhere tightly where it’s not visible and finish off.

I hope you had fun making Flounder! I think it’s such a fun TsumTsum to make!

Have a wonderful day!

Love
Danielle

Posted in: Crafting, Crochet, Tsum Tsum Tagged: Amigurumi, Crochet, cute, Disney, Flounder, Free Pattern, haken, kawaii, The little mermaid

♥ Chip Mug Ufufy

23 april 2020 by Delinlea Leave a Comment

Hey Lovelies! Are you ready for a new Ufufy pattern?! I hope you do. Today’s Ufufy, doesn’t have that typical oval shape, but it’s still cute. Can you already guess which one it will be? Well, I’m gonna tell you now, it’s gonna be Chip Mug! This one just happened when I saw a picture of it. Let’s dive into the pattern.

Chip Mug Ufufy

For this Pattern you’ll need:
♥ Yarn in White, Light Yellow and pink (I used Zeeman Supersoft)
♥ Crochet Hook, 2mm.
♥ Stuffing.
♥ Felt in black and some thread for facial details.
♥ Stitch Markers.
♥ Yarn Needle.
♥ Sewing Pins.

Stitches used (US Terms):
Magic Ring.
CH = Chain.
SLST = Slip Stitch.
SC = Single Crochet.
ST = Stitch.
BL = Back Loops.
FL = Front Loops.
Inc = Increase.
Dec = Decrease.
(…) = Repeat the space in brackets the given number of times.
[…] = Total number of stitches.

Pattern Chip Mug

Work in continues rounds, use a stitch marker to mark your first stitch of every row. This is for every part, unless stated otherwise.

Body
Use the color White.

1: 6SC in Magic Ring. [6]
2: 2SC in each st around. [12]
3: (1SC, inc) 6 times. [18]
4: (2SC, inc) 6 times. [24]
5: (3SC, inc) 6 times. [30]
6: BL, 30SC. [30]
7: 30SC. [30]
8: (9SC, inc) 3 times. [33]
9: 33SC. [33]
10: (10SC, inc) 3 times. [36]
11: 36SC. [36]
12: (11SC, inc) 3 times. [39]
13: 39SC. [39]
14: 39SC. [39]
15: (11SC, dec) 3 times. [36]
16: (4SC, dec) 6 times. [30]
17: (3SC, dec) 6 times. [24]
18: BL, (2SC, dec) 6 times. [18]
19: (1SC, dec) 6 times. [12]
20: (dec) 6 times. [6]
Fasten off and weave in tail.
At row 6 you worked in the Back Loops only, rejoin now in the Front Loops with Light Yellow yarn  and make 30SC. You can also make one SC less on the spot you want the ‘chip’ to be, make sure to start at that point.

Foot of the Mug
Start with the color Pink.

Rejoin in the front loops of row 18 of the body.
1: FL, 18SC.
2: (2SC, inc) 6 times. [24]
Change to the color Light Yellow.
3: FL, 24SC. [24]
Fasten off and weave in tail.

Handle of the Mug
Use the color Light Yellow.

1: 5SC in Magic Ring. [5]
2: 5SC. [5]
|
8: 5SC. [5]
Fasten off and leave a long tail for sewing.

Assembling

There is not much to assemble, only the handle of the mug. Place it with sewing pins on the spot you like it. Make sure that there is space the make the mouth underneath. Sew it on.
With felt and/or thread make his facial features.

And Chip Mug is already done, and I love him so much! I had a lot of fun making him, and I hope you too!

Have a wonderful day!

Love
Danielle

Posted in: Crafting, Crochet, Ufufy Tagged: Amigurumi, Beauty and the Beast, Chip Mug, Crochet, cute, Disney, Free Pattern, haken, Ufufy

♥ Dibo Amigurumi

16 april 2020 by Delinlea Leave a Comment

Hey Lovelies! Meet Dibo! Dibo it this very active creature that jumps around all the time! He loves to sit in high places, preferably in trees or plants. He loves that. Sometimes you can get really tired of his presence, jumping around you all the time, he can’t sit still.
This creature was born from my imagination, I just started crocheting and went with the flow. First I thought it was gonna be a dino, but it didn’t look like that in the end. I still love him, or is he to weird?! xD Anyway, you just need 1 color of yarn and really quick to make, so I hope you will enjoy him as well!

Dibo

For this Pattern you’ll need:
♥ Yarn in a color of choice! (I used budgetyarn.com)
♥ Crochet Hook, 2,5mm.
♥ Stuffing.
♥ Safety Eyes, 5mm.
♥ Stitch Markers.
♥ Yarn Needle.
♥ Sewing Pins.

Stitches used (US Terms):
Magic Ring.
CH = Chain.
SLST = Slip Stitch.
SC = Single Crochet.
HDC = Half Double Crochet.
ST = Stitch.
Inc = Increase.
Dec = Decrease.
(…) = Repeat the space in brackets the given number of times.
[…] = Total number of stitches.

Pattern Dibo

Work in continues rounds, use a stitch marker to mark your first stitch of every row. This is for every part, unless stated otherwise.

Body

Before you start, prepare 3 strands of yarn, about 6cm. Tie them together with knot and put them aside. This will be for his hair.

1: 6SC in a Magic Yarn. [6] Before closing the magic ring, put in the 3 strands you prepared earlier, with the knot on the inside. now close the magic ring.
2: 2SC in each st around. [12]
3: (3SC, inc) 3 times. [15]
4: (4SC, inc) 3 times. [18]
5: 18SC. [18]
6: (5SC, inc) 3 times. [21]
7: 21SC. [21]
8: (6SC, inc) 3 times. [24]
9: 24SC. [24]
|
11: 24SC. [24]
12: (2SC, dec) 6 times. [18]
13: (1SC, dec) 6 times. [12] Place the eyes between row 5 and 6, about 2cm apart. Stuff the body firmly.
14: Dec all around. [6]
Fasten off and weave in tail.

Snout

1: Ch4, insert in second Chain from hook, 2SC, 3SC in the next st, continue along the other side of the chain, 1SC, inc. [8]
2: 8SC. [8]
Fasten off and leave a long tail for sewing.

Tail

1: 6SC in Magic Ring. [6]
2: 6SC. [6]
3: (1SC, inc) 3 times. [9]
4: 9SC. [9]
5: 9SC. [9]
6: 9SC. [9]
7: (2SC, inc) 3 times. [12]
8: 6HDC, 6SC. [12]
9: 6HDC, 6SC. [12]
10: 6HDC, 1SC. [7]
Fasten off and leave a long tail for sewing. Don’t forget to stuff the tail.

Assembling

Whenever I start assembling Amigurumi’s, I use sewing pins to put all things together first. This way I can move them around until I am happy with how it looks.

Put his snout in between his eyes, slightly lower, and sew it on. Eventually, make, with some black yarn, his nostrils.
Put his tail on his lower back, pointing downwards. And sew it on.

And that was it already for Dibo! Quick and easy pattern for you to enjoy!

Have a wonderful day!

Love
Danielle

Posted in: Crafting, Crochet Tagged: Amigurumi, Creature, Crochet, cute, Dibo, Fantasy, Free Pattern, haken, kawaii
« Vorige 1 2 3 4 5 … 16 17 18 19 20 21 22 23 24 … 49 50 51 52 53 Volgende »

What are you looking for?!

My Socials

Ko-Fi

I love making all these free things for you, tho it would be very helpfull if you can support me on Ko-Fi! (You don’t have to tho, totally up to you!)

Ko-Fi Shop!!

In my Ko-Fi shop you can find PDF Amigurumi Patterns!! You can pay easily with PayPal.
Go to the shop here!!

Recent Blog Posts

  • ♥ Happy 2022!
  • ♥ Day 12; Lights
  • ♥ Day 11; Flower Deco
  • ♥ Day 10; Snowman
  • ♥ Day 9; Gingerbread Houses

Recent Comments

  • Erzsebet M. Marosvari op ♥ My Entry For a Faber Castell Contest
  • Delinlea op ♥ Pietje Gnome Amigurumi
  • Delinlea op ♥ Toy Story Alien TsumTsum Amigurumi
  • Delinlea op ♥ Pua Tsum Tsum Amigurumi
  • Charli op ♥ Free Pattern; CNY Mouse Amigurumi

Categories

  • animation
  • Beadwork
  • Blogmas 2018
  • Blogmas 2020
  • Blogmas 2021
  • Books
  • Bujo
  • Christmas
  • Christmas CAL 2019
  • Christmas Countdown 2017
  • Contest
  • Crafting
  • Crochet
  • Drawing
  • Drawing Lesson
  • Easter
  • Geen categorie
  • Life
  • Miniature
  • Nail Art
  • New Year
  • Paper
  • plush
  • Pokemon
  • Poseable Art Doll
  • Recipe
  • Sewing
  • Shop Pattern
  • Sinterklaas
  • Social Media
  • Tsum Tsum
  • Ufufy

Copyright © 2025 Delinlea - My little fantasy world.

Family WordPress Theme by themehall.com