Delinlea - My little fantasy world
  • ♥ Home
  • ♥ About Me
  • ♥ Blogmas 2021
  • ♥ Free Patterns
    • ♥ Amigurumi; Spring/Easter
    • ♥ Amigurumi; Fall/Halloween
    • ♥ Amigurumi; Winter
    • ♥ Amigurumi Tsum Tsum
    • ♥ Amigurumi Ufufy
    • ♥ Amigurumi Others
    • ♥ Christmas Countdown 2017
    • ♥ Blogmas 2018
    • ♥ Blogmas 2020
  • ♥ Tutorials
    • ♥ Easter
    • ♥ Home Deco
    • ♥ Others
  • ♥ Drawing Lessons
  • ♥ FanFic
    • ♥ Chapter 1
    • ♥ Chapter 2
    • ♥ Chapter 3
    • ♥ Chapter 4
    • ♥ Chapter 5
    • ♥ Chapter 6
    • ♥ Chapter 7
  • ♥ Gallery
    • ♥ Crafts
    • ♥ Drawings
    • ♥ Poseable Art Dolls
  • ♥ Links
  • ♥ Contact
    • Privacy Policy

Ufufy

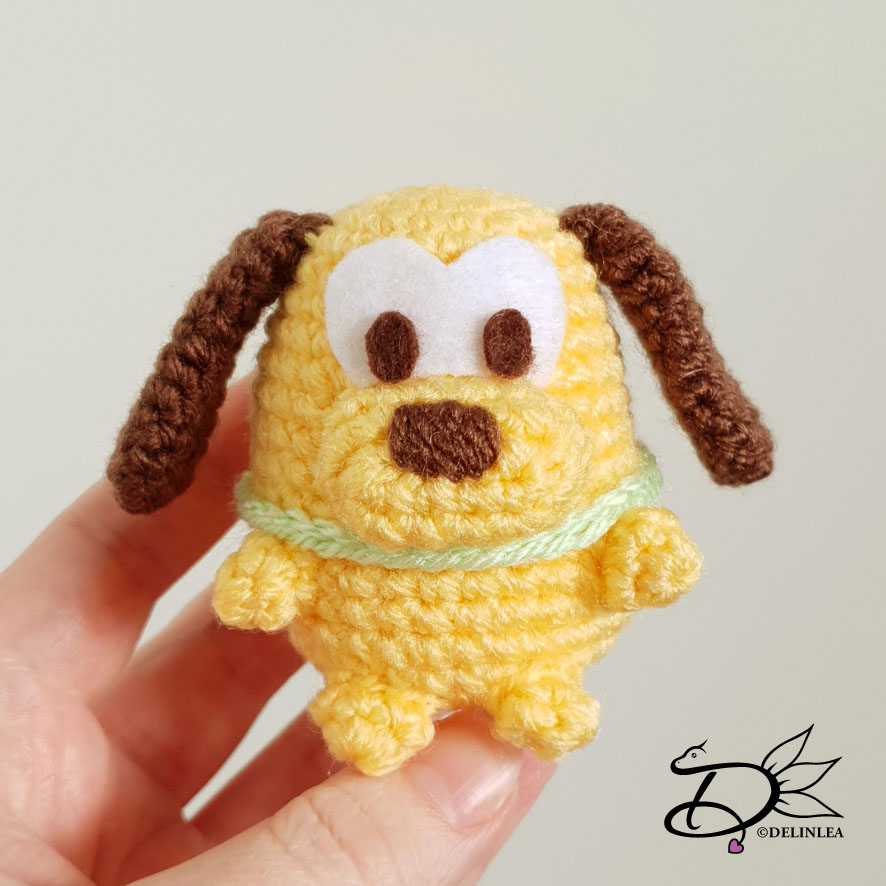
♥ Free Pattern; Pluto Ufufy

2 mei 2019 by Delinlea Leave a Comment

Hey Lovelies! I am so sorry I didn’t post last week. The thing was that my cat needed surgery, her uterus was inflamed and had to be removed. I was busy taking care of her. She’s doing fine by now, she just needs to heal!
That for that, today I am posting a new Amigurumi pattern, I hope you will enjoy this one. I wanted to make our collection of Ufufy’s a little bigger by adding Pluto! Have fun!

For this DIY you’ll need:
♥ Yarn in the colors;  Yellow, Brown and Green.
♥ Crochet Hook (I used a 2,5mm hook).
♥ Stuffing.
♥ Scissors.
♥ Sewing Pins.
♥ Yarn Needle.
♥ Felt in brown and white.
♥ (Fabric) Glue.

Stitches used (US Terms):
Magic Ring.
CH = Chain.
SC = Single Crochet.
ST = Stitch.
Inc = Increase.
Dec = Decrease.
(…) = Repeat the space in brackets the given number of times.
[…] = Total number of stitches.

Pattern

Work in continues rounds, use a stitch marker to mark your first stitch of every row. This is for every part, unless stated otherwise.

Body
Use the color yellow.

1: 6SC in magic ring. [6]
2: 2SC in each ST around. [12]
3: (1SC, inc) 6 times. [18]
4: (2SC, inc) 6 times. [24]
5: 24SC. [24]
6: 24SC. [24]
7: (3SC, inc) 6 times. [30]
8: 30SC. [30]
|
17: 30SC. [30]
18: (3SC, dec) 6 times. [24]
19: (2SC, dec) 6 times. [18] Stuff the body here.
20: (1SC, dec) 6 times. [12]
21: Dec all around. [6]
Fasten off and  weave in tail.

Legs (make 4)
Use the color yellow.

1: 6SC in Magic Ring. [6]
2: 6SC [6]
Fasten off and leave long tail for sewing. You don’t have to stuff them, just flatten.

Snout
Use the color yellow.

Make 5 CH.
1: Insert in second chain from hook, 3SC, 3SC in the last st, 2SC, inc. [10]
2: inc, 2SC, (inc) 3 times, 2SC, (inc) 2 times. [16]
3: 16SC. [16]
Fasten off and leave a long tail for sewing. You will have to stuff the snout, but that’s easier when it’s about half way sewn to the body.
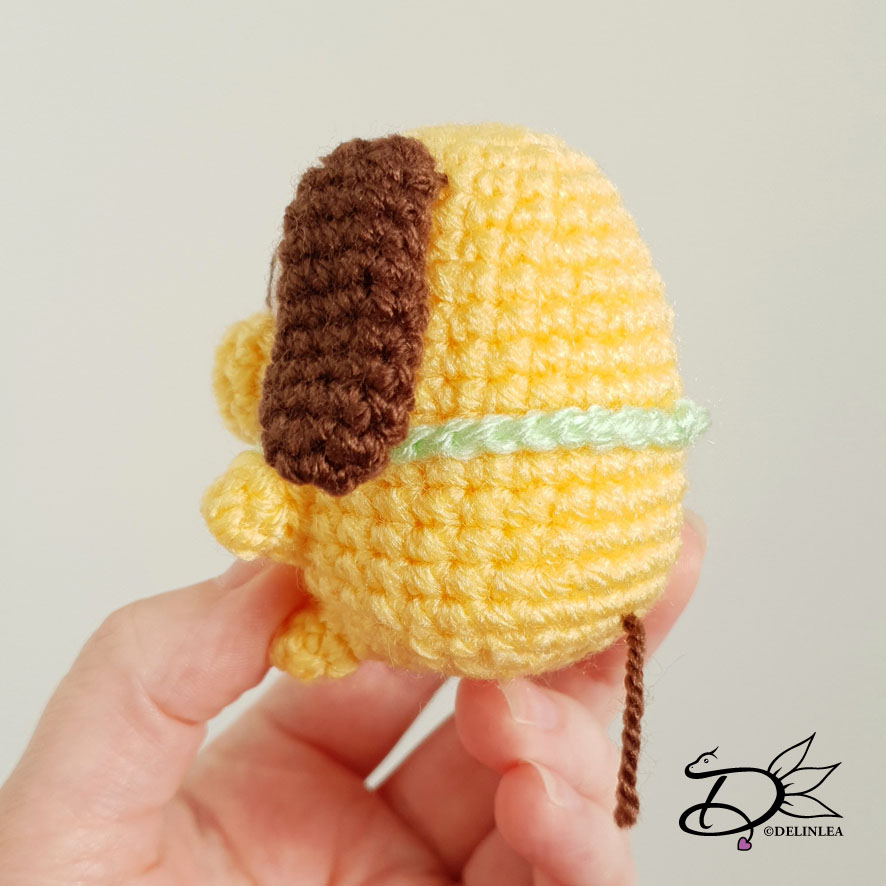
Ears (make 2)
Use the color brown.

1: 6SC in magic ring. [6]
2: (1SC, inc) 3 times. [9]
3: 9SC. [9]
|
9: 9SC. [9]
10: (1SC, dec) 3 times. [6]
11: 6SC. [6]
Fasten off and leave a long tail for sewing. Stuffing is not needed.

Collar
Use the color Green.

Chain about 40. Just measure if you need more or less.
Make round, fasten off and weave in tails.

Assembling

I always use sewing pins to place all parts first, before sewing. This way you can easily move all parts around until you are happy with the outcome.

First create a nose on the snout. You can either do this with brown felt and glue it on, or embroider it on with brown yarn, just where you are comfortable with.
Put the collar around his body, around mid way, but a tiny bit lower. You can sew it on, but also you can leave it loose, up to you. From here you know how to position the legs, and sew those on.
Time to position the snout, it’s just above the collar, happy with it’s position? Sew it on as well. Last are the ears to sew on, on both sides of it’s head. Ah and don’t forget his tail! I just sewn on a piece of yarn. Nothing to fancy.
out of felt you will make the eyes. Best way is to cut them out of a piece of scrap paper, this way you won’t waste any felt. If you are happy with how it looks on pluto. The you can cut the pieces out of felt and glue them to pluto’s head.

I hope you enjoyed this little pattern. Have a wonderful day and I’ll see you next week!

Love
Danielle

Posted in: Crafting, Geen categorie, Ufufy Tagged: Amigurumi, Crochet, Disney, Free Pattern, haken, Pluto, Ufufy

♥ Amigurumi Piglet Ufufy

16 augustus 2018 by Delinlea Leave a Comment

Hey Lovelies! Despite all the busy times, I really wanted to make you a new pattern! And I also needed a bit of time to relax, so I made this cute Piglet Ufufy~. Another to the collection. These are always so fast to make, a good way to just sit down and relax, even it’s a tiny bit.
I hope you will enjoy this cutie!

For this DIY you’ll need:
♥  Yarn. I used thin acrylic yarn. Light Pink, Dark Pink and Hoy Pink
♥  Crochet hook.
♥  Stitch marker.
♥  Yarn needle.
♥  Sewing pins. (optional)
♥  Embroidery Neeldle and Dark Pink thread.
♥  Scissors.
♥  Fiber Fill.
♥  Brown and Pink Felt.
♥  Key Chain. (optional)
♥  Glue (optional).

Stitches used:
CH = Chain.
SC = Single Crochet.
ST = Stitch.
Inc = Increase.
Dec = Decrease.
Slst = Slip Stitch.
(…) = Repeat the space in brackets the given number of times.
[…] = Total number of stitches.

Pattern:

Body
Start with Light Pink.

1: 6SC in magic ring. [6]
2: 2SC in each ST around. [12]
3: (1SC, inc), 6 times. [18]
4: (2SC, inc), 6 times. [24]
5: SC in each st around. [24]
6: SC in each st around. [24]
7: (3SC, inc), 6 times. [30]
8: SC in each st around. [30
|
10: SC in each st around. [30]
Change to Hot Pink.
11: SC in each st around. [30]
|
15: SC in each st around. [30]
Change back to Light Pink
16: SC in each st around. [30]
17: SC in each st around. [30]
18: (3SC, dec), 6 times. [24]
19: (2SC, dec), 6 times. [18] Stuff the body here.
20: (1SC, dec), 6 times. [12]
21: Dec all around. [6]
Fasten off and  weave in tail.

Legs (4)
In Light Pink .

1: 4SC in Magic Ring. [4]
2: (1SC, inc), 2 times. [6]
Fasten off and leave long tail for sewing. You don’t have to stuff them, just flatten.

Ears (2)
In Dark Pink.

1: 4SC in Magic Ring. [4]
2: (1SC, inc), 2 times. [6]
3: (2SC, inc), 2 times. [8]
4: SC in each ST around. [8]
Fasten off and leave long tail for sewing. You don’t have to stuff them, just flatten.

Assembling

First, embroider some lines in the hot pink part of the body, use Dark Pink thread for this.
Then place the legs onto the body with sewing pins, the feet right under the Hot Pink part of the body and the arms in the middle of the Hot Pink part of the body. Sew them on.
Now place the ear on top of the head, right beside each other and sew them on as wel.
Cut some eyes and nose out of felt and glue them on. (you can also embroider the eyes and nose on, just what you want.

I hope you enjoyed this pattern! I would love to see yours if you made him! Share him with #DelinleaDIY on twitter or Instagram!

Love
Danielle


Posted in: Crafting, Crochet, Ufufy Tagged: Amigurumi, Crochet, cute, Disney, Free Pattern, haken, kawaii, Ufufy

♥ Amigurumi: Marie Ufufy

14 juni 2018 by Delinlea Leave a Comment

Hey Lovelies!

I thought it’s time for another Ufufy! I doubt way to long what to upload, so today I am a bit late with  uploading, I will do better next week! I’m sorry! Let’s make Marie, shall we?!

For this DIY you’ll need:
♥  Yarn. I used thin acrylic yarn. White And Pink.
♥  Crochet hook.
♥  Stitch marker.
♥  Yarn needle.
♥  Sewing pins. (optional)
♥  Scissors.
♥  Fiber Fill.
♥  Pink and Blue Felt.
♥  Key Chain.
♥  Glue (optional).

Stitches used:
CH = Chain.
SC = Single Crochet.
ST = Stitch.
Inc = Increase.
Dec = Decrease.
Slst = Slip Stitch.
(…) = Repeat the space in brackets the given number of times.
[…] = Total number of stitches.

Pattern

Body
In White.

1: 6SC in magic ring. [6]
2: 2SC in each ST around. [12]
3: (1SC, inc), 6 times. [18]
4: (2SC, inc), 6 times. [24]
5: SC in each st around. [24]
6: SC in each st around. [24]
7: (3SC, inc), 6 times. [30]
8: SC in each st around. [30]
|
17: SC in each st around. [30]
18: (3SC, dec), 6 times. [24]
19: (2SC, dec), 6 times. [18] Stuff the body here.
20: (1SC, dec), 6 times. [12]
21: Dec all around. [6]
Fasten off and  weave in tail.

Legs (4)
In White.

1: 4SC in Magic Ring. [4]
2: (1SC, inc), 2 times. [6]
Fasten off and leave long tail for sewing. You don’t have to stuff them, just flatten.

Tail
In White.

Chain 5, insert in second chain from hook, 4SC.
Fasten off and leave a long tail for sewing.

Ears (2)
In White.

1: 4SC in magic Ring. [4]
2: (1SC, inc), 2 times. [6]
3: (1SC, inc), 3 times. [9]
4: (2SC, inc), 3 times. [12]
Fasten off and leave a long tail for sewing.

Inside of the Ears (2)
In Pink.

1: Chain3, insert in second chain from hook, 2SC, turn. [2]
2: Chain1, dec. [1]
Fasten off and leave a long tail for sewing.

Bow on top of her Head
In Pink.

1: Chain 7, insert in 2nd chain from hook, 6SC, turn. [6]
2: Chain 1, 6SC. [6]
3: SLST around the bow for a nice edge.
Fasten off and leave a long tail. Use a Yarn Needle to go to the middle of the bow and wrap the tail tightly around several times and fasten off.

Bow for on her Back
In Pink.

1: Chain 11, insert in 2nd chain from hook, 10SC, turn. [10]
2: Chain 1, 10SC. [10]
3: Chain 1, 10SC. [10]
4: SLST around the bow for a nice edge.
Fasten off and leave a long tail. Use a Yarn Needle to go to the middle of the bow and wrap the tail tightly around several times and fasten off.

Collar
In Pink.

Chain 32 and SLST in the first chain to make it round.

Assembling

Start with sewing on the legs, use some sewing pins first to make sure you position them right, before sewing them on. This way you can easily move them around until you are happy with the look. The ‘arms’ go just under the middle of the body. Sew them on securely.
Sew the inside of the ears to the ears, and sew those to the body.
To give Marie some fluff on top of her head and on the sides of her face, I took 2 pieces of white yarn, tied a knot in the middle and pulled both ends through the side, with a yarn needle, to the middle of the head and on the sides of the face, just under the ears. Make sure the knot dissapears inside the body. Cut the yarn slightly longer as you want and with the yarn needle you can untwist the yarn, so it get’s fluffy. Now you can give them the final hair cut ^^.
Time for the bow on top of her head. I glued it on, but you can totally sew them on if you prefer.
Now put on her collar, and sew or glue it on, so it stays in place. And don’t forget to sew the big bow to her back, on her collar.
Cut her eyes out of blue felt and a nose out of pink felt and glue those on. give her some blush on her cheeks with some soft pastel chalk or make-up.

You are finished now! I hope you enjoyed making Marie! Ofcourse you can add lashes and eyebrows with needle and thread, but I was just lazy and I like how she turned out this way!

Have a lovely crafty day y’all.

Love
Danielle


Posted in: Crafting, Crochet, Ufufy Tagged: Amigurumi, Aristocats, Cat, Crochet, Disney, DIY, haken, Marie

♥ Dumbo Ufufy Amigurumi

10 mei 2018 by Delinlea 6 Comments

Hey Lovelies!

Time for another DIY, I kept is simple this week and chose to make a Dumbo Ufufy! I’m struggling with my health so I wasn’t able to do something else. By the way, what do you like to see tutorials or patterns for?! Let me know in the comments below! Now, let’s go on to the pattern!

For this DIY you’ll need:
♥  Yarn. I used thin acrylic yarn. Light Blue, Pink, Light Yellow and Dark Pink or Reddish.
♥  Crochet hook.
♥  Stitch marker.
♥  Yarn needle.
♥  Sewing pins. (optional)
♥  Scissors.
♥  Fiber Fill.
♥  Black Felt.
♥  Key Chain. (optional)
♥  Glue. (optional)

Stitches used:
CH = Chain.
SC = Single Crochet.
HDC = Half Double Crochet
ST = Stitch.
Inc = Increase.
Dec = Decrease.
Slst = Slip Stitch.
BL = Back Loops
(…) = Repeat the space in brackets the given number of times.
[…] = Total number of stitches.

Pattern:

Work in continues rounds, use a stitch marker to mark your first stitch of every row. This is for every part, unless stated otherwise.

Body
In Light Blue.

1: 6SC in magic ring. [6]
2: 2SC in each ST around. [12]
3: (1SC, inc), 6 times. [18]
4: (2SC, inc), 6 times. [24]
5: SC in each st around. [24]
6: SC in each st around. [24]
7: (3SC, inc), 6 times. [30]
8: SC in each st around. [30]
|
17: SC in each st around. [30]
18: (3SC, dec), 6 times. [24]
19: (2SC, dec), 6 times. [18] Stuff the body here.
20: (1SC, dec), 6 times. [12]
21: Dec all around. [6]
Fasten off and  weave in tail.

Legs (4)
In Light Blue.

1: 4SC in Magic Ring. [4]
2: (1SC, inc), 2 times. [6]
Fasten off and leave long tail for sewing. You don’t have to stuff them, just flatten.

Ears (2)
In Light Blue.

1: 6SC in magic ring. [6]
2: 2SC in each st around. [12]
3: (1SC, inc) 6 times. [18]
4: SC in each st around. [18]
|
7: SC in each st around. [18]
8: (1SC, dec) 6 times. [12]
Fasten off and leave a long tail for sewing.

Inside of the Ears (2)
In Pink, don’t work in continues rounds.

1: CH5, insert in 2nd chain from hook, 4SC, turn. [4]
2: CH1, inc, 2SC, inc, turn. [6]
3: CH1, inc, 4SC, inc, turn. [8]
4: CH1, 8SC, turn. [8]
5: CH1, 8SC, turn. [8]
6: CH1, dec, 4SC, dec. [6]
Fasten off and leave a long tail for sewing.

Nose
In Light Blue.

1: 4SC in magic ring. [4]
2: SC in each st around. [4]
3: (1SC, inc) 2 times. [6]
4: inc, 1SC, slst.
Fasten off and leave a long tail for sewing.

Hat
In Light Yellow.

1: 4SC in magic ring. [4]
2: (1SC, inc) 2 times. [6]
3: Work in back loops only, (1SC, inc) 3 times. [9]
Fasten off and leave a long tail for sewing.

Tail
In Light Blue.

CH6, insert in 2nd chain from hook, 5SC.
Fasten off and leave a long tail for sewing.

Collar
In Dark Pink or Reddish.

Chain 30 (or more/less, depends on how you stuffed the body, just wrap it around.) Make a circle by making a slst in the first CH.
Make 1SC, 2HDC in the next st, 1SC, SLST. and repeat this until the end of the chains.
Fasten off and weave in tail.
Make with Light Yellow a border around the collar, I tried to sew it on, but didn’t like the look of it, so I used glue in the end.

Assembling

Sew on the legs, use some sewing pins to place the legs first, so you can easily replace them. I placed the lower legs first with about a cm apart, then placed the upper leggs and sewn them on.
Now sew on Dumbo’s nose, just above the middle of the body.
For the ears, sew this inside of the ear to the outer part of the ear and fasten off. Place the ears onto the body with some sewing pins, and when you are happy with the look of it, sew them on.
Sew his tail to his butt. and place his hat on top of the body. I personally was lazy, so I glued it on, but you can totally sew it on!
Cut his eyes out of some black felt and glue these to both sides of the nose. You can add some details, like eyelashes with embroidery if you want, but that’s totally up to you!
Last place his collar around his neck and you are done! You don’t have to sew the collar it stays in place as it is, but ofcourse you can sew it if you are worried that it will come off.

I hope you liked this pattern of another Ufufy! And stay tuned to see what DIY will be up next week. Let me know in the comments below if there is anything you like to see a patternor DIY for. I will do my best to make it! Have a wonderful day everyone!

Love
Danielle


Posted in: Crafting, Crochet, Ufufy Tagged: Amigurumi, Crochet, Disney, dumbo, haken, Ufufy

♥ Amigurumi: Winnie the Pooh Ufufy Keychain

19 april 2018 by Delinlea Leave a Comment

Hey Lovelies!

Another week, another DIY! I just love these Ufufy’s! They look so adorable! I can’t recist them. So, I thought why not make another keychain for my bag, you can never have enough. But of course you don’t have to turn it into a keychain, just leave them as they are and put them anywhere and everywhere haha. Let’s make an whole army of them so they can conquer the world.

For this DIY you’ll need:
♥  Yarn. I used thin acrylic yarn. Pink, Light Yellow and Light Brown
♥  Crochet hook.
♥  Stitch marker.
♥  Yarn needle.
♥  Sewing pins. (optional)
♥  Scissors.
♥  Fiber Fill.
♥  Brown Felt.
♥  Key Chain.
♥  Glue (optional).

Stitches used:
CH = Chain.
SC = Single Crochet.
ST = Stitch.
BL = Back Loop.
FL = Front Loop.
Inc = Increase.
Dec = Decrease.
Slst = Slip Stitch.
(…) = Repeat the space in brackets the given number of times.
[…] = Total number of stitches.

Pattern:

Body
Start with Light Yellow

1: 6SC in magic ring. [6]
2: 2SC in each ST around. [12]
3: (1SC, inc), 6 times. [18]
4: (2SC, inc), 6 times. [24]
5: SC in each st around. [24]
6: SC in each st around. [24]
7: (3SC, inc), 6 times. [30]
8: SC in each st around. [30
|
10: SC in each st around. [30]
Change to Pink
11: SC in each st around. [30]
12: Work in Back Loops only, SC in each st around. [30]
13: SC in each st around. [30]
|
15: SC in each st around. [30]
Change back to Light Yellow.
16: Work in Back loops only, SC in each st around. [30]
17: SC in each st around. [30]
18: (3SC, dec), 6 times. [24]
19: (2SC, dec), 6 times. [18] Stuff the body here.
20: (1SC, dec), 6 times. [12]
21: Dec all around. [6]
Fasten off and  weave in tail.

Working in Back Loops is optional, but this gives a bit more 3D-ish look. So at row 12 and 16 you worked in Back Loops, join now in the Front Loops and SLST around. Fasten off and weave in tail.

Legs (4)
In Light Yellow.

1: 4SC in Magic Ring. [4]
2: (1SC, inc), 2 times. [6]
Fasten off and leave long tail for sewing. You don’t have to stuff them, just flatten.

Ears (2)
in Light Yellow

1: 5SC in magic ring. [5]
2: 2SC in each st around. [10]
3: SC in each st around. [10]
4: (dec, 1SC), 3 times, SLST. [7]
Fasten off and leave long tail for sewing. You don’t have to stuff them, just flatten.

Honey pot
Start with Light Brown.

1: 6SC in magic ring. [6]
2: 2SC in each st around. [12]
3: (3SC, inc), 3 times. [15]
Change to light yellow.
4: SC in each st around. [15]
5: SC in each st around. [15]
Change back to light brown.
6: (3SC, dec). 3 times. [12]
7: (1SC, dec), 4 times. [8]
8. SC in each st around. [8]
9: SC in each st around. [8]
Fasten off and weave in tail. Roll to top part a bit so you will get the rim of the pot. Further, stuff it slightly or not at all and just flatten it.

Assembling

Now it’s time to assemble Winnie the Pooh. Use some sewing pins to place the legs and ears first, so you can easily move them around until you like how Pooh looks.
When you are happy with the position, sew on the legs and ears.
Sew the honey pot in between his front legs, so he kinda holds the pot. I made the pot flat, but I guess you can also stuff it slightly.
Cut his facial features out of the brown felt and glue those on, you can use some pastel dust or blusher to add some blush to his cheeks. Add the keychain if you want and he is done! I love how he turned out, even tho his ears are slightly too big haha.

I hope you enjoyed this Pattern! Would love to see yours if you made it! #DelinleaDIY on Instagram/Twitter/Vero.

Love
Danielle


Posted in: Crafting, Crochet, Ufufy Tagged: Amigurumi, Disney, DIY, Free Pattern, haken, Ufufy, Winnie the pooh
« Vorige 1 2 3 4 5 6 Volgende »

What are you looking for?!

My Socials

Ko-Fi

I love making all these free things for you, tho it would be very helpfull if you can support me on Ko-Fi! (You don’t have to tho, totally up to you!)

Ko-Fi Shop!!

In my Ko-Fi shop you can find PDF Amigurumi Patterns!! You can pay easily with PayPal.
Go to the shop here!!

Recent Blog Posts

  • ♥ Happy 2022!
  • ♥ Day 12; Lights
  • ♥ Day 11; Flower Deco
  • ♥ Day 10; Snowman
  • ♥ Day 9; Gingerbread Houses

Recent Comments

  • Delinlea op ♥ Pietje Gnome Amigurumi
  • Delinlea op ♥ Toy Story Alien TsumTsum Amigurumi
  • Delinlea op ♥ Pua Tsum Tsum Amigurumi
  • Charli op ♥ Free Pattern; CNY Mouse Amigurumi
  • Peter Pesch op ♥ Pietje Gnome Amigurumi

Categories

  • animation
  • Beadwork
  • Blogmas 2018
  • Blogmas 2020
  • Blogmas 2021
  • Books
  • Bujo
  • Christmas
  • Christmas CAL 2019
  • Christmas Countdown 2017
  • Contest
  • Crafting
  • Crochet
  • Drawing
  • Drawing Lesson
  • Easter
  • Geen categorie
  • Life
  • Miniature
  • Nail Art
  • New Year
  • Paper
  • plush
  • Pokemon
  • Poseable Art Doll
  • Recipe
  • Sewing
  • Shop Pattern
  • Sinterklaas
  • Social Media
  • Tsum Tsum
  • Ufufy

Copyright © 2025 Delinlea - My little fantasy world.

Family WordPress Theme by themehall.com