Delinlea - My little fantasy world
  • ♥ Home
  • ♥ About Me
  • ♥ Blogmas 2021
  • ♥ Free Patterns
    • ♥ Amigurumi; Spring/Easter
    • ♥ Amigurumi; Fall/Halloween
    • ♥ Amigurumi; Winter
    • ♥ Amigurumi Tsum Tsum
    • ♥ Amigurumi Ufufy
    • ♥ Amigurumi Others
    • ♥ Christmas Countdown 2017
    • ♥ Blogmas 2018
    • ♥ Blogmas 2020
  • ♥ Tutorials
    • ♥ Easter
    • ♥ Home Deco
    • ♥ Others
  • ♥ Drawing Lessons
  • ♥ FanFic
    • ♥ Chapter 1
    • ♥ Chapter 2
    • ♥ Chapter 3
    • ♥ Chapter 4
    • ♥ Chapter 5
    • ♥ Chapter 6
    • ♥ Chapter 7
  • ♥ Gallery
    • ♥ Crafts
    • ♥ Drawings
    • ♥ Poseable Art Dolls
  • ♥ Links
  • ♥ Contact
    • Privacy Policy

ornament

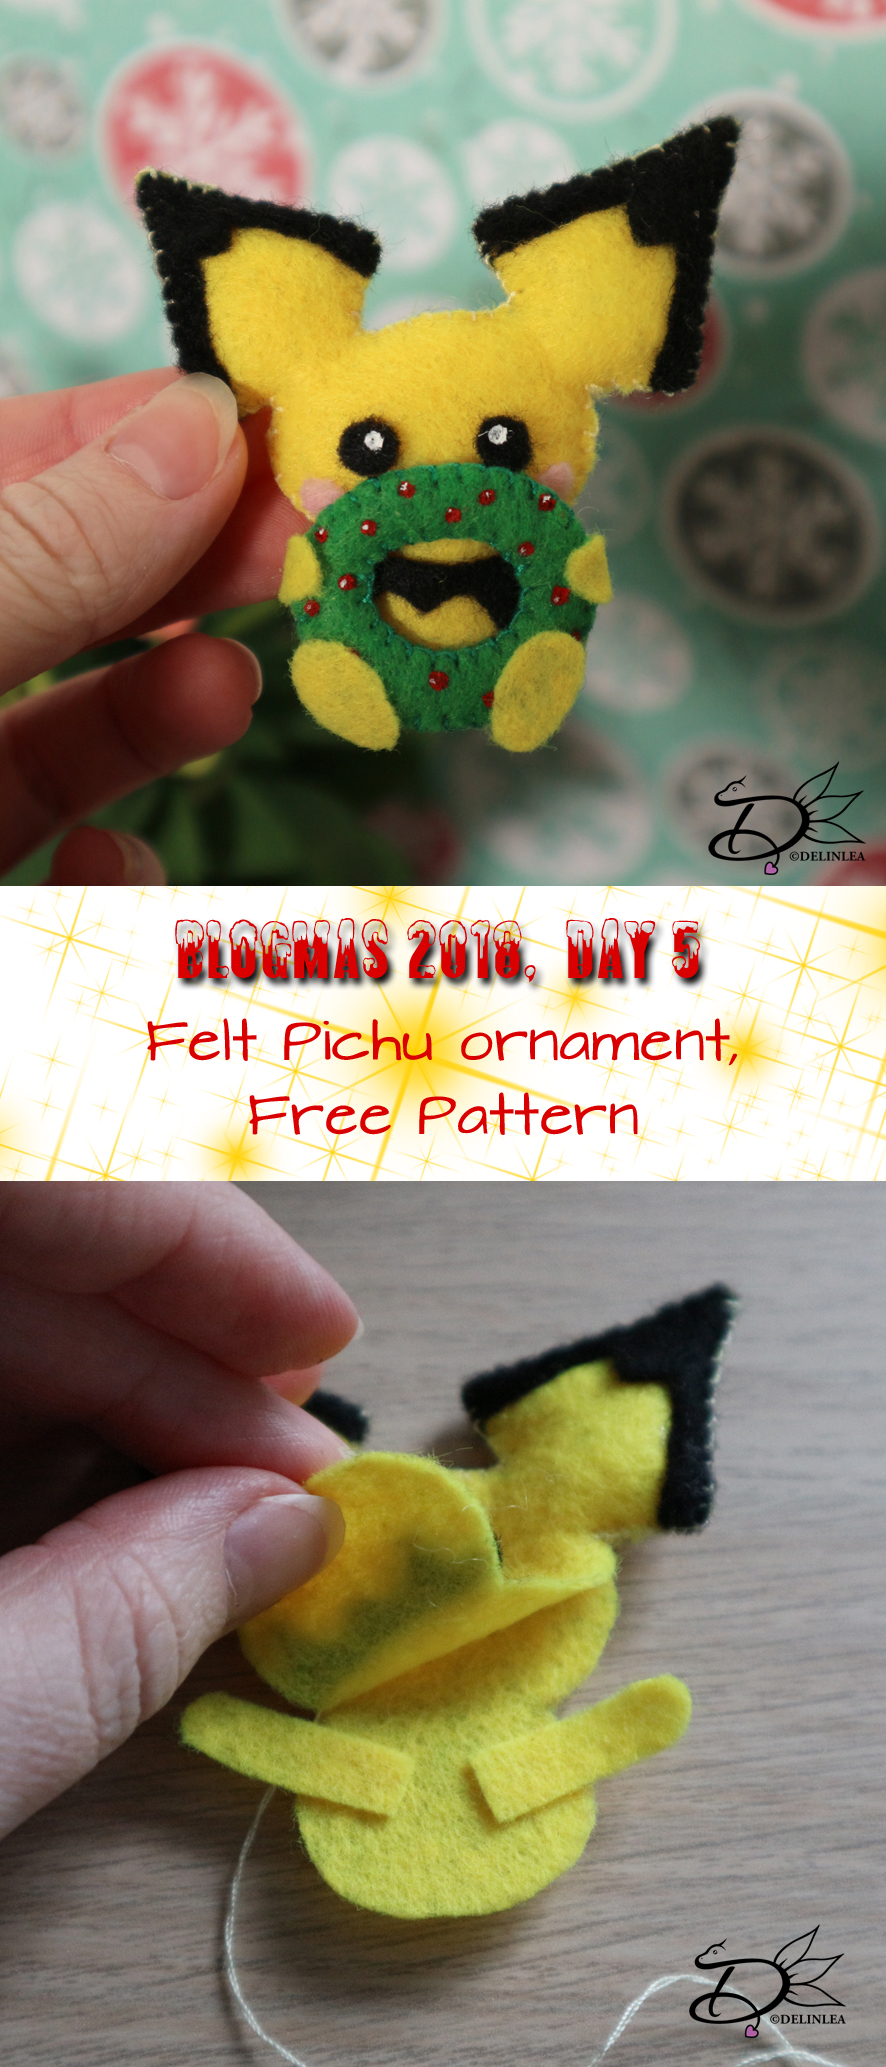
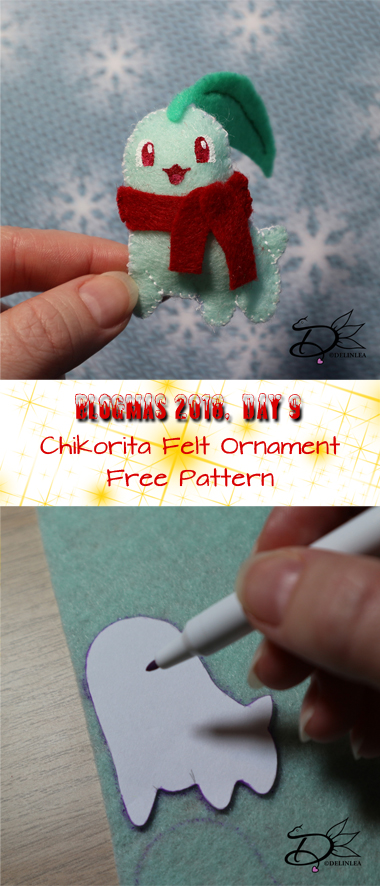
♥ Day 9; Chikorita Felt Ornament

9 december 2018 by Delinlea Leave a Comment

Hey Lovelies! It’s day 9 of Blogmas 2018! I love making those cute felt ornaments so I planned another one for today! It’s Chikorita’s turn! He needed some warmth so he’s wearing a scarf! ^_^

For this DIY you’ll need:
♥  Felt in the colors Light Green, Green and Red(white optional).
♥  Sewing thread in matching colors to the felt.
♥  Sewing Needle.
♥  Trick Marker or anything else where you cancopy the pattern with onto your felt.
♥  Pattern.
♥  Scissors.
♥  Stuffing.
♥  Fabric Glue. (optional)
♥  Acryllic Paint in white and Red (optional)

DIY

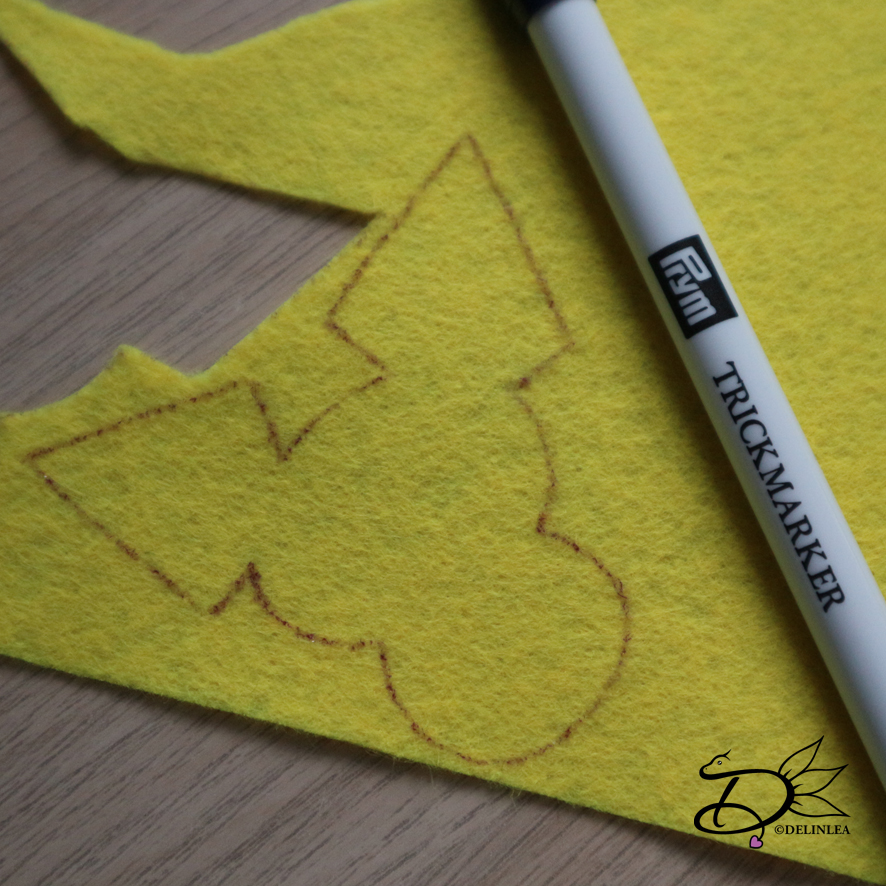
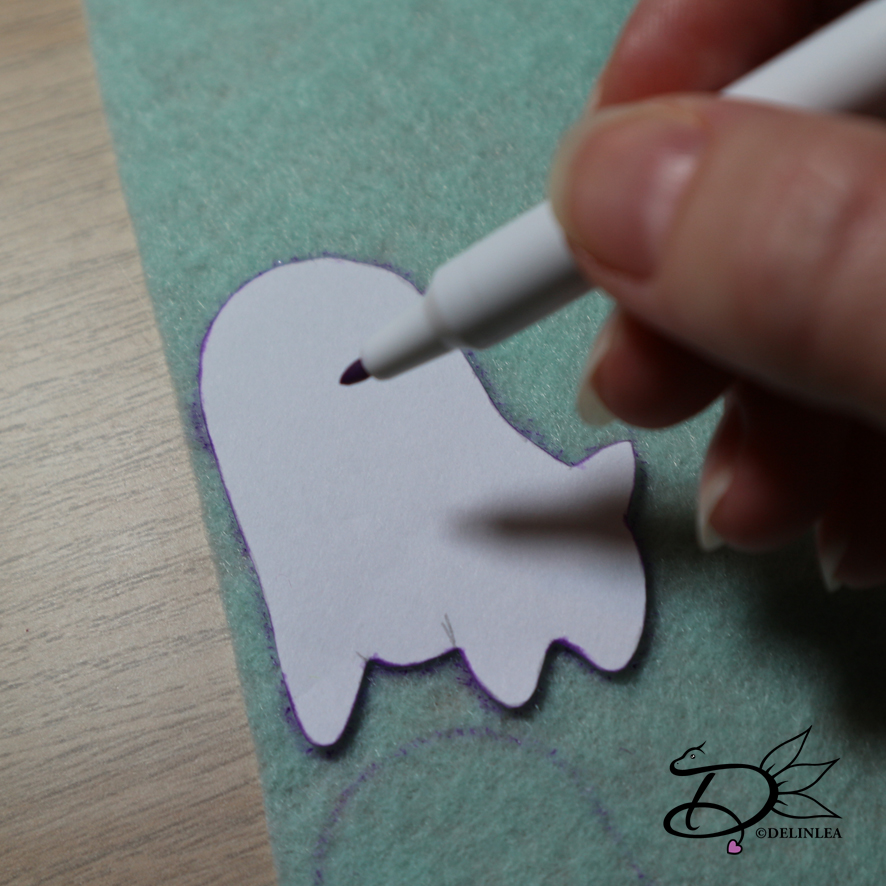
First off all, download the pattern HERE! And print it out(or draw it from your screen). The good thing is, you can make it as big as you want! Then cut out all the pieces. On every piece is stated how many times youneed to cut it out of felt.

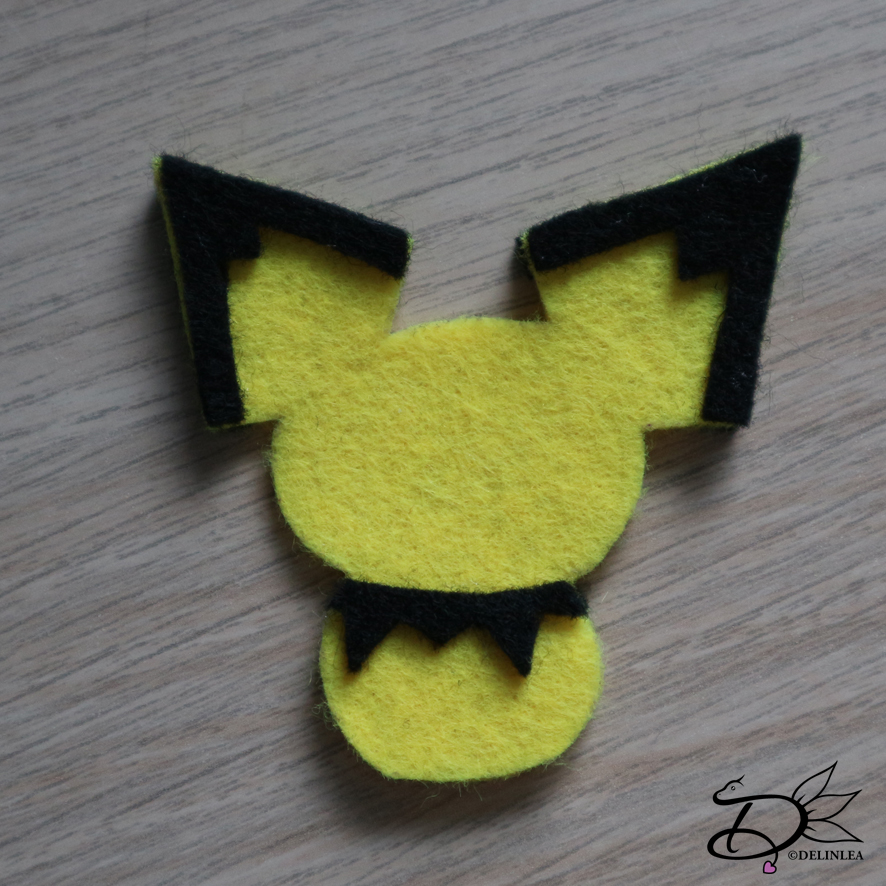
Cut all the pieces out of felt. Part A out of Light Green,Part B out of Green Felt, Part C, D and E out of Red felt. The eyes and mouthyou can either choose to make them out of Felt or paint them on like I did.Depends on what you want.

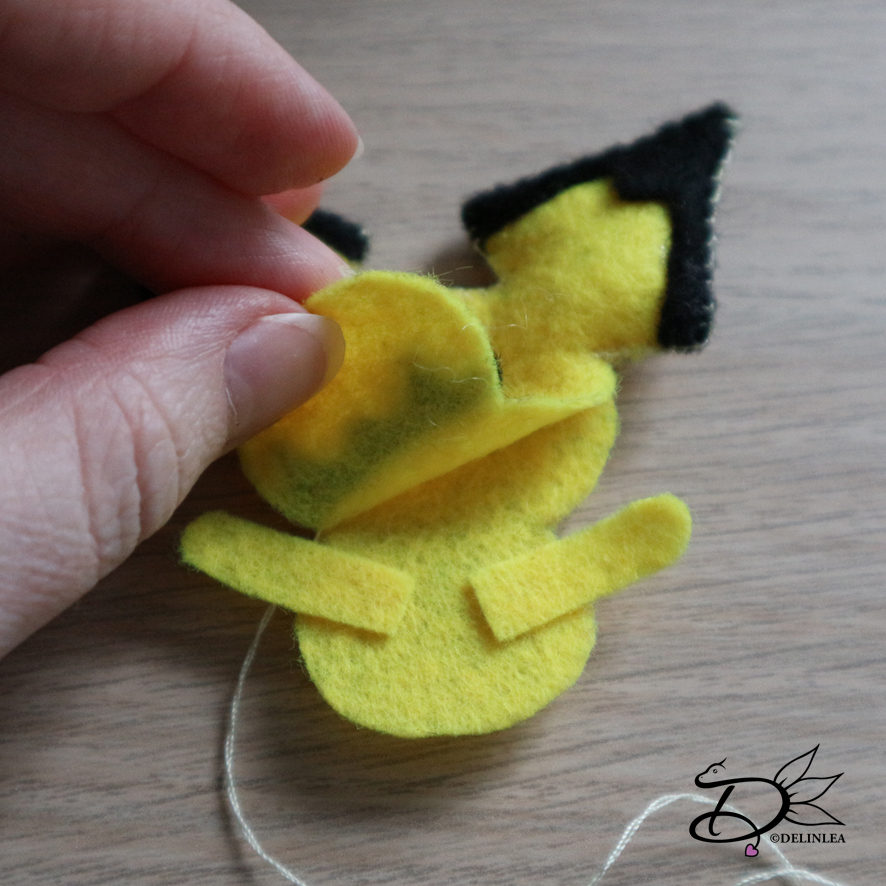
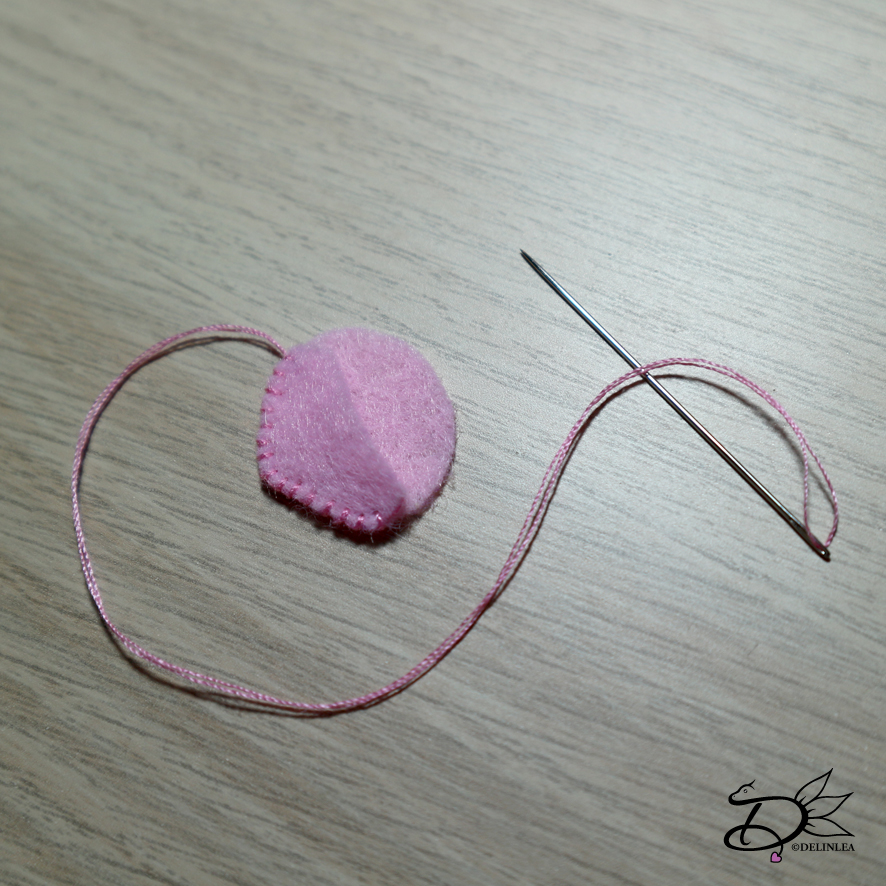
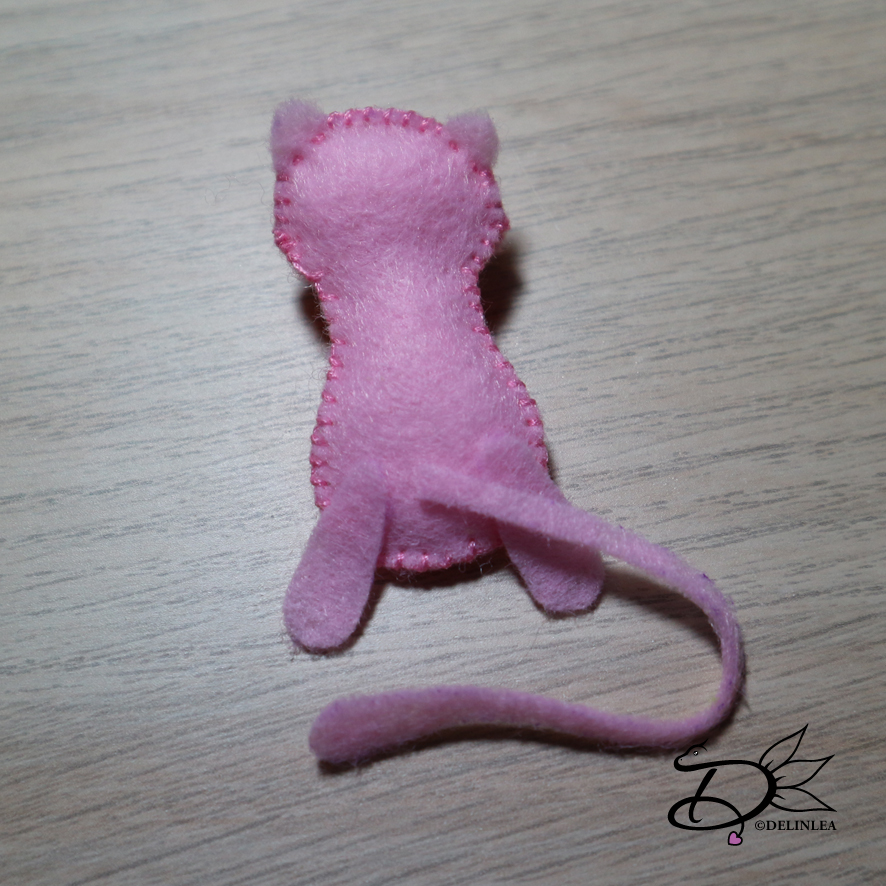
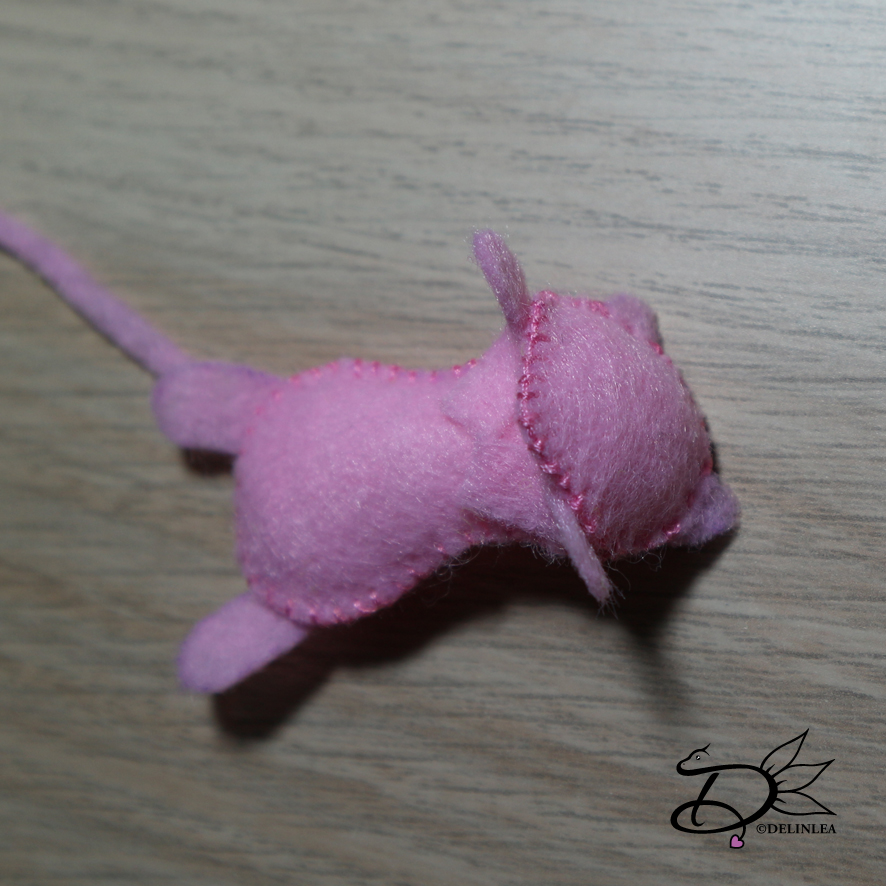
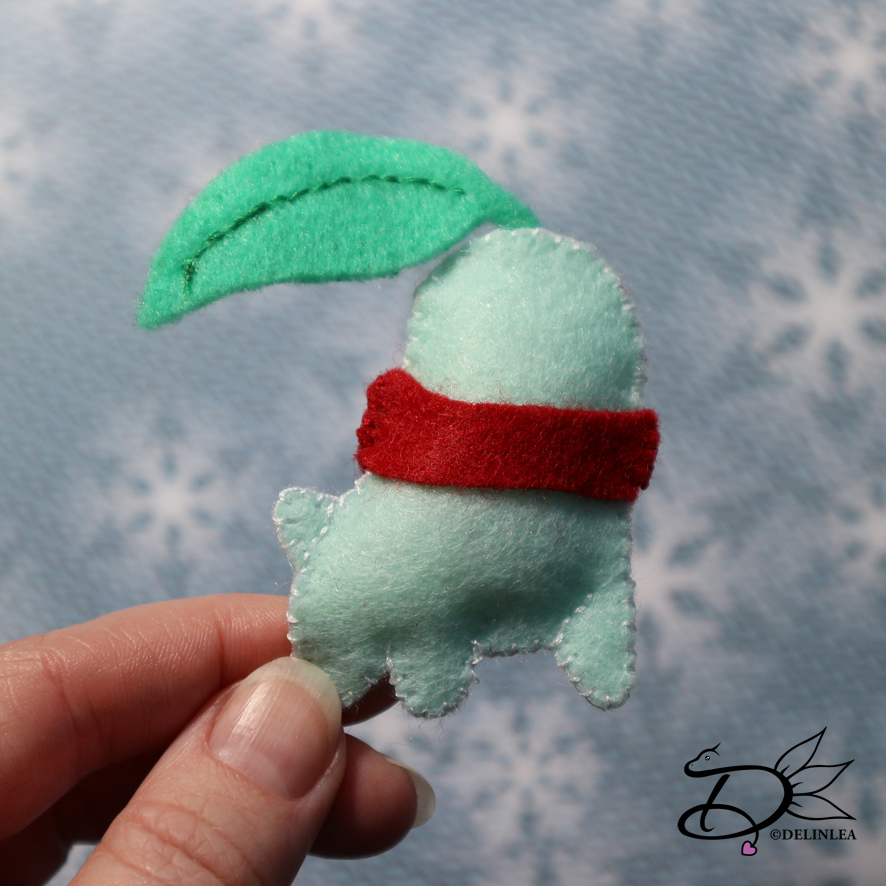
Sew parts A together with a Blanket stitch. There are some lines in the body that continue, use a running stitch to make those lines, and go back the same way.

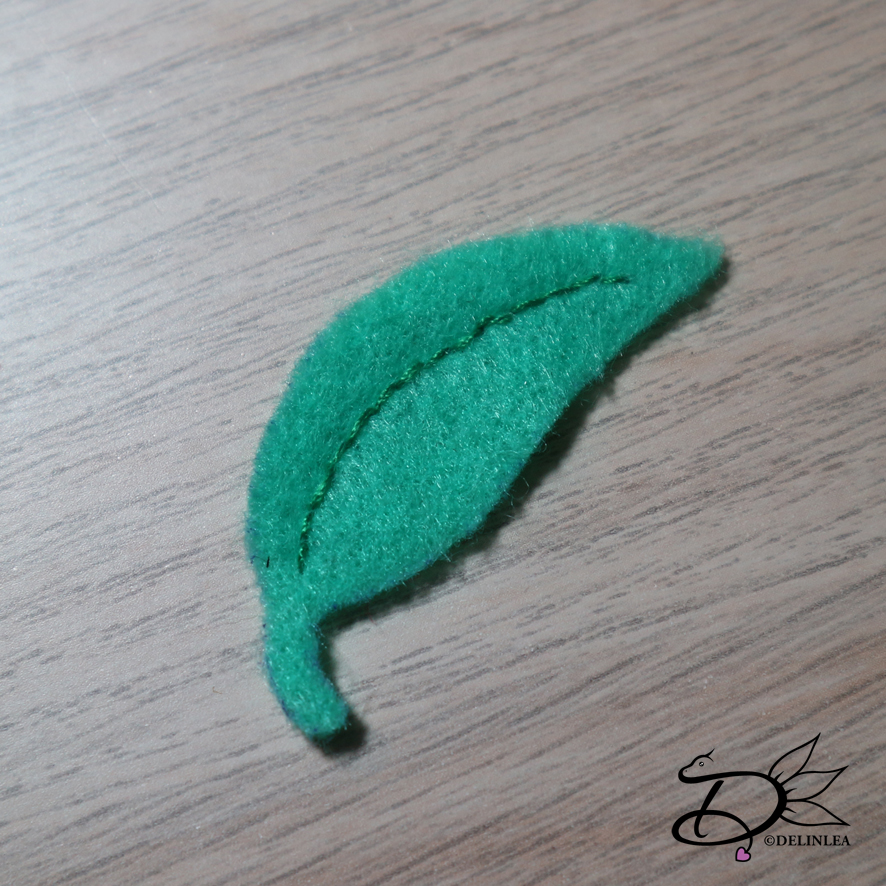
With a running stitch you’ll make the details in the leave (part B). After that, you’ll glue or sew it to Chikorita’s head.

Then it’s time to put on his scarf, I glued all pieces on, only on the sides of parts C I used a blanket stitch.

Last but not least, paint on his eyes and Mouth. Or if you chose to make them out of felt, do that now.

And another ornament is done! This one we can add to our collection! And if you made one, don’t forget to share with #DelinleaBlogmas2018DIY or #DelinleaDIY on Twitter or Instagram, so I can see^^

Love
Danielle

Posted in: Blogmas 2018, Christmas, Pokemon Tagged: blogmas 2018, chikorita, Christmas, felt, Free Pattern, ornament, Pokemon

♥ Day 5; Pichu Felt Ornament

5 december 2018 by Delinlea Leave a Comment

Hey lovelies! Day 5 is here and time for a new DIY! The 3rd ornament for Blogmas is here. And a bunch more will come, I’m hoping you’ll be happy with that! ^^
Today we are going to make a Pichu who’s holding a wreath. I love it, let’s go~~!

For this DIY you’ll need:
♥  Felt in the colors Yellow, Black, Green and Pink.
♥  Sewing thread in matching colors to the felt.
♥  Sewing Needle.
♥  Trick Marker or anything else where you can copy the pattern with onto your felt.
♥  Pattern.
♥  Scissors.
♥  Stuffing.
♥  Fabric Glue. (optional)
♥  Acryllic Paint in Red and White.

DIY

First off all, download the pattern HERE! And print it out (or draw it from your screen). The good thing is, you can make it as big as you want! Then cut out all the pieces. On every piece is stated how many times you need to cut it out of felt.

Use a trick marker or anything else you can copy the pattern with on to the felt. Cut Parts A, E and F out of yellow felt. Parts B, C, D, G and the eyes out of black felt. Part i you’ll cut out of pink and part H you’ll cut out of green felt. Make sure you’ll cut out the right amount of every piece, the way it’s stated on the pattern.
Don’t loose track of which piece is which.

On part A you’ll position parts B (left ear), C (right ear) and D on the right places. You can use a tiny bit of glue to keep them in place.

Then start sewing at the right ear with a blanket stitch. Make sure before closing the first ear, that you’ll stuff it already! You will get in trouble if you don’t. Just go along the edge of the head, the other ear, and do the same for the other ear with stuffing. Before you start closing the body, make sure you place the arms (part F) in between the layers. and use a running stitch to keep the in place, sew the rest of the body with the blanket stitch. And before entirely closing it up, stuff the head and body.

Glue the eyes and the cheeks to his face, and with a white dot of acryllic paint you’ll bring the eyes alive.

Sew both part H togheter with a blanket stitch, both the inside and the outside of the wreath. When you are done, paint red dots on there (little berries). You can put a tiny white dot in every ‘berry’ for a bit of shine.

Position the wreath and glue it to the body. Then glue the hands around the wreath. On the wreath you’ll glue the feet (part E) and the tail (part G) on his back.

And another felt ornament is ready! cute right?! Share yours with #DelinleaBlogmas2018DIY on twitter or insta!

I will see you tomorrow again! Have a nice day!

Love
Danielle


Posted in: Blogmas 2018, Crafting, Pokemon Tagged: blogmas 2018, Christmas, DIY, felt, Free, ornament, pichu, Pokemon

♥ Day 3; Togepi Felt Ornament

3 december 2018 by Delinlea Leave a Comment

Hey Lovelies! it’s day 3 of my Blogmas! And we go back to felt! We need more ornament for our tree right?! (Or anything else where you can hang them xD let’s just hang them everwhere!!). For today I planned to make Togepi in a Stocking! So cute! Let’s do this.

For this DIY you’ll need:
♥  Felt in the colors Red, White and Beige.
♥  Sewing thread in matching colors to the felt.
♥  Sewing Needle.
♥  Trick Marker or anything else where you can copy the pattern with onto your felt.
♥  Pattern.
♥  Scissors.
♥  Stuffing.
♥  Fabric Glue. (optional)
♥  Acryllic Paint in Dark Brown, Red and Blue.

DIY

First off all, download the pattern HERE! And print it out (or draw it from your screen). The good thing is, you can make it as big as you want! Then cut out all the pieces. On every piece is stated how many times you need to cut it out of felt.

Part A you will cut out of Red felt. Part B, C, D and E you will cut out of white felt. Part F, G and H you’ll cut out of beige felt. keep in mind how many times you need to cut out each piece. And keep track of which piece is which.

Glue or sew (with a running stitch) part B and C to part A. Then, Sew the completed parts A together with a blanket stitch (this stitch you will use for this whole piece).
When you have the base of the stocking done, you need part D, I glued this on as well, but I guess you can also sew it on. Start in the middle of the back of the stocking (see picture), wrap it around, and finish of tightly at where you started. You might have a bit too much in length of this piece, just cut the remaining part off.
Now stuff the stocking lightly.

Now you need parts F and G. Sew these together, the bottom part you’ll leave open. And where his ‘spikes’ (how to call it else?!) are you’ll use a running stitch.

Put the face part inbetween the shell (part E) I used glue to attach these but you can sew it as well. Around the shell you sew it close, but don’t forget to stuff it before entirely closing.

Glue on his arms (part H) And with paint you’ll gonna make all the details on his shell and his face. I figured it’s easier to use paint here since mine is pretty small, but if you made yours bigger you can also use felt for this part.

If you want you can attach a loop to be able to hang it somewhere, just take a piece of thread, put it through a needle, pull it half way through your ornament. Remove the needle and tie both end together.

And another felt ornament is ready! cute right?! Share yours with #DelinleaBlogmas2018DIY on twitter or insta!

I will see you tomorrow again! Have a nice day!

Love
Danielle


Posted in: Blogmas 2018, Christmas, Crafting, Pokemon Tagged: blogmas 2018, Christmas, DIY, felt, Free, ornament, Pokemon

♥ Day 1; Mew Felt Ornament

1 december 2018 by Delinlea Leave a Comment

Hey Lovelies! Today is the start of Blogmas 2018!! That means, from today on, until dec 24!! A new blog with DIY will be uploaded daily! So 24 free DIYs for you this month! This whole month is Christmas X Pokémon themed! I hope you like that!? I promise they are all very cute. There might be 1 exception, that’s not gonna be Pokémon themed, but you will find out =P.

I will kick off this blogmas with a felt ornament! I choose to put Mew with a star as the first DIY. Let’s go into it! Shall we?!


For this DIY you’ll need:
♥  Felt in the colors Yellow, Pink and White/Blue.
♥  Sewing thread in matching colors to the felt.
♥  Sewing Needle.
♥  Trick Marker or anything else where you can copy the pattern with onto your felt.
♥  Pattern.
♥  Scissors.
♥  Stuffing.
♥  Fabric Glue. (optional)
♥  Acryllic Paint. (optional)

DIY

First off all, download the pattern HERE! And print it out (or draw it from your screen). The good thing is, you can make it as big as you want! Then cut out all the pieces. On every piece is stated how many times you need to cut it out.

The star you copy and cut out of Yellow felt, The eyes out of white (and blue if you decide not to use paint like I did) and the rest of the pieces you copy on Pink felt and cut them out. Make sure you don’t loose track of what pieces are which.

Sewing

Sew the star together, using the Blanket stitch! (This stitch will use all the time) Make sure before closing the whole star, that you stuff it, to give it a little bit more dimension.

Then sew part A and B together of Mew. Then line up part C with part B and sew those together. You don’t have to do this very neathly since it doesn’t show anyway!

Now sew on the back of the body, part D, start by the head, by the ears you sew both parts together with a running stitch, you don’t sew around them. And stuff the head before you start with the body. Then sew the body together as well, and before entirely closing, stuff this as wel.

Now I used Glue to attach the remaining parts, but you can ofcourse choose to sew this on as well, I went for the quick option xD. Glue on the legs, part F, to the back of Mew. (Use the drawn image on the pattern for reference). Then glue on the tail, part E, inbetween the legs.
Glue on the arms as wel, just under the head, as shown in the picture.

Now it’s time to attach mew to the star, start by his head and arms, glue this on, in the position you like. Then glue the body to the star, so it’s won’t move anymore. Now you bring the tail to the front of the star and position it the way you like! Glue on when you are happy with how it looks.

And last but not least, glue on the eyes! If you didn’t use the blue felt and went for the paint option like I did. This is the moment to paint them.

With a lilttle pieces of sewing thread make a loop to hang it on. Just pull your length of thread through the star with a needle. Till you reached the middle of the thread, put both ends together and tie a knot.

And you are done with mew! How cute will it look in your christmas tree?! Adorable right?!
Share yours with #DelinleaBlogmas2018DIY on twitter or insta! Love to see yours!

I will see you tomorrow!

Love
Danielle

Posted in: Blogmas 2018, Christmas, Crafting Tagged: blogmas 2018, Christmas, DIY, felt, Free, mew, ornament, Pokemon, star

♥ Day 20: Mickey Bells Ornament

20 december 2017 by Delinlea Leave a Comment

Hey Lovelies!

There are only a few days left to Christmas and I decided to make a small, cute tutorial for today. Let’s not stress too much, right?! It’s gonna be a short and easy one today, but I hope you will like it anyway. Let’s make some Mickey Bells Ornaments.

For this DIY you’ll need:
♥  Bells in 2 sizes.
♥  A Hot Glue Gun.
♥  Thread.

Now take 1 big bell and 2 smaller ones. Make sure your glue gun is very hot and glue the smaller bells slightly off the middle of the big bell. This way you create ears on the big bell. And Tadah! you have your mickey bell ornament! haha.

Isn’t it cute?! Very easy, but I love how they look in my tree! Show me yours in your tree with the #DelinleaDIY!

Don’t stress to much right before Christmas, enjoy those days of prepping. You will regret it if you don’t!

Love
Danielle

Posted in: Christmas, Christmas Countdown 2017, Crafting Tagged: bells, Christmas, Christmas Countdown, Disney, DIY, Free, Mickey, ornament

What are you looking for?!

My Socials

Ko-Fi

I love making all these free things for you, tho it would be very helpfull if you can support me on Ko-Fi! (You don’t have to tho, totally up to you!)

Ko-Fi Shop!!

In my Ko-Fi shop you can find PDF Amigurumi Patterns!! You can pay easily with PayPal.
Go to the shop here!!

Recent Blog Posts

  • ♥ Happy 2022!
  • ♥ Day 12; Lights
  • ♥ Day 11; Flower Deco
  • ♥ Day 10; Snowman
  • ♥ Day 9; Gingerbread Houses

Recent Comments

  • Delinlea op ♥ Pietje Gnome Amigurumi
  • Delinlea op ♥ Toy Story Alien TsumTsum Amigurumi
  • Delinlea op ♥ Pua Tsum Tsum Amigurumi
  • Charli op ♥ Free Pattern; CNY Mouse Amigurumi
  • Peter Pesch op ♥ Pietje Gnome Amigurumi

Categories

  • animation
  • Beadwork
  • Blogmas 2018
  • Blogmas 2020
  • Blogmas 2021
  • Books
  • Bujo
  • Christmas
  • Christmas CAL 2019
  • Christmas Countdown 2017
  • Contest
  • Crafting
  • Crochet
  • Drawing
  • Drawing Lesson
  • Easter
  • Geen categorie
  • Life
  • Miniature
  • Nail Art
  • New Year
  • Paper
  • plush
  • Pokemon
  • Poseable Art Doll
  • Recipe
  • Sewing
  • Shop Pattern
  • Sinterklaas
  • Social Media
  • Tsum Tsum
  • Ufufy

Copyright © 2025 Delinlea - My little fantasy world.

Family WordPress Theme by themehall.com