Delinlea - My little fantasy world
  • ♥ Home
  • ♥ About Me
  • ♥ Blogmas 2021
  • ♥ Free Patterns
    • ♥ Amigurumi; Spring/Easter
    • ♥ Amigurumi; Fall/Halloween
    • ♥ Amigurumi; Winter
    • ♥ Amigurumi Tsum Tsum
    • ♥ Amigurumi Ufufy
    • ♥ Amigurumi Others
    • ♥ Christmas Countdown 2017
    • ♥ Blogmas 2018
    • ♥ Blogmas 2020
  • ♥ Tutorials
    • ♥ Easter
    • ♥ Home Deco
    • ♥ Others
  • ♥ Drawing Lessons
  • ♥ FanFic
    • ♥ Chapter 1
    • ♥ Chapter 2
    • ♥ Chapter 3
    • ♥ Chapter 4
    • ♥ Chapter 5
    • ♥ Chapter 6
    • ♥ Chapter 7
  • ♥ Gallery
    • ♥ Crafts
    • ♥ Drawings
    • ♥ Poseable Art Dolls
  • ♥ Links
  • ♥ Contact
    • Privacy Policy

cute

♥ Easter Shakers DIY

1 april 2021 by Delinlea Leave a Comment

Hey Lovelies! It’s almost Easter time and I have barely done anything this year. While usually I have plenty of ideas that I wanna make/do. *Sigh not sure why actually. Maybe I’m just too tired still (and in pain, but let’s not talk about that). Anyway, let’s go to today’s tutorial! We are gonna make some Easter shakers, you can put them to decorate of as a little gift or just to play around with. It’s fun and I hope you will join me to make some.

For this DIY you’ll need:
♥ Paper.
♥ Pencil/Marker.
♥ Printer. (optional)
♥ Sheet of clear plastic.
♥ Needle and Thread. (color of choice)
♥ Glitter, Sequins, etc. (to put inside)
♥ Glue.

DIY Easter Shakers

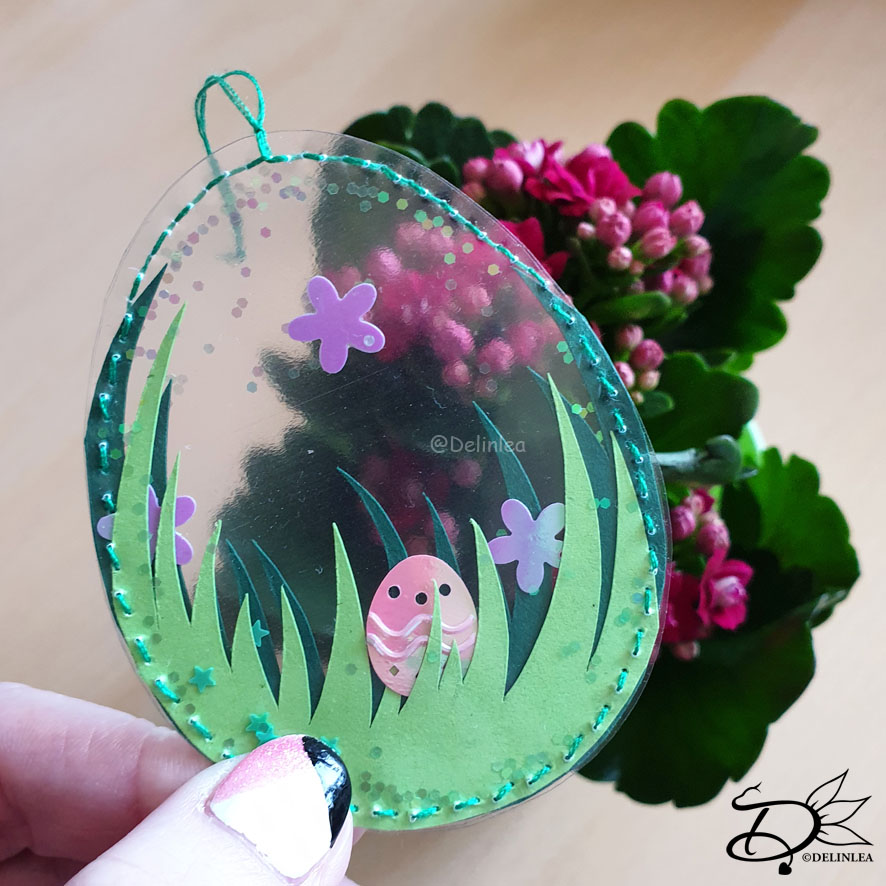
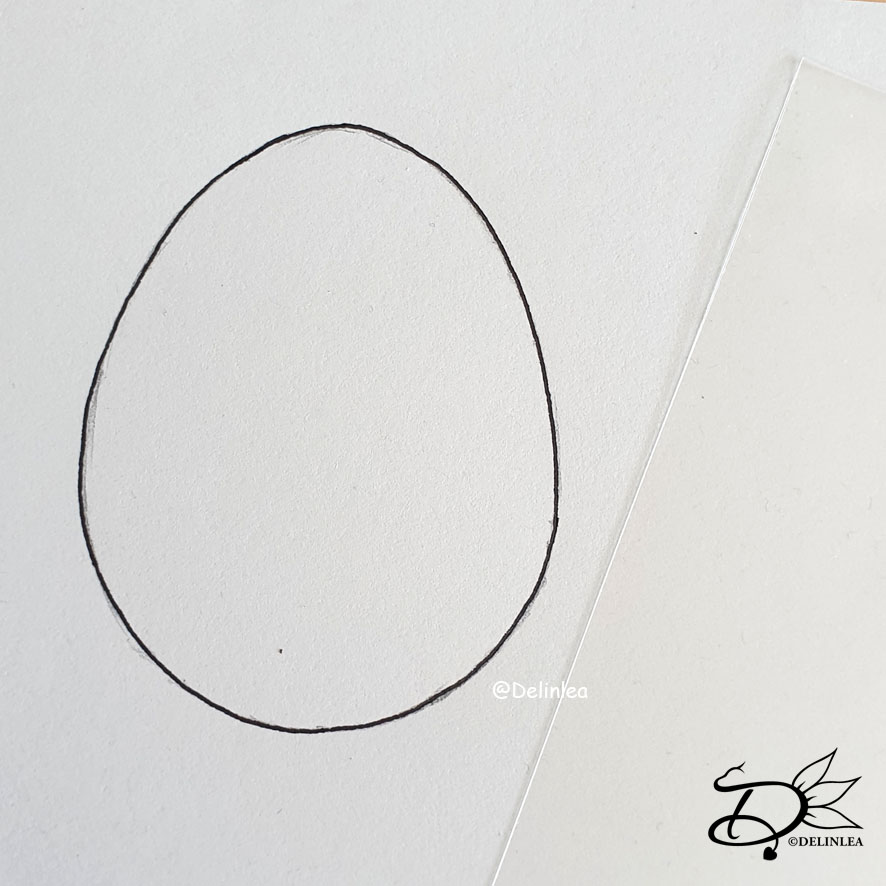
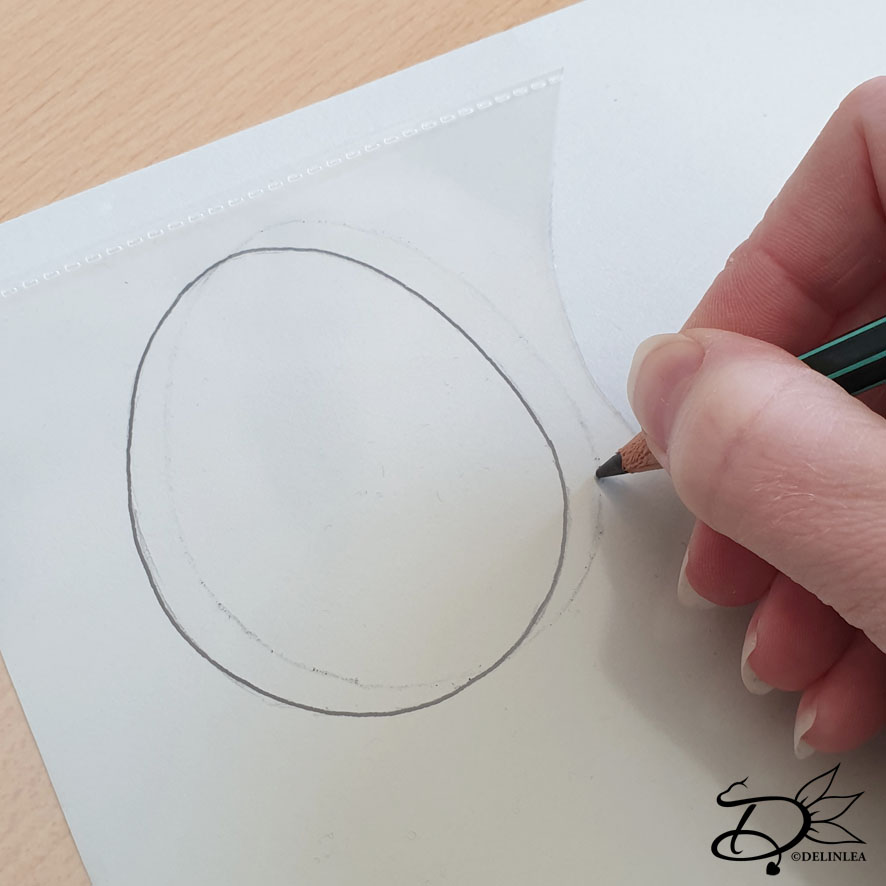
Start with drawing or printing out an egg shape on paper, make it as big as you want. This will be your guide. Trace this with pencil or a marker (test what works for you) on a sheet of clear plastic. Make sure you cut out 2 of the same shape.

Option 1, Easy

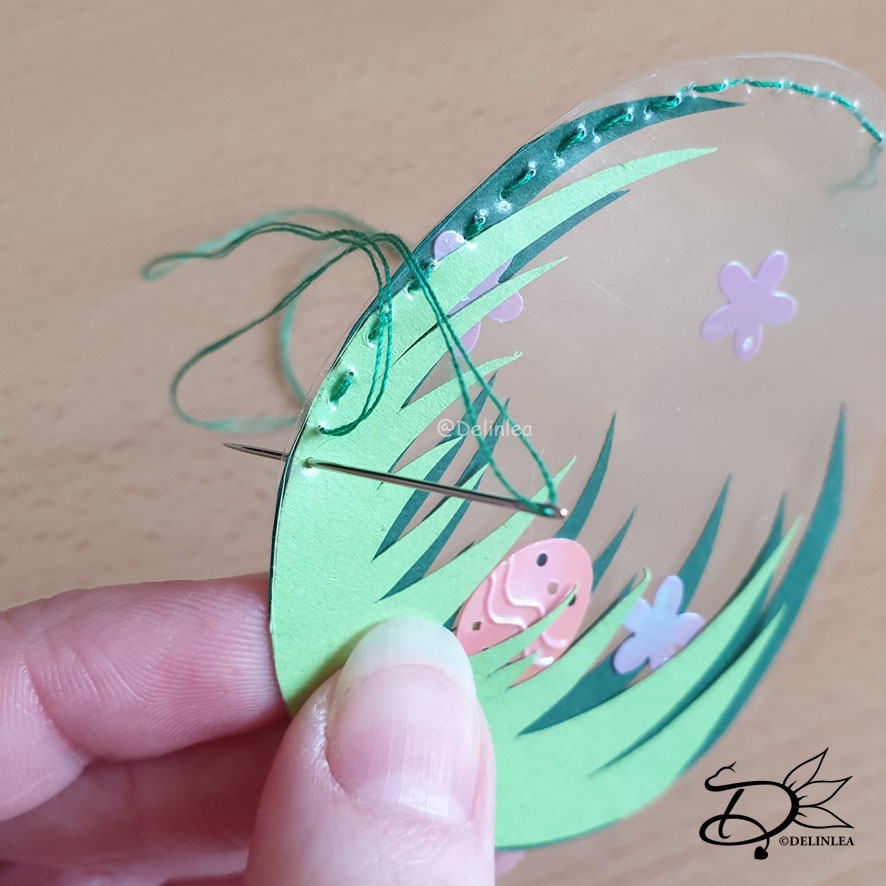
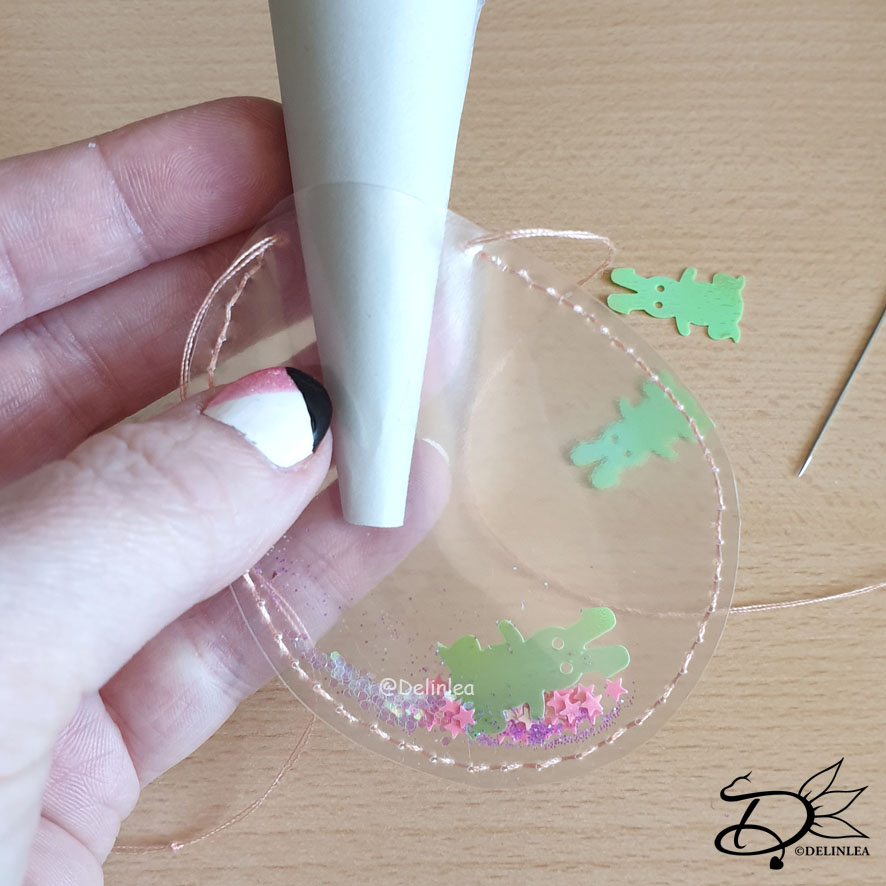
Prepare some glitter, sequins, etc, that you can put inside your egg. Set it aside and continue with the clear egg. Take your needle and thread color of choice and start sewing the 2 sheets of the egg together. Sew about 2-5mm from the edge, with a running stitch (a blanket stitch will work too). Try to make your stitches not too far apart from each other, or the glitter or other things will fall out. When you almost reached the end of sewing the 2 pieces together, about 2cm left, open this hole up and put the glitter you prepared inside, you might wanna make a funnel of paper to make this easier. Then continue to sew the opening close. Tie a knot in the yarn and with the left over yarn you can make a loop to be able to hang it.

Option 2, Harder

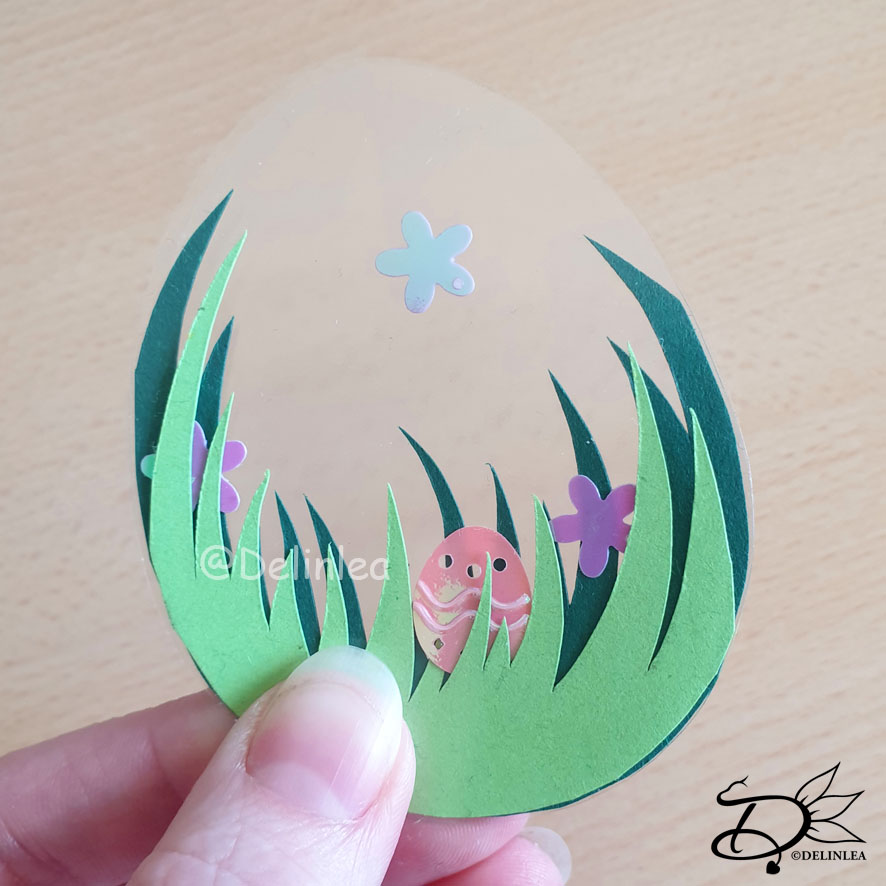
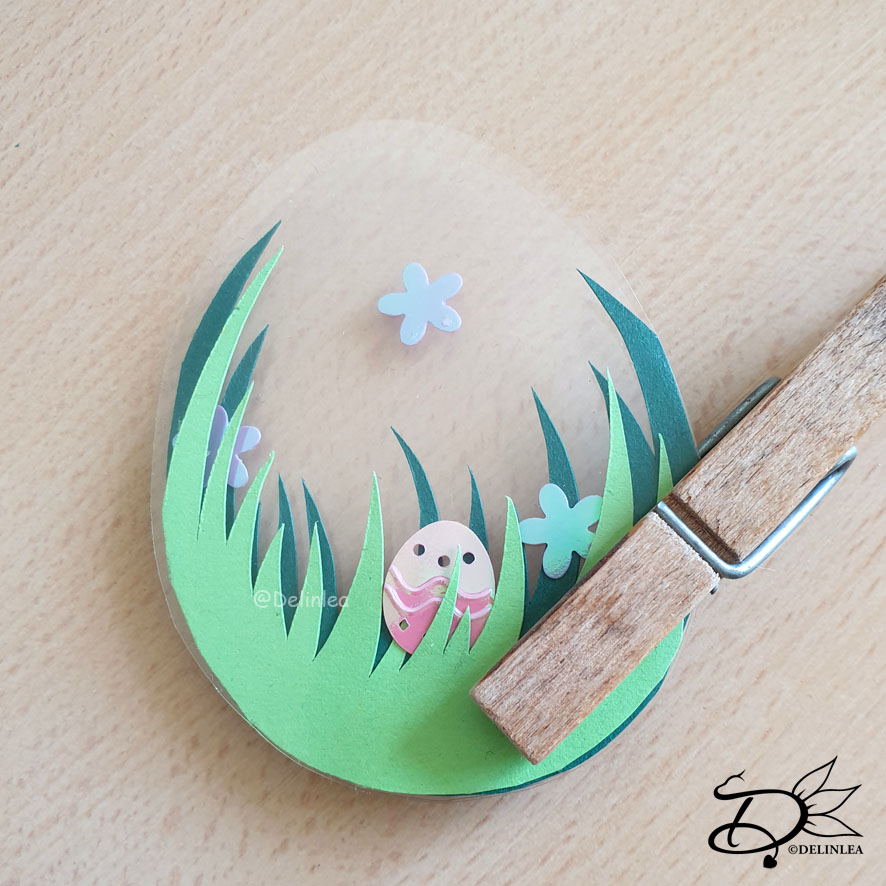
Trace the egg on green colored paper as well, I used 2 different shades of green but 1 is fine as well. Draw grass in those egg shapes and cut out. You can make as many layers as you like, use a bit of glue in between the layers to make it a bit easier. Now you can choose to glue some of the sequins/glitter to the grass already, or add those later, or do both, glue and add later like I did. Next, put the paper in between the two plastic egg shape sheets. Make sure to hold it in place well, maybe with the help of a clip. Now start sewing like I explained by option 1.

Wrap up

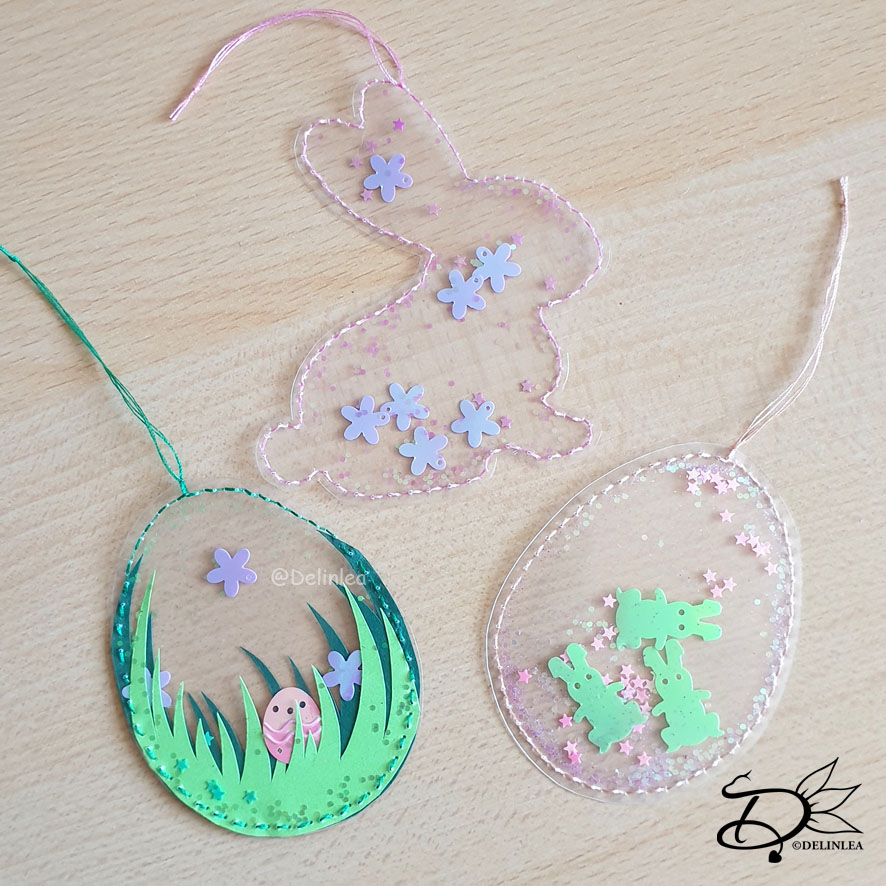
Now your fun egg shape shakers are done! I hope you will like them, I absolutely did and went ahead to make some different shapes as well. I love the clear and shaker effect of it. A bit more playful! If you had fun making some as well, make sure to show me on Twitter or Instagram with #DelinleaDIY, I’d love to see what you made!

Have a wonderful day and I’ll see you next week!

Love
Danielle

PS. if you love those DIYs, maybe you’d like to support me on Ko-Fi?! So I can keep making content like this!

// ©2021 Delinlea / Danielle Kaal // Items made with this tutorial may be sold in a limited number. Credit to ‘Delinlea’ is appreciated. Not allowed for mass production or commercial purposes. You may not reproduce, translate, share, freely distribute or sell this tutorial as your own in digital or printed from.

Posted in: Crafting, Easter Tagged: cute, decoration, DIY, Easter, kawaii, Shakers, spring, Tutorial

♥ Flounder Ufufy Amigurumi

19 maart 2021 by Delinlea 1 Comment

Hey Lovelies! So, the last 2 weeks, as you probably noticed, I couldn’t make a blog post. We just moved, and the lovely people who renovated this place, cut all the internet cables. And guess what, we had to wait forever for someone to fix it. Good timing, to have no internet, in times like we live in now. Oh well, we survived 2 weeks without and we are back online. I am so tired and full of pain from the move though, so it was a challenge to upload a pattern today, a day late, I’m so glad I made it! Today I wanted to show you how to make a Flouder Ufufy, from the Little Mermaid. I hope you will love him a lot!

Flounder Ufufy made with the Amigurumi technique

For this Pattern you’ll need:
♥ Yarn in the colors Yellow, Light Blue and Darker Blue. (I used Zeeman SuperSoft).
♥ Crochet Hook. (I used a 2mm hook).
♥ Stitch Markers.
♥ Sewing Pins
♥ Stuffing.
♥ Yarn Needle.
♥ Felt in the color Black.
♥ Scissors.
♥ (Fabric) Glue.

Stitches used (US Terms):
Magic Ring.
CH = Chain.
SLST = Slip Stitch.
SC = Single Crochet.
ST = Stitch.
Inc = Increase.
Dec = Decrease.
(…) = Repeat the space in brackets the given number of times.
[…] = Total number of stitches.

Pattern Flounder

This pattern is made using continuous rounds, unless stated otherwise.

Body
Start with the color Yellow.

1: 6SC in a Magic Ring. [6]
2: 2SC in each st around. [12]
3: (1SC, inc) 6 times. [18]
4: (2SC, inc) 6 times. [24]
5: 24SC. [24]
6: 24SC. [24]
From here on you will change colors to create the stripes on his back.
7: Yellow; (3SC, inc) 2 times, Blue; (3SC, inc) 2 times, Yellow; (3SC, inc) 2 times. [30]
8: Yellow; 30SC. [30]
9: Yellow; 30SC. [30]
10: Yellow; 11SC, Blue; 8SC, Yellow; 11SC. [30]
11: Yellow; 30SC. [30]
12: Yellow; 30SC. [30]
13: Yellow; 12SC, Blue; 6SC, Yellow, 12SC. [30]
14: Yellow; 30SC. [30]
15: Yellow; 30SC. [30]
16: Yellow; 13SC, Blue; 4SC, Yellow; 13SC. [30]
Continue with Yellow only.
17: 30SC. [30]
18: (3SC, dec) 6 times. [24]
19: (2SC, dec) 6 times. [18]
Stuff the body.
20: (1SC, dec) 6 times. [12]
21: Dec around. [6]
Fasten off and weave in tail.

Snout
Use the color Yellow.

1: 6SC in a Magic Ring. [6]
2: (3SC in the next st, 2SC) 2 times. [10]
3: 10SC. [10]
Fasten off and leave a long tail for sewing.

Fins/Arms and Tail (Make 3)
Start with the color Light Blue

1: Ch5, insert in the second ch from hook, inc, change to the color Dark Blue; 2SC, change back to Light Blue; 3SC in the next st, continue along the other side of the chain, change to the color Dark Blue; 2SC, change back to the color Light Blue; 1SC. [10]
2: (Light Blue; 2SC, Dark Blue, 2SC, Light Blue; 1SC) 2 times. [10]
3: (Light Blue; Dec, Dark Blue, 2SC, Light Blue; 1SC) 2 times. [8]
Fasten off and leave a long tail for sewing.

Fin/Hair
Start with the color Light Blue.
This part is not made with continues rounds.

1: Ch2, insert in second ch from hook, 1 sc, turn. [1]
2: Ch1, inc, turn. [2]
3: Ch1, 2SC, turn. [2]
Change to the color Dark Blue.
4: Ch1, 2SC, turn. [2]
Change to the color Light Blue.
5-6: Ch1, 2SC, turn. [2]
Change to the color Dark Blue.
7: Ch1, 2SC, turn. [2]
Change to the color Light Blue.
8: Ch1, 2SC, turn. [2]
9-10: Ch3, insert in second ch from hook, 2SlSt. [2]
11: Ch2, insert in second ch from hook, 1SlSt. [1]
Fasten off and leave a long tail for sewing.

Assembling

Whenever I start assembling a Amigurumi, I use sewing pins first to put everything together. This way I can move all parts around easily until I am happy with how it looks. Then I will sew it on. I recommend you do so as well.

I started with sewing on Flounder his head fin/hair, the third ‘hair’ with be on top of his head. Make sure to keep checking that the stripes of his body go on the back. Next sew on his snout, mine came around row 8 and down, from the body. Next sew on his arm fins and the tail. Last cut 2 eyes (and eyebrows) from the black felt and glue those on. With a bit of sewing thread I made the eyebrows, since I thought that was easier as the felt, but you can totally do felt as well!

Flounder is already finished, so cute right?! I hope you had fun making him. If you made him, please show me on Twitter or Instagram, I would love to see what you create with my patterns.

Have a wonderful day!

Love
Danielle

PS. if you love those Ufufy patterns, maybe you’d like to support me on Ko-Fi?! So I can keep making content like this!

// ©2021 Delinlea / Danielle Kaal // Items made with this pattern may be sold in a limited number. Credit to ‘Delinlea’ is appreciated. Not allowed for mass production or commercial purposes. You may not reproduce, translate, share, freely distribute or sell this pattern as your own in digital or printed from.

Posted in: Crafting, Crochet, Ufufy Tagged: Amigurumi, Crochet, cute, Disney, Flounder, Free Pattern, haken, kawaii, The little mermaid

♥ Thumper Ufufy Amigurumi

26 februari 2021 by Delinlea Leave a Comment

Hey Lovelies! I’m a day late with uploading! Nooo~~ Haha, it’s a lot to move houses all by yourself, and keeping everything up that has to be done. And I realized that I seriously have to reduce all of my craft supplies. Let’s see what I can all make with it, I’ve plenty of ideas. Anyway, back to today’s blog, Let’s make this adorable Thumper ufufy! It’s one of those I really needed to add to our pattern collection. I hope you will love him.

Thumper Ufufy with the Amigurumi Technique

For this Pattern you’ll need:
♥ Yarn in the colors Grey, Light Yellow, White and Pink. (I used Zeeman SuperSoft).
♥ Bit of Fluffy White yarn.
♥ Crochet Hook. (I used a 2,5mm and a bigger hook for the fluff yarn).
♥ Stitch Markers.
♥ Sewing Pins
♥ Stuffing.
♥ Yarn Needle.
♥ Felt in the colors Black and Pink.
♥ Scissors.
♥ (Fabric) Glue.

Stitches used (US Terms):
Magic Ring.
CH = Chain.
SLST = Slip Stitch.
FSC = Foundation Single Crochet.
SC = Single Crochet.
ST = Stitch.
Inc = Increase.
Dec = Decrease.
(…) = Repeat the space in brackets the given number of times.
[…] = Total number of stitches.

Pattern Thumper

This pattern is made using continuous rounds, unless stated otherwise.

Body
Start with the color Grey.

1: 6SC in a Magic Ring. [6]
2: 2SC in each st around. [12]
3: (1SC, inc) 6 times. [18]
4: (2SC, inc) 6 times. [24]
From here on you will change colors to make the eyes etc.
5: Grey; 11SC, Light Yellow; 2SC, Grey; 2SC, Light Yellow; 2SC, Grey; 7SC. [24]
6: Grey; (3SC, inc) 2 times, 3SC, (Light Yellow, inc, 2SC, Grey; 1SC) 2 times, Grey; inc, 3SC, inc. [30]
7: Grey; 13SC, Light Yellow; 4SC, Grey; 1SC, Light Yellow; 4SC, Grey; 8SC. [30]
8: Repeat row7.
9: Grey; 11SC, Light Yellow; 13SC, Grey; 6SC. [30]
10: Repeat row9.
11: Grey; 13SC, Light Yellow; 9SC, Grey; 8SC. [30]
12: Grey; 13SC, Light Yellow; BL 9SC, Grey; continue normally, 8SC. [30]
13: Repeat row11.
14: Repeat row11.
15: Grey; 12SC, inc, Light Yellow; dec, 5SC, dec, Grey; inc, 7SC. [30]
16: Grey; 13SC, inc, Light Yellow; dec, 3SC, dec, Grey; inc, 8SC. [30]
Continue with Grey only.
17: 30SC. [30]
18: (3SC, dec) 6 times. [24]
19: (2SC, dec) 6 times. [18] Stuff the body!
20: (1SC, dec) 6 times. [12]
21: (dec) 6 times. [6]
Fasten off and weave in tail.
At row12 you worked in the Back Loops only, now attach the fluffy yarn in the Front Loops, and make 9SlSt. Fasten off and weave in tail. My fluffy yarn was too long so I gave it a little trim.

Legs & Tail (Make 5)
Make 4 in the color Grey for the legs and 1 in White for the Tail.

1: 6SC in a Magic Ring. [6]
2: 6SC. [6]
Fasten off and leave a long tail for sewing.

Snout
Use the color White.

1: 6SC in a Magic Ring. [6]
2: (1SC, inc) 3 times. [9]
Fasten off and leave a long tail for sewing.

Ears (Make 2)
Use the color Grey.

1: 4SC in a Magic Ring. [4]
2: (Inc, 1SC) 2 times. [6]
3-6: 6SC. [6]
Fasten off and leave a long tail for sewing.

Inside of the Ears (Make 2)
Use the color Pink.

Make 4FSC.
Fasten off and leave a long tail for sewing.

Assembling

Whenever I start assembling a Amigurumi, I use sewing pins first to put everything together. This way I can move all parts around easily until I am happy with how it looks. Then I will sew it on. I recommend you do so as well.

Start with sewing on the legs of Thumper, around his belly. Then sew the inside of the ears to the grey base of the ears, after sew them to the top of the head. Then sew on his snout and tail. Out of some pink felt, cut a small triangle, and from black felt 2 eyes. Glue those all on.

Thumper is already finished! I hope you had fun making him. If you made him, please show me on Twitter or Instagram, I would love to see what you create with my patterns.

Have a wonderful day!

Love Danielle

PS. if you love those Ufufy patterns, maybe you’d like to support me on Ko-Fi?! So I can keep making content like this!

// ©2021 Delinlea / Danielle Kaal // Items made with this pattern may be sold in a limited number. Credit to ‘Delinlea’ is appreciated. Not allowed for mass production or commercial purposes. You may not reproduce, translate, share, freely distribute or sell this pattern as your own in digital or printed from.

Posted in: Crafting, Ufufy Tagged: Amigurumi, Crochet, cute, Disney, Free Pattern, haken, kawaii, Thumper, Ufufy

♥ Toy Story Alien TsumTsum Amigurumi

4 februari 2021 by Delinlea 6 Comments

Hey Lovelies! I’m finally here with a new pattern! Life didn’t go as planned, all of a sudden we are gonna move, and pretty quick as well, within this month. I will try my best to keep uploading, but if I can’t you know why. I was asked if I could make a pattern for the Toy Story Alien Tsum Tsum, and of course I can help with that! I hope you will like him!

Toy Story Alien TsumTsum made with the Amigurumi Technique

For this Pattern you’ll need:
♥ Yarn in the colors;  Green, Light Blue, Dark Blue and Purple. (I used Zeeman Supersoft)
♥ Crochet Hook (I used a 2,5mm hook).
♥ Stuffing.
♥ Scissors.
♥ Sewing Pins.
♥ Yarn Needle.
♥ Felt for the facial details.
♥ (Fabric) Glue.

Stitches used (US Terms):
Magic Ring.
CH = Chain.
SLST = Slip Stitch.
SC = Single Crochet.
FSC = Foundation Single Crochet.
ST = Stitch.
Inc = Increase.
Dec = Decrease.
(…) = Repeat the space in brackets the given number of times.
[…] = Total number of stitches.

Pattern Toy Story Alien TsumTsum

This pattern is made using continues rounds, unless stated otherwise. Use a stitch marker to mark the first stitch.

Body
Start with the color Green.

1: 6SC in a Magic Ring. [6]
2: 2SC in each st around. [12]
3: (1SC, inc) 6 times. [18]
4: (2SC, inc) 6 times. [24]
5: (3SC, inc) 6 times. [30]
6: (4SC, inc) 6 times. [36]
7: (5SC, inc) 6 times. [42]
8-4: 42SC. [42]
Change to the color Light Blue.
15-29: 42SC. [42]
30: (5SC, dec) 6 times. [36]
31: (4SC, dec) 6 times. [30]
32: (3SC, dec) 6 times. [24]
Stuff the body.
33: (2SC, dec) 6 times. [18]
34: (1SC, dec) 6 times. [12]
35: dec around. [6]
Fasten off and weave in tail.

Legs (Make 4)
2 in the color Green, 2 in the color Dark Blue.

1: 4SC in a Magic Ring. [4]
2: 2SC in each st around. [8]
3-5: 8SC. [8]
Fasten off and leave a long tail for sewing.

Collar & Belt.
Collar in the color Purple, Belt in the color Dark Blue.

42FSC, SlSt in the first st.
Sew it close neatly and leave a long tail for sewing it to the body.

Eyes (Make 3)
Use the color White.

1: 6SC in a Magic Ring. [6]
2: 2SC in each st around. [12]
Fasten off and leave a long tail for sewing.

Ears (Make 2)
Use the color Green.

1: 4SC in a Magic Ring. [4]
2: (inc, 1SC) 2 times. [6]
3: (1SC, inc) 3 times. [9]
4-7: 9SC. [9]
8: (1SC, dec) 3 times. [6]
Fasten off and leave a long tail for sewing.

Antenna
Use the color Green.

1: 4SC in a Magic Ring. [4]
2: 2SC in each st around. [8]
3-4: 8SC. [8]
5: Dec around. [4]
6-8: 4SC. [4]
Fasten off and leave a long tail for sewing.

Assembling

Whenever I start assembling a Amigurumi, I use sewing pins first to put everything together. This way I can move all parts around easily until I am happy with how it looks. Then I will sew it on. I recommend you do so as well.

Sew the purple collar on where the Green of the body goes over into Light Blue. Then sew on his legs, the Greens go just after the collar, and the Dark Blue legs go at the end of the body. After, sew on the belt as well, just in front of the back legs.
Now position the first eye a bit off center, higher, of the face. When you got that one right, you will know where the other eyes will go as well.
Then on top of his head goes the Antenna, and to the sides the ears. Last cut some pupils out of Black felt and glue those to the eyes.

Your Toy Story Alien is done! I hope you had fun making this buddy! Let’s see who to make next! If you have any suggestions let me know down below or message me on Twitter or Instagram! And don’t forget to show your Tsum Tsum to me there as well, I’d love to see what you make using my patterns!

Have a wonderful day!

Love Danielle

PS. if you love those Tsum Tsum patterns, maybe you’d like to support me on Ko-Fi?! So I can keep making content like this!

// ©2021 Delinlea / Danielle Kaal // Items made with this pattern may be sold in a limited number. Credit to ‘Delinlea’ is appreciated. Not allowed for mass production or commercial purposes. You may not reproduce, translate, share, freely distribute or sell this pattern as your own in digital or printed from.

Posted in: Crafting, Crochet, Tsum Tsum Tagged: Alien, Amigurumi, Crochet, cute, Disney, haken, kawaii, toy story, Tsum Tsum, yarn

♥ Merry Christmas!

25 december 2020 by Delinlea Leave a Comment

Hey Lovelies! I wanted to make one last post to close up this Blogmas 2020 adventure! I hope you enjoyed all the patterns I made! It sure was a lot of work to get everything done, but when I see all the cute things, it just makes me happy. Specially your response!

Merry Christmas!!

Merry Christmas, Blogmas wrap up picture

Enjoy today, relax, eat well but not too much haha.

Have a wonderful day and I’ll see you in the new year!

Love
Danielle

PS. if you love those Blogmas patterns, maybe you’d like to support me on Ko-Fi?! So I can keep making content like this!

Posted in: Blogmas 2020, Christmas, Crafting, Crochet Tagged: Amigurumi, Blogmas 2020, Crochet, cute, haken, kawaii, wrap up
« Vorige 1 2 3 4 5 6 7 8 … 20 21 22 23 24 Volgende »

What are you looking for?!

My Socials

Ko-Fi

I love making all these free things for you, tho it would be very helpfull if you can support me on Ko-Fi! (You don’t have to tho, totally up to you!)

Ko-Fi Shop!!

In my Ko-Fi shop you can find PDF Amigurumi Patterns!! You can pay easily with PayPal.
Go to the shop here!!

Recent Blog Posts

  • ♥ Happy 2022!
  • ♥ Day 12; Lights
  • ♥ Day 11; Flower Deco
  • ♥ Day 10; Snowman
  • ♥ Day 9; Gingerbread Houses

Recent Comments

  • Delinlea op ♥ Pietje Gnome Amigurumi
  • Delinlea op ♥ Toy Story Alien TsumTsum Amigurumi
  • Delinlea op ♥ Pua Tsum Tsum Amigurumi
  • Charli op ♥ Free Pattern; CNY Mouse Amigurumi
  • Peter Pesch op ♥ Pietje Gnome Amigurumi

Categories

  • animation
  • Beadwork
  • Blogmas 2018
  • Blogmas 2020
  • Blogmas 2021
  • Books
  • Bujo
  • Christmas
  • Christmas CAL 2019
  • Christmas Countdown 2017
  • Contest
  • Crafting
  • Crochet
  • Drawing
  • Drawing Lesson
  • Easter
  • Geen categorie
  • Life
  • Miniature
  • Nail Art
  • New Year
  • Paper
  • plush
  • Pokemon
  • Poseable Art Doll
  • Recipe
  • Sewing
  • Shop Pattern
  • Sinterklaas
  • Social Media
  • Tsum Tsum
  • Ufufy

Copyright © 2025 Delinlea - My little fantasy world.

Family WordPress Theme by themehall.com