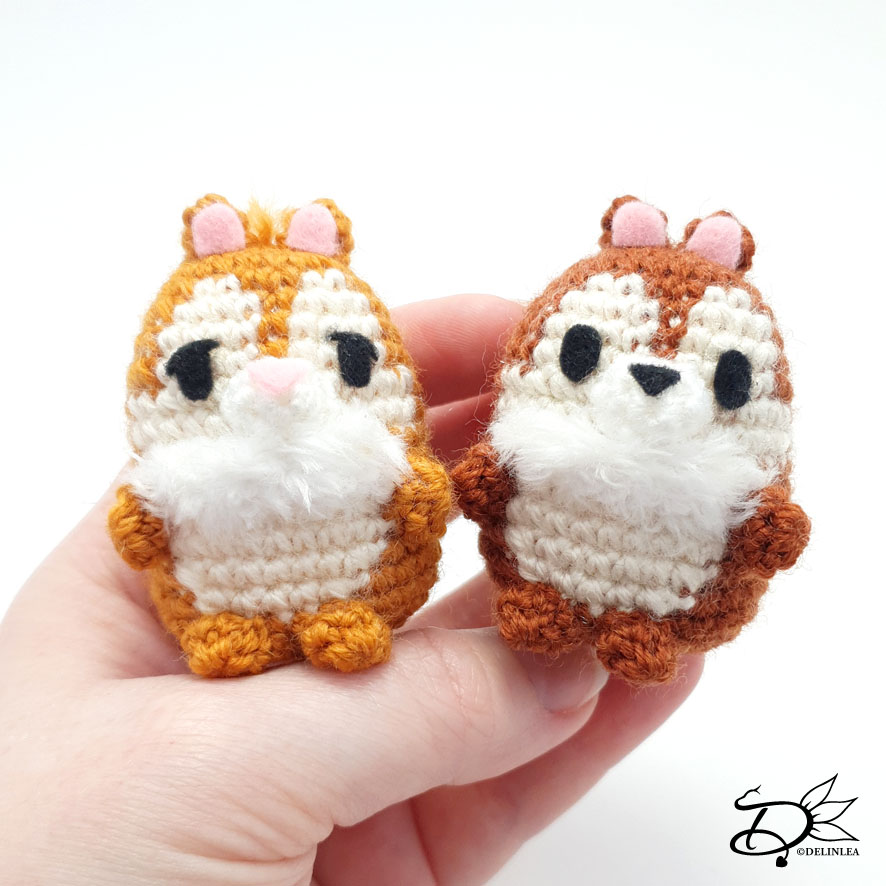
Hey Lovelies! I hope you are doing well these days. I’m gonna keep the intro short today, since I am clueless what to write haha. I usually know what to write, and now I’m like blank. Oh well, some days are like that I guess. The pattern for today are Chip and Dale Ufufy! I finally made those cuties. I hope you will enjoy them and let’s go to the pattern.
For this Pattern you’ll need:
♥ Yarn in the colors Brown (2 colors, check Chip and Dale to see what color of Brown), Light Yellow, White and Black.
♥ Bit of Fluffy White yarn.
♥ Crochet Hook. (I used a 2mm and a bigger hook for the fluff yarn).
♥ Stitch Markers.
♥ Sewing Pins
♥ Stuffing.
♥ Yarn Needle.
♥ Felt in the colors Black/Dark Brown, White and Pink.
♥ Scissors.
♥ (Fabric) Glue.
Stitches used (US Terms):
Magic Ring.
CH = Chain.
SLST = Slip Stitch.
SC = Single Crochet.
ST = Stitch.
Inc = Increase.
Dec = Decrease.
(…) = Repeat the space in brackets the given number of times.
[…] = Total number of stitches.
Pattern Chip and Dale
This
pattern is made using continuous rounds, unless stated otherwise.
Both Chip and Dale have a different color brown, so check pictures to figure out
which color you need.
Body
Start with the color Brown.
1: 6SC in a Magic Ring. [6]
2: 2SC in each st around. [12]
3: (1SC, inc) 6 times. [18]
4: (2SC, inc) 6 tines. [24]
From here on you will change colors to make the eyes etc.
5: Brown; 11SC, Light Yellow; 2SC, Brown; 2SC, Light Yellow; 2SC, Brown; 7SC. [24]
6: Brown; (3SC, inc) 2 times, 3SC, (Light Yellow, inc, 2SC, Brown; 1SC) 2 times, Brown; inc, 3SC, inc. [30]
7: Brown; 13SC, Light Yellow; 4SC, Brown; 1SC, Light Yellow; 4SC, Brown; 8SC. [30]
8: Repeat row7.
9: Brown; 11SC, Light Yellow; 13SC, Brown; 6SC. [30]
10: Repeat row9.
From here you will also add black to create the stripe on his back.
11: Brown; 2SC, Black; 1SC, Brown; 10SC, Light Yellow; 9SC, Brown; 8SC. [30]
12: Brown; 2SC, Black; 1SC, Brown; 10SC, Light Yellow; BL 9SC, Brown; continue normally, 8SC. [30]
13: Repeat row11.
14: Repeat row11.
15: Brown; 2SC, Black; 1SC, Brown; 9SC, inc, Light Yellow; dec, 5SC, dec, Brown; inc, 7SC. [30]
16: Brown; 2SC, Black; 1SC, Brown; 10SC, inc, Light Yellow; dec, 3SC, dec, Brown; inc, 8SC. [30]
17: Brown; 2SC, Black; 1SC, Brown, 27SC. [30]
18: (3SC, dec) 6 times. [24]
19: (2SC, dec) 6 times. [18] Stuff the body!
20: (1SC, dec) 6 times. [12]
21: (dec) 6 times. [6]
Fasten off and weave in tail.
At row12 you worked in the Back Loops only, now attach the fluffy yarn in the Front Loops, and make 9SlSt. Fasten off and weave in tail. My fluffy yarn was too long so I gave it a little trim.
Legs (Make 4)
Use the color Brown.
1: 6SC in a Magic Ring. [6]
2: 6SC. [6]
Fasten off and leave a long tail for sewing.
Snout
Use the color White.
1: 6SC in a Magic Ring. [6]
2: (1SC, inc) 3 times. [9]
Fasten off and leave a long tail for sewing.
Ears and Tail. (Make 3)
Use the color Brown for the 2 ears and White for the tail.
1: 4SC in a Magic Ring. [4]
2: (inc, 1SC) 2 times. [6]
Fasten off and leave a long tail for sewing.
Assembling
Whenever I assemble Amigurumi, I use sewing pins to pit the piece together first, so I can all parts move around easily. When I am happy, I’ll sew them on. I recommend you do so as well!
Position the snout right under the Brown stripe between his eyes and sew it on. Place the ears on top of his head, side by side, and sew them on. If you are making Dale, the tail of yarn you used to sew the ears on, weave them in to the top of his head and let them peak out, fluff them up and cut to the length you like.
For the legs, 2 go, side by side, right under his belly and the arms go on both sides of the belly.
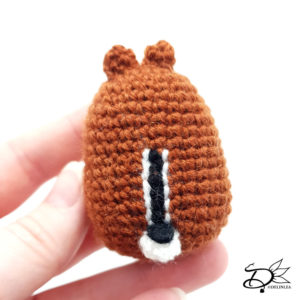
Now go to his back, take a piece of white yarn and stitch a stripe at both sides of the black stripe. (see the pics in case you are not sure what to do) and last position his tail under the stripe and sew it on.
With felt, make some eyes, a nose, a stripe to go on his tail (if you like) and the inner ears, for dale you also make some cute little teeth. Glue those on and he’s done. (The colors for the nose for Chip and Dale are different, so make sure to put the correct color for the nose, also the eyes differ in shape.)
And Chip and Dale are created! More to add to our collection. It’s growing quite big now, but I won’t stop making them yet, way too many cute ones out there, still xD. I hope you won’t mind.
I hope you made those cuties as well and if you did, show them to me on Instagram or Twitter and use the #DelinleaDIY. Since I love to see what you make with my patterns!
Have a wonderful day and I’ll see you next week!
Love
Danielle


