Delinlea - My little fantasy world
  • ♥ Home
  • ♥ About Me
  • ♥ Blogmas 2021
  • ♥ Free Patterns
    • ♥ Amigurumi; Spring/Easter
    • ♥ Amigurumi; Fall/Halloween
    • ♥ Amigurumi; Winter
    • ♥ Amigurumi Tsum Tsum
    • ♥ Amigurumi Ufufy
    • ♥ Amigurumi Others
    • ♥ Christmas Countdown 2017
    • ♥ Blogmas 2018
    • ♥ Blogmas 2020
  • ♥ Tutorials
    • ♥ Easter
    • ♥ Home Deco
    • ♥ Others
  • ♥ Drawing Lessons
  • ♥ FanFic
    • ♥ Chapter 1
    • ♥ Chapter 2
    • ♥ Chapter 3
    • ♥ Chapter 4
    • ♥ Chapter 5
    • ♥ Chapter 6
    • ♥ Chapter 7
  • ♥ Gallery
    • ♥ Crafts
    • ♥ Drawings
    • ♥ Poseable Art Dolls
  • ♥ Links
  • ♥ Contact

Crafting

♥ Free Pattern; 7 Dwarfs Ufufy

5 september 2019 by Delinlea 1 Comment

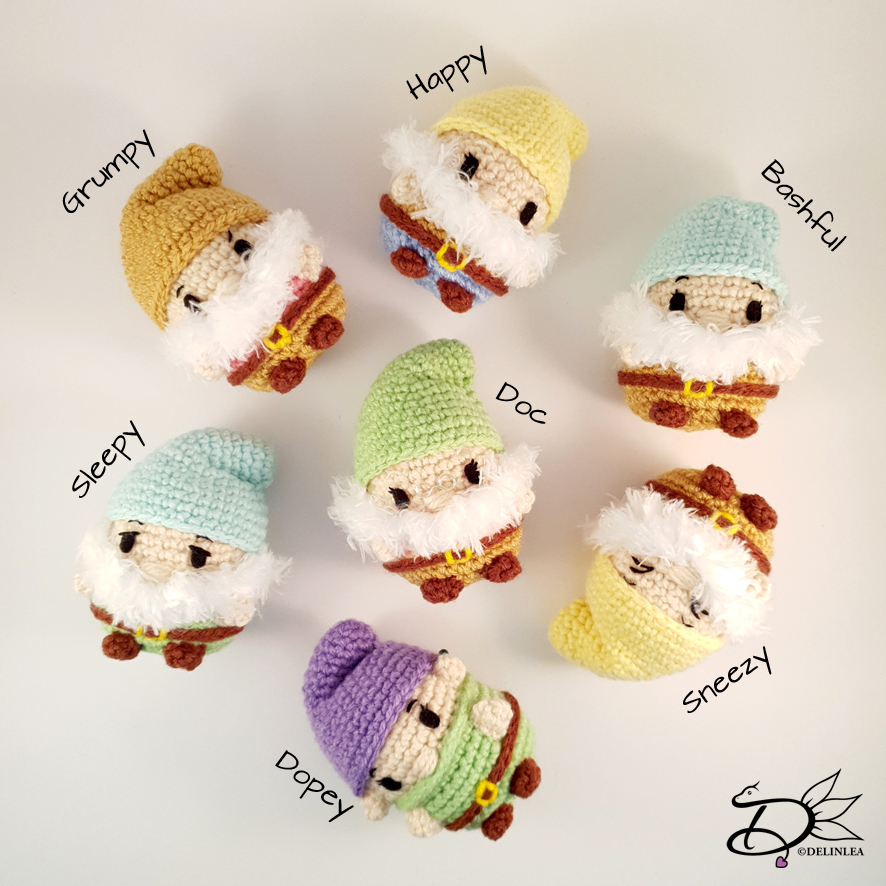
Hey Lovelies! Remember I made Dopey of the 7 Dwarfs of Snow White earlier this year?! Well I made his friends finally, couldn’t leave him alone! And it feels also perfect with fall kicking in. I don’t know I always think of dwarfs/gnome with fall xD. So, here’s today’s pattern. The remaining 6 dwarfs, Grumpy, Sneezy, Bashful, Sleepy, Doc and Happy.

For this DIY you’ll need:
♥ Yarn in the colors;  Beige, Brown, Yellow, Dark Pink, Light Orange, Light Yellow, Light Green, Blue, Light Blue, Light Brown. (I used Budgetyarn.com and Stylecraft Special DK)
♥ Fluffy Yarn in White.
♥ Crochet Hook (I used a 2,5mm hook for the ‘normal’yarn and a 3mm hook for the fluffy yarn).
♥ Stuffing.
♥ Scissors.
♥ Sewing Pins.
♥ Yarn Needle.
♥ Felt in Black.
♥ (Fabric) Glue.

Stitches used (US Terms):
Magic Ring.
BL = Back Loops.
FL = Front Loops.
CH = Chain.
SLST = Slip Stitch.
SC = Single Crochet.
ST = Stitch.
Inc = Increase.
Dec = Decrease.
(…) = Repeat the space in brackets the given number of times.
[…] = Total number of stitches.

Color Scheme for each Dwarf

  • Name                   Shirt                      Pants                    Hat
  • Grumpy               Dark Pink            Light Brown       Light Brown
  • Bashful                Light Brown       Light Brown       Light Blue
  • Doc                      Light Orange      Light Brown       Light Green
  • Happy                 Light Brown       Blue                      Light Yellow
  • Sleepy                  Light Green        Light Green        Light Blue           
  • Sneezy                 Light Brown       Light Brown       Light Yellow

For all dwarfs you alse use the colors Beige, Brown and Yellow.

Pattern

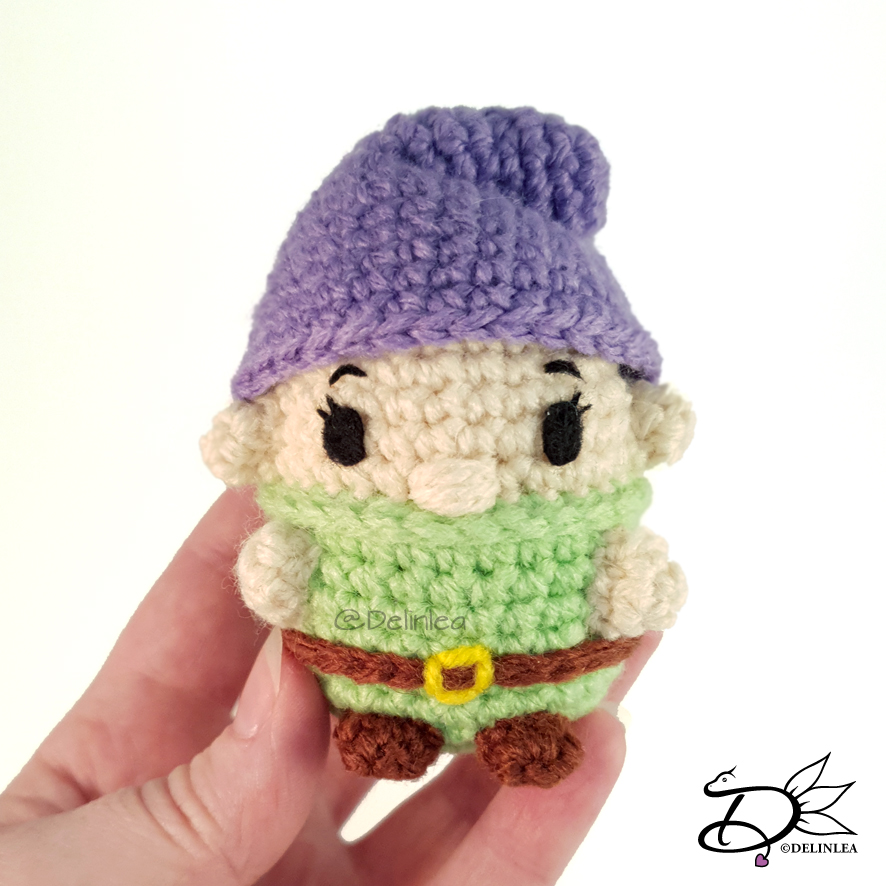
The pattern will be the same as Dopey, which you can find here. With some alternations. Look carefully which color you need for which dwarf. The faces will give each dwarf the personality, so look carefully at that.

Body

If you have a different color for the pants make sure to change color at row 16!

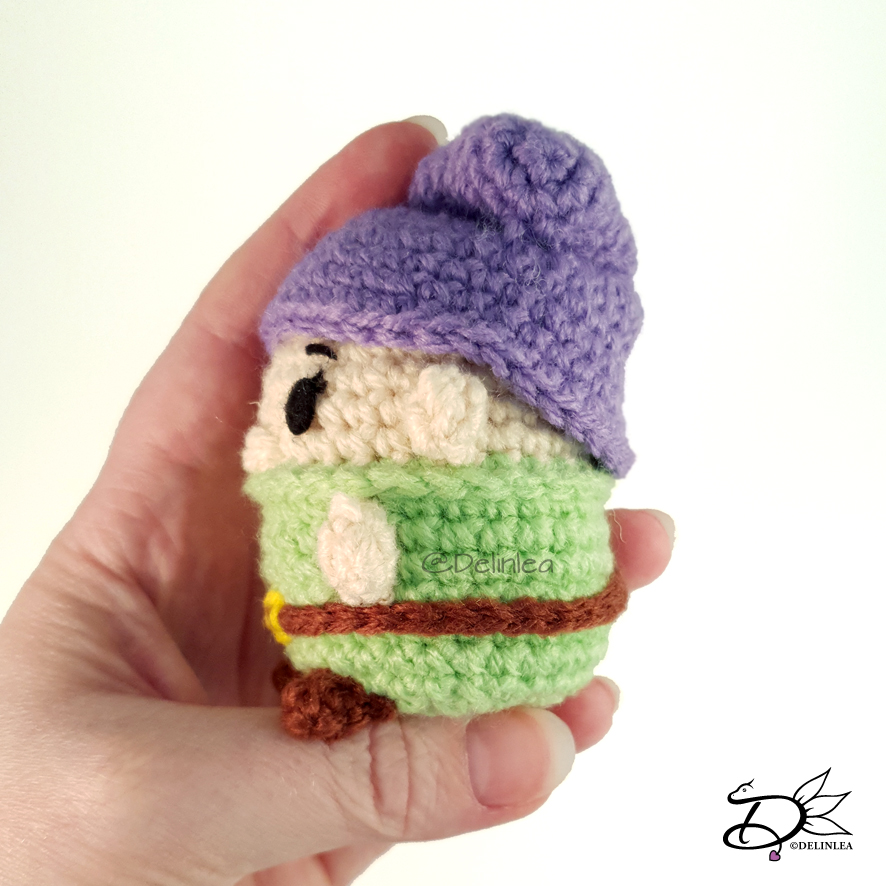
At the body, row 12, you worked in BL make sure to keep the first stitch marked. When you finished the body, work in the front loops of row 12, to make a part of the rim of the shirt but also his beard.

Beard, work with your fulffy yarn:
Skip 5 st, 7SC, 2HDC, 2DC, 2HDC, 7SC and leave the remaining 5st as they are. Fasten off and weave in tail.
The stitches you skipped you will SlSt with the matching color of the shirt. Fasten off and weave in tail.

Arms/Feet/Belt/Hat

These are all the same as Dopey, no alternations, just check you are using the right color for the right dwarf.

For those dwarfs, you don’t have to make the ears, they will dissapear under the hat anyway. You can tho, if you still want xD.

  • Sneezy
  • Sleepy
  • Happy
  • Doc
  • Basful

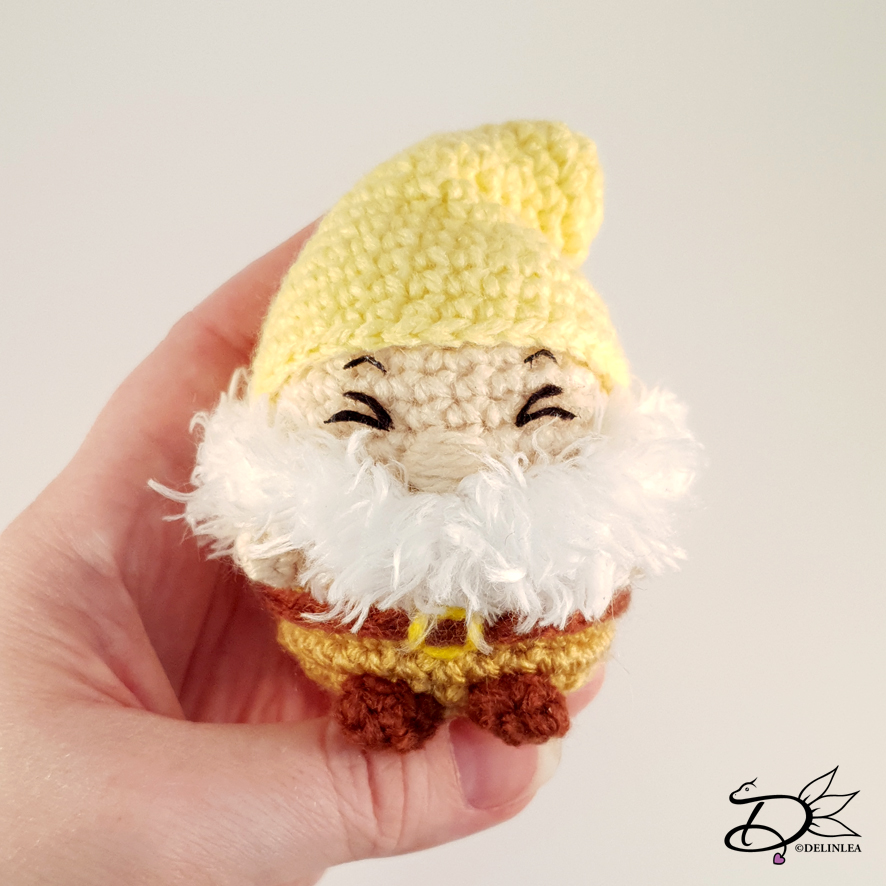
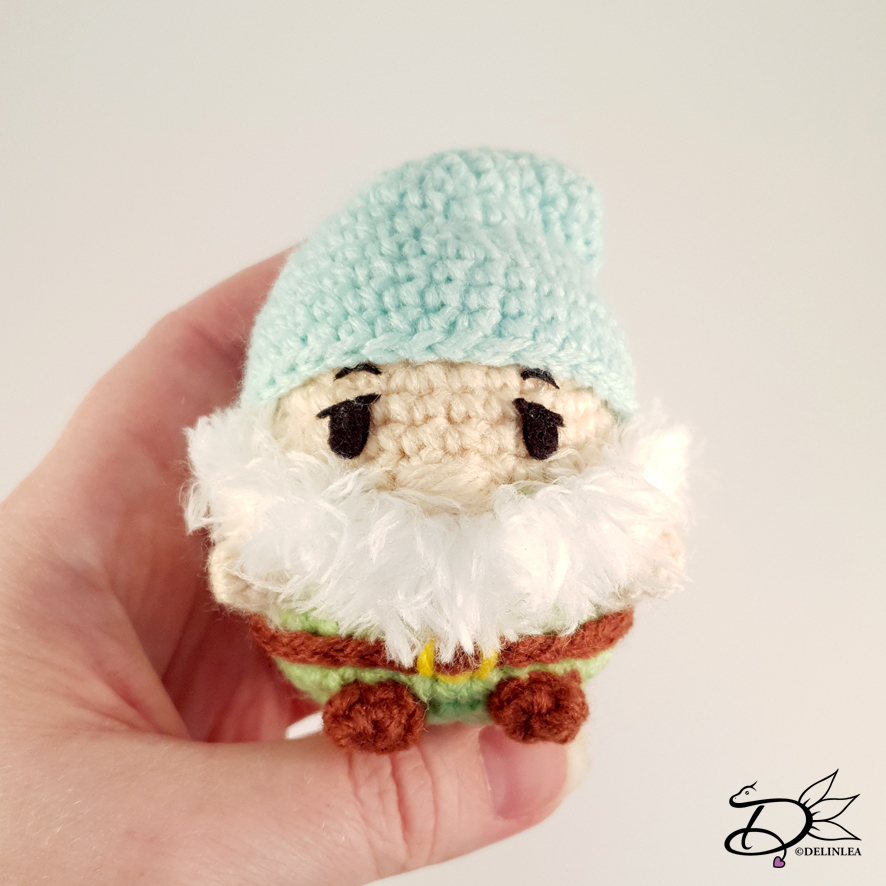
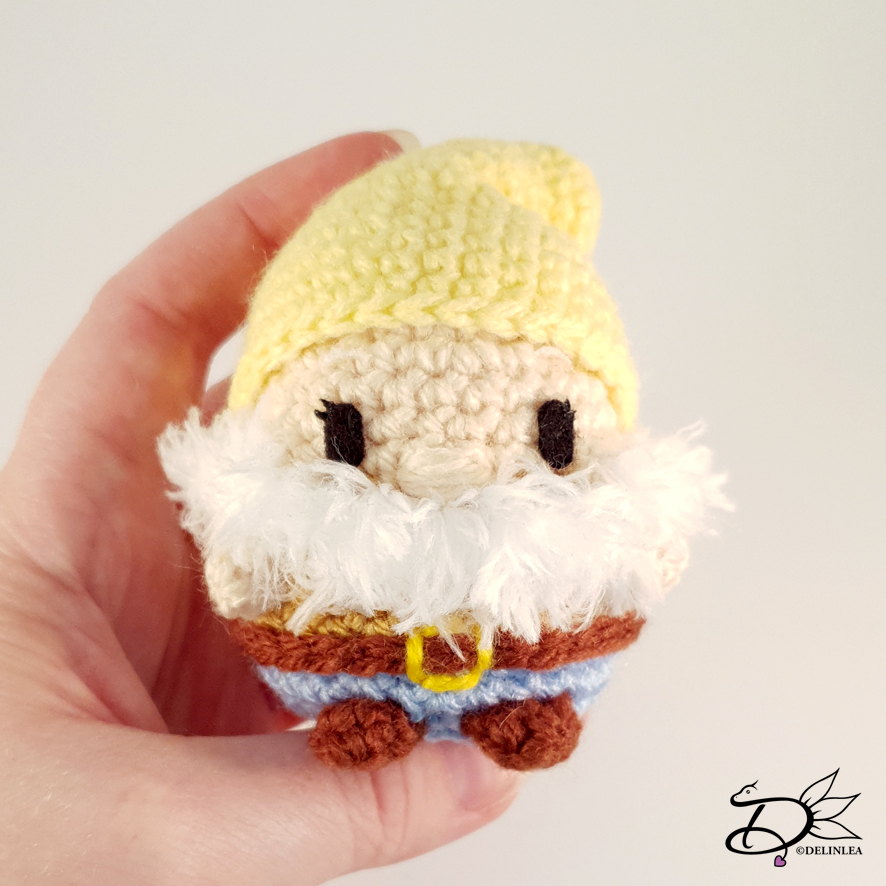
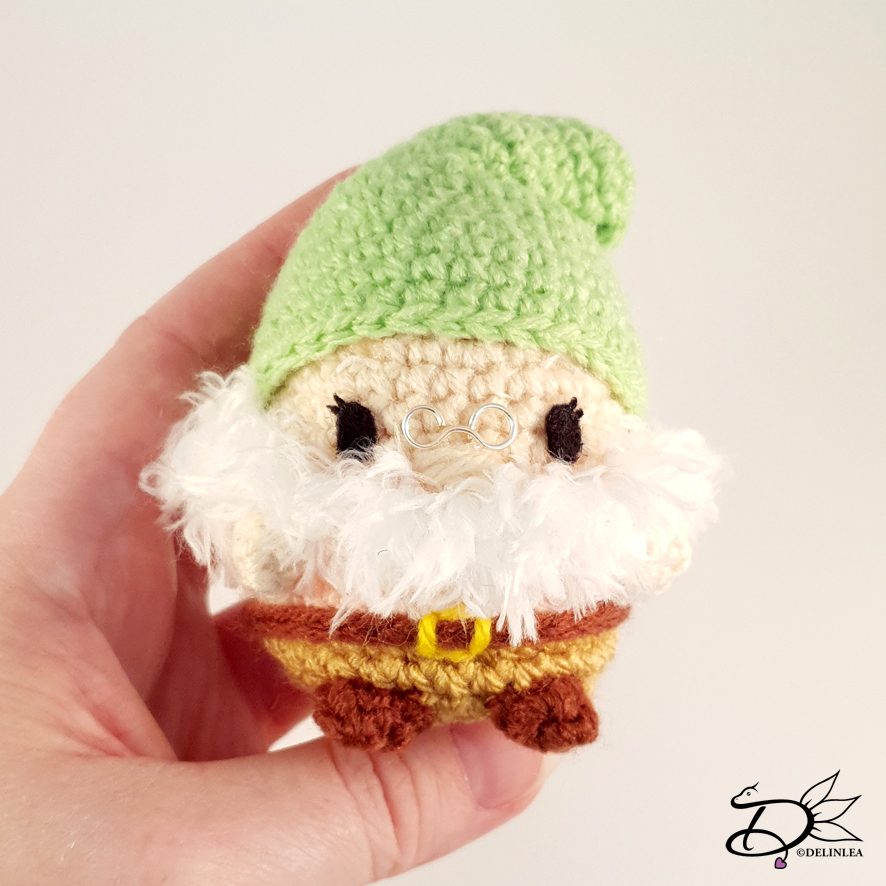
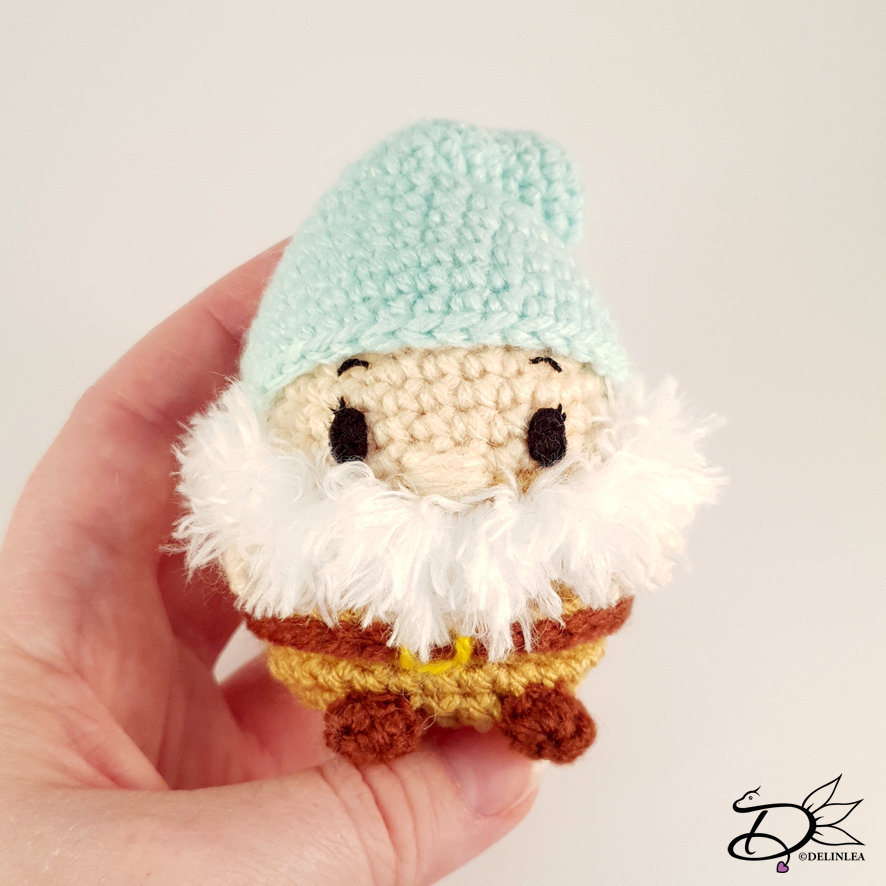
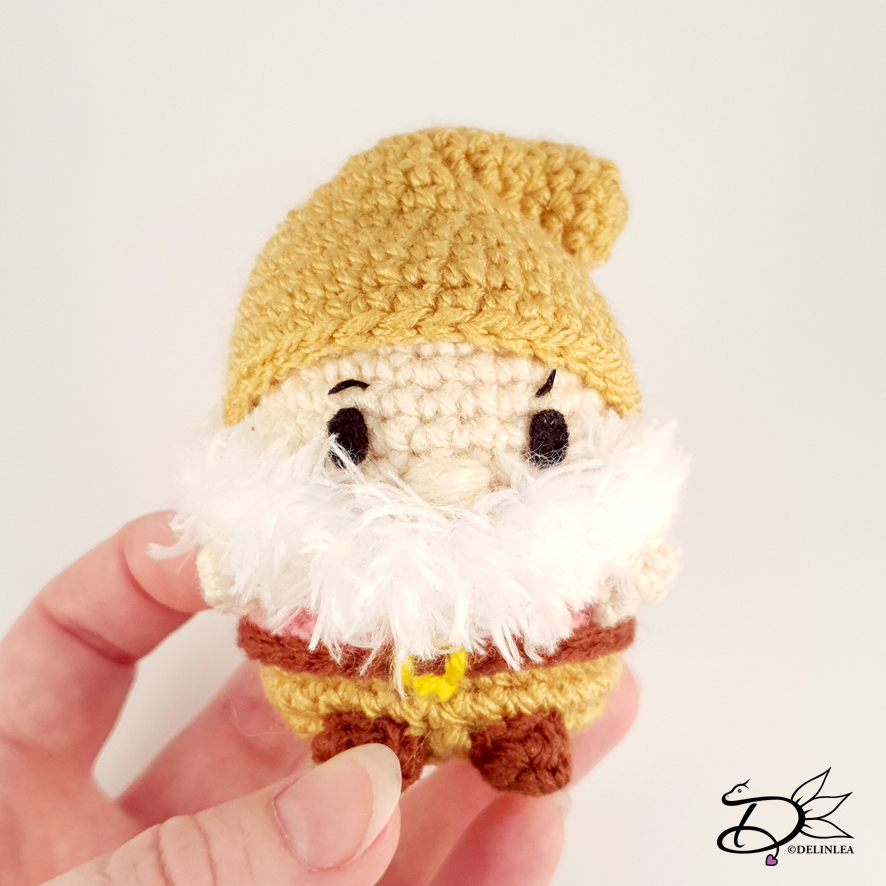
Assemble your dwarfs as described on Dopey’s Pattern. And once again, make sure to check what each face looks like, this will give the difference for each.  For Doc I made him some little glasses out of wire, so adorable!

I hope you enjoyed those instuctions. The 7 dwarfs are finally complete! Now I miss Snow White, I’ll make her one day!

Love
Danielle

Posted in: Crafting, Crochet, plush, Ufufy Tagged: 7 dwarfs, Amigurumi, Crochet, Disney, haken, snow white, Ufufy

♥ Happy Birthday to Me!

30 augustus 2019 by Delinlea Leave a Comment

Hey Lovelies! Guess what it is today?! It’s my Birthday! That’s why I am a day late with uploading, because I really wanted to upload on my day xD. And to celebrate I wanted to give you this adorable  cupcake pattern, with a very naughty dragon. I guess it likes cupcakes as much as I do! Are you ready to celebrate with me and enjoy this pattern for now?

Birthday CupCake with Naughty Dragon

What you’ll need:
♥  Yarn, StyleCraft Special: in the colors Cloud Blue, White, Walnut and Wisteria (+ some extra scrap pieces in colors of choise for sprinkles.)
♥  Crochet hook. (I used a 2,5mm hook)
♥  Stitch marker.
♥  Stuffing
♥  Yarn needle.
♥  Sewing Pins.
♥  Safety Eyes, 8mm
♥  Scissors.
♥  Sparkly Thread. (optional)

Stitches used (US Terms):
Magic Ring.
CH = Chain.
SC = Single Crochet.
ST = Stitch.
FSC = Foundation Single Crochet. (Optional)
FPSC = Front Post Single Crochet.
BL = Back Loops.
FL = Front Loops.
Inc = Increase.
Dec = Decrease.
Slst = Slip Stitch.
(…) = Repeat the space in brackets the given number of times.
[…] = Total number of stitches.

Pattern Cupcake

Cup of the Cupcake + Cake
Start with the color Cloud Blue.

1: 6SC in Magic Ring. [6]
2: Inc all around. [12]
3: (1SC, inc) 6 times. [18]
4: (2SC, inc) 6 times. [24]
5: (3SC, inc) 6 times. [30]
6: (4SC, inc) 6 times. [36]
7: BL! 36SC. [36]
8: (FPSC, BL 1SC) 18 times. [36]
9: (FPSC, BL inc) 18 times. [54]
10: (FPSC, BL 2SC) 18 times. [54]
|
14: (FPSC, BL 2SC) 18 times. [54]
Change to the color Walnut
15: FL! 54SC. [54]
16: (2SC, inc) 18 times. [72]
17: 72SC. [72]
18: 72SC. [72]
19: (2SC, dec) 18 times. [54]
20: (7SC, dec) 6 times. [48]
21: (6SC, dec) 6 times. [42]
22: (5SC, dec) 6 times. [36]
23: (4SC, dec) 6 times. [30]
24: (3SC, dec) 6 times. [24] Stuff the cupcake around here.
25: (2SC, dec) 6 times. [18]
26: (1SC, dec) 6 times. [12]
27: Dec all around. [6]
Fasten off and weave in tail.

Frosting
Use the color white.

1: Ch 16, insert in second ch from hook, 15SC, turn. [15]
2: Inc, 12SC, dec, turn. [15]
3: Dec, 12SC, inc, turn. [15]
Repeat row 2 and 3 until you have 36 rows!
Note, you always increase at the same side, and decrease always at the same side.
Note 2, I don’t use Turning Chains, but you can if you feel more comfortable doing so.
Sew the first row and the last row together.

Pattern Dragon

Head
Use the color Wisteria

1: 6SC in Magic Ring. [6]
2: Inc all around,=. [12]
3: 12SC. [12]
4: 12SC. [12]
5: 3SC, (inc) 6 times, 3SC. [18]
6: 18SC. [18]
7: (2SC, inc) 6 times. [24]
8: 24SC. [24]
|
10: 24SC. [24]
11: (2SC, dec) 6 times. [18] Add in the eye between row 5 and 6. Stuff the head around here.
12: (1SC, dec) 6 times. [12]
13: Dec all around. [6]
Fasten off and weave in tail.

Ears (Make 2)
Use the color Wisteria

1: 4FSC. [4]
2: Dec, 2SC. [3]
Fasten off and leave a long tail for sewing.

Horns (Make 2)
Use the color White.

1: 3SC in Magic Ring. [3]
2: Inc, 2SC. [4]
Fasten off and leave a long tail for sewing.

Feet (Make 2)
Use the color Wisteria

1: 6SC in Magic Ring. [6]
2: (1SC, inc) 3 times. [9]
3: 9SC. [9]
4: (2SC, inc) 3 times. [12]
5: 12SC. [12]
|
7: 12SC. [12]
Fasten off, make the foot flat and close the opening.

Arms (Make 2)
Use the color Wisteria

1: 6SC in Magic Ring. [6]
|
4: 6SC. [6]
Fasten off and leave a long tail for sewing.

Tail
Use the color Wisteria

1: 6SC in Magic Ring. [6]
2: 6SC. [6]
3: (1SC, inc) 3 times. [9]
4: 9SC. [9]
|
8: 9SC. [9]
10: (2SC, inc) 3 times. [12]
11: 12SC. [12]
|
14: 12SC. [12]
Fasten off and leave a long tail for sewing, stuff the tail as well.

Assembling

Before I sew anything together I use sewing pins to position all pieces, this way I can easily move around things until I like it. I recomment you doing this as well.

Sew the frosting to the cupcake, mine came around row 20/21. With a piece of white yarn sew a straight stitch along the top edge of the frosting. Pull both ends of the yarn and knot it tightly.
Assemble the dragons head, sew on his ears and horns. Also stitch on some ‘frosting’ with some white yarn. Then sew the head on top of the frosting, in the middle.
Position his feet, arms and tail as well and sew those on if you are happy. You don’t have to position them evenly to give it a silly look.
Last stitch on some sprinkles with some scrap yarn in colors of choise!

I hope you enjoyed my little birthday gift to you! This won’t be long online. And if you made this little cutie, make sure to show me on social media!

Love
Danielle

Posted in: Crafting, Crochet Tagged: Amigurumi, Birthday, Crochet, cupcake, cute, Dragon, haken, kawaii

♥ Free Pattern; Maleficent Tsum Tsum Amigurumi

8 augustus 2019 by Delinlea Leave a Comment

Hey Lovelies! How are you all doing?! I hope better as that I am. As you might have noticed, I haven’t uploaded a blog post for the last  two weeks. I wanna apologize for that. Due to some health problems it’s hard for me to create things. I hope those problems will be solved very soon and can go back to my regular uploading schedule. I’ll try to start with next weeks entry right away after posting this one.
Enough babbling, today it’s time for a new free Tsum Tsum Pattern. I wanted to make Maleficent for quit some time now, and I finally did! It was quit challenging tho. I had to redo some parts regularly, which is not usual for me. Hopefully you’ll like the pattern, let’s get to it.

Maleficent Tsum Tsum

For this DIY you will need:
♥  Yarn: in the colors Black, Mint Green and Purple. (I used budgetyarn.com)
♥  Crochet hook. (I used a 2,5mm hook)
♥  Stitch marker.
♥  Stuffing
♥  Yarn needle.
♥  Sewing Pins.
♥  Felt in Black and Purple.
♥  Scissors.
♥  (Fabric) Glue.

Stitches used (US Terms):
Magic Ring.
CH = Chain.
SC = Single Crochet.
ST = Stitch.
FSC = Foundation Single Crochet. (Optional)
BL = Back Loops.
FL = Front Loops.
Picot = Chain 3, and SlSt in the 3rd loop of the first CH.
Inc = Increase.
Dec = Decrease.
Slst = Slip Stitch.
(…) = Repeat the space in brackets the given number of times.
[…] = Total number of stitches.

Maleficent Tsum Tsum

Pattern

This pattern will be worked in continues rounds, unless stated otherwise.

Body
start with the color Mint Green.
Before you start, keep about 1meter of black yarn apart.

1: 6SC in Magic Ring. [6]
2: : 2SC in each st around. [12]
3: (1SC, inc) 6 times. [18]
4: (2SC, inc) 6 times. [24]
5: (3SC, inc) 2 times, 3SC, (1SC Mint Green and 1SC Black in the same st) Change to Mint Green, (3SC, inc)3 times. [30]
6: (4SC, inc) 2 times, 3SC, change to Black, 1SC, inc, 1SC, Change to Mint Green, 3SC, inc, (4SC, inc) 2 times. [36]
7: (5SC, inc) 2times, 3SC, Change to Black, 2SC, inc, 1SC, Change to Mint Green, 4SC, Inc, (5SC, inc) 2 times. [42]
8: 13SC, Change to Black, 13SC, Change to Mint Green, 16SC. [42]
9: 10SC, Change to Black, 19SC, Change to Mint Green, 13SC. [42]
10: 8SC, Change to Black, 23SC, Change to Mint Green, 11SC. [42]
11: Change to Black, 42SC. [42]
|
14: 42SC.
The edge of the face looks a bit rough this way, you can neaten it up by using Surface Crochet. This means, SlSt around the edge of the face with the meter of black yarn you kept apart.
15: 42SC. [42]
|
26: 42SC. [42]
Change to Purple
27: Work in back loops only, 42SC. [42]
28: 42SC. [42]
29: 42SC. [42]
30: (5SC, dec), 6 times. [36]
31: (4SC, dec), 6 times. [30]
32: (3SC, dec), 6 times. [24]
33: (2SC, dec), 6 times. [18] Stuff the body here.
34: (1SC, dec), 6 times. [12]
35: Dec around. [6]
Fasten off and weave in tail.

Skirt
Use the color Black.

At row 27 of the body you worked in the back loops only. Rejoin your yarn now in the front loops.
1: 42SC. [42]
2: 42SC. [42]
3: (1SC, 1HDC, 1DC + Picot + 1DC in the next st, 1HDC) 10 times, 1SC, SLST. [62]
Fasten off and weave in tail.

Maleficent Tsum Tsum

Ears (Make 2)
Use the color Mint Green.

Crochet 6SC in a Magic Ring, fasten off and leave a long tail for sewing.

Legs (Make 4)
Make 2 in the color Mint Green and 2 in the color Black.

1: 4SC in Magic Ring. [4]
2: 2SC in each st around. [8]
3: 8SC. [8]
|
4: 8SC. [8]
Fasten off and leave a long tail for sewing. 
You don’t have to stuff the legs, but you can if you want.

Horns (Make 2)
Use the color Black.

1: 4SC in Magic Ring. [4]
2: 4SC. [4]
3: (1SC, inc) 2 times. [6]
4: 6SC. [6]
5: (2SC, inc) 2 times. [8]
6: 8SC. [8]
7: 3SC, (inc) 2 times, 3SC. [10]
8: 4SC, (inc) 2 times, 4SC. [12]
9: 12SC. [12]
10: 12SC. [12]
Fasten off and leave a long tail for sewing.
Stuff the horns nicely.

Maleficent Tsum Tsum

Spikes (Make 4)
Use the color Black.

1: 4SC in Magic Ring. [4]
2: 4SC. [4]
3: (1SC, inc) 2 times. [6]
4: 6SC. [6]
Fasten off and leave a long tail for sewing.

Collar (Make 2)
Make 1 in Black and 1 in Purple.
You won’t work this one in continues rounds but turn your work after every row.

1: 27FSC, turn. [27] (Or chain 28, insert in the second ch from hook and make 27SC.)
2: Inc, 25SC, inc, turn. [29]
3: Inc, 27SC, inc. [31]
Fasten off and leave a long tail for sewing.
Sew Both parts together so you have 1 colar in the end.

Maleficent Tsum Tsum

Assembling

By using sewing pins to position all of the parts, before sewing on, you can move around all parts until you are happy with the result. I recomment you doing that as well.

Start with sewing on the legs/arms first. The Black ones are the legs, those go on the purple part of the body, behind the skirt. The Mint Green ones are the arms and face slightly forward.
Sew the ears to both sides of the face.
The horns go on next, if you have sewn those on, atach some purple yarn to the tip and swirl it down and fasten off. Now you can slightly shape them as well, by folding a bit (I hope you get what I mean).
Now the horns are in place, you sew on the spikes, 2 under each horn.
Last you sew on the collar. Mine is placed around the 16th row of the body.
With some left over Mint Green yarn, I made her nose, slightly lower as the start of the body. From felt, cut our the eyes and eyebrows, and glue those on!

Tip; if you still have some mint green parts showing in the black part around the face, use a waterproof black marker and simply color them. If you are planning to give this to a kid who possibly sticks it in the mouth, you might not wanna do this.

Maleficent is done! She has a lot of individual parts, but we made it to the end! I hope you like how she turned out, will you show me if you made her? I would love to see what you made with my pattern!

Love
Danielle

Posted in: Crafting, Crochet, Tsum Tsum Tagged: Amigurumi, Crochet, cute, Disney, haken, kawaii, maleficent, Tsum Tsum

♥ Free Pattern; Dopey Ufufy Amigurumi

4 juli 2019 by Delinlea Leave a Comment

Hey Lovelies! I first wanna apologize that I didn’t upload a blog last week. Personal things, it just all got to much for me and with the heat kicking in…Yeah. I hate hot weather, I’ll be waiting for winter already haha. What is your favorite season?
Anyway, I hope you are doing fine!? Are you ready for a new Amigurumi pattern?! Do you have your hook and yarn ready?! Because today we are gonna make a Dopey Ufufy! Who doesn’t love the 7 dwarfs of Snow White. Let’s do this.

Dopey Ufufy

For this DIY you’ll need:
♥ Yarn in the colors;  Beige, Light Green, Brown, Light Purple and a tiny bit of Yellow. (I used Budgetyarn.com)
♥ Crochet Hook (I used a 2,5mm hook).
♥ Stuffing.
♥ Scissors.
♥ Sewing Pins.
♥ Yarn Needle.
♥ Felt in Black.
♥ (Fabric) Glue.

Stitches used (US Terms):
Magic Ring.
BL = Back Loops.
FL = Front Loops.
CH = Chain.
SLST = Slip Stitch.
SC = Single Crochet.
ST = Stitch.
Inc = Increase.
Dec = Decrease.
(…) = Repeat the space in brackets the given number of times.
[…] = Total number of stitches.

Pattern

Work in continues rounds, use a stitch marker to mark your first stitch of every row. This is for every part, unless stated otherwise.

Body
Start with the color Beige.

1: 6SC in magic ring. [6]
2: 2SC in each ST around. [12]
3: (1SC, inc) 6 times. [18]
4: (2SC, inc) 6 times. [24]
5: 24SC. [24]
6: 24SC. [24]
7: (3SC, inc) 6 times. [30]
8: 30SC. [30]
|
10: 30SC. [30]
Change to the color Light Green.
11: 30SC. [30]
12: Work in BL, 30SC. [30]
13: 30SC. [30]
|
17: 30SC. [30]
18: (3SC, dec) 6 times. [24]
19: (2SC, dec) 6 times. [18] Stuff the body here.
20: (1SC, dec) 6 times. [12]
21: Dec all around. [6]
Fasten off and  weave in tail.

Arms/Legs and Ears (Make 6)
Use the color Beige for 2 Arms & 2 Ears. Use the color Brown for the Legs.

1: 4SC in Magic Ring.
2: (1SC, inc) 2 times. [6]
Fasten off and leave a long tail for sewing.
At row 12 you worked in back loops, work now in the front loops, SLST around the body to make an extra dimension in his clothes. This is optional.

Belt
Use the color Brown.

Make a chain of 32CH. You can adjust the size by crocheting more or less CH. Make round and sew together.

Hat
Use the color Light Purple. (I used a darker shade of this color as should been, since I didn’t had a lighter version. It still does look cute I guess, maybe I’ll change it in the future.

1: 6SC in Magic Ring. [6]
2: 2SC in each St around. [12]
3: 12SC. [12]
|
5: 12SC. [12]
6: (1SC, inc) 6 times. [18]
7: 18SC. [18]
|
9: 18SC. [18]
10: (2SC, inc) 6 times. [24]
11: 24SC. [24]
12: (3SC, inc) 6 times. [30]
13: 30SC. [30]
14: (4SC, inc) 6 times. [36]
15: 36SC. [36]
|
17: 36SC. [36]
Fasten off and leave a long tail for sewing. You can stuff the hat lightly to hold shape a bit. To keep the tip of the hat folded over, I have sewn it to the base of the hat. Just with one stitch to hold it in place.

Dopey Ufufy

Assembling

For amigurumi, I always use sewing pins to position all of my parts. This way you can easily move everything around until you are happy with the result. I recommend you do so as well.

Start with sewing on his legs, this way you know where the arms have to be placed, just under the rim of his green clothes. Above the green rim, you will position his ears, on both sides of his head.
Put on his belt, I recommend to secure it with a few stitches in the back so it won’t slide down. And in front, you will secure the piece of yellow yarn, make a small rectangle with the yarn so it looks like a belt.
Make a nose with some beige yarn, going back and forth on the same spot. And put his hat on, you can sew this on, it really depends on how it sit on itself.
From some black felt, cut out eyes and eyebrows, and glue those on.

I hope you love this new addition to our Ufufy family! It’s getting bigger and bigger. Which ones have you made so far?! So me on twitter or instagram!

Love
Danielle

Posted in: Crafting, Crochet, Ufufy Tagged: 7 dwarfs, Amigurumi, Crochet, cute, Disney, dopey, haken, kawaii, snow white, Ufufy

♥ Free Pattern; Rolley Tsum Tsum

20 juni 2019 by Delinlea Leave a Comment

Hey Lovelies! What are you doing these days?! I am mainly drawing, whenever I can. But  at the same time I wanna do a bazillion things. I’m annoyed by myself haha. I wish there was more time in the world, or a way to freeze time, or grow more arms when needed xD. Let’s just keep going, one step at the time. This week we are gonna expand our Tsum Tsum collection with a Dalmatian, from ofcourse the 101 Dalmatians. I made Rolley for you, but I will try to make the others (and Cruella) as well, since they are slightly different. Enjoy!

Rolly Tsum Tsum

So for this DIY you will need:
♥  Yarn: in the colors White, Red and Black. (I used zeeman supersoft)
♥  Crochet hook. (I used a 2mm hook)
♥  Stitch marker.
♥  Stuffing
♥  Yarn needle.
♥  Sewing Pins.
♥  Felt in Black.
♥  Scissors.
♥  (Fabric) Glue.

Stitches used (US Terms):
Magic Ring.
Color Changing.
CH = Chain.
SLST = Slip Stitch.
SC = Single Crochet.
ST = Stitch.
FSC = Foundation Single Crochet. (Optional)
Inc = Increase.
Dec = Decrease.
Slst = Slip Stitch.
(…) = Repeat the space in brackets the given number of times.
[…] = Total number of stitches.

Rolly Tsum Tsum

Pattern

This pattern will be worked in continues rounds, unless stated otherwise.

Body
Start with the color White.

1: 6SC in magic ring. [6]
2: Inc in each st around. [12]
3: (1SC, inc) 6 times. [18]
4: (2SC, inc) 6 times. [24]
5: (3SC, inc) 6 times. [30]
6: (4SC, inc) 6 times. [36]
7: (5SC, inc) 6 times. [42]
8: SC in each st around. [42]
|
12: SC in each st around. [42]
From here on the colors will change every several stitches to create his dots, I will state the number of stitches for each color. (W = White, B = Black
13: W 6SC, B 2SC, W 4SC, B 2SC, W 7SC, B 2SC, W 5SC, B 2SC, W 12SC. [42]
14: W 5SC, B 3SC, W 12SC, B 3SC, W 4SC, B 4SC, W 11SC. [42]
15: W 6SC, B 2SC, W 8SC, B 1SC, W 4SC, B 3SC, W 4SC, B 3SC, W 11SC. [42]
16: W 15SC, B 3SC, W 11SC, B 2SC, W 5SC, B 2SC, W 4SC. [42]
17: W 10SC, B 2SC, W 4SC, B 2SC, W 7SC, B 2SC, W 8SC, B 3SC, W 4SC. [42]
18: W 9SC, B 4SC, W 11SC, B 3SC, W 9SC, B 3SC, W 3SC. [42]
19: W 11SC, B 2SC, W 19SC, B 2SC, W 3SC, B 1SC, W 4SC. [42]
20: All White, SC in each st around. [42]
21: All White, SC in each st around. [42]
22 – 28: Repeat row 13 to 19
29: All White, SC in each st around. [42]
30: All White, (5SC, dec), 6 times. [36]
31: (W 4SC, dec, 1SC, B 2SC, W 1SC, dec) 3 times. [30]
32: (W 3SC, dec, 2SC, B 1SC, W dec) 6 times. [24]
Continue with White.
33: (2SC, dec), 6 times. [18] Stuff the body here.
34: (1SC, dec), 6 times. [12]
35: Dec around. [6]
Fasten off and weave in tail.

Ears (Make 2)
Use the color White.

1: 6SC in Magic Ring. [6]
2: (1SC, inc) 3 times. [9]
3: 9SC. [9]
4: (2SC, inc) 3 times. [12]
5: 12SC. [12]
6: (3SC, inc) 3 times. [15]
7: (4SC, inc) 3 times. [18]
8: (5SC, inc) 3 times. [21]
9: 21SC. [21]
|
11: 21SC. [21]
Fasten off and leave a long tail for sewing.

Rolly Tsum Tsum

Snout
Use the color White, you won’t work in continues rounds, close every round  with a slst in the first st.

1: Ch7, insert in 2nd chain from hook, 5SC, 3SC in the next st, 4SC, inc. [14]
2: Ch1, inc, 4SC, inc 3 times, 4SC, inc 2 times. [20]
3: Ch1, 20SC [20]
4: Ch1, 20SC [20]
Fasten off, leave long tail for sewing. Stuff the snout lightly.

Legs (Make 4)
Use the color White

1: 4SC in magic ring. [4]
2: Inc in each st around. [8]
3: SC in each st around. [8]
|
5: SC in each st around. [8]
Fasten off and leave a long tail for sewing. You don’t have to stuff the legs.

Tail
Use the color White

Chain 9, insert in second chain from hook and make 8 slst. Fasten off and leave long tail for sewing.

Collar
Use the color Red

Make a chain of either FSC or CH, measure around the body to know how many stitches you want. If you used FSC you are done, if you used CH, insert in 2nd chain from hook, and crochet SC all the way back.
Fasten off and make a round collar.

Rolly Tsum Tsum

Assembling

I always try to use sewing pins to position all of my parts first, before sewing on, this way I am able to move parts around until I am happy.

At one part of the body there’s less dots, this will be the belly, so keep that in mind. Start with positioning the snout first, place it just under the middle of the face. Sew it on. Now position the legs and sew them on. Same for the tail. Last you will place the ears, keep in mind that you will fold those over. and sew those on.
Put on his collar just behind his ears and front legs.
Last, cut eyes, a nose and eyebrows from felt and glue those to the face. And Rolly is already done!

I hope you enjoyed this pattern! I am looking forward for the next one, I hope you too!? See you next week!

Love
Danielle

Posted in: Crafting, Crochet, Tsum Tsum Tagged: 101 dalmatians, Amigurumi, Crochet, cute, Disney, haken, kawaii, rolly, TsumTsum
« Vorige 1 2 3 4 5 … 22 23 24 25 26 27 28 29 30 … 40 41 42 43 44 Volgende »

What are you looking for?!

My Socials

Ko-Fi

I love making all these free things for you, tho it would be very helpfull if you can support me on Ko-Fi! (You don’t have to tho, totally up to you!)

Ko-Fi Shop!!

In my Ko-Fi shop you can find PDF Amigurumi Patterns!! You can pay easily with PayPal.
Go to the shop here!!

Recent Blog Posts

  • ♥ Happy 2022!
  • ♥ Day 12; Lights
  • ♥ Day 11; Flower Deco
  • ♥ Day 10; Snowman
  • ♥ Day 9; Gingerbread Houses

Recent Comments

  • Liane Van der Donck op ♥ Amigurumi Ghost
  • Kimberly Spear op ♥ Free Pattern; Amigurumi Shiber
  • Delinlea op ♥ Pua Tsum Tsum Amigurumi
  • Marfermar op ♥ Free Pattern; Easter Bunny
  • mary op ♥ Pua Tsum Tsum Amigurumi

Categories

  • animation
  • Beadwork
  • Blogmas 2018
  • Blogmas 2020
  • Blogmas 2021
  • Books
  • Bujo
  • Christmas
  • Christmas CAL 2019
  • Christmas Countdown 2017
  • Contest
  • Crafting
  • Crochet
  • Drawing
  • Drawing Lesson
  • Easter
  • Geen categorie
  • Life
  • Miniature
  • Nail Art
  • New Year
  • Paper
  • plush
  • Pokemon
  • Poseable Art Doll
  • Recipe
  • Sewing
  • Shop Pattern
  • Sinterklaas
  • Social Media
  • Tsum Tsum
  • Ufufy

Copyright © 2023 Delinlea - My little fantasy world.

Family WordPress Theme by themehall.com