Delinlea - My little fantasy world
  • ♥ Home
  • ♥ About Me
  • ♥ Blogmas 2021
  • ♥ Free Patterns
    • ♥ Amigurumi; Spring/Easter
    • ♥ Amigurumi; Fall/Halloween
    • ♥ Amigurumi; Winter
    • ♥ Amigurumi Tsum Tsum
    • ♥ Amigurumi Ufufy
    • ♥ Amigurumi Others
    • ♥ Christmas Countdown 2017
    • ♥ Blogmas 2018
    • ♥ Blogmas 2020
  • ♥ Tutorials
    • ♥ Easter
    • ♥ Home Deco
    • ♥ Others
  • ♥ Drawing Lessons
  • ♥ FanFic
    • ♥ Chapter 1
    • ♥ Chapter 2
    • ♥ Chapter 3
    • ♥ Chapter 4
    • ♥ Chapter 5
    • ♥ Chapter 6
    • ♥ Chapter 7
  • ♥ Gallery
    • ♥ Crafts
    • ♥ Drawings
    • ♥ Poseable Art Dolls
  • ♥ Links
  • ♥ Contact
    • Privacy Policy

Author: Delinlea

♥ Day 3; Bow

5 december 2021 by Delinlea Leave a Comment

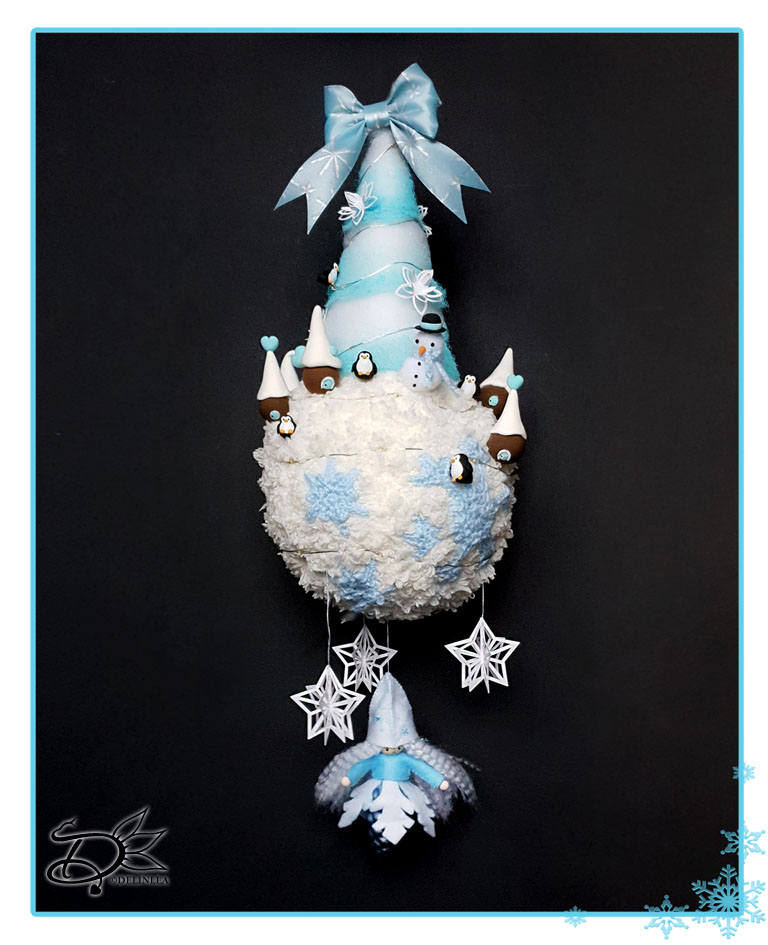
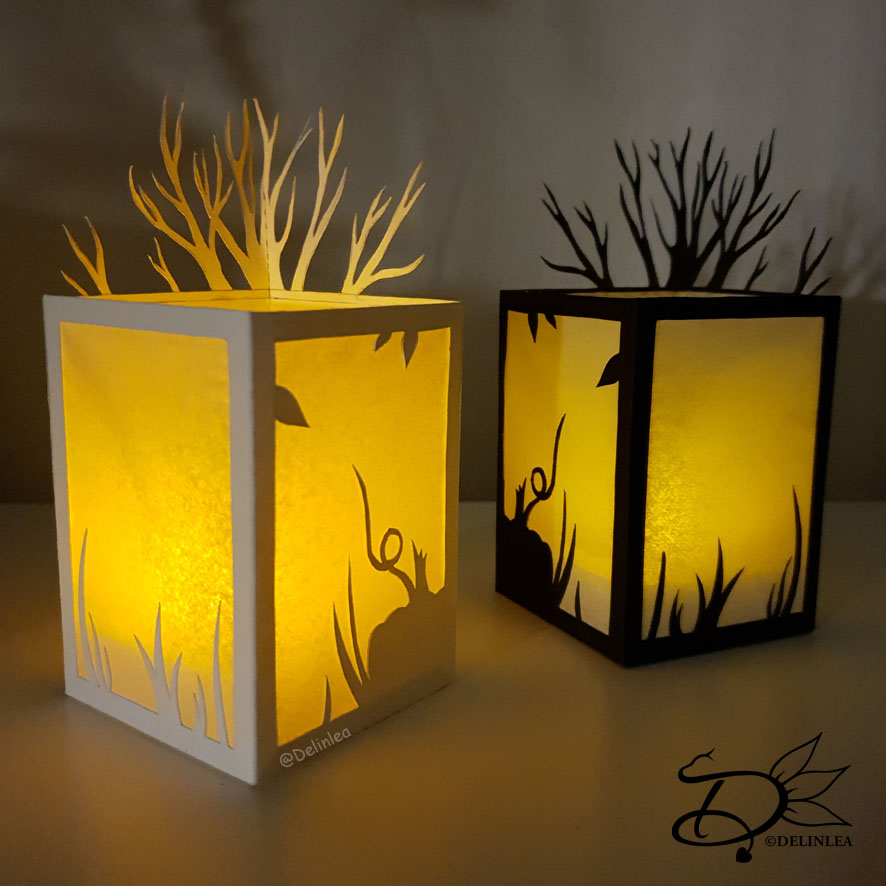
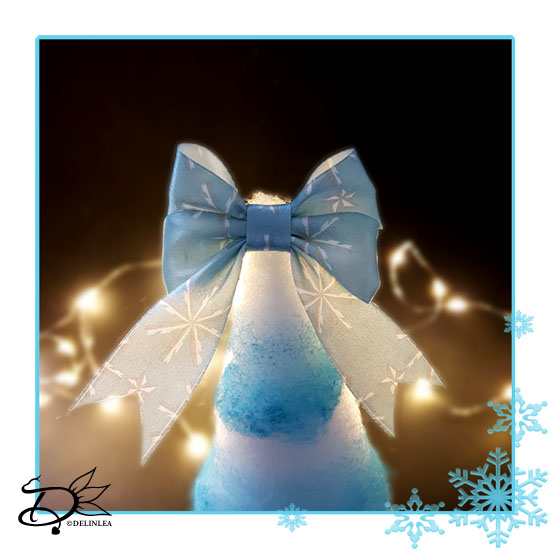
Hey Lovelies! A lovely bow on top of our tree is a must, right?! Well it doesn’t have to be a bow on top, but something on top. And this time I just went for a pretty bow. It’s not that hard to make, although a bow can look pretty complicate to make. I’ll help you step by step in this blog to make your own.

Bow

For this DIY you’ll need:
♥ Light Blue Ribbon, 2,5cm wide.
♥  (Hot) Glue.
♥ Scissors.
♥ Ruler.
♥ Pencil.

DIY Bow

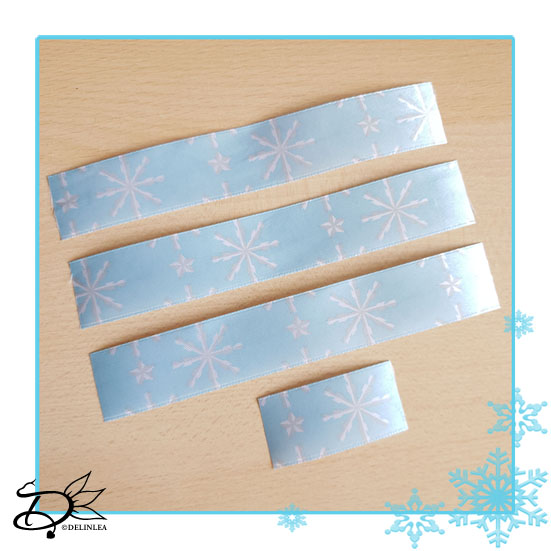
Cut 3 pieces of ribbon of 15cm and 1 piece of 5cm.

Make a circle of 2 of the 15cm lengths and clue the ends together. The 3rd 15cm length you fold in half and cut a triangle out of both ends. Where the fold is you make a small zigzag down, to make it easier to insert later. You can use a bit of glue to keep the zigzag together.

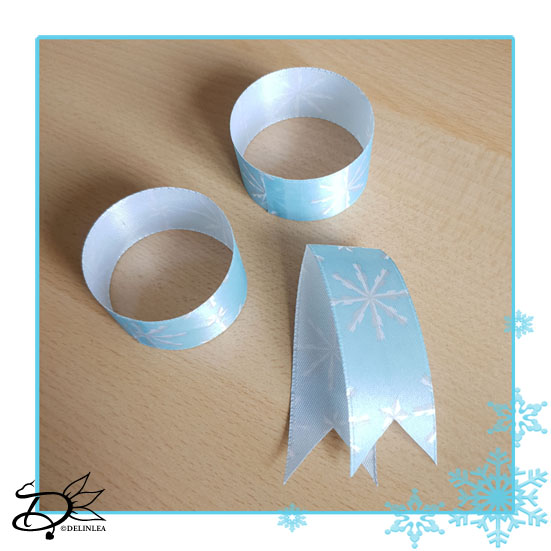
The 5cm length you fold ¼ in from both sides, so you make the width of the ribbon smaller.

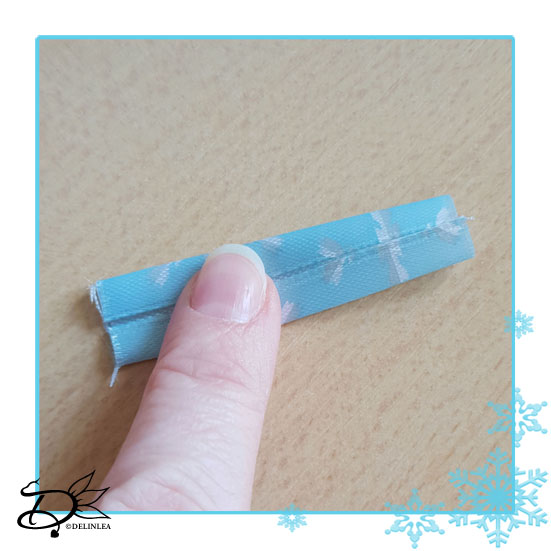
Now put both rings slightly inside each other and push it flat in the middle, make sure the glued ends are in the back. And glue this down as well, so they stay like that. (See picture).
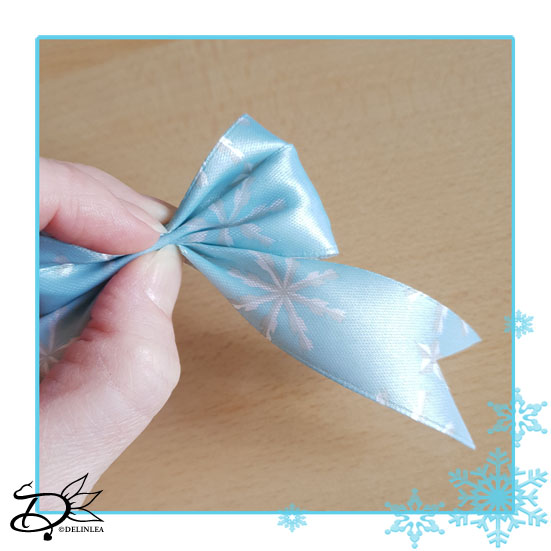
Where you put the glue in the middle, grab from both the top and bottom, so it ruffles up there. You can see the bow shape now.

Add the piece with the triangle cut out on the bottom on the bow. And wrap the 5cm length, that’s folded smaller to the middle of the bow. It might be slightly too long, just cut a bit off and glue it neatly.

Last you can shape the bow a bit, carefully pull the 2 circles a bit out of each other. And maybe adjust here and there.

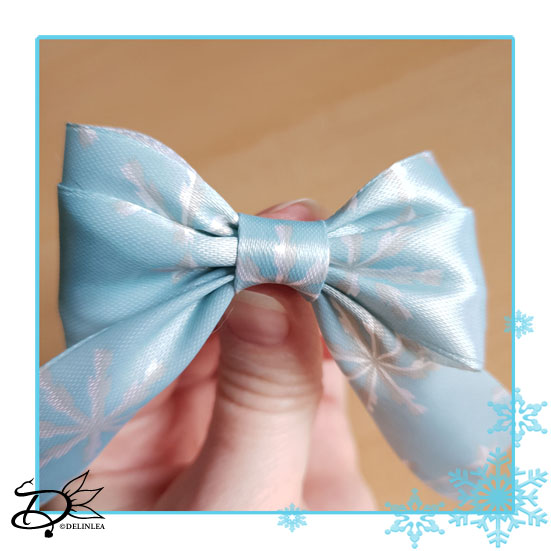
Your bow is ready and you can add it to the top of your tree now! Look how beautiful!

If you decided to join this lovely project, or just some parts of it, show me on Twitter or Instagram what you are working on! I’d love to see!

If you like to buy the PDF pattern for this whole project, go to my ko-fi shop. This will have an extra story attached and no ads.

Have a wonderful day!

Love
Danielle

PS. if you love those patterns, maybe you’d like to support me on Ko-Fi?! So I can keep making content like this!

// ©2021 Delinlea / Danielle Kaal // Items made with this pattern/DIY may be sold in a limited number. Credit to ‘Delinlea’ is appreciated. Not allowed for mass production or commercial purposes. You may not reproduce, translate, share, freely distribute or sell this pattern/DIY as your own in digital or printed from.

Posted in: Blogmas 2021, Christmas, Crafting Tagged: Blogmas 2021, bow, Christmas, ribbon, Winter Wonderland

♥ Day 2; Christmas Tree

3 december 2021 by Delinlea Leave a Comment

Hey Lovelies! The next day of Christmas. And what is Christmas without a tree, well we really need to make one. Even though this one is not typical, I hope you’ll still like it! It’s a snowy one, almost looking like a cotton candy tree, don’t eat it though! I love how it turned out and I hope yours will turn out amazing as well.

Christmas Tree

For this DIY you’ll need:
♥ This Template. (This download gives you all templates for blogmas 2021)
♥ Paper, about 200gr/m2.
♥ Snow Blanket or Sheet Stuffing.
♥ Light Blue Acrylic Paint.
♥ Sponge.
♥ Scissors.
♥ Pencil/Marker.
♥ (Hot) Glue.

DIY Christmas Tree

Print out this template and cut all parts out of the Christmas Tree.

Base

Trace part A on some thicker paper, like 200gr/m2 and make a cone of it, glue neatly together.

Snow

Trace the other parts, B, C and D on to the snow blanket and cut all those parts out. Round of the edge with the waves, with a pair of scissors, to make it look prettier. Try all parts on the cone, matching the lines and see if they fit. If they do, go to the next step.

Painting

With a sponge I made the edge with the waves, light blue. Just dab it on carefully, leave a part white with a gradient to a light blue edge. You could skip this step as well if you think a white tree is better.

Finishing off

Now it’s time to glue parts B, C and D to the cone (part A). I used hot glue for this to make this go faster. Start with gluing on the bottom layer, Part B use the lines drawn on the cone as guide. Do the same for part C. For Part D, you kinda do the same, but since there is no line to guide you, place the top part about 1cm past the top of the cone and continue to glue it on.

That’s it! The Christmas tree is done. Glue it on top of the snowball, but before you do so, attach a long piece of thread to the snowball and pull it through the tree as well.

If you decided to join this lovely project, or just some parts of it, show me on Twitter or Instagram what you are working on! I’d love to see!

If you like to buy the PDF pattern for this whole project, go to my ko-fi shop. This will have an extra story attached and no ads.

Have a wonderful day!

Love
Danielle

PS. if you love those patterns, maybe you’d like to support me on Ko-Fi?! So I can keep making content like this!

// ©2021 Delinlea / Danielle Kaal // Items made with this pattern/DIY may be sold in a limited number. Credit to ‘Delinlea’ is appreciated. Not allowed for mass production or commercial purposes. You may not reproduce, translate, share, freely distribute or sell this pattern/DIY as your own in digital or printed from.

Posted in: Blogmas 2021, Christmas, Crafting Tagged: Blogmas 2021, Christmas, snow, tree

♥ Day 1; Snowball

1 december 2021 by Delinlea Leave a Comment

Hey Lovelies! We are kicking of blogmas 2021 with a pretty easy one! Just a big amigurumi ball made with fluffy yarn. Now I think about it, if you make several you can use it to a “Snowball” fight, how much fun would that be?! Obviously. this ball will be the base for our whole project, if you’ve see the blogmas intro blog. I hope you will have fun with our Winter Wonderland project, as I said before, I’ll post every other day this year. Not each day till Christmas. This will also give you more time to make all the things.

Snowball Amigurumi

For this Pattern you’ll need:
♥ Fluffy Yarn in the color White.
♥ Crochet Hook, 6,5MM*.
♥ Stuffing.
♥ Scissors.
♥ Stitch Markers.
♥ Yarn Needle.

*Check your yarn that you wanna use, to which hook size you need. For amigurumi it isn’t necessary to use the exact same yarn, they will only turn out bigger or smaller.

This is the yarn I used.

Stitches used (US Terms):
Magic Ring.
CH = Chain.
SC = Single Crochet.
ST = Stitch.
Inc = Increase.
Dec = Decrease.
(…) = Repeat the space in brackets the given number of times.
[…] = Total number of stitches.

This pattern is made using continuous rounds, unless stated otherwise. Use a stitch marker to mark the first stitch.

Pattern Snowball

1: 6SC in a Magic Ring. [6]
2: 2SC in each st around. [12]
3: (1SC, inc) 6 times. [18]
4: (2SC, inc) 6 times. [24]
5: (3SC, inc) 6 times. [30]
6: (4SC, inc) 6 times. [36]
7: (5SC, inc) 6 times. [42]
8-12: 42SC. [42]
13: (5SC, dec) 6 times. [36]
14: (4SC, dec) 6 times. [30]
15: (3SC, dec) 6 times. [24]
16: (2SC, dec) 6 times. [18]
Start with stuffing already.
17: (1SC, dec) 6 times. [12]
Continue stuffing.
18: Dec around. [6]
Stuff a bit more if needed.
Fasten off and weave in tail.

For this one there is no assembling needed as well, good thing right. I am sometimes annoyed when I have to assemble amigurumi’s, anyone with me?

If you decided to join this lovely project, or just some parts of it, show me on Twitter or Instagram what you are working on! I’d love to see!

If you like to buy the PDF pattern for this whole project, go to my ko-fi shop. This will have an extra story attached and no ads.

Have a wonderful day!

Love
Danielle

PS. if you love those patterns, maybe you’d like to support me on Ko-Fi?! So I can keep making content like this!

// ©2021 Delinlea / Danielle Kaal // Items made with this pattern/DIY may be sold in a limited number. Credit to ‘Delinlea’ is appreciated. Not allowed for mass production or commercial purposes. You may not reproduce, translate, share, freely distribute or sell this pattern/DIY as your own in digital or printed from.

Posted in: Blogmas 2021, Christmas, Crafting, Crochet, Shop Pattern Tagged: Amigurumi, Blogmas 2021, Christmas, Crochet, haken, snowball, Winter Wonderland

♥ Winter Wonderland BLOGMAS 2021

27 november 2021 by Delinlea Leave a Comment

Hey Lovelies! This year we will do another Christmas Craft Along, or Blogmas, or however you wanna call it! I’m excited to do this this year again! I somehow always look forward to making those blogs every year. They make me happy, even though it is a lot of work as well and coming up with something new each year isn’t easy either. But I managed.

This year will be a tiny bit different, I will make a blog post every other day, not each day like I usually do. I will post every uneven day, so dec 1st, dec 3rd etc. I hope that’s fine by you!

Last year I did all crochet items, check them here if you missed them!

This time we will do all kinds of crafts, like paper art, crochet, clay, etc. All kinds of things, but I am sure you will manage to make all, even if you are not familiar with the medium we’re working with!

It has a Winter Wonderland theme!
We will basically make one thing in the end, but all the items we will make it separate and assemble it together along the way. Of course you don’t have to make everything, for example if you only like the tree or the fairies, just make those and decorate your house with it.

This is what we will make in the end:

The whole DIY/pattern is already available as PDF on my Ko-Fi, in case you wanna start early or don’t want any advertisement in the blogs. A little extra in the PDF is a story line. You won’t get that in the blogs! Go to my Ko-Fi shop now and buy it!

I hope you are just as excited as I am, I had a lot of fun making this and coming up with all those Winter Wonderland parts.

Stay Creative!

Love
Danielle

PS. Don’t forget to mark dec 1st on your calendar! I’ll see you then!
PS2. if you love those patterns, maybe you’d like to support me on Ko-Fi?! So I can keep making content like this!

// ©2021 Delinlea / Danielle Kaal // Items made with this pattern/DIY may be sold in a limited number. Credit to ‘Delinlea’ is appreciated. Not allowed for mass production or commercial purposes. You may not reproduce, translate, share, freely distribute or sell this pattern/DIY as your own in digital or printed from.

Posted in: Blogmas 2021, Christmas, Crafting, Crochet, Paper, Shop Pattern Tagged: Blogmas 2021, Christmas, crafting, DIY, intro, Ko-Fi, Pattern

♥ Paper Autumn Lantern DIY

11 november 2021 by Delinlea Leave a Comment

Hey Lovelies! Today it’s November 11th, and there are a bunch of celebrations today, one of the things we celebrate is St. Maarten. Kids go door to door, at night, with a lantern and sing to get candy. It’s a bit similar to trick or treating. It’s also Singles day, but that has nothing to do with today’s blog haha. Maybe a bit, just take time for yourself and craft you own lantern. Cause today we will make this fun paper lantern that you can decorate your house with!

Paper Lantern

For this DIY you’ll need:
♥ Paper in a color of choice (about 200 gr/m2)
♥ This Template.
♥ Semi-Translucent Paper.
♥ Printer or Pencil.
♥ X-acto knife.
♥ Cutting Mat.
♥ Glue.
♥ Bone Folder.

DIY Lantern

Print out this template, you can use regular printer paper and tape it to your thick paper. Printers sometimes don’t like thick paper. You can use any color of paper I used black and white, but it’s totally up to you.

Cutting out

Start cutting out all the solid lines with an x-acto knife. Make sure to put an cutting mat under your work, you don’t wanna damage your workspace. All the dotted lines you leave alone for now. Easiest is to do the insides/windows first.

Now score all the dotted lines with a bone folder or anything else you can make an indent with.

Making Windows

Cut out a rectangle of the semi translucent paper, for the windows, slightly smaller as the paper outlines. (the bottom of the lantern you can ignore). Mine was about 23,7cm by 8,25cm. Glue this neatly to the inside and let it dry well.

!! Just a slight warning, if you use white glue and your paper is not thick enough, it can warp. I prefer to use clear glue for this reason, it doesn’t contain water. !!

Folding and Glueing

When all has dried well, it’s time to folded all the dotted lines that you have scored before. I used a bone folder to make them neat. After that you can glue everything together.

Paper Lantern

Your paper lantern is done! Isn’t it adorable?! I love them, and I already know so many more designs for them, wanna see those too?! Anyway, if you made some as well, please show me on Twitter or Instagram, I’d love to see what you made!

Have a wonderful day!

Love
Danielle

PS. if you love those DIY’s, maybe you’d like to support me on Ko-Fi?! So I can keep making content like this!

// ©2021 Delinlea / Danielle Kaal // Items made with this DIY may be sold in a limited number. Credit to ‘Delinlea’ is appreciated. Not allowed for mass production or commercial purposes. You may not reproduce, translate, share, freely distribute or sell this DIY as your own in digital or printed from.

Posted in: Crafting, Paper Tagged: Autumn, cute, DIY, fall, kawaii, Lantern, paper, Papier, Sint maarten, Template
« Vorige 1 2 3 4 5 6 7 … 49 50 51 52 53 Volgende »

What are you looking for?!

My Socials

Ko-Fi

I love making all these free things for you, tho it would be very helpfull if you can support me on Ko-Fi! (You don’t have to tho, totally up to you!)

Ko-Fi Shop!!

In my Ko-Fi shop you can find PDF Amigurumi Patterns!! You can pay easily with PayPal.
Go to the shop here!!

Recent Blog Posts

  • ♥ Happy 2022!
  • ♥ Day 12; Lights
  • ♥ Day 11; Flower Deco
  • ♥ Day 10; Snowman
  • ♥ Day 9; Gingerbread Houses

Recent Comments

  • Delinlea op ♥ Pietje Gnome Amigurumi
  • Delinlea op ♥ Toy Story Alien TsumTsum Amigurumi
  • Delinlea op ♥ Pua Tsum Tsum Amigurumi
  • Charli op ♥ Free Pattern; CNY Mouse Amigurumi
  • Peter Pesch op ♥ Pietje Gnome Amigurumi

Categories

  • animation
  • Beadwork
  • Blogmas 2018
  • Blogmas 2020
  • Blogmas 2021
  • Books
  • Bujo
  • Christmas
  • Christmas CAL 2019
  • Christmas Countdown 2017
  • Contest
  • Crafting
  • Crochet
  • Drawing
  • Drawing Lesson
  • Easter
  • Geen categorie
  • Life
  • Miniature
  • Nail Art
  • New Year
  • Paper
  • plush
  • Pokemon
  • Poseable Art Doll
  • Recipe
  • Sewing
  • Shop Pattern
  • Sinterklaas
  • Social Media
  • Tsum Tsum
  • Ufufy

Copyright © 2025 Delinlea - My little fantasy world.

Family WordPress Theme by themehall.com