Delinlea - My little fantasy world
  • ♥ Home
  • ♥ About Me
  • ♥ Blogmas 2021
  • ♥ Free Patterns
    • ♥ Amigurumi; Spring/Easter
    • ♥ Amigurumi; Fall/Halloween
    • ♥ Amigurumi; Winter
    • ♥ Amigurumi Tsum Tsum
    • ♥ Amigurumi Ufufy
    • ♥ Amigurumi Others
    • ♥ Christmas Countdown 2017
    • ♥ Blogmas 2018
    • ♥ Blogmas 2020
  • ♥ Tutorials
    • ♥ Easter
    • ♥ Home Deco
    • ♥ Others
  • ♥ Drawing Lessons
  • ♥ FanFic
    • ♥ Chapter 1
    • ♥ Chapter 2
    • ♥ Chapter 3
    • ♥ Chapter 4
    • ♥ Chapter 5
    • ♥ Chapter 6
    • ♥ Chapter 7
  • ♥ Gallery
    • ♥ Crafts
    • ♥ Drawings
    • ♥ Poseable Art Dolls
  • ♥ Links
  • ♥ Contact
    • Privacy Policy

blogmas 2018

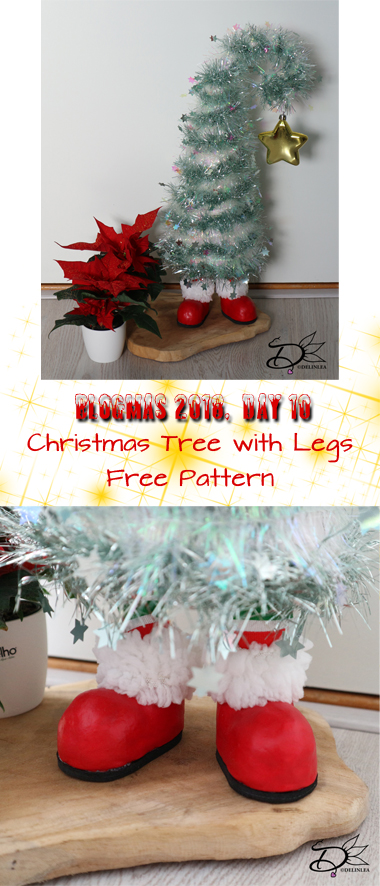
♥ Day 10; Christmas Tree with Legs

10 december 2018 by Delinlea Leave a Comment

Hey Lovelies! I know today’s blog is late! I’m sorry, but I made a mistake in today’s DIY and I had to fix it xD. Today’s DIY is also the non-pokemon one! yay! I’m excited, cause I really wanted to make this for my room! It’s a cute little christmas tree with legs! xD

For the Tree you’ll need:
Styrofoam Cone of 27cm high.
2 Garlands of 270cm (one color for both, or both different in color)
30 cm Wire.
Aluminum foil.
White Duct Tape.
For the Legs you’ll need:
Clay.
Black Foam.
Faux White Fur.
2X 14cm Wire.
Red Acryllic paint.
Red and Green striped Fabric. (Or white fabric and Acrylic Paint)
Aluminum foil.
Other stuff You’ll need:
Scissors.
Paper.
Hot Glue Gun.
Scewer.
Brushes.
Star Bauble.

Tree

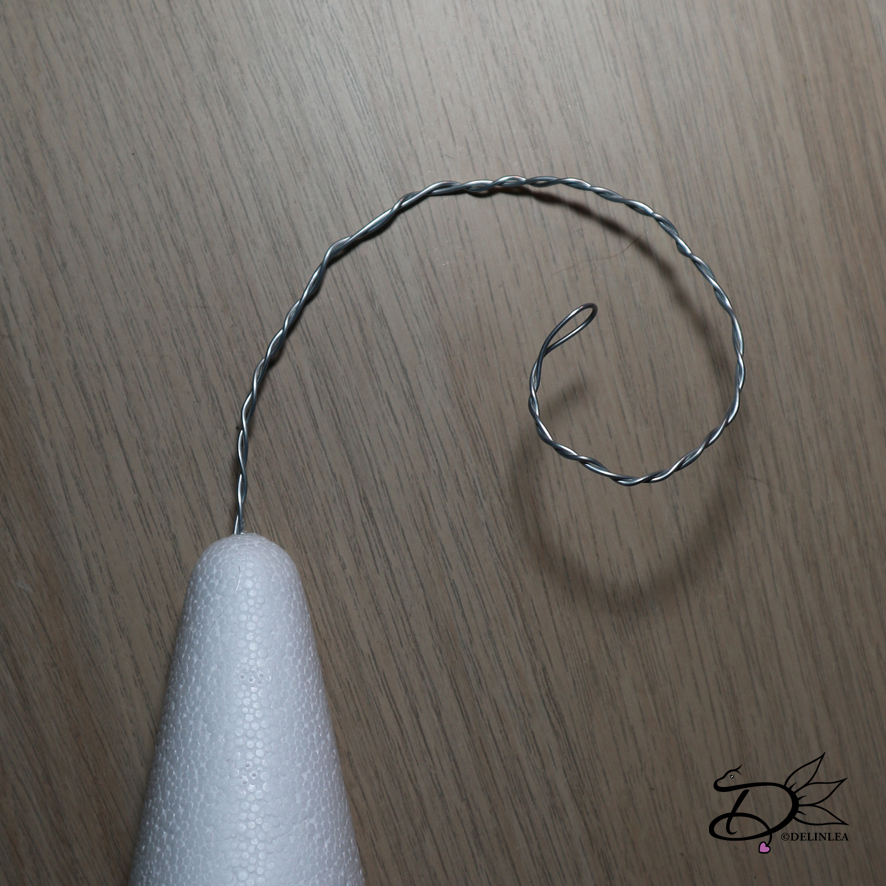
Make a hole with a scewer in the top of the cone, that’s where the wire will go in. Glue the wire to the top of the cone.  And make a curl in it.

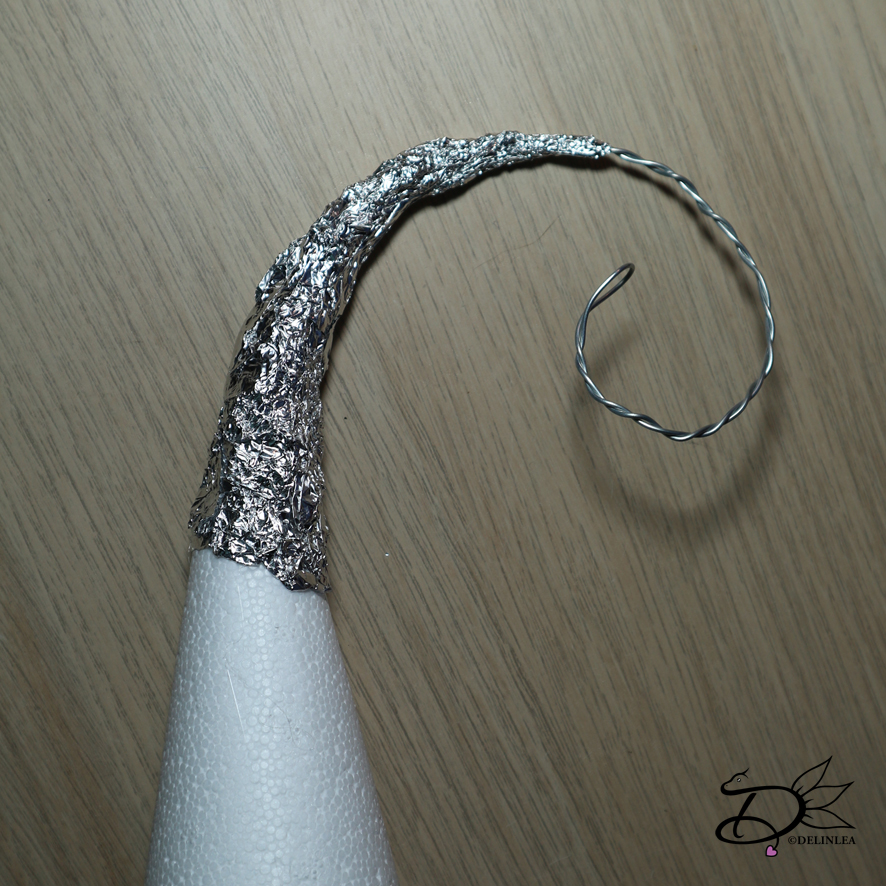
With Aluminium foil, you will create a smoother shape from the cone to the wire.

Cover the aluminum foil with the white Duct Tape, so it doesn’t show so much when you wrap the garlands around it.

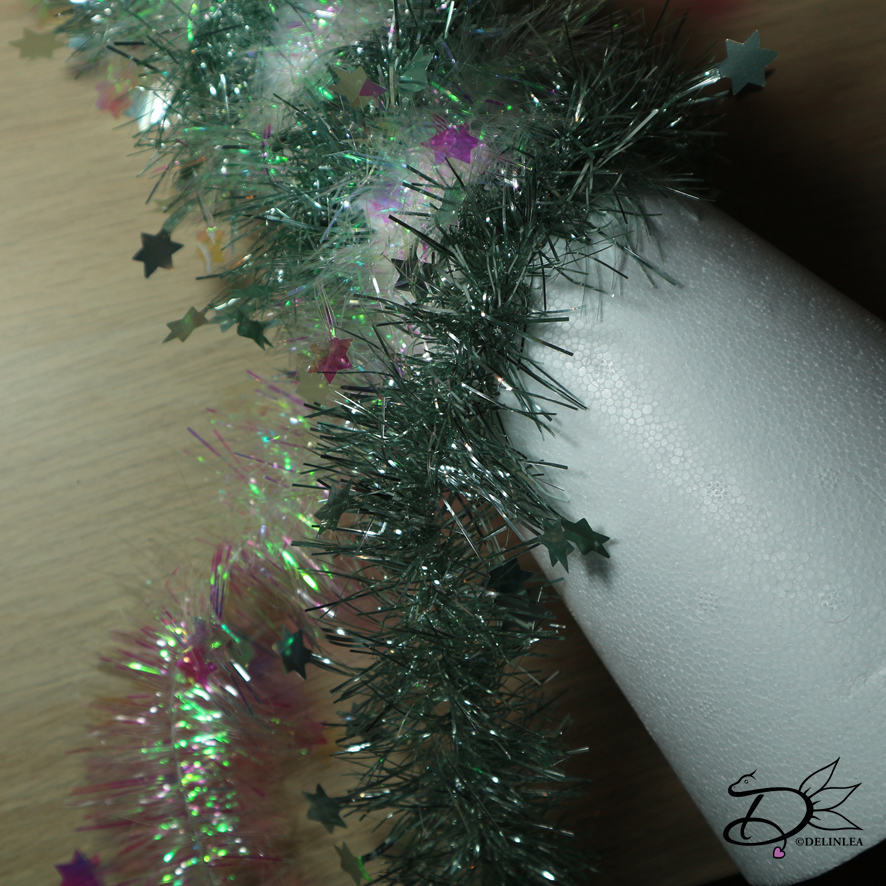
Wrap the garlands around the tree shape, start with both at the top of the tree, where the wire is. Glue this tight. And start wrapping it nice and slowly down. Make sure you glue them to the tree shape every now and then, so it won’t fall down.

Now, you can leave it like this and decorate it, oooorrr.. you can something fun!! Let’s give it legs!! It will give it that little extra jolly!

Legs

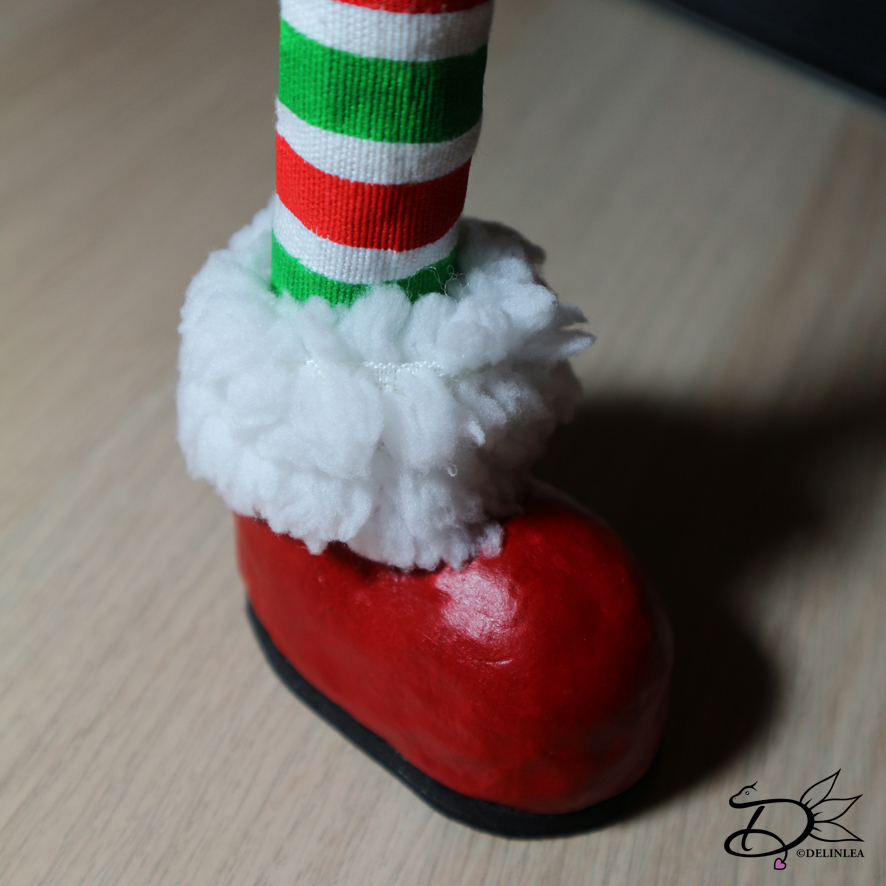
I have made the boots for the tree myself, but ofcourse you can also buy them to make it easier and quicker. It’s up to you!

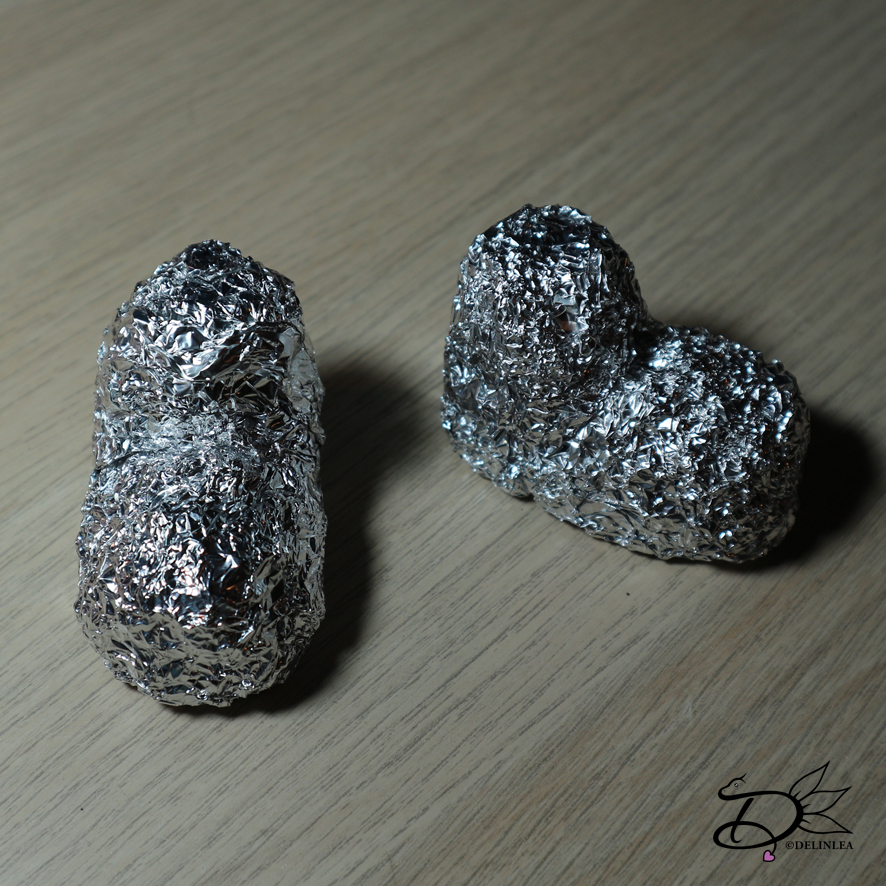
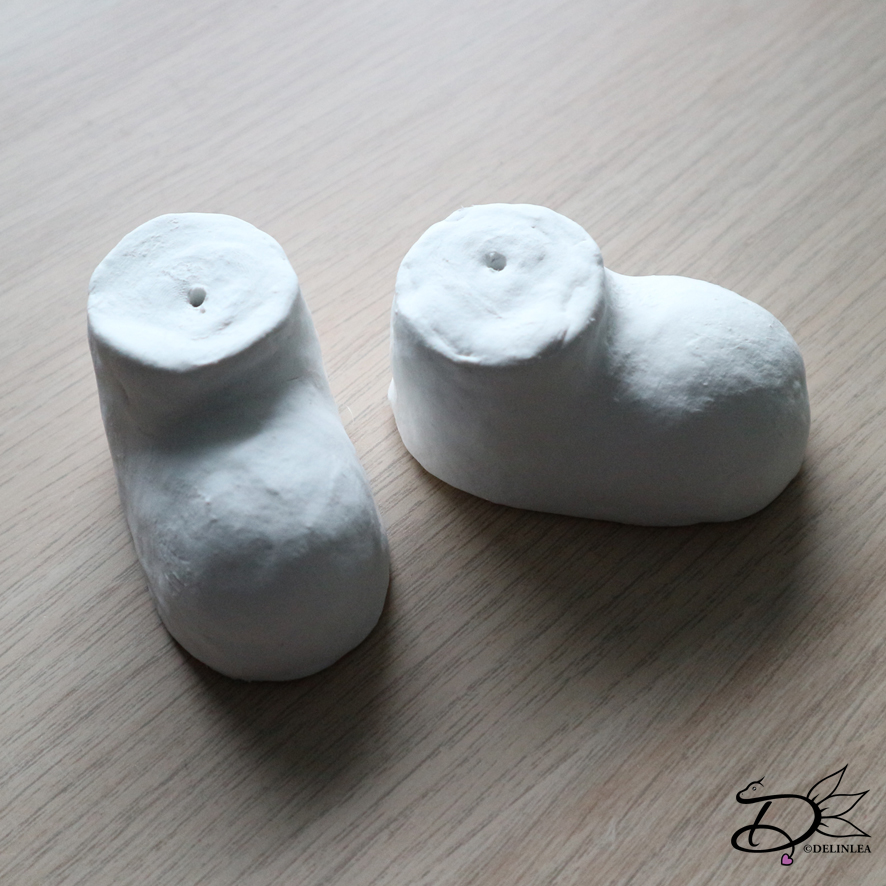
Make with Aluminum foil boot shapes. Make sure they are about the size.

Cover the foil with air dry clay or oven bake clay. it’s up to you. I have use air dry since, I was able to wait xD. Make sure you make a small hole with a scewer where te legs should be, this is for the wire later.

When the clay is dry, or out of the oven and cooled down. Trace the boots on paper, this you will need for the soles later. After that,  it’s time to paint them, I have used Redpaint, but it’s up to you what you like!

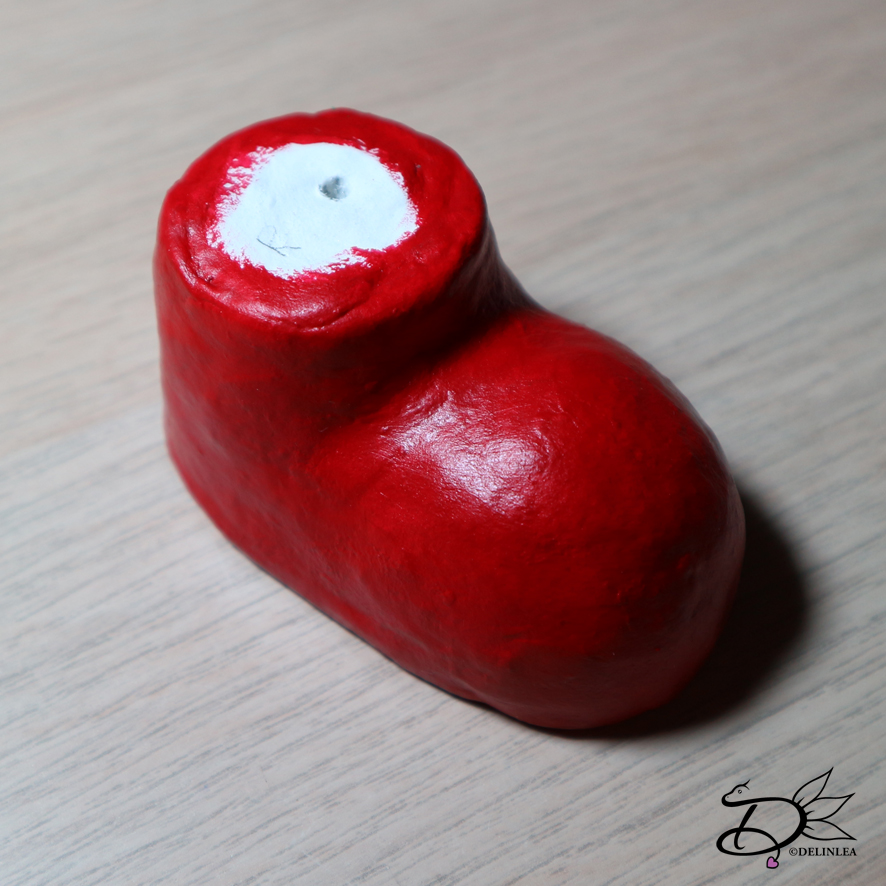
When those are drying, get out your black foam. From this we are gonna make the soles for the boots. Why? Because this way the boots won’t get damaged or the surface they are on, won’t get damaged. You, ofcourse, canmake those out of clay as well, if you prefer.
Trace the template you made earlier on the faom, keep track of what’s front andback, and if it’s left or right. Cut these out.

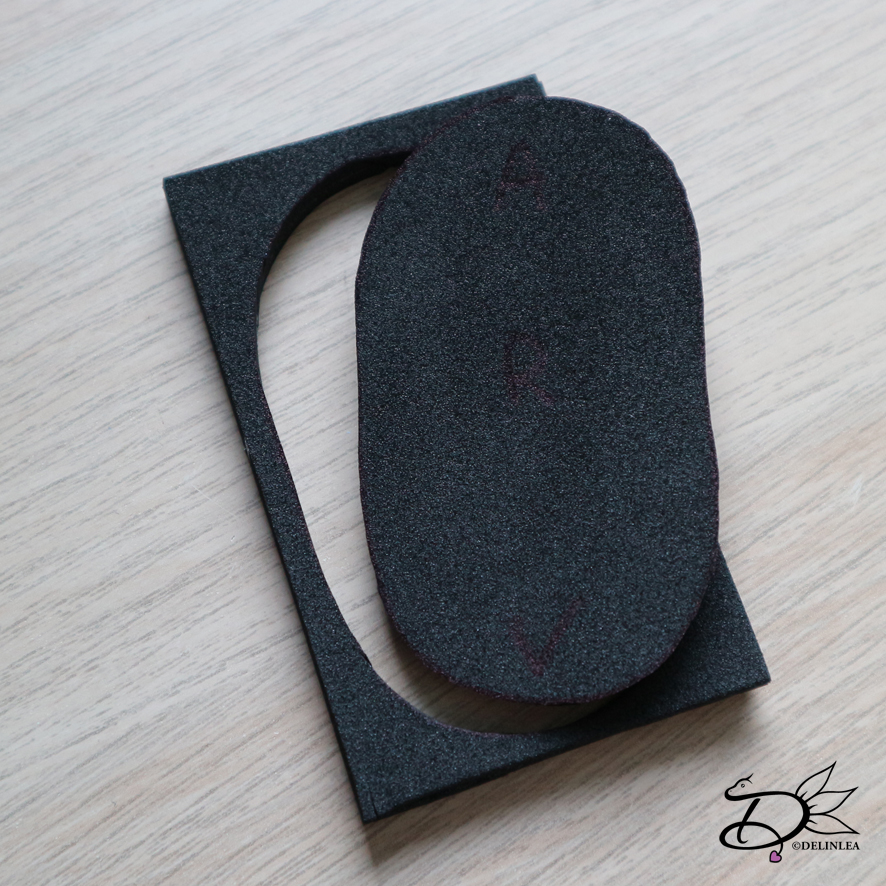
If you’re paint is dry, you can glue on the soles to the boots.

Now you’ll gonna need your white faux fur. I used a piece of 14 by 4 cm (But make sure this is enough in length for your boots). In length I glued the top and bottom parts to the middle. So the inside of the fur is covered. Now glue this to the top of the boots. Glue also the 14cm wire in the holes you made in the boots.

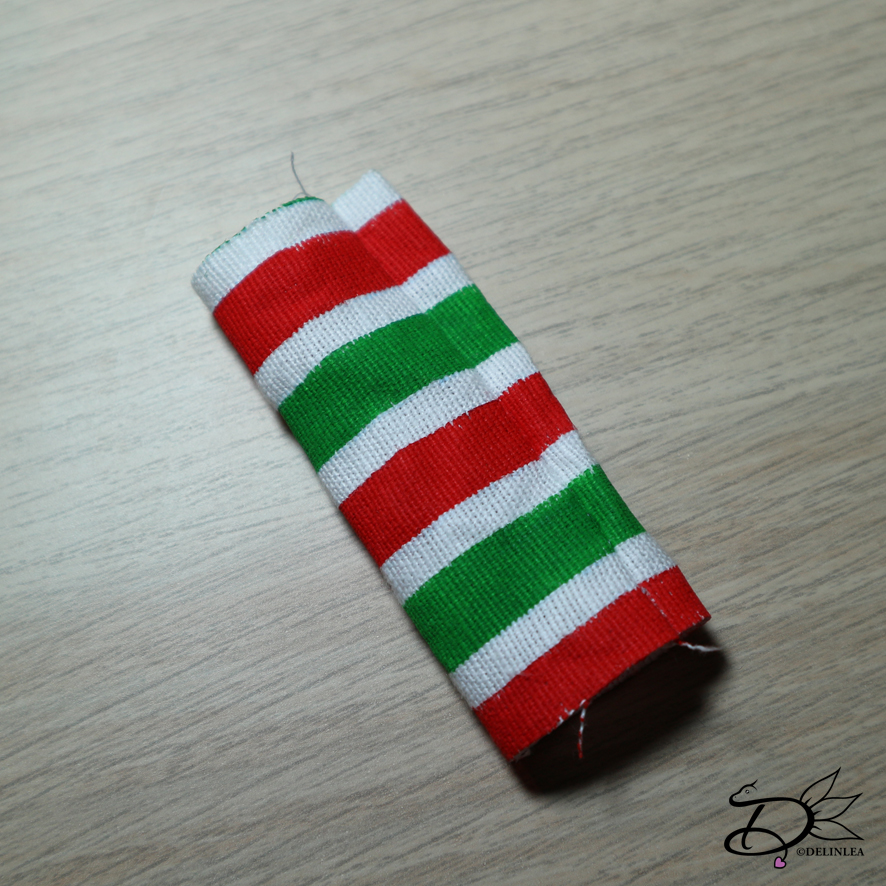
This step is optional, it’s just what you prefer, but I made some kind of pants to cover the wire. Since I had no striped green and red fabric, I used white fabric, that I painted. I Used  2 pieces of 8,5 by 7 cm.
Fold it in half, with the right side of the fabric being in the inside, and line it up neathly, so you have 7 by 4,24cm. Now sew that close and turn inside out. Put this around the wire of the legs.

Now it’s time to attach the legs to the tree, I drew a line through the middel of the bottom of the tree, so I knew the legs are gonna be placed at the same level. Poke a hole with the scewer where you want the legs to be. Then glue the wire of the legs in.

Add the star bauble to the tip of the christmas tree! And you are finished!!

It’s it cute?! I love it, and I hope you will too! If you make it, don’t forget to share with #DelinleaBlogmas2018DIY or #DelinleaDIY

Love you and see you tomorrow!

Danielle

Posted in: Blogmas 2018, Christmas, Pokemon Tagged: blogmas 2018, Christmas, DIY, legs, tree

♥ Day 9; Chikorita Felt Ornament

9 december 2018 by Delinlea Leave a Comment

Hey Lovelies! It’s day 9 of Blogmas 2018! I love making those cute felt ornaments so I planned another one for today! It’s Chikorita’s turn! He needed some warmth so he’s wearing a scarf! ^_^

For this DIY you’ll need:
♥  Felt in the colors Light Green, Green and Red(white optional).
♥  Sewing thread in matching colors to the felt.
♥  Sewing Needle.
♥  Trick Marker or anything else where you cancopy the pattern with onto your felt.
♥  Pattern.
♥  Scissors.
♥  Stuffing.
♥  Fabric Glue. (optional)
♥  Acryllic Paint in white and Red (optional)

DIY

First off all, download the pattern HERE! And print it out(or draw it from your screen). The good thing is, you can make it as big as you want! Then cut out all the pieces. On every piece is stated how many times youneed to cut it out of felt.

Cut all the pieces out of felt. Part A out of Light Green,Part B out of Green Felt, Part C, D and E out of Red felt. The eyes and mouthyou can either choose to make them out of Felt or paint them on like I did.Depends on what you want.

Sew parts A together with a Blanket stitch. There are some lines in the body that continue, use a running stitch to make those lines, and go back the same way.

With a running stitch you’ll make the details in the leave (part B). After that, you’ll glue or sew it to Chikorita’s head.

Then it’s time to put on his scarf, I glued all pieces on, only on the sides of parts C I used a blanket stitch.

Last but not least, paint on his eyes and Mouth. Or if you chose to make them out of felt, do that now.

And another ornament is done! This one we can add to our collection! And if you made one, don’t forget to share with #DelinleaBlogmas2018DIY or #DelinleaDIY on Twitter or Instagram, so I can see^^

Love
Danielle

Posted in: Blogmas 2018, Christmas, Pokemon Tagged: blogmas 2018, chikorita, Christmas, felt, Free Pattern, ornament, Pokemon

♥ Day 8; Amigurumi Pikachu in Santa Sleepingbag

8 december 2018 by Delinlea Leave a Comment

Hey Lovelies! It’s day 8 of Blogmas! And that means that weare already have survived one week! Time really flies! I hope you are havingfun so far. But for today we will have a new amigurumi! Pikachu in a Santasleepingbag! I hope you like him.

For this DIY you will need:
♥  Yarn, in Yellow, Black, Red and Grey.
♥  Plush Yarn in White.
♥  Pompom. (self made of bought)
♥  Crochet hook.
♥  Stitch marker.
♥  Yarn Needle.
♥  Sewing Pins. (optional)
♥  Fiber fill.
♥  Felt in the colors Black, Brown andRed.
♥  Glue.
♥  Scissors.

Stitches used:
CH = Chain.
SC = Single Crochet.
FSC = Foundation Single Crochet.
ST = Stitch.
Inc = Increase.
Dec = Decrease.
Slst = Slip Stitch.
(…) = Repeat the space in brackets the given number of times.
[…] = Total number of stitches.

Pattern

Pikachu Head
In Yellow.

1: 6SC in Magic Ring. [6]
2: 2SC in each ST around. [12]
3: (1SC, inc) 6 times. [18]
4: (2SC, inc) 6 times. [24]
5: (3SC, inc) 6 times. [30]
6: SC in each ST around. [30]
|
9: SC in each ST around. [30]
10: 7SC, inc, 1SC, inc, 4SC, inc, 4SC, inc, 1SC, inc, 8SC. [35]
11: 7SC, inc, 3SC, inc, 10SC, inc, 3SC, inc, 8SC. [39]
12: SC in each ST around. [39]
13: 7SC, dec, 3SC, dec, 10SC, dec, 3SC, dec, 8SC. [35]
14: SC in each ST around. [35]
15: 7SC, dec, 1SC, dec, 4SC, dec, 4SC, dec, 1SC, dec, 8SC. [30]
16: (3SC, dec) 6 times. [24]
17: (2SC, dec) 6 times. [18]
18: (1SC, dec) 6 times. [12]
19: Dec all around. [6]
Fasten off and weave in tail.

Pikachu Ears (2)
Start with Black.

1: 4SC in Magic Ring. [4]
2: (1SC, inc) 2 times. [6]
3: (1SC, inc) 3 times. [9]
4: SC in each ST around. [9]
5: (2SC, inc) 3 times. [12]
Change to Yellow.
6: SC in each ST around. [12]
|
8: SC in each ST around. [12]
9: (2SC, dec) 3 times. [9]
10: SC in each ST around. [9]
|
13: SC in each ST around. [9]
Fasten off and leave a long tail for sewing.

Sleeping Bag
In Red.

1: 6SC in Magic Ring. [6]
2: 2SC in each ST around. [12]
3: (1SC, inc) 6 times. [18]
4: (2SC, inc) 6 times. [24]
5: (3SC, inc) 6 times. [30]
6: (4SC, inc) 6 times. [36]
7: (5SC, inc) 6 times. [42]
8: SC in each ST around. [42]
|
20: SC in each ST around. [42]
21: (5SC, dec) 6 times. [36]
22: (4SC, dec) 6 times. [30]
21: (3SC, dec) 6 times. [24]
22: (2SC, dec) 6 times. [18]
Fasten off and weave in tail.

Hood of the Sleepingbag.
In Red.

1: 6SC in Magic Ring. [6]
2: 6SC. [6]
3: (1SC, inc) 3 times. [9]
4: (2SC, inc) 3 times. [12]
5: (3SC, inc) 3 times. [15]
6: (4SC, inc) 3 times. [18]
7: (5SC, inc) 3 times. [21]
8: (6SC, inc) 3 times. [24]
9: (7SC, inc) 3 times. [27]
10: (8SC, inc) 3 times. [30]
11: (9SC, inc) 3 times. [33]
12: (10SC, inc) 3 times. [36]
13: (11SC, inc) 3 times. [39]
14: (12SC, inc) 3 times. [42]
15: 42SC. [42]
|
24: 42SC. [42]
Change to the White Plush Yarn.
25: 42SC. [42]
If your Plush yarn is thinner as mine, you might need to do 1 or 2 extra layers.
Fasten off and weave in tail.

Belt
In Black.

Crochet 40 FSC! Fasten off and leave a long tail for sewing.

Assembling

Use some sewing pins to pin the hood to the sleepingbag.This will help you to sew it on neathly, and sew it on.
Make a circle of the belt, sew both ends together. Place the belt around thesleepingbag and sew that on. The belt is not placed in the middle, but a littlelower. With some yellow yarn you’ll embroider the belt buckle on.
With some grey yarn you’ll make the zipper, and finish of with a tiny piece of greyfelt.
This to complete his head. Sew on his ears. Make sure you’ll keep the head theright way, the pattern has made the shape for the cheeks already. When the earsare on, you can sew his head to the sleepingbag. This can be a bit tricky, justuse some sewing pins to make sure it’s placed right and then start sewingcarefully.
Now cut out some eyes, nose, mouth and cheeks out of felt and glue those on.For the eyes I used brown felt and colored them black so you’ll have a littleshine in the eyes. With a white dot of felt of acryllic paint in the eyes you’ll finish it off.
Glue or sew a pompom to the tip of his hood.

And you are all done! isn’t he cute?! I hope you’ll have fun making him! and if you did so, share yours with the #DelinleaBlogmas2018DIY or #DelinleaDIY on twitter or insta.

Have a wonderful day and I’ll see you tomorrow.

Love
Danielle

Posted in: Blogmas 2018, Christmas, Pokemon Tagged: Amigurumi, blogmas 2018, Christmas, Crochet, haken, pikachu, Pokemon, Santa

♥ Day 7; Ditto Felt Ornament

7 december 2018 by Delinlea Leave a Comment

Hey Lovelies! It’s day 7 of Blogmas! What do you think of blogmas so far, with all those Pokémon?! It’s time for a new ornament! Today we will make a Ditto who has gotten in trouble with the lights. Instead of decorating the tree, he decorated himself xD. So cute!

For this DIY you’ll need:
♥  Felt in the colors Pink, Red and Green.
♥  Sewing thread in matching colors to the felt.
♥  Sewing Needle.
♥  Trick Marker or anything else where you can copy the pattern with onto your felt.
♥  Pattern.
♥  Scissors.
♥  Stuffing.
♥  Fabric Glue. (optional)
♥  Acryllic Paint in Black.
♥ about 50 cm of black yarn.

DIY

First off all, download the pattern HERE! And print it out (or draw it from your screen). The good thing is, you can make it as big as you want! Then cut out all the pieces. On every piece is stated how many times you need to cut it out of felt.

Copy all te pieces to felt, part A you’ll cut out of Pink felt. Part B you’ll cut out of green and red felt. About 14 times total. You can do more or less, or use other colors for the light. But red and green always gives me that Christmassy feeling.

When you’ve done that it’s time to sew both parts A to each other. Use a Blanket stitch to do so. Before almost completely closing it up, make sure you stuff the body.
After finishing sewing the body, paint on the face of ditto with some black paint.

Now the fun part, wrap ditto in the black yarn. You can do this however you like, and how much yarn you use is up to you, 50 cm is probably too much. You can glue the yarn to ditto if you like, or just in some places, or even just the start and ending point.

Time for the lights! glue this here and there to the black yarn. Just do this random, to spots you like.

And you are already done! This is a pretty quick one, but I love it so much! I hope you do to, and make him as well. And if you do so, don’t forget to show me with #DelinleaBlogmas2018DIY on twitter or Instagram.

Have a lovely day, and I’ll see you tomorrow again!

Love
Danielle


Posted in: Blogmas 2018, Christmas, Pokemon Tagged: blogmas 2018, Christmas, ditto, DIY, Free Pattern, Pokemon

♥ Day 6; Pokeball Bauble

6 december 2018 by Delinlea Leave a Comment

Hey Lovelies! It’s day 6 of Blogmas! I kept it simple today, but I think it’s very cute to hang them in your christmas tree! Defenitly if you make a lot of them, maybe also in different versions?! You’re curious now, right?! Let’s make a Pokeball Bauble!

For this DIY you’ll need:
♥  A Red Bauble in any size!
♥  White Acrylic Paint.
♥  Black and White Paper.
♥  Brush.
♥  Scissors.
♥  Ruler.
♥  Glue.

DIY

Paint the bottom part of the bauble white, about half way. You maybe need several layers. Let it dry completly!

Cut out a stroke of black paper. This will be for the part where the pokeball normally opens. The width and length of the stroke depends on how big your bauble is! Just do what looks best. Glue this around the bauble, in the middle. Where the red and white meets.

Cut out 2 circles. A big one out of black paper, and a slightly smaller one out of white paper. Glue the white circle to the black circle and glue those to the bauble, where the ends of the stroke of blank paper meets.

And you are already done! it’s cute right, imagine this one, with plenty others in your christmas tree! Maybe different versions! Be creative and have fun!

See you tomorrow again! I hope you enjoyed this DIY, and if you make it share with #DelinleaBlogmas2018DIY on twitter or insta!

Love
Danielle


Posted in: Blogmas 2018, Christmas, Pokemon Tagged: bauble, blogmas 2018, Christmas, DIY, Pokemon
« Vorige 1 2 3 Volgende »

What are you looking for?!

My Socials

Ko-Fi

I love making all these free things for you, tho it would be very helpfull if you can support me on Ko-Fi! (You don’t have to tho, totally up to you!)

Ko-Fi Shop!!

In my Ko-Fi shop you can find PDF Amigurumi Patterns!! You can pay easily with PayPal.
Go to the shop here!!

Recent Blog Posts

  • ♥ Happy 2022!
  • ♥ Day 12; Lights
  • ♥ Day 11; Flower Deco
  • ♥ Day 10; Snowman
  • ♥ Day 9; Gingerbread Houses

Recent Comments

  • Delinlea op ♥ Pietje Gnome Amigurumi
  • Delinlea op ♥ Toy Story Alien TsumTsum Amigurumi
  • Delinlea op ♥ Pua Tsum Tsum Amigurumi
  • Charli op ♥ Free Pattern; CNY Mouse Amigurumi
  • Peter Pesch op ♥ Pietje Gnome Amigurumi

Categories

  • animation
  • Beadwork
  • Blogmas 2018
  • Blogmas 2020
  • Blogmas 2021
  • Books
  • Bujo
  • Christmas
  • Christmas CAL 2019
  • Christmas Countdown 2017
  • Contest
  • Crafting
  • Crochet
  • Drawing
  • Drawing Lesson
  • Easter
  • Geen categorie
  • Life
  • Miniature
  • Nail Art
  • New Year
  • Paper
  • plush
  • Pokemon
  • Poseable Art Doll
  • Recipe
  • Sewing
  • Shop Pattern
  • Sinterklaas
  • Social Media
  • Tsum Tsum
  • Ufufy

Copyright © 2025 Delinlea - My little fantasy world.

Family WordPress Theme by themehall.com