Delinlea - My little fantasy world
  • ♥ Home
  • ♥ About Me
  • ♥ Blogmas 2021
  • ♥ Free Patterns
    • ♥ Amigurumi; Spring/Easter
    • ♥ Amigurumi; Fall/Halloween
    • ♥ Amigurumi; Winter
    • ♥ Amigurumi Tsum Tsum
    • ♥ Amigurumi Ufufy
    • ♥ Amigurumi Others
    • ♥ Christmas Countdown 2017
    • ♥ Blogmas 2018
    • ♥ Blogmas 2020
  • ♥ Tutorials
    • ♥ Easter
    • ♥ Home Deco
    • ♥ Others
  • ♥ Drawing Lessons
  • ♥ FanFic
    • ♥ Chapter 1
    • ♥ Chapter 2
    • ♥ Chapter 3
    • ♥ Chapter 4
    • ♥ Chapter 5
    • ♥ Chapter 6
    • ♥ Chapter 7
  • ♥ Gallery
    • ♥ Crafts
    • ♥ Drawings
    • ♥ Poseable Art Dolls
  • ♥ Links
  • ♥ Contact
    • Privacy Policy

Author: Delinlea

♥ Halloween Amigurumi’s

1 oktober 2020 by Delinlea Leave a Comment

Hey Lovelies! The spooky month started! Yay! I love it, although we don’t really celebrate it here in the Netherlands. Over the years I have made quite some amigurumi’s that are Halloween related, so I want to list them down in today’s blog. Maybe some you’ve missed or forgot about. So, let’s refresh our memory!

♥ Bat

This bad isn’t scary at all, but who said that all Halloween related stuff had to be scary?! It’s fun to change things up. I think it will look cute to hang a bunch in the air at a party, maybe if someone walks into them, they might get scared anyway if they didn’t expect them!
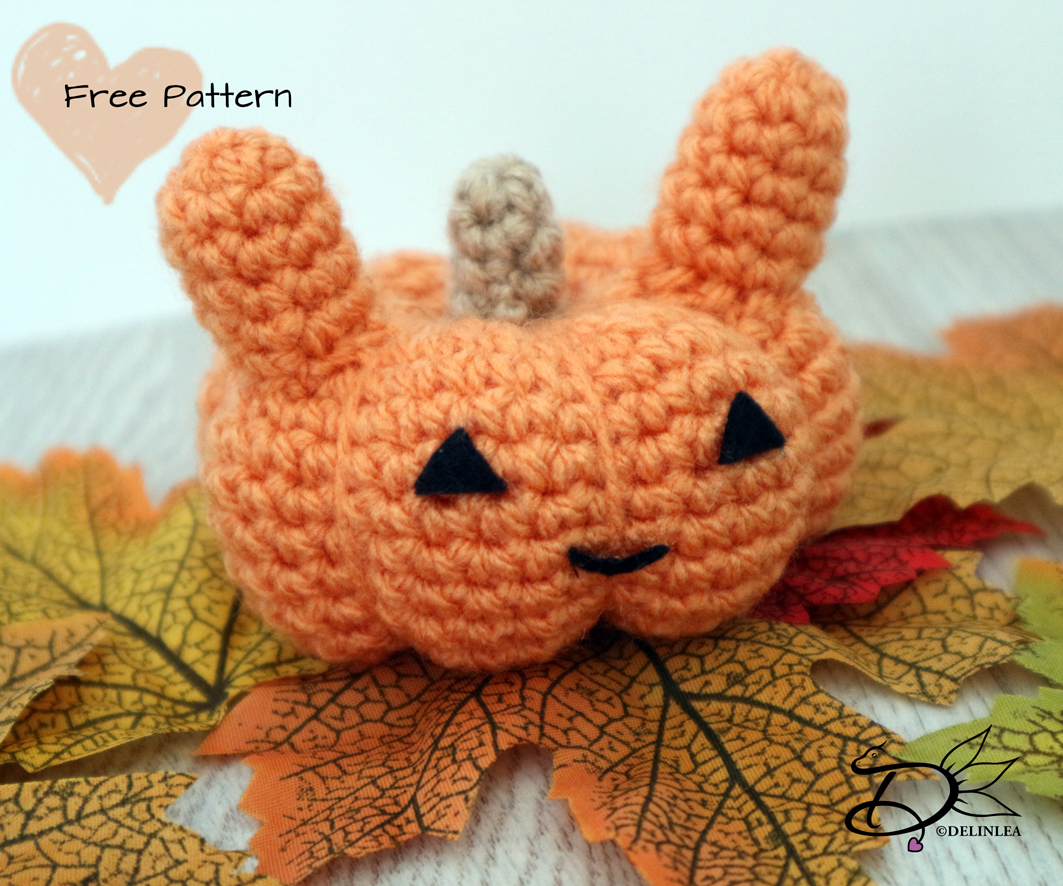
♥ Bunny Pumpkin

What’s Halloween without Pumpkins?! I just can’t imagine that. I love to decorate, craft and also cook with them. They are multifunctional! I think this year I need to buy a good pumpkin to carve it out. Not sure what yet tho. I will figure that out later. For now enjoy this Amigurumi pattern, at least you don’t have to watch it if it gets moldy xD.
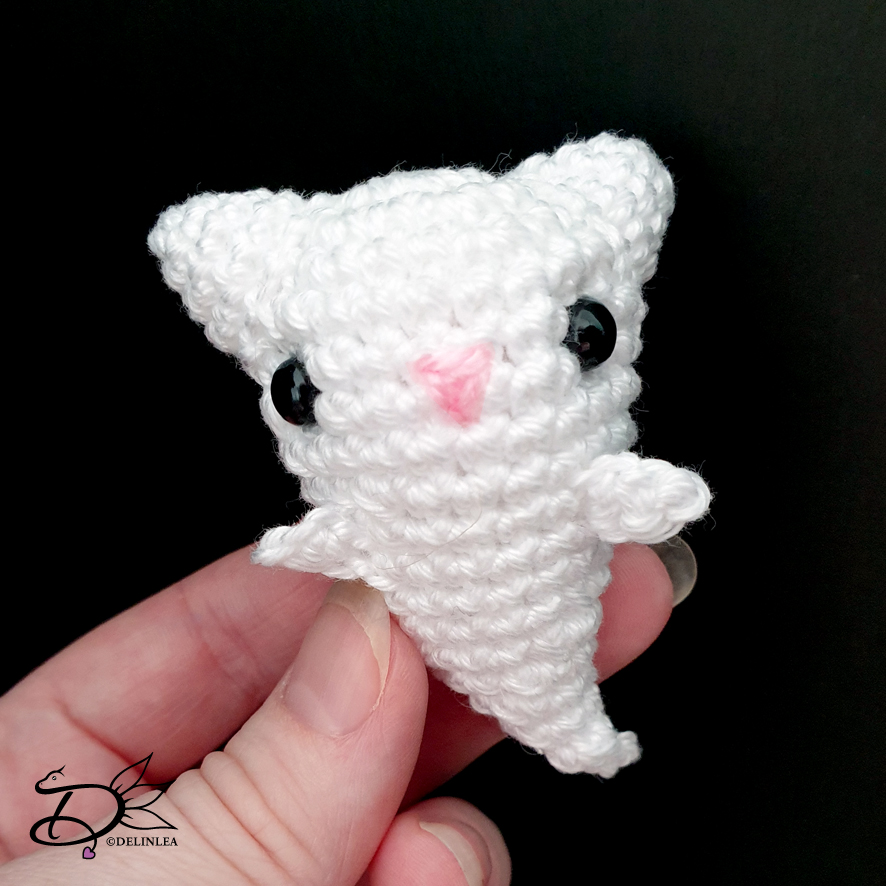
♥ Cat Ghost

How cute is this cat ghost?! I’ve made 3 in go last year, oops xD. And I actually feel like making more.. I guess I will. They are just so easy to make!

Cat Ghost

♥ Ghost

This little ghost is using the most basic and well know crochet technique, granny square! I sometimes like to play around with stitches like this. That’s how this pattern came alive as well. I usually just have too many ideas.
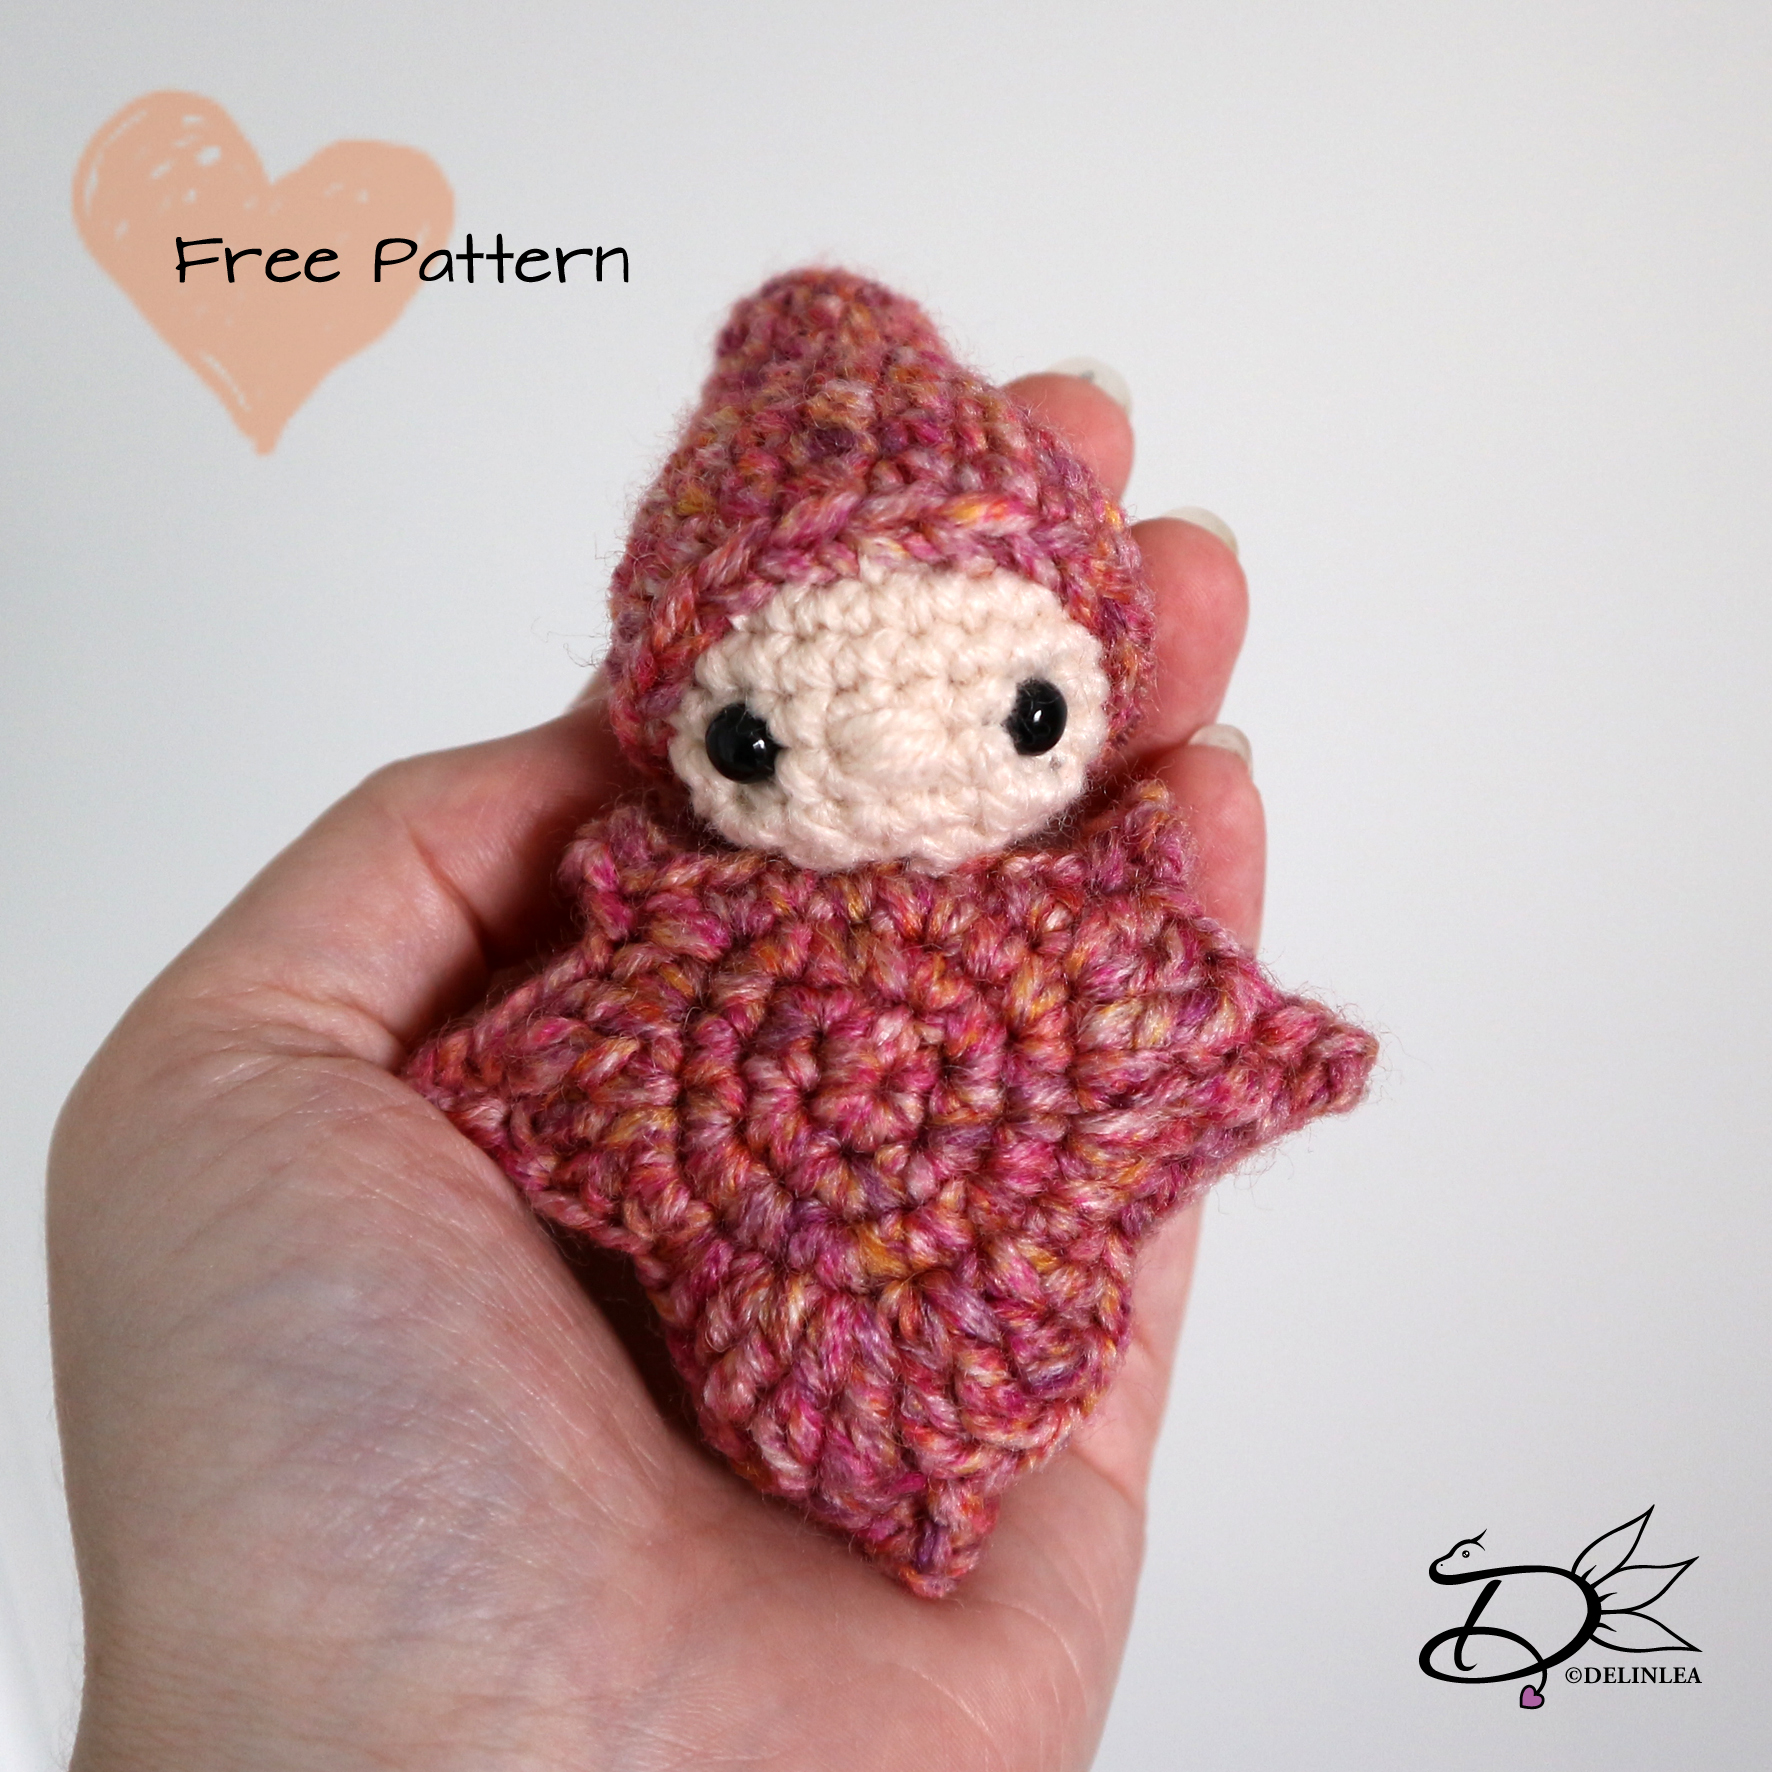
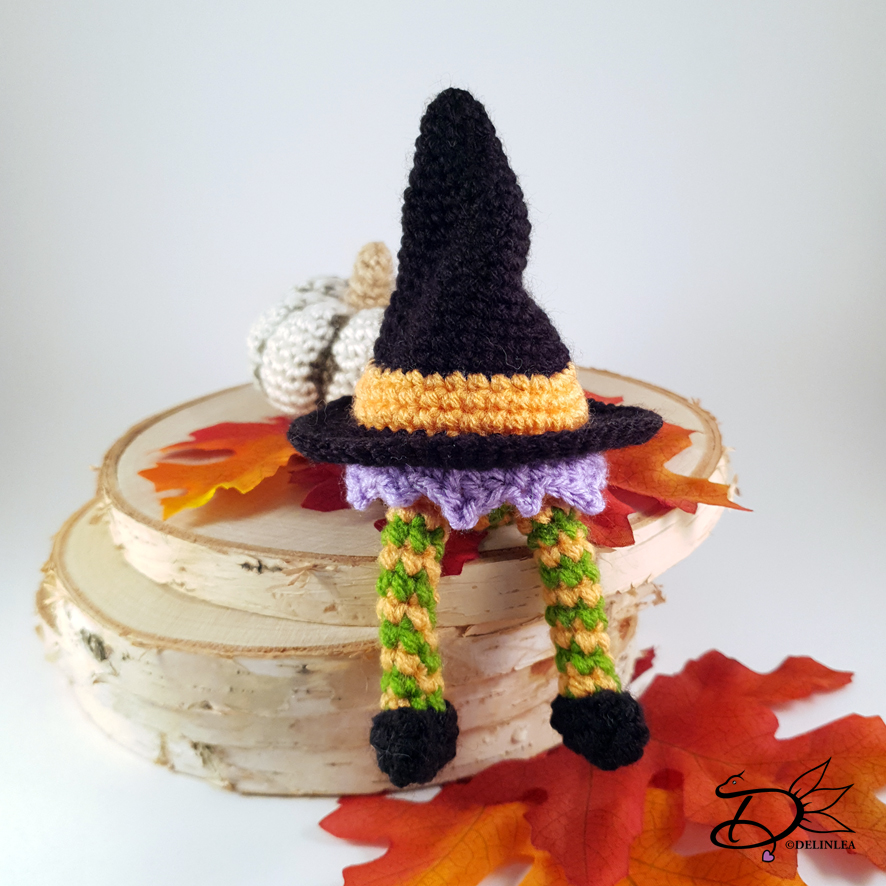
♥ Hiding Witches

Yes, shy witches exist as well! Didn’t know that right?! These love to hide under their hat and are really friendly, they actually just wanna help you but don’t know how to do that. Maybe we should give them a little hand! These you can make in all sorts of colors, and let them sit anywhere. I think it’s fun decoration around this time of year!
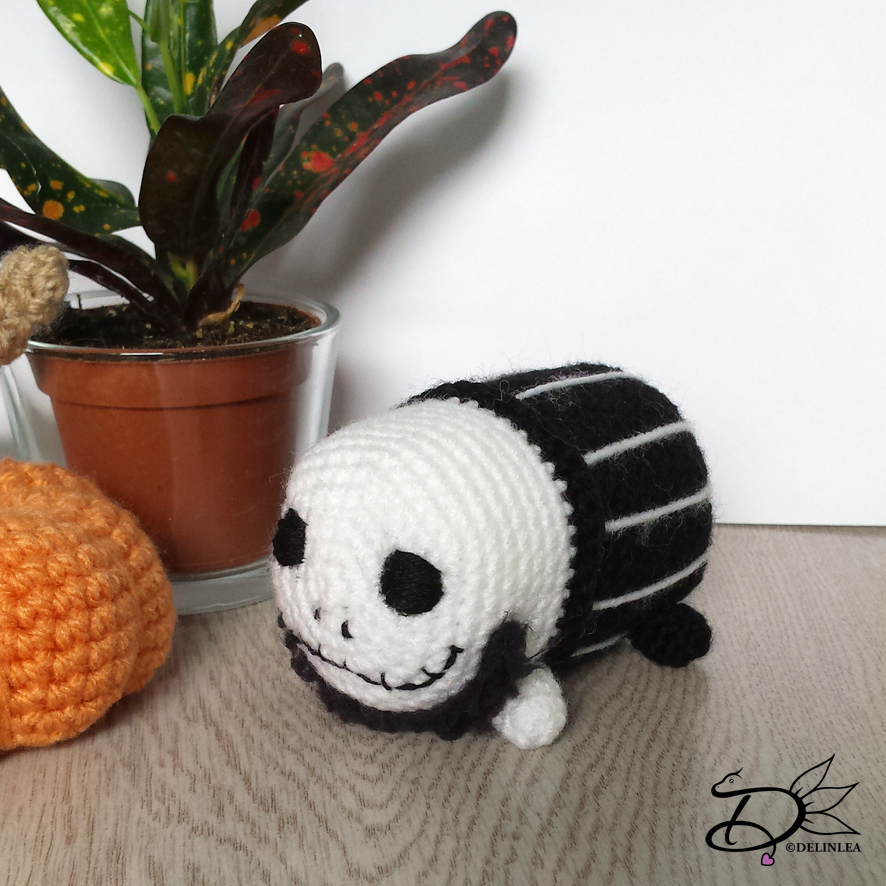
Hiding Witches

♥ Jack Skellington

I think I should add Jack here as well. I really should watch the movie again since I forgot a bit where it was about. But the Nightmare Before Christmas just shouldn’t be left out here!
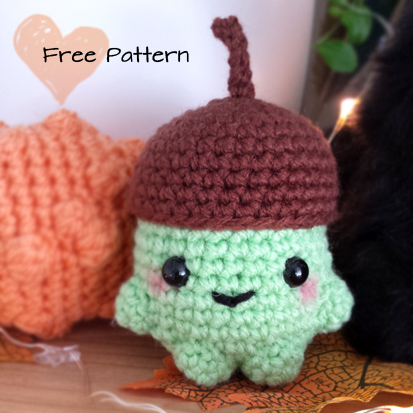
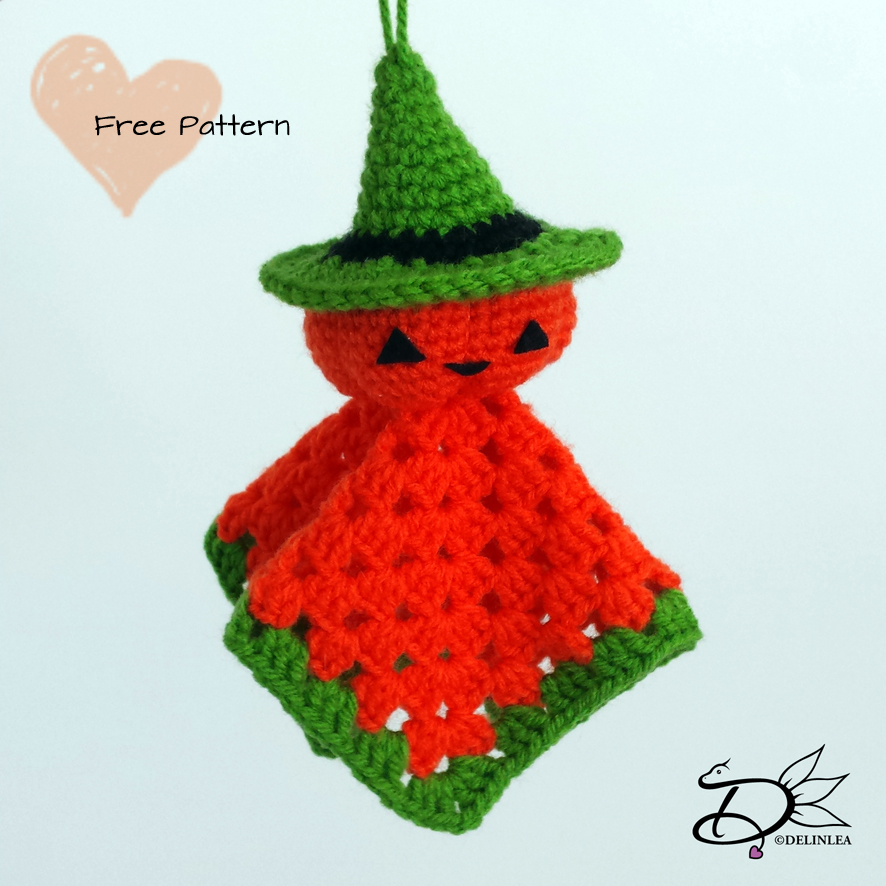
♥ Pumpkin Ghost

This one is also made using the Ghost pattern, same series. Just added a Pumpkin instead of a round head. It already gives such a different vibe! I love this one the most, I think, out of this series. Probably because of the pumpkin head that makes it just that little different. I love things that are different!
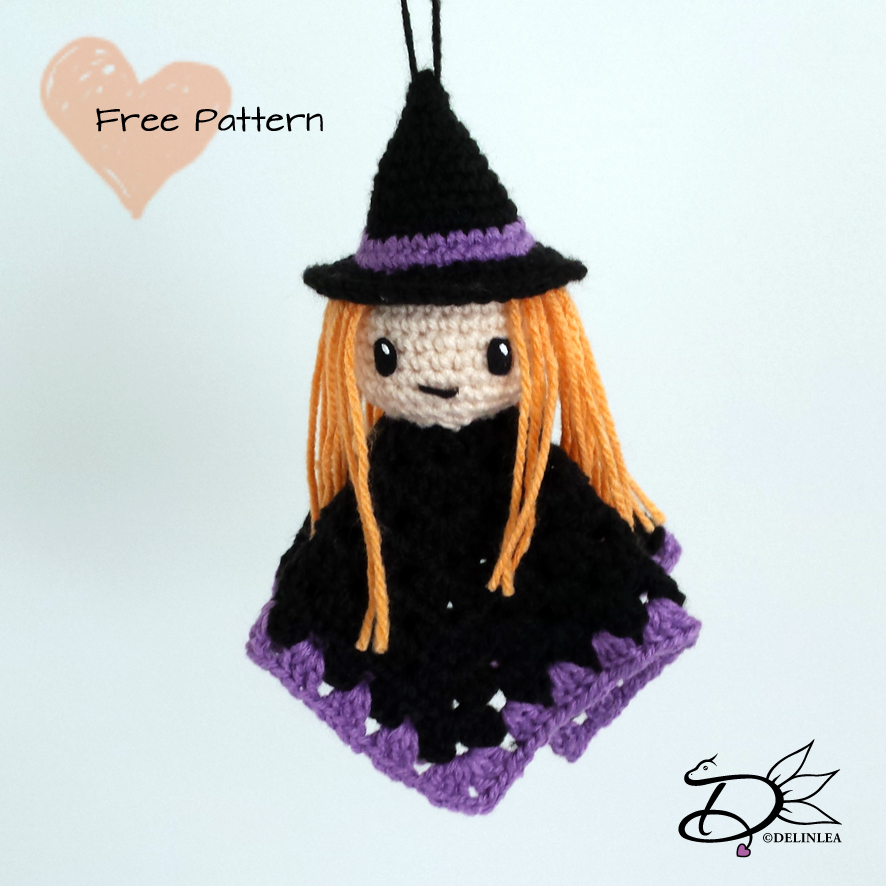
♥ Witch Ghost

Just like the Ghost pattern, is this one from the same series I made. With a few chances you can make something look completely different. You can make so many variations. You don’t always have to make a completely new pattern. 

I hope this post refreshed your mind and that you are able to make some of these patterns you might have forgotten. These are all fun to make, and pretty easy as well! If you made some of those patterns, I hope you will show me on Twitter or Instagram with the #DelinleaDIY. I always love to see what you created using my patterns.

Have a wonderful day and I’ll see you next week!

Love
Danielle

Posted in: Crafting, Crochet Tagged: Amigurumi, Crochet, Free Pattern, haken, Halloween, kawaii, pumpkin, Tsum Tsum

♥ Buzz Lightyear TsumTsum Amigurumi

24 september 2020 by Delinlea Leave a Comment

Hey Lovelies! I’m a bit late with today’s post. Well simply because I got distracted by Thai Drama’s xD. Do you like to watch drama’s? And which do you like? Anyway, I tried to crochet while trying to read the subtitles as well, that went very~~ slow xD.
As you might know today it’s time for a Tsum Tsum, I hope you are ready and a lover of Toy Story! It’s Buzz Lightyear!! Let’s go to the pattern.

Buzz Lightyear Tsum Tsum

For this Pattern you’ll need;
♥ Yarn in the colors Beige, Purple, Green, White, Black and Red. (I used Stylecraft Special DK)
♥ Crochet hook. ( I used a 3mm)
♥ Stuffing.
♥ Black, and Brown Felt for facial details.
♥ Yarn Needle.
♥ Sewing Pins.
♥ Stitch Marker.
♥ (Fabric) Glue.

Stitches used (US Terms):
Magic Ring.
CH = Chain.
SLST = Slip Stitch.
FSC = Foundation Single Crochet.
SC = Single Crochet.
ST = Stitch.
BL = Back Loops.
FL = Front Loops.
Inc = Increase.
Dec = Decrease.
(…) = Repeat the space in brackets the given number of times.
[…] = Total number of stitches.

Buzz Lightyear Tsum Tsum

♥ Pattern Buzz Lightyear Tsum Tsum.

This pattern is made with continues rounds, unless stated otherwise. Use a stitch marker to mark your first/last stitch of your row.

Body
Start with the color Beige.

1: 6SC in a Magic Ring. [6]
2: 2SC in each st around. [12]
3: (1SC, inc) 6 times. [18]
4: (2SC, inc) 6 times. [24]
5: (3SC, inc) 6 times. [30]
6: (4SC, inc) 6 times. [36]
7: (5SC, inc) 6 times. [42]
8: 42SC. [42]
|
13: 42SC. [42]
Change to the color White.
14: BL 42SC. [42] Mark the first FL of this row!
15: 42SC. [42]
|
23: 42SC. [42]
Change to the color Black.
24: 42SC. [42]
25: 42SC. [42]
Change to the color White.
26: 42SC. [42]
27: 42SC. [42]
Change to the color Green.
28: 42SC. [42]
Change to the color White.
29: 42SC. [42]
30: (5SC, dec) 6 times. [36]
31: (4SC, dec) 6 times. [30]
32: (3SC, dec) 6 times. [24]
33: (2SC, dec) 6 times. [18] Stuff the body.
34: (1SC, dec) 6 times. [12]
35: Dec around. [6]
Fasten off and weave in tail.

Purple Head Cover
At row 14 of the body you worked in BL, now rejoin your purple yarn in the front loops, in the stitch you marked. I kept the butt towards me and worked on it that way.

1: 42SC. [42]
2: 42SC. [42]
Break the yarn and fasten off. Now, skip 9st from where you stopped and rejoin your yarn.
3: 30SC, turn. [30] The remaining stitches you leave untouched.
4: Dec, 5HDC, 1SC, SlSt, 1SC and mark this st with a stitch marker, 9SC, 1SC and mark this st with a stitch marker as well, SlSt, 1SC, 5HDC, Dec.
Break the yarn and fasten off. Now, go to the stitches your marked in the previous row. Join your yarn in either one of them.
5: Dec, 9SC, dec, turn. [11]
6: Dec SC, 7HDC, dec SC. [9]
Fasten off and weave in tail and other tails that might be there.

Ear Covers (Make 2)
Use the color Purple.

5SC in a Magic Ring, SlSt in the first st.
Fasten off and leave a long tail for sewing

Green Band around his Body
Use the color Green.

1: 43FSC, make round with a SlSt in the first st. [43] (you could also Ch44, insert in second ch from hook, 43SC).
2: Ch1, 43SC, SlSt in the first st. [43]
|
4: Ch1, 43SC, SlSt in the first st. [43]
Fasten off and leave a long tail for sewing.

Legs (Make 4)
Make 2 in the color White, and 2 in the color Purple.

1: 4SC in a Magic Ring. [4]
2: 2SC in each st around. [8]
3: 8SC. [8]
|
5: 8SC. [8]
Fasten off and leave a long tail for sewing.

Middle of the Wings
Use the color White.

1: 6SC in a Magic Ring. [6]
2: 2SC in each st around. [12]
3: BL 12SC. [12]
Fasten off and leave a long tail for sewing.

Wings (Make 2)
Start with the color Purple.
This part won’t be worked in continues rounds.

1: Ch7, insert in second ch from hook, 6SC, turn. [6]
2: Ch1, 6SC, turn [6]
The next row you will alternate white and red yarn for every SC.
3: Ch1, 6SC. [6]
Fasten off and weave in tails.

Tip of the Wings (Make 2)
Use the color Green.

1: 6SC in a Magic Ring. [6]
2: (1SC, inc) 3 times. [9]
3: 9SC. [9]
Fasten off and leave a long tail for sewing.

♥ Assembling

Whenever I assemble Amigurumi’s, I always use sewing pins first. This way you can move parts around until you are happy, then sew it on.

First, put the green band around his body, right after the purple part, sew this on. The add his legs, White in front, Purple at the back.
The ear cover go on both sides of his face, on the purple part. I always like to use references to check where everything goes.
Last, let’s assemble his wings. The Green tips of the wings, slide those over the wing part and sew those on, keep in mind that the white and red part for both are facing forward when the green tips are on the outsides. So those will be mirrored when assembled. Then sew the middle part of the wings to the body, it will be partly on green and partly on white. Now the tip/wing combination you will sew to the middle part.
Make his face, I use yarn for his nose, and felt for the eyes, eyebrows and Chin.

That was it for today, some parts might feel a bit confusing, but if you have no clue how to do it, let me know and I’ll try to help you out! If you made Buzz Lightyear, show me on Twitter or Instagram with #DelinleaDIY I’d love to see what you created!

Have a wonderful day and I’ll see you next week!

Love
Danielle

Posted in: Crafting, Crochet, Tsum Tsum Tagged: Amigurumi, buzz lightyear, Crochet, cute, Disney, Free Pattern, haken, kawaii, toy story, Tsum Tsum

♥ Mrs. Potts Ufufy Amigurumi

17 september 2020 by Delinlea 2 Comments

Hey Lovelies! Are you ready for a new Ufufy Pattern? You know I made Chip Mug before, right? Well today it’s Mrs. Potts turn. Those don’t really look like an egg, as all ufufy’s do, but they are still really adorable! I tried to keep them the same size, so they fit in our collection!

Mrs. Potts Ufufy

For this Pattern you’ll need;
♥ Yarn in the colors White, Pink and Yellow. (I used Zeeman Supersoft)
♥ Crochet hook. ( I used a 2mm)
♥ Stuffing.
♥ Black Felt and Thread for facial details.
♥ Yarn Needle.
♥ Sewing Pins.
♥ Stitch Marker.
♥ (Fabric) Glue.

Stitches used (US Terms):
Magic Ring.
CH = Chain.
SLST = Slip Stitch.
SC = Single Crochet.
ST = Stitch.
BL = Back Loops.
FL = Front Loops.
Inc = Increase.
Dec = Decrease.
(…) = Repeat the space in brackets the given number of times.
[…] = Total number of stitches.

Chip Mug Pattern can be found here.

♥ Pattern Mrs. Potts Ufufy

This pattern is made with continues rounds, unless stated otherwise. Use a stitch marker to mark your first/last stitch of your row.

Body
Start with the color White.

1: 6SC in a Magic Ring. [6]
2: 2SC in each st around. [12]
3: (1SC, inc) 6 times. [18]
4: (2SC, inc) 6 times. [24]
5: (3SC, inc) 6 times. [30]
6: (4SC, inc) 6 times. [36]
7: 36SC. [36]
|
14: 36SC. [36]
15: (4SC, dec) 6 times. [30]
16: (3SC, dec) 6 times. [24]
17: BL, (2SC, dec) 6 times. [18]
18: (1SC, dec) 6 times. [12] Stuff the body.
19: dec all around. [6]
Fasten off and weave in tail.

Foot of the Pot
Start with the color Pink.

At row 17 of the body you worked in BL, now rejoin with Pink yarn in the FL.
1: 24SC. [24]
2: (3SC, inc) 6 times. [30]
Change to the color Yellow.
3: BL, 30SC. [30]
Fasten off and weave in tail

Nose
Use the color White.

1: 6SC in a Magic Ring. [6]
2: 2SC in each st around. [12]
3: 12SC. [12]
4: 3SC, (dec) 3 times, 3SC. [9]
5: 9SC. [9]
6: (2SC, inc) 3 times. [12]
7: 12SC. [12]
|
10: 12SC. [12] Stuff lightly.
11: (2SC, dec) 3 times. [9]
12: (1SC, dec) 3 times. [6]
Fasten off and leave a long tail for sewing.

Lid
Use the color Pink.

1: 4SC in a Magic Ring. [4]
2: 2SC in each st around. [8]
3: 8SC. [8]
4: Dec around. [4]
5: (1SC, inc) 2 times. [6]
6: 2SC in each st around. [12]
7: (1SC, inc) 6 times. [18]
8: (2Sc, inc) 6 times. [24]
9: 24SC. [24]
10: 24SC. [24]
11: BL 24SC. [24]
12: (2SC, dec) 6 times. [18]
Fasten off and leave a long tail for sewing.
If you want, you can stuff the lid lightly, but don’t put in their too much. You’ll get too much space between the body and the lid if you put too much stuffing.
Around the tip of the lid you have an Yellow accent, make a small chain that fits around there and sew it on.

Ruffles
Start with the color Pink.

At row 11 of the lid you worked in BL, rejoin with pink yarn in the FL.
1: 4SC in each st around. [96]
Change to the color Yellow.
2: 96SC. [96]
Fasten off and weave in tail.

Handle
Use the color Yellow.

1: 6SC in a Magic Ring. [6]
2: 6SC. [6]
Repeat row 2 until you have 15 rows.
Fasten off and leave a long tail for sewing.

Assembling

Whenever I assemble a Amigurumi, I’d like to use sewing pins first. This way you can move parts around easily until you are happy. Then sew it on.

First sew the lid to the body of Mrs. Potts, try to center it on top. Then sew on the nose, flatten the bottom lightly to do so. Last sew on the handle. But before you do, the side where you started with the magic ring will be curled. As you can see in the picture, I’ve sewn this, so it stays in place. After this you can sew it to the body.
Last make eyes from felt and use thread to make the eyelashes and eyebrows. With a bit of pink on the cheeks, finishes off this cute Mrs. Potts.

I hope you had fun making Mrs. Potts ! It looks maybe harder to make as it actually is. If you made on for your own, show me on Instagram or Twitter with the #DelinleaDIY, I’d love to see!

Have a wonderful day and I’ll see you next week!

Love
Danielle

Posted in: Crafting, Crochet, Ufufy Tagged: Amigurumi, Beauty and the Beast, Crochet, Disney, haken, mrs. potts, Tsum Tsum, Ufufy

♥ Leaf Rug or Blanket DIY

10 september 2020 by Delinlea Leave a Comment

Hey Lovelies! Since colder days are coming, well, weather forecast says else, but let’s ignore that xD. I really need a new rug, that I could easily dump in the washing machine. My cat is kinda old, with her little accidents, I just need to be able to clean it well. My last rug didn’t survive the washing machine, oops, haha. So, I came up with a much more fun one, in the shape of a leaf! I love botanics and would fit my space well. While I was making it, I realized it would be perfect as blanket as well! So, double fun, just choose where you wanna use this Leaf Rug/Blanket for. Let’s see how to create your own.

Leaf Rug or Blanket

For this DIY you’ll need:
♥ Green Fabric of choice, 1 by 2 meter.
♥ Sheet Stuffing/Snowblanket, 1 by 1 meter.
♥ Template of a Leaf.
♥ Sewing Machine. (optional)
♥ Needle and Thread.
♥ Embroidery Floss in Green.
♥ Tailor’s Chalk.
♥ Sewing Pins.
♥ Fabric Scissors.
♥ Fabric Glue. (Optional)

♥ DIY Leaf Rug or Blanket

Make a template of a leaf, you can easily find shapes online or draw one yourself. If you are confident enough you can also draw directly on the fabric. Since I am a perfectionist, I used newspaper to draw my leaf on and cut it out. Make sure you stay within 1 by 1 meter.

Fold your fabric in half, so you have a 1 by 1 meter sheet. On this, position your template and trace around it with the tailor’s chalk. Or, if you chose to draw it freehand, use the chalk as well.

Now before you cut it out. Keep in mind you need seam allowance. I just drew a line 1cm from the edge of the leaf on the inside, or you can add it around it. Just keep in mind that if you draw it within the shape, it will turn out a bit smaller. When you did that, cut it out, both layers at the same time!

In the end I changed the shape of the leaf, as you can see the pics side by side with and without the newspaper.

Sewing

Now it’s time for sewing! You could do this by hand, but that will probably take a while! I used my sewing machine, just a straight stitch will do. Start somewhere on one of the sides, since you need to leave a gap, about 20cm, to turn it inside out. To keep the layers together before sewing, use sewing pins along the edge.

Stuffing.

I used an old snow blanket for the stuffing, it was perfect! Cut it to size, use your template. It doesn’t have to be perfectly shaped, just make sure that it will fit inside the seams.

Now for the tricky part, the stuffing has to end up on the inside. You can do this 2 ways. Just flip the fabric and try to get the stuffing nicely inside, which is a challenge but possible.

Or the second way is, before you flip it, use a bit of fabric glue around the edge of the stuffing and glue it to the fabric. Just a warning here, test you glue on a scrap piece of fabric first. Some will leave really bad stains and that’s not pretty! Make sure to let the glue dry well and then flip the whole thing.

Stuffing glued on top of the still inside out piece.

Closing the Gap.

With a neeldle and thread, sew the gap closed. The best way is to use and invisible stitch. If you don’t know how to do this, watch a video on youtube, it’s not as hard as you might think. Make sure you fold in the sewing allowance neatly to the inside so, in the end, it won’t be visible when you are done.

Leaf Veins

It’s time to give our rug or blanket some more detail! Take out you chalk again and draw out the Leaf Veins is any shape or form you like. If you are happy with how it looks, take your sewing pins and pin those down.

I did use embroidery floss, split in 3 strands. And stitched those veins by hand, it will take a while, but this way they were thinker as I could get with sewing it on my sewing machine. You, of course could choose to use your sewing machine to finish it quickly. But I think it was worth it to do it by hand.

♥ Finished!

Your rug or blanket is finished! Isn’t it fun to see? I hope you enjoyed this tutorial and made a beautiful blanket or rug. If you did, don’t forget to show me on Twitter or Instagram with the #DelinleaDIY

Leaf Rug or Blanket

Have a wonderful day and I’ll see you next week!

Love
Danielle

Posted in: Crafting Tagged: Blanket, botanical, DIY, leaf, Rug, Tutorial

♥ Autumn Amigurumi’s

3 september 2020 by Delinlea Leave a Comment

Hey Lovelies! Are you seeing signs of Autumn arriving where you live as well?! Here the weather is acting like it’s fall. I love it a lot. Because of Fall coming I thought of making a overview with Amigurumi patterns I made over time! Some you might remember, other you might have forgotten. So, let’s do this.

♥ Autumn Spirit

This adorable spirit I made some years ago, and I still love it a lot, it’s not too hard to make, and quite fun that hang everywhere as decoration. Now looking him up, I realized that I had a lot more ideas to make as spirits.. hmm maybe it’s time to make some more. The pattern you can find here!

♥ Adorable Acorn

Do you like picking up Acorns as well in Autumn? I usually do, and put them everywhere. It’s magical what Nature can create, and I often think we don’t enjoy it enough. Nature gives us so much, and what do we give back?!

Anyway, this little one you should definitely make, it will keep you company during the cold days! The pattern you can find here!

♥ Little Foxy

Why did I only make a fox related to Autumn?! I guess I need to do something about that. Any suggestions?! Leave them below if you have. But this foxy is really sweet and always want’s to be around you, maybe as a keychain, so he can travel around with you to see the worlds. He’s really curious! The pattern you can find here!

Little Foxy

♥ Mushroom Buddy

Why do I feel like this mushroom buddy needs some friends?! Maybe because there are so many types of Mushrooms! I can probably can come up with a few more designs. But for now you have to do it with this one only! The pattern you can find here!

Mushroom Buddy

I won’t post the Halloween related amigurumi’s here, since I will make a post about those next month! So wait a little for that or go here, if you are looking for those already.

I hope you enjoy those patterns. Some have been a while since I made them, and then remembering how many more ideas I have. I guess I will be busy for a while! (I’ve some huge yarn stash that really needs to decrease xD) Let’s get crafty!

Ah, and if you made any, don’t forget to show me on Instagram or Twitter with #DelinleaDIY

Have a wonderful /Autumn/ day and I’ll see you next week!

Love
Danielle

Posted in: Crafting, Crochet Tagged: Amigurumi, Autumn, Crochet, cute, fall, haken, kawaii
« Vorige 1 2 3 4 5 … 12 13 14 15 16 17 18 19 20 … 49 50 51 52 53 Volgende »

What are you looking for?!

My Socials

Ko-Fi

I love making all these free things for you, tho it would be very helpfull if you can support me on Ko-Fi! (You don’t have to tho, totally up to you!)

Ko-Fi Shop!!

In my Ko-Fi shop you can find PDF Amigurumi Patterns!! You can pay easily with PayPal.
Go to the shop here!!

Recent Blog Posts

  • ♥ Happy 2022!
  • ♥ Day 12; Lights
  • ♥ Day 11; Flower Deco
  • ♥ Day 10; Snowman
  • ♥ Day 9; Gingerbread Houses

Recent Comments

  • Erzsebet M. Marosvari op ♥ My Entry For a Faber Castell Contest
  • Delinlea op ♥ Pietje Gnome Amigurumi
  • Delinlea op ♥ Toy Story Alien TsumTsum Amigurumi
  • Delinlea op ♥ Pua Tsum Tsum Amigurumi
  • Charli op ♥ Free Pattern; CNY Mouse Amigurumi

Categories

  • animation
  • Beadwork
  • Blogmas 2018
  • Blogmas 2020
  • Blogmas 2021
  • Books
  • Bujo
  • Christmas
  • Christmas CAL 2019
  • Christmas Countdown 2017
  • Contest
  • Crafting
  • Crochet
  • Drawing
  • Drawing Lesson
  • Easter
  • Geen categorie
  • Life
  • Miniature
  • Nail Art
  • New Year
  • Paper
  • plush
  • Pokemon
  • Poseable Art Doll
  • Recipe
  • Sewing
  • Shop Pattern
  • Sinterklaas
  • Social Media
  • Tsum Tsum
  • Ufufy

Copyright © 2025 Delinlea - My little fantasy world.

Family WordPress Theme by themehall.com