Delinlea - My little fantasy world
  • ♥ Home
  • ♥ About Me
  • ♥ Blogmas 2021
  • ♥ Free Patterns
    • ♥ Amigurumi; Spring/Easter
    • ♥ Amigurumi; Fall/Halloween
    • ♥ Amigurumi; Winter
    • ♥ Amigurumi Tsum Tsum
    • ♥ Amigurumi Ufufy
    • ♥ Amigurumi Others
    • ♥ Christmas Countdown 2017
    • ♥ Blogmas 2018
    • ♥ Blogmas 2020
  • ♥ Tutorials
    • ♥ Easter
    • ♥ Home Deco
    • ♥ Others
  • ♥ Drawing Lessons
  • ♥ FanFic
    • ♥ Chapter 1
    • ♥ Chapter 2
    • ♥ Chapter 3
    • ♥ Chapter 4
    • ♥ Chapter 5
    • ♥ Chapter 6
    • ♥ Chapter 7
  • ♥ Gallery
    • ♥ Crafts
    • ♥ Drawings
    • ♥ Poseable Art Dolls
  • ♥ Links
  • ♥ Contact
    • Privacy Policy

Author: Delinlea

♥ Drawing Lesson 1; How to start

9 mei 2019 by Delinlea Leave a Comment

Hey Lovelies! Most of you probably know I love to draw and I often get questions like how I learned it? How do you start? and most often of all, Can you teach me? So I decided to start this series of drawing lessons! Every now and then I will post a blog with drawing tips and or information. I hope you will enjoy!

Please take note that those tips are from my own experience and may be not the best out there. I just want to help you out! And how you can start drawing yourself. But, there’s always a but, drawing takes practice, a lot of practice. You can’t magically draw a portrait perfectly.

How to get started?! Well, get yourself a piece of paper and a pencil. And just start. It doesn’t matter in the beginning what kind of paper/pencil you use. Those can be very cheap, just what you have around. It’s all about the basics first. In this blog I will cover how you can ‘copy’ a photo reference to a sheet of paper. I give several options, it’s up to you what fits you best. There’s no right or wrong in art.

Traditional way

I have no idea how this is called for real, I’m sorry. But what I mean by this one is that you start with drawing and oval/circle and go from there. There are certain rules how to devide the oval and on which lines you draw the eyes, nose, mouth etc. In my eyes this is the most traditional way that is been used the longest. But I am not sure about that. I am not gonna teach you on how to this. Why? Because every face is different, and no face is symmetrical. If you still wanna know how this works, simple google ‘how to draw a face’ and a lot tutorials will come up.
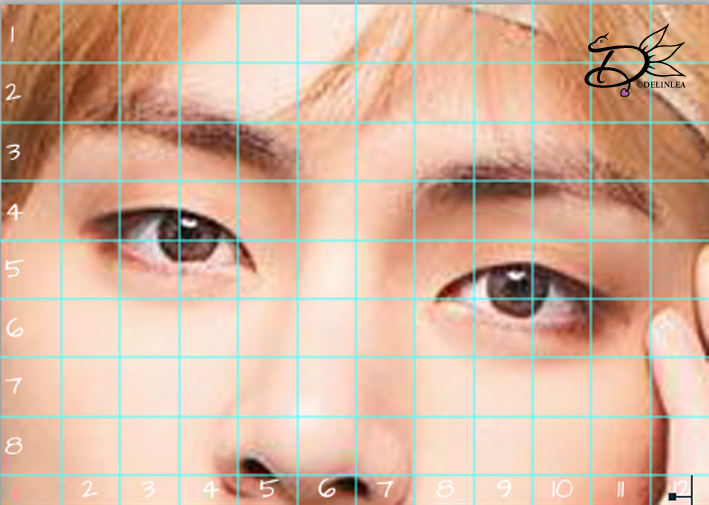
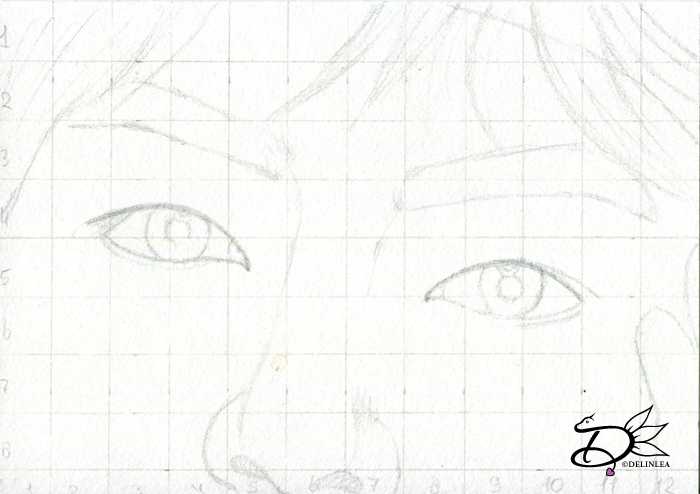
Grid

Using a grid for drawing, is quit populair. I personally never use it, well I did when I was a kid in school, that’s like forever ago haha. But I always see a lot people use it, and I can kinda understand why, it’s just not my thing. That’s the beauty of art, it’s a journey to find your own way and style, where you are comfortable. Gridding for me results in overthinking and making it way to complicated for myself haha.

A grid is usually excisting out of squares. Some people make triangles. Basicly it are lines to help you draw whatever your subject is. You draw them on your reference and on your paper. Most important is that if you use squares on your reference, make sure they are on your paper as well. And the same amount for the part you decide to draw. You can draw your squares on your paper bigger, same size, or smaller, this way you can control how big you want to be your final outcome.

You can draw your grid on the reference by hand, but then you need to print out your picture or use one from a magazine/anything else you don’t mind to draw on. You can also do it in a photo editing program. Try to find what works for you. I did it in Photoshop myself for this tutorial.

Tip 1: Number your squares along the edge of your paper and reference. This will make it easier to find the right square to draw in.
Tip 2: If your paper you wanna draw on isn’t too thick. You can also draw your grid on another sheet of paper with a black marker or so. Put this behind your paper you wanna draw on (eventually with a lightbox). This will save you time to draw the grid over and over.
Tip 3: Draw your grid lightly so you can erase it easily.

Measuring/Lines

After a grid there are also certain lines you can draw on your reference and draw your subject using those lines. It takes less time then drawing a grid all the time. But it’s also something you need to get a feeling for. With lines you can create shapes and measure your drawing points. Those drawing points you copy on your paper and draw the subject with those. You notice, when you draw a portrait, there are certain lines that are almost always the same. It’s not that hard to do, you can draw as many lines as you wanna use and work from there.

Tracing

Here’s a lot of discussion about, a lot people say it’s cheating. But these days even people say you already cheat when you use a reference. I don’t know what going on in the art community. But try to make up your own opinion. That’s why I include this option too.

Tracing is litterally tracing your subject onto your paper. Nothing more, nothing less. Maybe this sounds weird if you wanna learn how to draw. But I see it this way, If you draw your subject, that you wanna learn over and over with tracing. You get the feel how the shapes work. This will be saved into your mind/movements and you can draw it neatly without tracing after a while. While, if you keep drawing a shape wrong over and over, it will frustrate in the end.

Free Hand

Free hand a drawing is by far most, the most tricky to do. Why? Because you have no guidelines or what so ever. You just draw what you see. Copy the drawing with your own eyes and hands. For some people this is easy and do it all the time, other people need guidelines to draw well. Whatever it is for you, do it. Don’t let people tell you what’s right or wrong in art. Art = freedom, use it!

About me

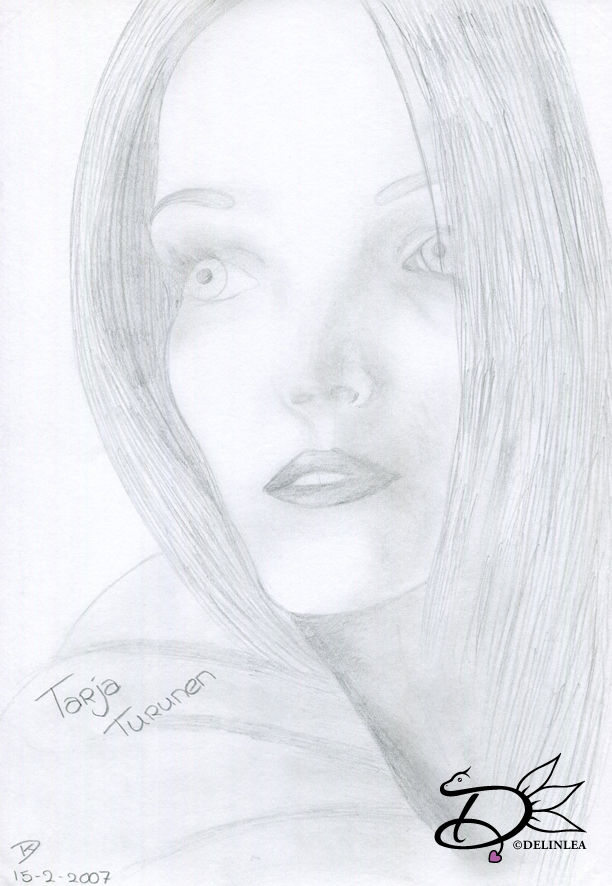
For me I learned drawing by free hand. I just did that, some people call that talent. But when you have seen my first drawings, you barely can recognize who it is (pictures below). We all have to start somewhere, don’t give up after the first few tries. Later on I also started to use lines/measuring to get proportions right. Now, I still combine these 2 most of the time, just how I feel, or how complicated the reference is. (For recent works check my Instagram).
I always loved drawing from when I was very young. But drawing portraits, I believe I was 17, I had a dream I could draw portraits, and the next day, was the day I started drawing portraits.
As for Age, it doesn’t matter when you start learning something. It’s never too later or too early to start something. Just do it.

I hope this lesson was helpful to you! And I hope you will start drawing as well! It’s something beautiful to do, to create and control what’s going on that blank sheet of paper. Create and have a wonderful day!

Love
Danielle

Posted in: Drawing Lesson Tagged: drawing, how to start, Lesson

♥ Free Pattern; Pluto Ufufy

2 mei 2019 by Delinlea Leave a Comment

Hey Lovelies! I am so sorry I didn’t post last week. The thing was that my cat needed surgery, her uterus was inflamed and had to be removed. I was busy taking care of her. She’s doing fine by now, she just needs to heal!
That for that, today I am posting a new Amigurumi pattern, I hope you will enjoy this one. I wanted to make our collection of Ufufy’s a little bigger by adding Pluto! Have fun!

For this DIY you’ll need:
♥ Yarn in the colors;  Yellow, Brown and Green.
♥ Crochet Hook (I used a 2,5mm hook).
♥ Stuffing.
♥ Scissors.
♥ Sewing Pins.
♥ Yarn Needle.
♥ Felt in brown and white.
♥ (Fabric) Glue.

Stitches used (US Terms):
Magic Ring.
CH = Chain.
SC = Single Crochet.
ST = Stitch.
Inc = Increase.
Dec = Decrease.
(…) = Repeat the space in brackets the given number of times.
[…] = Total number of stitches.

Pattern

Work in continues rounds, use a stitch marker to mark your first stitch of every row. This is for every part, unless stated otherwise.

Body
Use the color yellow.

1: 6SC in magic ring. [6]
2: 2SC in each ST around. [12]
3: (1SC, inc) 6 times. [18]
4: (2SC, inc) 6 times. [24]
5: 24SC. [24]
6: 24SC. [24]
7: (3SC, inc) 6 times. [30]
8: 30SC. [30]
|
17: 30SC. [30]
18: (3SC, dec) 6 times. [24]
19: (2SC, dec) 6 times. [18] Stuff the body here.
20: (1SC, dec) 6 times. [12]
21: Dec all around. [6]
Fasten off and  weave in tail.

Legs (make 4)
Use the color yellow.

1: 6SC in Magic Ring. [6]
2: 6SC [6]
Fasten off and leave long tail for sewing. You don’t have to stuff them, just flatten.

Snout
Use the color yellow.

Make 5 CH.
1: Insert in second chain from hook, 3SC, 3SC in the last st, 2SC, inc. [10]
2: inc, 2SC, (inc) 3 times, 2SC, (inc) 2 times. [16]
3: 16SC. [16]
Fasten off and leave a long tail for sewing. You will have to stuff the snout, but that’s easier when it’s about half way sewn to the body.

Ears (make 2)
Use the color brown.

1: 6SC in magic ring. [6]
2: (1SC, inc) 3 times. [9]
3: 9SC. [9]
|
9: 9SC. [9]
10: (1SC, dec) 3 times. [6]
11: 6SC. [6]
Fasten off and leave a long tail for sewing. Stuffing is not needed.

Collar
Use the color Green.

Chain about 40. Just measure if you need more or less.
Make round, fasten off and weave in tails.

Assembling

I always use sewing pins to place all parts first, before sewing. This way you can easily move all parts around until you are happy with the outcome.

First create a nose on the snout. You can either do this with brown felt and glue it on, or embroider it on with brown yarn, just where you are comfortable with.
Put the collar around his body, around mid way, but a tiny bit lower. You can sew it on, but also you can leave it loose, up to you. From here you know how to position the legs, and sew those on.
Time to position the snout, it’s just above the collar, happy with it’s position? Sew it on as well. Last are the ears to sew on, on both sides of it’s head. Ah and don’t forget his tail! I just sewn on a piece of yarn. Nothing to fancy.
out of felt you will make the eyes. Best way is to cut them out of a piece of scrap paper, this way you won’t waste any felt. If you are happy with how it looks on pluto. The you can cut the pieces out of felt and glue them to pluto’s head.

I hope you enjoyed this little pattern. Have a wonderful day and I’ll see you next week!

Love
Danielle

Posted in: Crafting, Geen categorie, Ufufy Tagged: Amigurumi, Crochet, Disney, Free Pattern, haken, Pluto, Ufufy

♥ Happy Easter!

21 april 2019 by Delinlea Leave a Comment

Hey Lovelies! Here’s a surprise post! I didn’t plan this at all, but felt like giving you a cute Coloring picture! I hope you will enjoy! And most of all enjoy your easter time if you celebrate! ♥

Download here: Link

Patterns for those shown in the picture above, can be found here
Baby Chicken
Easter Bunny
Boho Duckling

Love
Danielle

Posted in: Crafting, Easter Tagged: coloring picture, Easter, Free

♥ Free Pattern; Baby Chicken

18 april 2019 by Delinlea Leave a Comment

Hey Lovelies! How are you doing these days?! I hope you are doing fine and having fun. As I said in last weeks blog, I was working on a baby chicken as well. And I finished that one up for today’s blog post. I hope you will enjoy this pattern as well. It’s based ones again on my Boho Duckling! Enjoy!

For this DIY you’ll need:
♥ Yarn in the colors;  Yellow, Orange and White. (I used Budgetyarn)
♥ Crochet Hook (I used a 2,5mm hook).
♥ Stuffing.
♥ Scissors.
♥ Sewing Pins.
♥ Yarn Needle.
♥ Safety eyes, 6mm.

Stitches used (US Terms):
Magic Ring.
Ch = Chain.
SC = Single Crochet.
HDC = Half Double Crochet.
DC = Double Crochet.
Picot = made of 3 Chains.
ST = Stitch.
Inc = Increase.
Dec = Decrease.
(…) = Repeat the space in brackets the given number of times.
[…] = Total number of stitches.

Pattern

The Body, Head and Wings will be the same as the Boho Duckling. Use Yellow for these parts.

Beak
In the color Orange.

1: 4SC in Magic Ring. [4]
2: (inc, 1SC) 2 times. [6]
Fasten off and leave a long tail for sewing.

Feet
In the color Orange.

1: 6SC in Magic Ring. [6]
2: (1SC, inc) 3 times. [9]
The next part will be a bit tricky. If you can’t do it you can always make the feet from boho Duckling. You’ll devide your workin 3 parts. So the row you work on, make flat, side by side. Follow row 3/4 as written and repeat 3 times (2 times you need to re-attach your yarn).
3/4: 1SC, go to the other side of your work/row (that’s  why you had to flatten). Count 3 stitches back (so the 1 you just made and 2 from the last row). Insert your hook in that stitch. Make 2SC. You will work in a tiny circle. make 3 more SC on top of the 3 st you just made.
Fasten off and weave in all tails.

Egg Shell
In the color White.

1: 6SC in Magic Ring. [6]
2: 2SC in each st around. [12]
3: (1SC, inc) 6 times. [18]
4: (2SC, inc) 6 times. [24]
5: (3SC, inc) 6 times. [30]
6: 30SC. [30]
7: 30SC. [30]
8: (4SC, inc) 6 times. [36]
9: 36SC. [36]
|
11: 36SC. [36]
12: (HDC, DC, Picot, HDC, Picot, 3SC, HDC, DC, Picot, HDC, 2SC, Picot, 1SC) 3 times.
Fasten off and weave in tail.

Assembling

I always use sewing pins to place all parts first, before sewing. This way you can easily move all parts around until you are happy with the outcome.

Sew on the body to his head and place the wings at both sides of the body, sew on. His beak will go in between his eyes, but slighly lower. You don’t have to stuff the beak, but you can do if you want, do that when you are almost done sewing it on. Last sew on his feet.

Tip, add some pink pastel dust on his cheeks, for an extra cute look.

I hope you liked this pattern, and show me if you made it! Have a lovely day

Love
Danielle

Posted in: Crafting, Crochet, Easter Tagged: Amigurumi, animal, baby, chicken, Crochet, cute, haken, kawaii

♥ Free Pattern; Easter Bunny

11 april 2019 by Delinlea 1 Comment

Hey Lovelies! Are you ready for easter yet?! Well, I think I am, but at the same time I am not, I have so many ideas I wanna make and create, but there is not enough time haha. I think I can make easter stuff all year round. Better not do that xD. I’ll just gonna write them down, and if I have time I’ll make them for next year. For today I planned a easter variation on my Boho Duckling. A Easter Bunny! I also wanted to do a little chick, but I couldn’t figure out on time how I wanted the feet to look like, and since my arm hurts a lot, I thought it was better to only upload the easter bunny for you. And hopefully next week upload the little chick.

For this DIY you’ll need:
♥ Yarn in the colors;  Light Brown and Cream. (I used Stylecraft Special DK)
♥ Crochet Hook (I used a 2,5mm hook).
♥ Stuffing.
♥ Scissors.
♥ Sewing Pins.
♥ Yarn Needle.
♥ Safety eyes, 6mm.
♥ Pink Felt.
♥ Fabric Glue.

Stitches used (US Terms):
Magic Ring.
Ch = Chain.
SC = Single Crochet.
ST = Stitch.
Inc = Increase.
Dec = Decrease.
(…) = Repeat the space in brackets the given number of times.
[…] = Total number of stitches.

Pattern

The Body and Head will be the same as the Boho Duckling. Use the Light Brown color for this.
For the nose you can use either pink felt or embroider it on. Just what you think is best.

Ears (Make 2)
Use the color Light brown.

1: 6SC in Magic Ring. [6]
2: 2SC in each st around. [12]
3: (1SC, inc) 6 times. [18]
4: (2SC, inc) 6 times. [24]
5: 24SC. [24]
6: 24SC. [24]
7: 24SC. [24]
8: (6SC, dec) 3 times. [21]
9: 21SC. [21]
10: (5SC, dec) 3 times. [18]
11: 18SC. [18]
12: (4SC, dec) 3 times. [15]
13: 15SC. [15]
14: 15SC. [15]
15: 15SC. [15]
16: (3SC, dec) 3 times. [12]
17: 12SC. [12]
18: 12SC. [12]
19: 12SC. [12]
Fasten off and leave a long tail for sewing. Out of Pink felt, cut the inner ear. This you will glue on with fabric glue.

Feet (make 2)
Use the color Light Brown.

1: 6SC in Magic Ring. [6]
2: (1SC, inc) 3 times. [9]
3: 9SC. [9]
4: 9SC. [9]
5: 9SC. [9]
6: (2SC, inc) 3 times. [12]
7: 12SC. [12]
8: 12SC. [12]
9: (3SC, inc) 3 times. [15]
10: 15SC. [15]
11: (4SC, inc) 3 times. [18]
12: 18SC. [18]
13: 3SC, dec, 7SC, dec, 4SC. [16]
14: 3SC, dec, 6SC, dec, 3SC. [14]
15: 2SC, dec, 5SC, dec, 3SC. [12]
Fasten off and leave a long tail for sewing.
Sew the top part, the opening, close.
Cut a heart out pink felt and glue this to the feet.

Arms and Tail (Make 3)
Use the color Light Brown for the arms (2). Use the color Cream for the tail.

1: 6SC in Magic Ring. [6]
2: (1SC, inc) 3 times. [9]
Fasten off and leave a long tail for sewing.

Assembling.

I always use sewing pins to place all parts first, before sewing. This way you can easily move all parts around until you are happy with the outcome.

Sew the body to the head. After that sew on the arms. Now you can reach them well.
The order doesn’t really matter, but sew on the ears, feet and tail on as well. And you are already done!

I hope you will love this cute little easter bunny! I definitely love him! Will you show me yours when you made him too? I’d love to see!

Have a wonderful day!

Love
Danielle

Posted in: Crafting, Crochet, Easter Tagged: Amigurumi, Bunny, Crochet, cute, Easter, Free Pattern, haken, kawaii
« Vorige 1 2 3 4 5 … 26 27 28 29 30 31 32 33 34 … 49 50 51 52 53 Volgende »

What are you looking for?!

My Socials

Ko-Fi

I love making all these free things for you, tho it would be very helpfull if you can support me on Ko-Fi! (You don’t have to tho, totally up to you!)

Ko-Fi Shop!!

In my Ko-Fi shop you can find PDF Amigurumi Patterns!! You can pay easily with PayPal.
Go to the shop here!!

Recent Blog Posts

  • ♥ Happy 2022!
  • ♥ Day 12; Lights
  • ♥ Day 11; Flower Deco
  • ♥ Day 10; Snowman
  • ♥ Day 9; Gingerbread Houses

Recent Comments

  • Erzsebet M. Marosvari op ♥ My Entry For a Faber Castell Contest
  • Delinlea op ♥ Pietje Gnome Amigurumi
  • Delinlea op ♥ Toy Story Alien TsumTsum Amigurumi
  • Delinlea op ♥ Pua Tsum Tsum Amigurumi
  • Charli op ♥ Free Pattern; CNY Mouse Amigurumi

Categories

  • animation
  • Beadwork
  • Blogmas 2018
  • Blogmas 2020
  • Blogmas 2021
  • Books
  • Bujo
  • Christmas
  • Christmas CAL 2019
  • Christmas Countdown 2017
  • Contest
  • Crafting
  • Crochet
  • Drawing
  • Drawing Lesson
  • Easter
  • Geen categorie
  • Life
  • Miniature
  • Nail Art
  • New Year
  • Paper
  • plush
  • Pokemon
  • Poseable Art Doll
  • Recipe
  • Sewing
  • Shop Pattern
  • Sinterklaas
  • Social Media
  • Tsum Tsum
  • Ufufy

Copyright © 2025 Delinlea - My little fantasy world.

Family WordPress Theme by themehall.com