Delinlea - My little fantasy world
  • ♥ Home
  • ♥ About Me
  • ♥ Blogmas 2021
  • ♥ Free Patterns
    • ♥ Amigurumi; Spring/Easter
    • ♥ Amigurumi; Fall/Halloween
    • ♥ Amigurumi; Winter
    • ♥ Amigurumi Tsum Tsum
    • ♥ Amigurumi Ufufy
    • ♥ Amigurumi Others
    • ♥ Christmas Countdown 2017
    • ♥ Blogmas 2018
    • ♥ Blogmas 2020
  • ♥ Tutorials
    • ♥ Easter
    • ♥ Home Deco
    • ♥ Others
  • ♥ Drawing Lessons
  • ♥ FanFic
    • ♥ Chapter 1
    • ♥ Chapter 2
    • ♥ Chapter 3
    • ♥ Chapter 4
    • ♥ Chapter 5
    • ♥ Chapter 6
    • ♥ Chapter 7
  • ♥ Gallery
    • ♥ Crafts
    • ♥ Drawings
    • ♥ Poseable Art Dolls
  • ♥ Links
  • ♥ Contact
    • Privacy Policy

Crafting

♥ Halloween Creature Amigurumi

21 oktober 2021 by Delinlea Leave a Comment

Hey Lovelies! It’s almost Halloween, and I had many ideas, started some ages ago and didn’t finish it yet. And of course I lost the sketch of how it needed to look like. After a lot of searching I finally found the sketch back and managed to finish the amigurumi in no time! This little creature came out of it, and I actually like it, simple but cute. Today is a free pattern for you to enjoy.

(hmm how to type this while my cats want attention?! Haha I keep needing to correct words/sentences since they keep walking over my keyboard. Life with 2 kittens isn’t always easy, but they are adorable and so sweet, they just don’t always listen).

Halloween Creature made with the Amigurumi technique

For this Pattern you’ll need:
♥ Fluffy Yarn in the color Purple.
♥ DK Yarn in the colors Purple and Black.
♥ Crochet Hook, 2,5/3 &6,5MM*.
♥ Stuffing.
♥ Scissors.
♥ Stitch Markers.
♥ Sewing Pins.
♥ Yarn Needle.
♥ 1 Safety Eyes, 10mm.
♥ Bit of Black and Pink felt for the eye and tongue.
♥ (Fabric) Glue.

*Check your yarn that you wanna use, to which hook size you need. For amigurumi it isn’t necessary to use the exact same yarn, they will only turn out bigger or smaller.

Stitches used (US Terms):
Magic Ring.
CH = Chain.
SLST = Slip Stitch.
SC = Single Crochet.
ST = Stitch.
BL = Back Loops only.
Inc = Increase.
Dec = Decrease.
(…) = Repeat the space in brackets the given number of times.
[…] = Total number of stitches.

This pattern is made using continuous rounds, unless stated otherwise. Use a stitch marker to mark the first stitch.

Pattern Halloween Creature

Body
Use the Purple Fluffy yarn and a 6,5mm hook.

1: 6SC in a Magic Ring. [6]
2: 2SC in each st around. [12]
3: (1SC, inc) 6 times. [18]
4-6: 18SC. [18]
7: (1SC, dec) 6 times. [12]
Place the 1 eye around the middle of this body. Stuff the body as well.
8: Dec around. [6]
Fasten off and weave in tail.

Hat
Use the Black DK yarn and a 2,5/3mm hook.

1: 6SC in a Magic Ring. [6]
2: 6SC. [6]
3: (2SC, inc) 2 times. [8]
4: (3SC, inc) 2 times. [10]
5: (4SC, inc) 2 times. [12]
6: (5SC, inc) 2 times. [14]
7: (6SC, inc) 2 times. [16]
8: (7SC, inc) 2 times. [18]
9: (8SC, inc) 2 times. [20]
10: (9SC, inc) 2 times. [22]
11: 22SC. [22]
12: BL, (1SC, inc) 11 times. [33]
13-14: 33SC. [33]
Fasten off and leave a long tail for sewing.
Stuff lightly.

Ribbon for the Hat
Use the Purple DK yarn and a 2,5/3mm hook.

Make 22Ch, SlSt in the first Chain. [22]
Fasten off and leave a long tail for sewing.

Arms (Make 2)
Use the Purple DK yarn and a 2,5/3mm hook.

1: 6SC in a Magic Ring. [6]
2: (1SC, inc) 3 times. [9]
3-5: 9SC. [8]
6: (1SC, dec) 3 times. [6]
Fasten off and leave a long tail for sewing.
Stuff the arms as well.

Feet (Make 2)
Use the Black DK yarn and a 2,5/3mm hook.

1: 8SC in a Magic Ring. [8]
2: 2SC in each st around. [16]
3-4: 16SC. [16]
5: (1SC, dec) 5 times, 1SC. [12]
Fasten off and leave a long tail for sewing.
Stuff the feet as well.

Mouth
Use the Black DK yarn and a 2,5/3mm hook.

Make 8Ch.
Fasten off and leave a long tail for sewing.

Assembling

Whenever I start to assemble an Amigurumi, I use sewing pins first, to position all parts. This way I can move the parts around until I am happy with how it looks. I recommend you do so as well.
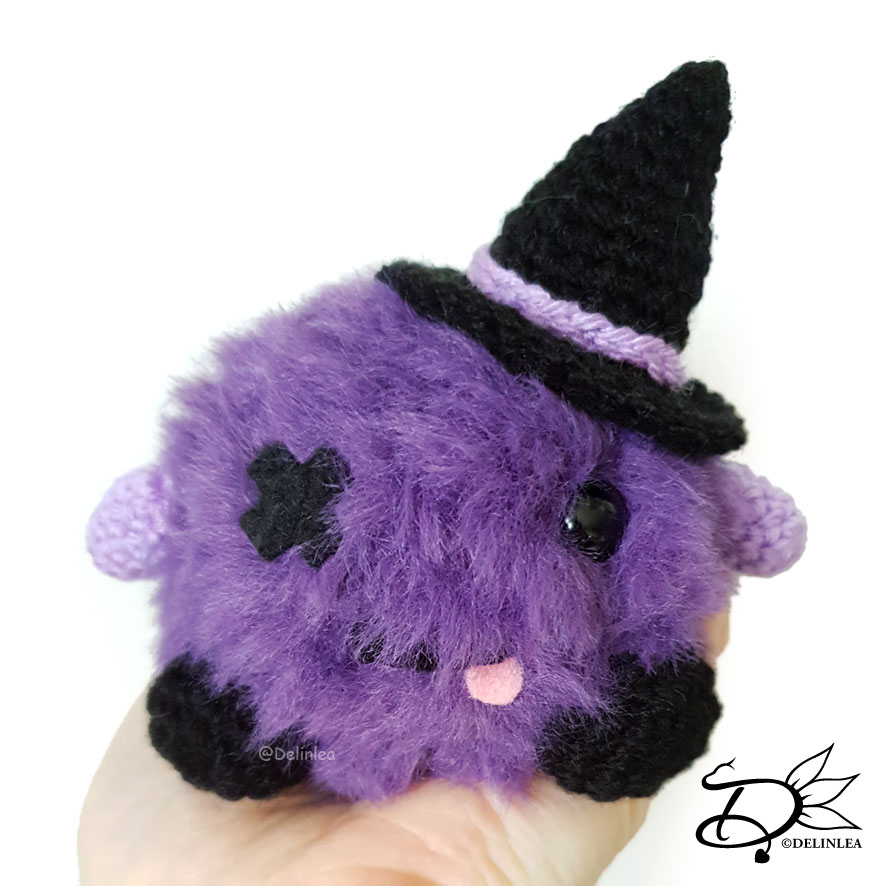
Use the pictures as reference, to see where all parts go.

From felt, cut out a cross of black felt and a small tongue for pink felt. Glue the cross on where the other eye should be. Now you can also position where the mouth should go and sew this on and glue on the tongue.
Sew the feet to the body and the arms on each side of the body. Sew the ribbon of the hat on and attach the hat to the body as well.

That’s all for today! But I really love how this one turned out, I hope you do as well. If you decide to make it, make sure to tag me on Twitter or Instagram, I’d love to see what you create with my patterns!

Have a wonderful day!

Love
Danielle

PS. if you love those patterns, maybe you’d like to support me on Ko-Fi?! So I can keep making content like this!

// ©2021 Delinlea / Danielle Kaal // Items made with this pattern may be sold in a limited number. Credit to ‘Delinlea’ is appreciated. Not allowed for mass production or commercial purposes. You may not reproduce, translate, share, freely distribute or sell this pattern as your own in digital or printed from.

Posted in: Crafting, Crochet Tagged: Amigurumi, Creature, Crochet, cute, DIY, Free Pattern, haken, Halloween, kawaii

♥ Mushroom Lady & Kid Amigurumi Shop Pattern

16 oktober 2021 by Delinlea Leave a Comment

Hey Lovelies! It’s a few days later as my usual uploading date, but here we are with a new pattern! I had some troubles with the digital part (always the same haha, me and electronics just don’t go well together), hence why I’m uploading late.

I just love Autumn, if you didn’t knew yet. My new shop pattern will be those cute Mushroom Lady and Kid! Aren’t they adorable together?! I love discovering new mushroom in nature, trying to figure what they are. Nature can be so Beautiful and Inspirational!

Mushroom Lady & Kid amigurumi image

When I was taking pictures in the nearby forest, some people walked by, they were like, that doesn’t grow here haha. I usually hate to get attention like that, socially awkward! But usually when I’m doing what I love, I act a bit easier around people.

Anyway, you can find the shop pattern on my Ko-Fi page here~! (Paypal only)

Have a wonderful day!

Love
Danielle

PS. if you love those patterns, maybe you’d like to support me on Ko-Fi?! So I can keep making content like this!

// ©2021 Delinlea / Danielle Kaal // Items made with this pattern may be sold in a limited number. Credit to ‘Delinlea’ is appreciated. Not allowed for mass production or commercial purposes. You may not reproduce, translate, share, freely distribute or sell this pattern as your own in digital or printed from.

Posted in: Crafting, Crochet, Shop Pattern Tagged: Amigurumi, Autumn, Crochet, cute, fall, haken, kawaii, Ko-Fi, Lady & Kid, mushroom, Pattern, Shop Pattern

♥ Cat Pillow Luna

30 september 2021 by Delinlea Leave a Comment

Hey Lovelies! It’s been a long while since I posted something on my blog. I really needed some time off, and still, I can’t promise that there will be a blog next week or every week. We will see what happens. I try to let go of it more, and just see what I feel like doing/making. For today I wanted to make a pillow for my cat, since she loves to crawl under blankets etc. I hope she will use this pillow as well, where she can be cozy.

I tried to write this tutorial down as good as possible, but it might be slightly confusing since I forgot to take pictures often. If you have any questions, just let me know, I’ll try to help you out!

For this DIY you’ll need:
♥ Pillow. (Can be any size, as long as it’s big enough for your cat, mine is 50x60cm)
♥ Cotton Fabric in a color of choice.
♥ Coral Fleece in a color of choice. (You can also choose to skip the cotton fabric and make it out of fleece only).
♥ Zipper, about 30cm.
♥ Sewing Pins.
♥ Scissors.
♥ Sewing Machine.
♥ Iron. (Optional)

Tutorial Cat Bed Pillow

Measure the pillow you wanna use and maybe add a cm, so the pillow stays nice and fluffy ones you put the cover over it. Mine is 50 by 60 cm.

Now I wanted the “blanket” to be slightly bigger on one side so the cat can go in easily and have some space. And I wanted to flip a small part back, about 10cm, so it looks cute! Like they will be sleeping in a small bed.

Cutting Fabric

Cut a piece as big as your pillow from cotton (Part A) and one out of fleece (Part B), don’t forget to add seam allowance, about 1cm! This will be the pillow cover.

For the blanket, make a template first, from paper. Or draw directly on the cotton fabric if you want to, make sure you do this on the wrong side. Draw the size of your pillow, measure 10cm down one of the short sides, and add 3cm at the 10cm mark to the width. As you can see in the picture one of the shorts sides will be extended a bit as well. But since you might be using a different size pillow, the easiest way to do this is to cut the bottom part with seam allowance already, up to the 10cm mark, fold the fabric on the 10cm line and trace the sides of the bottom. (I did this wrong myself at first and had to cut of that 10cm that you’ll flip back later, and add it with another piece of fabric with the right measurements). When you’ve drawn that right, cut the remaining out as well. The cotton sheet will be Part C. Cut the same from Fleece (Part D).

Diamond was trying to ‘help’ me when I tried to cut the fabric!

Sewing the First Part

Take part C and D, lay these on top of each other neatly with the right sides on the inside. Sew only the top side together.
Flip the fabric, so the right sides are on the outside now, iron the seam if you want to, or make it at least neat.

Zipper

Sewing a zipper to a piece of fabric is not something I seriously know how to do, so if you don’t know how, maybe look up a tutorial. Add one part of the zipper, with sewing pins, to one of the short sides of part A, center it neatly. Sew this on using the sewing machine.

The other side of the zipper is a bit harder, the other 3 layers go this part. Part C and D you’ve sewn together just now, you will add the zipper to the bottom side. But before you do this, you’ve to put part B on top of part D, with the right sides together, line it up neatly. I’ve sewn those 3 layers together first, so I was sure it was all attached. Now center the zipper as well with sewing pins, make sure the cotton fabric (Part C) is facing up just like the other side of the zipper, and sew it on.

Finishing off

On to the last part, the zipper is attached. Put part A on top of part C with the right sides together. The pillow should be inside out right now. The hard part is gonna be the blanket at this point, but just make sure that all the sides are lined up and the 10cm part of the blanket should be flipped back now. Take your time to pin all the sides neatly, so you’ll only have a rectangle shape left.
Open the zipper if it wasn’t yet and start sewing around the all the edges but the zipper part. Take your time to sew it neatly, some parts have many layers, not all sewing machines like that. Just be careful. Trim the corners when you are done sewing, so it corners will look nicer after flipping.

Last is to flip the pillow cover inside out and put the pillow inside! You are done! You made it, I hope your cats will love it a lot. Luna has sit in it for a few seconds and left again, I think it’s not cold enough yet haha. Anyway, if you decided to make one as well, show it to me on Twitter or Instagram, I’d love to see how yours turned out!

I’m sorry for the lack of pictures, I was just in the flow and then I just forget things oops. I hope you don’t mind too much.

Have a wonderful day!

Love
Danielle

PS. if you love those kind of tutorials, maybe you’d like to support me on Ko-Fi?! So I can keep making content like this!

// ©2021 Delinlea / Danielle Kaal // Items made with this pattern may be sold in a limited number. Credit to ‘Delinlea’ is appreciated. Not allowed for mass production or commercial purposes. You may not reproduce, translate, share, freely distribute or sell this pattern as your own in digital or printed from.

Posted in: Crafting, Sewing Tagged: Bed, Cat, DIY, pillow, sewing, Tutorial

♥ DIY Bleach Shirt

8 juli 2021 by Delinlea Leave a Comment

Hey Lovelies! I love playing around with bleach on clothes. (Yes, I take precautions, don’t worry!). The only thing is I hate the smell of it, so I prefer to do it with all windows open and escape my room after or do it outside. It really depends on the project I’m doing. Have you ever used bleach to alternate clothes?! If you have or not, doesn’t really matter. I’m here to give you a idea what you could do. My brain is already like, I can do this and that and THAT. Yeah, way too many ideas. I really hope I can inspire you as well!

DIY with Bleach on a Shirt, design

For this DIY you’ll need:
♥ Clothing of choice, but make sure it’s of a natural material like cotton.
♥  (Thick) Bleach.
♥ Plastic bottle with tiny nozzle or brush with a small cup.
♥ Spray Bottle. (Optional)
♥  (Pastel) pencil.
♥ Paper.
♥ Scissors.
♥ Plastic Sheets/Trash bags.

Warning! Make sure you are allowed to work with Bleach, if you are under age, ask your parents. It’s aggressive stuff. Take all precautions needed, like a well ventilated area, gloves etc. Read the label well.

Tutorial Bleach Shirt

First off, is to prepare your clothes, I used a t-shirt. If you bought it new, wash it. There’s always something on there that makes it sorta water resistant and that will make it a bit harder to work with. Let it dry.

Make your design

While your clothes are drying, think of your design. I chose to do various leaves. I drew the shapes on paper and cut those out. But of course, feel free to make any design.

When your shirt is dry, start laying out the paper leaves on your shirt. Make any composition you like and trace these on your shirt with a pastel pencil. I chose pastel since that grabs better on a t-shirt and it will wash out later, I am not sure if graphite will wash out. You can free style your design as well, but for the tutorial it’s easier to explain it this way.

Bleaching

When you are happy with the line art on your shirt. It’s time to start the bleaching process. Make sure to take all the precautions, like wearing gloves, open all windows or work outside etc, protect surfaces and probably most important, put plastic in between the layers of your clothes that you are gonna bleach. You don’t want your design leak through to the other side, right?!

When you’ve done that, fill a small bottle with thick bleach, which has a small nozzle. This makes it easier to make details. Also fill a spray bottle with bleach. Make some test on paper or a scrap piece to see how it comes out the bottle and get the feel of it. If you don’t have any bottles I mentioned, a brush will work as well, just will take a bit longer to trace all the lines.

The bottles I used, Left is the small nozzled bottle, right is the spray bottle.

I sprayed the shirt with bleach first, carefully, just to distress the shirt a bit. This part somehow took longer to bleach for me. Then I started tracing the lines I made with the small nozzled bottle. It might take a bit of practice in the beginning. Also try to make the lines as thin as possible with tracing, they most likely will expand a bit while it works in. For me it took just seconds to see it work, especially when you use fresh bought bleach. Sometimes it will get less strong over time.

You kinda wanna work quickly, once the bleach has done its part, there’s no use to keep it on there longer, it will only damage your clothes. So, when you finish tracing all the lines, make sure all lines are bleached the way you want. Just a small note here; when you use a black t-shirt, those won’t bleach white, those will turn out orange-ish.

Washing

When you are happy with how it looks (it will lighten a bit more after washing and drying). Then it’s time to rinse your shirt. Use cold water and rinse it thoroughly. After that, throw it in the washing machine immediately on a full program. Some say to wash it without any soap, but I tested both ways and it doesn’t really matter.

Drying

When the washing machine is done, all you have to do is to wait for it to dry! I know, waiting is annoying, but just be patient, you can soon show of you own one of a kind t-shirt or other clothes you decided to alternate!

I hope you liked this tutorial! I think this is quite fun to do! Just making your own style of clothes! Who doesn’t want that?! I also made some mistakes with this shirt, one of the leaves is not as detailed, that’s where I started, I figured the lines needed to be thinner by then. Oh well, I still love how mine turned out. And if you decide to make one yourself as well, please show me on Twitter of Instagram, I’d love to see what you create!

Have a wonderful day and I’ll see you next week!

Love
Danielle

PS. if you love those kind of blogs, maybe you’d like to support me on Ko-Fi?! So I can keep making content like this!

// ©2021 Delinlea / Danielle Kaal // You may not reproduce, translate, share, freely distribute or sell this tutorial as your own. Credit to ‘Delinlea’ is appreciated, when you share anything made with this tutorial.

Posted in: Crafting Tagged: alternating, bleach, clothing, DIY, leaves, T-shirt, Tutorial

♥ River Amigurumi Shop Pattern

1 juli 2021 by Delinlea Leave a Comment

Hey Lovelies! It’s time for a new shop pattern today! I made this pattern a while ago as well, but never did anything with it in the end. I found it back and decided it’s time to work it out! This little one I called River. A tiny little creature with wings or without wings, he’s cute either way.

River Amigurumi Shop pattern

These creatures love to be around you, often wanna sit on your shoulder or on your hands. Totally loves to cuddle. I hope you are ready for that if you wanna bring a River inside your life.

The pattern can be found over at my Ko-fi shop, as usual, you can pay there with Paypal. I still don’t have another place you can buy from for now. I’ll keep you updated if anything changes!

I hope you’ll enjoy those shop patterns, they are easy to make. Just have fun! You wanna make this too!

Have a wonderful day and I’ll see you next week!

Love
Danielle

PS. if you love those patterns, maybe you’d like to support me on Ko-Fi?! So I can keep making content like this!

// ©2021 Delinlea / Danielle Kaal // Items made with this pattern may be sold in a limited number. Credit to ‘Delinlea’ is appreciated. Not allowed for mass production or commercial purposes. You may not reproduce, translate, share, freely distribute or sell this pattern as your own in digital or printed from.

Posted in: Crafting, Crochet, plush, Shop Pattern Tagged: Amigurumi, Crochet, cute, haken, kawaii, river, Shop Pattern
« Vorige 1 2 3 4 5 6 7 8 … 40 41 42 43 44 Volgende »

What are you looking for?!

My Socials

Ko-Fi

I love making all these free things for you, tho it would be very helpfull if you can support me on Ko-Fi! (You don’t have to tho, totally up to you!)

Ko-Fi Shop!!

In my Ko-Fi shop you can find PDF Amigurumi Patterns!! You can pay easily with PayPal.
Go to the shop here!!

Recent Blog Posts

  • ♥ Happy 2022!
  • ♥ Day 12; Lights
  • ♥ Day 11; Flower Deco
  • ♥ Day 10; Snowman
  • ♥ Day 9; Gingerbread Houses

Recent Comments

  • Delinlea op ♥ Pietje Gnome Amigurumi
  • Delinlea op ♥ Toy Story Alien TsumTsum Amigurumi
  • Delinlea op ♥ Pua Tsum Tsum Amigurumi
  • Charli op ♥ Free Pattern; CNY Mouse Amigurumi
  • Peter Pesch op ♥ Pietje Gnome Amigurumi

Categories

  • animation
  • Beadwork
  • Blogmas 2018
  • Blogmas 2020
  • Blogmas 2021
  • Books
  • Bujo
  • Christmas
  • Christmas CAL 2019
  • Christmas Countdown 2017
  • Contest
  • Crafting
  • Crochet
  • Drawing
  • Drawing Lesson
  • Easter
  • Geen categorie
  • Life
  • Miniature
  • Nail Art
  • New Year
  • Paper
  • plush
  • Pokemon
  • Poseable Art Doll
  • Recipe
  • Sewing
  • Shop Pattern
  • Sinterklaas
  • Social Media
  • Tsum Tsum
  • Ufufy

Copyright © 2025 Delinlea - My little fantasy world.

Family WordPress Theme by themehall.com