Delinlea - My little fantasy world
  • ♥ Home
  • ♥ About Me
  • ♥ Blogmas 2021
  • ♥ Free Patterns
    • ♥ Amigurumi; Spring/Easter
    • ♥ Amigurumi; Fall/Halloween
    • ♥ Amigurumi; Winter
    • ♥ Amigurumi Tsum Tsum
    • ♥ Amigurumi Ufufy
    • ♥ Amigurumi Others
    • ♥ Christmas Countdown 2017
    • ♥ Blogmas 2018
    • ♥ Blogmas 2020
  • ♥ Tutorials
    • ♥ Easter
    • ♥ Home Deco
    • ♥ Others
  • ♥ Drawing Lessons
  • ♥ FanFic
    • ♥ Chapter 1
    • ♥ Chapter 2
    • ♥ Chapter 3
    • ♥ Chapter 4
    • ♥ Chapter 5
    • ♥ Chapter 6
    • ♥ Chapter 7
  • ♥ Gallery
    • ♥ Crafts
    • ♥ Drawings
    • ♥ Poseable Art Dolls
  • ♥ Links
  • ♥ Contact
    • Privacy Policy

Crafting

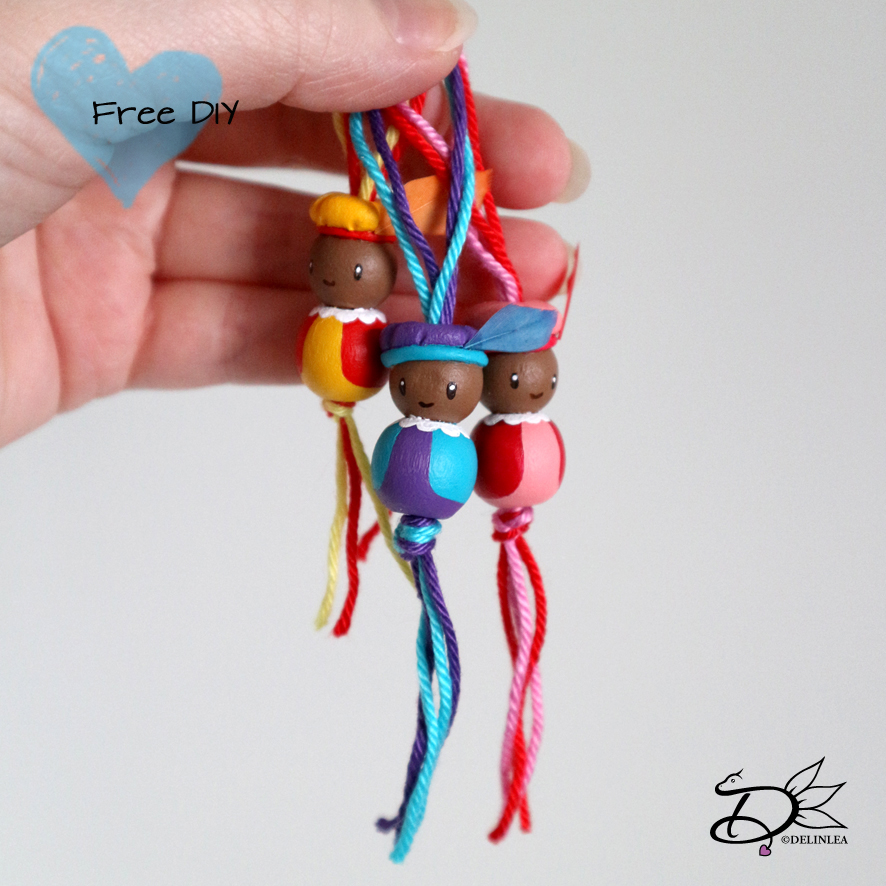
♥ Pietjes Lucky Charms

29 november 2018 by Delinlea Leave a Comment

Hey Lovelies! Sinterklaas is in town! If you don’t know what Sinterklaas is, it’s a Dutch celebration similar to Christmas, only celebrated on the 5th of Dec. (Fun fact: Christmas is actually based on Sinterklaas xD).
Anyway I just had to make a DIY for this and I planned to make a whole bunch of lucky charms. But I ended up making only de ‘Zwarte Piet’ ones. I ran out of time to maken Sinterklaas en Amerigo. I’m so sorry, maybe I’ll make a DIY on that next year!

For this DIY you’ll need:
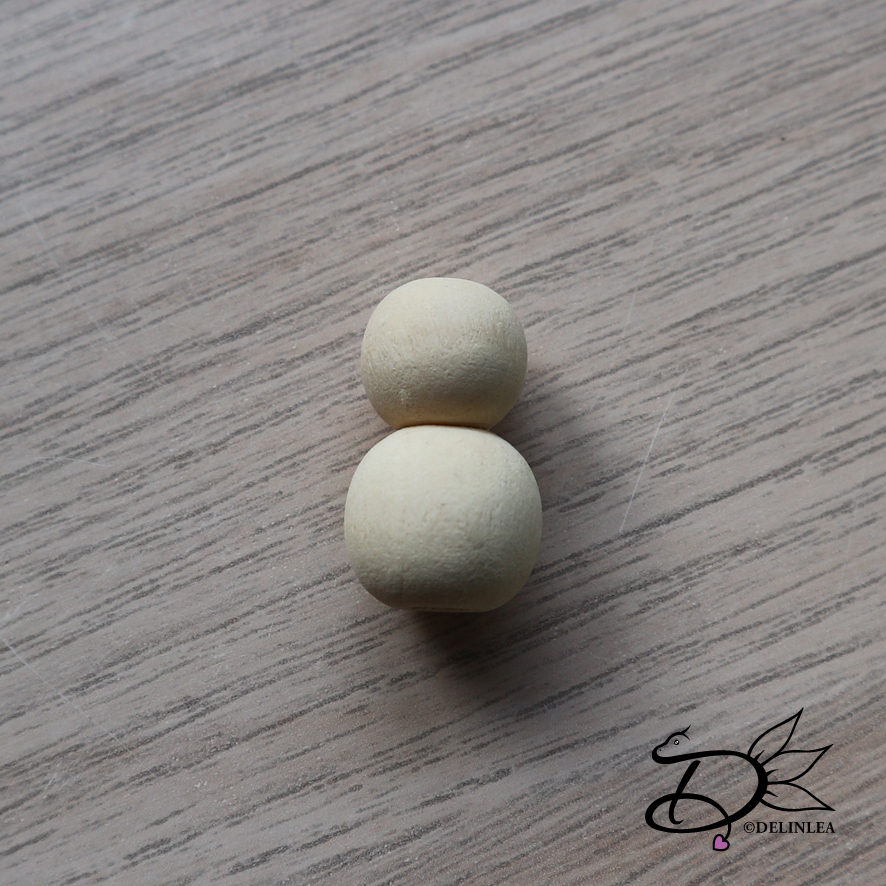
♥  Wooden beads in 2 sizes. (you can make them as big as you want)
♥  Air Dry Clay.
♥  PVA Glue.
♥  Scewer.
♥  Acryllic paints in colors of choice.
♥  Paintbrush.
♥  Matching pieces of thread, to the paint.
♥  Tiny piece of a Feather.
♥  Scissors.

DIY

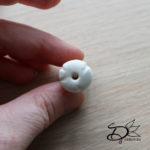
First, glue the 2 different sized beads together, make sure the holes line up. Let that dry.

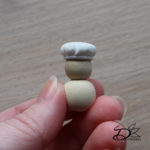
Make with clay a snake and make a circle around the smaller bead aka head. Use glue eventually to make it stick better, that’s what I did.

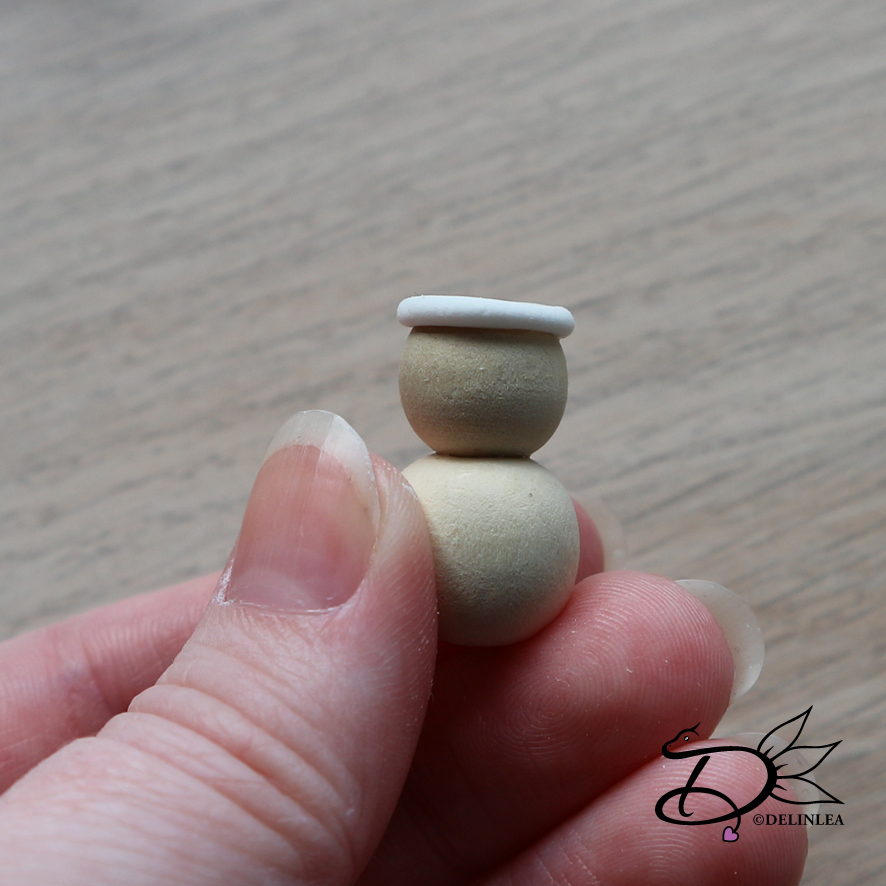
Now make a ball of some clay, about 1cm, and flatten this on to the head, until it touches the snake you put on there earlier. Use a scewer to poke through the hole on top. and make some creases with the scewer into the hat. Let the clay dry now.
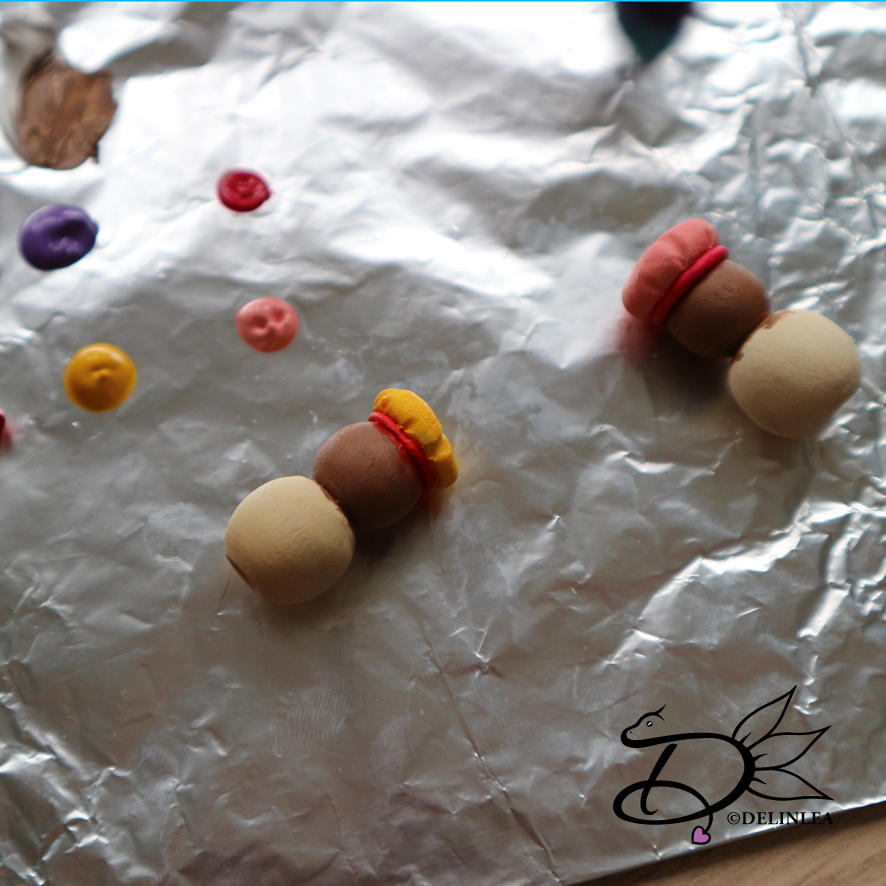

Painting

Now it’s time to paint your pieces. I used 2 colors of choise, light brown, dark brown and white. It doesn’t really matter where you start, just make them cute and nice. The only thing you paint on last is the eyes!
Optional, varnish the beads so they are nice and protected. But you don’t have to.

Finishing off.

Cut a tiny piece of the top of a normal sized feather and glue this on his hat.
Then cut of about 30 cm of thread, in 2 colors. put this through the body of the Zwarte Piet, tie a knot at the bottom and you are done.

Blogmas 2018

From dec 1, Saturday! YES, you are reading that right! This Saturday will start Blogmas 2018 on this blog, that means 25 DIYs up till Christmas will be there for you, all for free! Every day a new DIY, Good news right?!

Have a lovely day!

Love
Danielle

Posted in: Crafting Tagged: DIY, gelukspoppetjes, Lucky Charm, sinterklaas, zwarte piet

♥ Dark and Light Pillow

23 november 2018 by Delinlea Leave a Comment

Hey Lovelies! Obvisously we had to make a pillow, of 45 by 45 cm and both sides had to be crocheted. But this challenge went a little different from the first 3. This time we were able to choose our own yarn and colors. The only bad side of that was that you had half of a week less to create, but we also got into 2 week challenges now.

Nu mochten we dus een kussen maken, van 45 bij 45 cm, en beide zijden moesten gehaakt zijn. Maar deze opdracht ging iets anders dan de eerste drie. Deze keer mochten we zelf garen en kleuren uitkiezen. Het enige nadeel daarvan was dat we een halve week minder hadden om te haken, maar nu komen we ook in de opdrachten van 2 weken.

I saw this challenge coming, and I was a bit scared of it. I wasn’t sure what I should make for it, where to start, what colors, a lot of things going through my mind. In the end I just picked colors I liked of the StyleCraft Special DK yarn. Turned out, I went for a pastel rainbow. Soon the idea came to use a light and dark side, a bit like yin yang. So maybe also Mandala like. I just went with that idea and waited for my yarn to come.

Ik had deze opdracht eigenlijk wel verwacht, en was er een beetje bang voor. Ik wist niet wat ik er voor moest maken, hoe ik moest beginnen, heel veel dingen die door mijn hoofd gingen. uiteindelijk heb ik gewoon kleuren uitgezocht die me leuk leken van StyleCraft Special DK. Wat bleek, ik had een pastel regenboog uitgekozen. Toen ontstond snel het idee om een lichte en donkere kant te maken, beetje YinTang achtig. En misschien in een mandala vorm. Ik ben voor dat idee gegaan en toen begon het wachten op mijn garen.

When it arrived, I quickly started, the first few rows went pretty fast, all did go smoothly. But there was a point, I was like, what the.. am I doing. I didn’t know how to go on, I kept taking out the rows, crochet them again, etc. After a lot of struggle I finally finished my pillow, and at first, to be honest, I wasn’t to happy about it. But now, after a while I am proud of what I created! I am so happy with my design now! I did it!

Toen mijn pakket aan kwam, ben ik snel aan de gang gegaan. De eerste paar toeren ging vrij vlot en gemakkelijk. Maar er was een moment dat het gewoon niet lukte! Ik wist niet hoe ik verder moest, bleef dezelfde toer maar haken en uithalen.
Na een hele tijd zwoegen is mijn kussen eindelijk af gekomen! En in het begin vond ik hem eigenlijk niet eens zo heel mooi. Maar nu, na enige tijd, ben ik blij met wat ik gemaakt heb! Wat ik ontworpen heb! Ik heb het gewoon geflikt!

Here’s my pillow:
Dit is mijn kussen:


What do you think of my pillow?! Like it?! Or did I use to many different stitches like the judges said?

Wat vindt jij van mijn kussen? Mooi?! of vindt je, net als de jury dat ik teveel verschillenge steken heb gebruikt?!

Love
Danielle

Posted in: Crochet Tagged: Crochet, haken, kussen, mandala, pillow, yin yang

♥ 3D Origami; Plusle and Minum Diagram

15 november 2018 by Delinlea Leave a Comment

Hey Lovelies, as I said last week, I will throw in another diagram repost from my old website. Today you can make some Plusle and Minum pokemon in 3D Origami! They are adorable! you must make them!

You gotta catch em all, right?!

I hope you will enjoy making them tho!

Love Danielle

Posted in: Crafting, Paper Tagged: 3D Origami, 3DO, paper, Pokemon

♥ 3D Origami; Matoki Diagram

8 november 2018 by Delinlea Leave a Comment

Hey Lovelies! Today no new tutorial or DIY, wel not for me at least, it’s a repost from my old website. Today I wanna give you the 3D Origami pattern of Matoki’s. These are the alien of B.A.P a Korean boyband.

I am so busy that I have barely time to breath, so I throw this one in quickly~! I hope you will enjoy it anyway!  If you don’t know how you have to do 3DO, just google search it, there’s plenty of tutorials to be found out there, plenty of videos as wel.

Next week I will repost the last 3DO pattern from my old website, so I can delete that one. It has no use anymore.

After that week, I can hopefully create new content for you! Please bear with me for a while.

Love
Danielle

Posted in: Crafting, Paper Tagged: 3D Origami, 3DO, B.A.P, bap, kpop, Matoki, paper

♥ Amigurumi: Jack Skellington TsumTsum

25 oktober 2018 by Delinlea Leave a Comment

Hey Lovelies! Today I really wanted to make you another TsumTsum pattern, and since halloween is coming, I wanted something a it less cute haha xD. So today we will make a Jack Skellington Tsum! I hope you will enjoy~~!

For this DIY you will need:
♥  Yarn: in the colors Black and White.
♥  Crochet hook.
♥  Stitch marker. (optional)
♥  Fiber fill.
♥  Yarn needle.
♥  Embroidery needle with black thread or black felt.
♥  Scissors.

Stitches used (US):
SC = Single Crochet.
ST = Stitch.
Inc = Increase.
Dec = Decrease.
BL = Back Loops only.
Slst = Slip Stitch.
(…) = Repeat the space in brackets the given number of times.
[…] = Total number of stitches.

Pattern

Body
Start with the color White

1: 6SC in magic ring. [6]
2: Inc in each st around. [12]
3: (1SC, inc), 6 times. [18]
4: (2SC, inc), 6 times. [24]
5: (3SC, inc), 6 times. [30]
6: (4SC, inc), 6 times. [36]
7: (5SC, inc), 6 times. [42]
8: SC in each st around. [42]
|
14: SC in each st around. [42]
Change to Black.
15: SC in each st around. [42]
16: SC in back loops only, in each st around. [42]
17: SC in each st around. [42]
|
29: SC in each st around. [42]
30: (5SC, dec), 6 times. [36]
31: (4SC, dec), 6 times. [30]
32: (3SC, dec), 6 times. [24]
33: (2SC, dec), 6 times. [18] Stuff the body here.
34: (1SC, dec), 6 times. [12]
35: Dec around. [6]
Fasten off and weave in tail. Make with White yarn some stripes on the black part, make it look like his fancy suit!

Now at row 16  you worked in the back loops only. Join now, with black in the front loops, and crochet 42SC around. [42]

Legs (4)
2 in White, 2 in Black.

1: 4SC in magic ring. [4]
2: Inc in each st around. [8]
3: SC in each st around. [8]
|
5: SC in each st around. [8]
Fasten off and leave a long tail vor sewing.

Assembling

To make sure you sew all parts in the right place, you can use some sewing pins to position them. When you are happy with the position, you can sew them on.
Sew the legs on to the bottom of the body, the front legs are pointing to the front. The back legs are pointing to the side.
For the eyes, nose and other details, you can either choose to use felt or you can embroider them on. I chose to embroider them on, cause yeah why choose the easy way haha. But which way you choose, your Tsum will be cute anyway.
With some black plushy yarn I created his beard, but you can use regular yarn for it as well. Just go around half way his face, pull the yarn through and repeat a few more times.

I hope you Enjoyed this pattern! Don’t forget to show me when you did make him~~.

Love
Danielle


Posted in: Crafting, Crochet, Tsum Tsum Tagged: Amigurumi, Crochet, cute, Disney, haken, jack skellington, kawaii, the nightmare before christmas, TsumTsum
« Vorige 1 2 3 4 5 … 27 28 29 30 31 32 33 34 35 … 40 41 42 43 44 Volgende »

What are you looking for?!

My Socials

Ko-Fi

I love making all these free things for you, tho it would be very helpfull if you can support me on Ko-Fi! (You don’t have to tho, totally up to you!)

Ko-Fi Shop!!

In my Ko-Fi shop you can find PDF Amigurumi Patterns!! You can pay easily with PayPal.
Go to the shop here!!

Recent Blog Posts

  • ♥ Happy 2022!
  • ♥ Day 12; Lights
  • ♥ Day 11; Flower Deco
  • ♥ Day 10; Snowman
  • ♥ Day 9; Gingerbread Houses

Recent Comments

  • Erzsebet M. Marosvari op ♥ My Entry For a Faber Castell Contest
  • Delinlea op ♥ Pietje Gnome Amigurumi
  • Delinlea op ♥ Toy Story Alien TsumTsum Amigurumi
  • Delinlea op ♥ Pua Tsum Tsum Amigurumi
  • Charli op ♥ Free Pattern; CNY Mouse Amigurumi

Categories

  • animation
  • Beadwork
  • Blogmas 2018
  • Blogmas 2020
  • Blogmas 2021
  • Books
  • Bujo
  • Christmas
  • Christmas CAL 2019
  • Christmas Countdown 2017
  • Contest
  • Crafting
  • Crochet
  • Drawing
  • Drawing Lesson
  • Easter
  • Geen categorie
  • Life
  • Miniature
  • Nail Art
  • New Year
  • Paper
  • plush
  • Pokemon
  • Poseable Art Doll
  • Recipe
  • Sewing
  • Shop Pattern
  • Sinterklaas
  • Social Media
  • Tsum Tsum
  • Ufufy

Copyright © 2025 Delinlea - My little fantasy world.

Family WordPress Theme by themehall.com